|
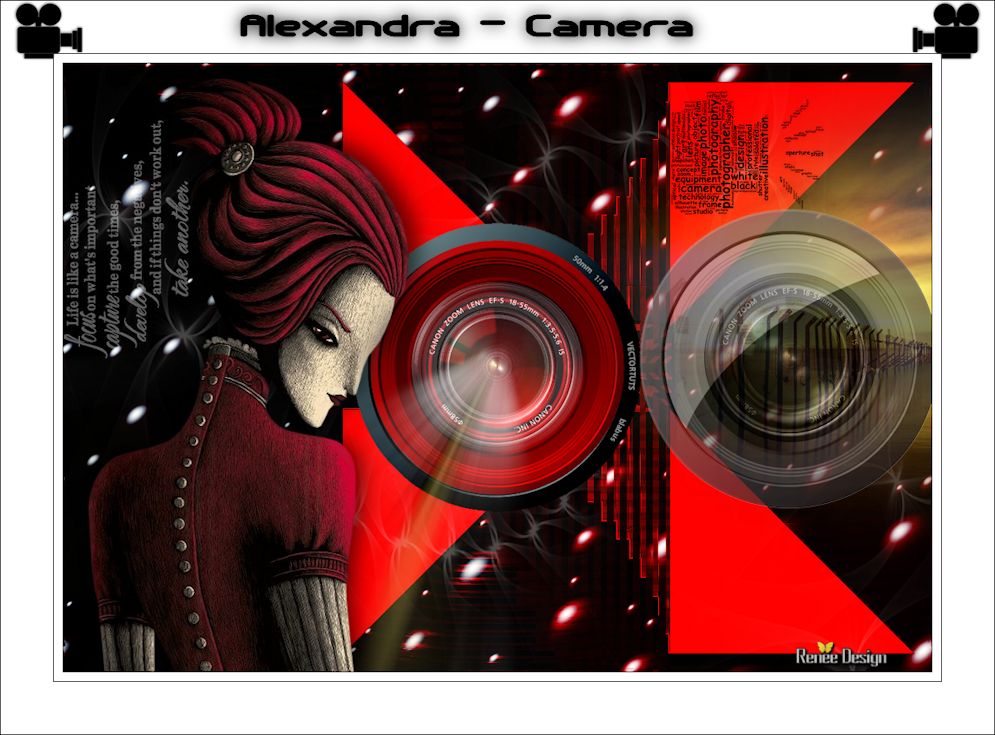
Alexandra_Camera
Let's start the lesson .
Part One
In this lesson we will make the lens of a camera.
By using several layers all filled with different gradients we will create a three dimmensional illusion.
To make this lesson, just some amount of concentration is needed .
Let's start the lesson .
1. Open image ''camera_creation_pspimage''
- Material Properties: Foreground color to this color: #7e7e7e Background color to this color : #000000
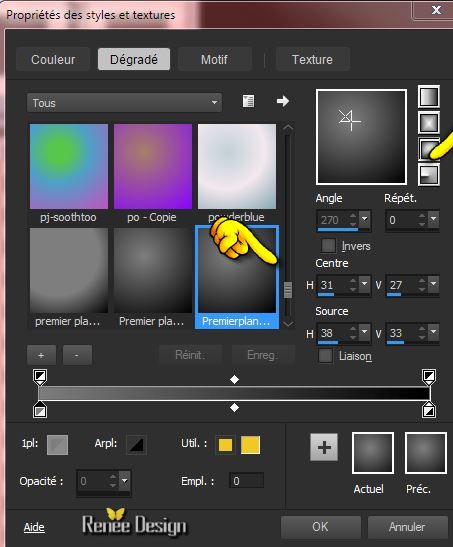
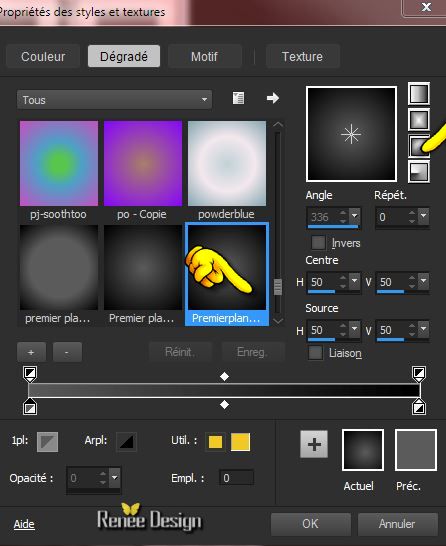
2. Put your foreground/background into a sunburst gradient with settings below
3. Activate Flood Fill Tool and fill the selection with the gradient
Keep selected !!!
4. Selections-Modify-Contract 6 pixels
5. Layer-New Raster Layer
6. Activate Flood Fill Tool and fill the selection with the foreground color #7e7e7e
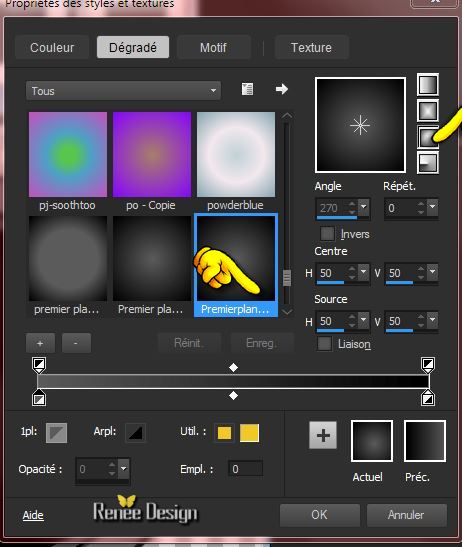
7. Material Properties:Change the settings:Put your foreground/background into a sunburst gradient with settings below
8 .Layer-New Raster Layer
9. Selections-Modify-Contract 30 pixels
10. Activate Flood Fill Tool and fill the selection with the gradient
11. Material Properties: Foreground color to this color:#5b5b5b
12. Layer-New Raster Layer
13. Selections-Modify-Contract 2 pixels
- Activate Flood Fill Tool and fill the selection with the background color black #000000
14. Layer-New Raster Layer
15. Selections-Modify-Contract 3 pixels
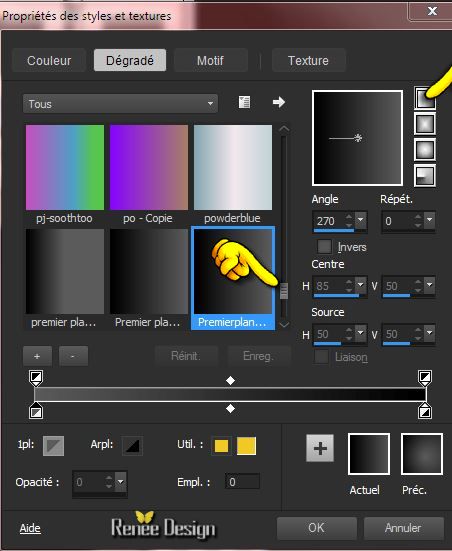
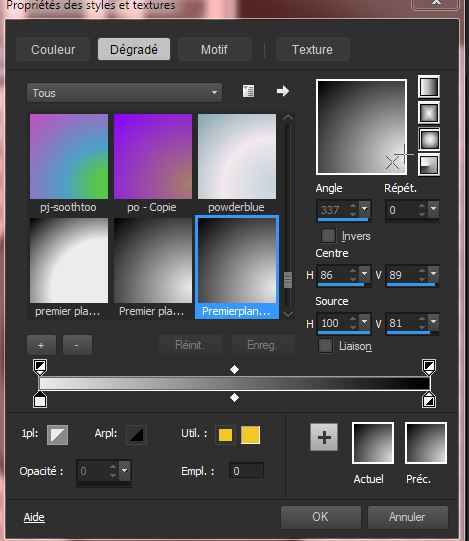
16. Material Properties:Put your foreground/background into a linear gradient with settings below
-Activate Flood Fill Tool and fill the selection with the gradient
Keep Selected
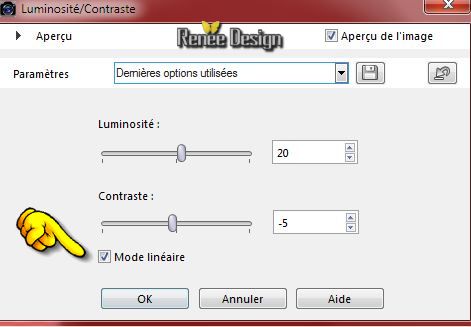
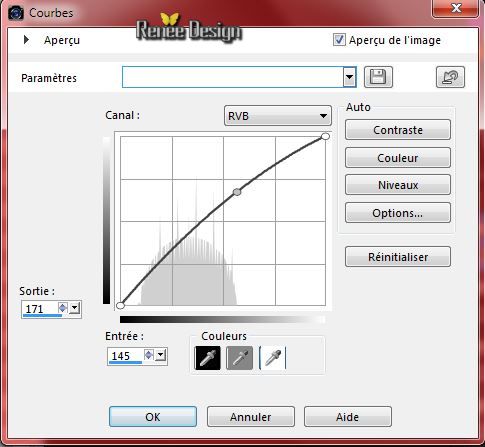
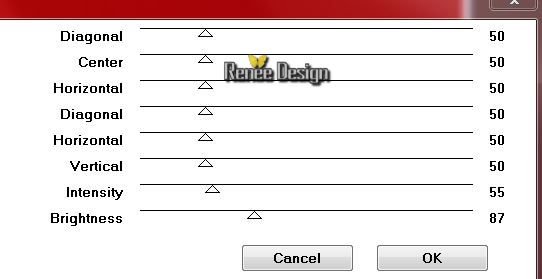
17. Adjust- Brightness and Contrast - Brightness/Contrast with these settings
- Adjust- Brightness and Contrast - Curves use settings below
18. Layer-New Raster Layer
19. Selections-Modify-Contract 6 pixels
20. Activate Flood Fill Tool and fill the selection with the foreground color
#5b5b5b
21. Layer-New Raster Layer
22. Selections-Modify-Contract 3 pixels
23. Activate Flood Fill Tool and fill the selection with the background color #000000
24. Layer-New Raster Layer
25. Selections-Modify-Contract 3 pixels
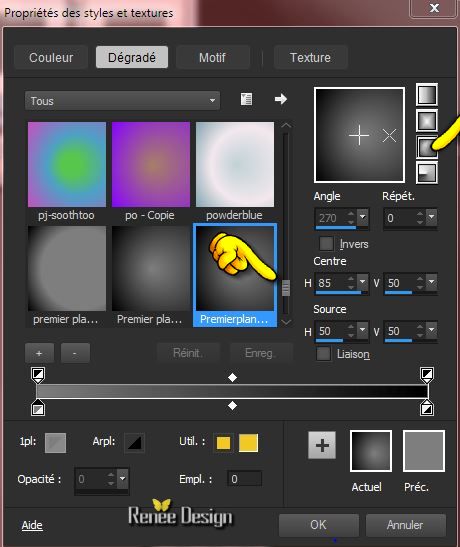
26. Material Properties: Put your foreground/background into a sunburst gradient with settings below
- Activate Flood Fill Tool and fill the selection with the gradient
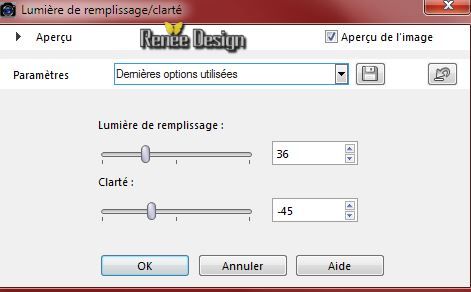
27. Adjust- Brightness and Contrast -Fill Light/Clarity use settings below
28. Layer-New Raster Layer (=layer 8)
On the same layer !!!! (To point 29)
- Selections-Modify-Contract 2 pixels /Activate Flood Fill Tool and fill the selection with the foreground color #5b5b5b
- Selections-Modify-Contract 3 pixels/ Activate Flood Fill Tool and fill the selection with the background color black
- Selections-Modify-Contract 2 pixels/ Activate Flood Fill Tool and fill the selection with the foreground color #5b5b5b
- Selections-Modify-Contract 3 pixels/ Activate Flood Fill Tool and fill the selection with the background color black
-Selections-Modify-Contract 2 pixels/ Activate Flood Fill Tool and fill the selection with the foreground color #5b5b5b
-Selections-Modify-Contract 3 pixels/ Activate Flood Fill Tool and fill the selection with the background color black
29. Layer-New Raster Layer
30. Selections-Modify-Contract 9 pixels
- Material Properties: Change the sunburst gradient into a linear gradient as configured
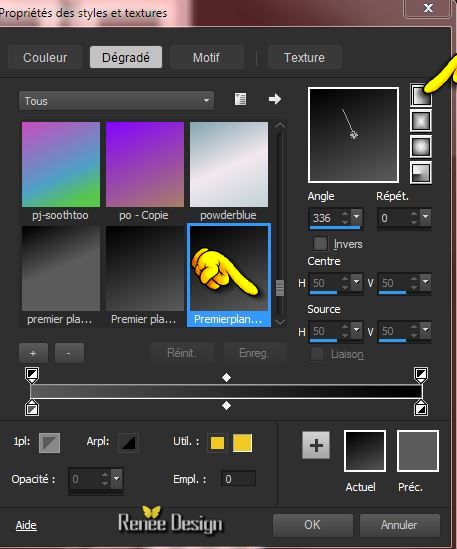
- Activate Flood Fill Tool and fill the selection with the gradient
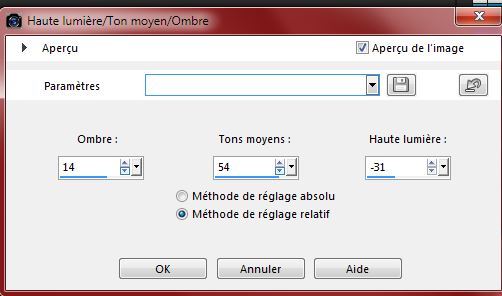
31. Adjust-Brightness and Contrast -Hightlight/Midtone/Shadow with these settings
32. Layer-New Raster Layer
33. Selections-Modify-Contract 10 pixels
34. Activate Flood Fill Tool and fill the selection with the foreground color #5b5b5b
35. Layer-New Raster Layer
36. Selections-Modify-Contract 2 pixels
37.Properties Foreground:Foreground color to this color #ececec
- Activate Flood Fill Tool and fill the selection with the foreground color
38. Material Properties:Foreground color to this color:#5b5b5b Background color to color black #000000
- Put your foreground/background into a sunburst gradient use settings below
39. Layers- New Raster layer
40. Activate Flood Fill Tool and fill the selection with the gradient
41. Layer Palette -Double click on this Layer and set the Blend Mode to "Luminance " Reduce the opacity of this layer to 83%
Selections- Deselect All
42. Layers- Merge-Merge Visible
43. Layers- New Raster layer
43. Selections - load/save selection - load selection from disk and choose my selection ''alexandra-3''
- Properties Foreground:Foreground color to this color:#ececec
44. Pot of Paint-Opacity 40% -Activate Flood Fill Tool and fill the selection with the foreground color
Selections- Deselect All
45. Layers- New Raster layer
45. Selections - load/save selection - load selection from disk and choose my selection "alexandra_4''
- Material Properties: Foreground color to this color: #ececec- Background color to color black
46.Put your foreground/background into a sunburst gradient with settings below
47. Pot of Paint -Opacity 100% - Activate Flood Fill Tool and fill the selection with the gradient
Selections- Deselect All
48. Layer Palette -double click on this layer and set the Blendmode to "Multiply" Reduce the opacity of this layer to: 63%
49. Selections - load/save selection - load selection from disk and choose my selection: ''alexandra''
Selections- Invert -DELETE
50. Selections- Deselect All
51. Layer-New Raster Layer
50. Selections - load/save selection - load selection from disk and choose my selection: '' alexandra_5''-
-Pot of Paint- Opacity 100%
Activate Flood fill tool and fill the selection with the foreground color #ececec (click 2x into selection)
51. Activate the tube ''
renee_camera_alexandra_lentille_centre''- activate ''lentille_1''
- Edit/copy-Edit paste as a new layer on your working area.With your move tool move into the middle
I have two camera models. You can use mine
52. Layers- Merge-Merge Visible
Give it the name'' Camera '' Save it for the moment
--------------------------------------------------------------
Second part
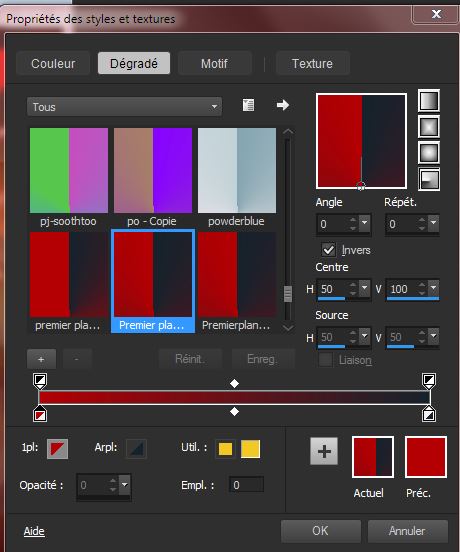
- Material Properties: Foreground color to this color:#16232d Background color to color : #b40004
1. Put your foreground/background into a radial gradient as configured
2. Open a new transparent image of 1000 x 700 pixels
- Activate Flood Fill Tool and fill the layer with the gradient
3. Effects- Plugins -Graphic plus -Cross shadow
4. Effects Plugins -Unlimited 2.0 -
Filter Factory Gallery C - FacetOffset - offset
193
5.
Effects- Edge Effects-Enhance More
6.
Layers- Duplicate -Image Flip
-
Layer Palette -Double click on this Layer and set the Blend Mode to "Soft Light "
7.
Layers- Merge- Merge Down
8. Effects- Plugins - Ulimited 2.0 -
RCS Pack 1.0- RCS Digi-Lens-Window Shades II
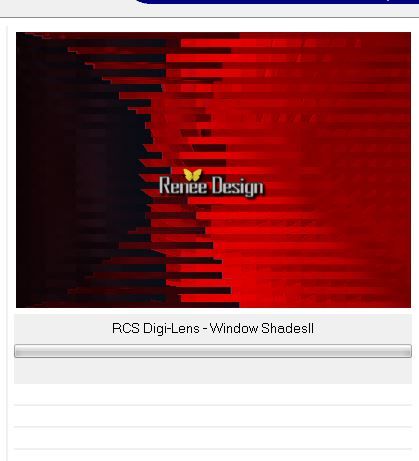
Repeat Plugins with the same settings
9.
Layers-Duplicate
10.
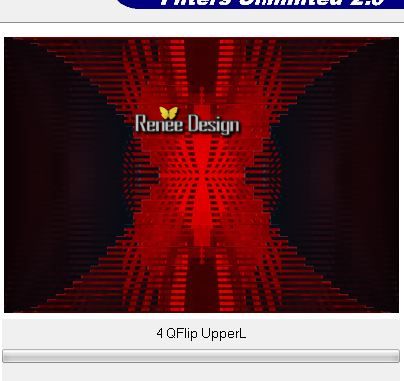
Effects-Plugins -Unlimitd 2.0 - BKGKaleidoscope -4 QFlip
UpperL
11.
Layer Palette -Double click on this Layer and set the Blend Mode to "Hard Light "
12.
Layers-Duplicate
13.
Effects- Plugins - Unlimited 2.0 - Scribe - Doughnutz mettre
control0 at 156
14.
Selections - load/save selection - load selection from disk and choose my selection: ''alexandra_1''- Delete!!
Selections- Deselect All
-
Layer Palette-Activate the layer underneath = Copy of raster 1
15. Effects- Plugins -Unlimited 2.0 -
&<BKGKaleidoscope - Blue Berry Pie
-repeat the plugins !!!
Activate the top of the layer-Palette
16.
Activate your tube ''camera"
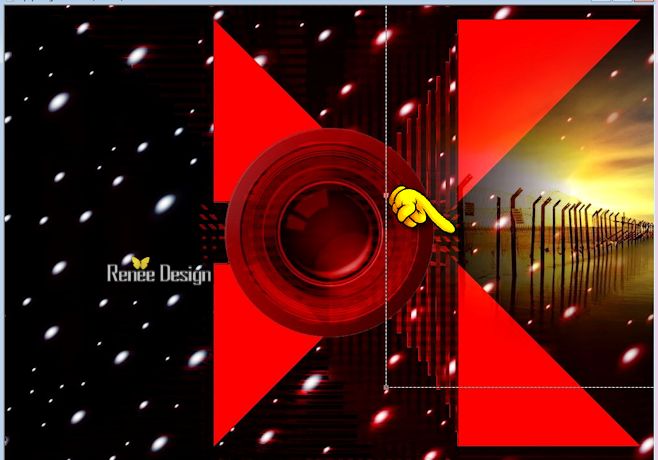
for the camera in the center- resize 80%
for the camera on the right side-resize 85 %
(
or take mine ''renee_camera_alexandra.pspimage''-)
Edit/copy-Edit paste as a new layer on your working area. Do not move/ Image resize 80 %!!
-
Choose your own color
-
I chose:Effects- Plugins - Nick Color Effex Pro 3.0- choose a dominant color of your work
17.
Activate the tube ''renee_camera_alexandra_cadre_objectif''-
Edit/copy-Edit paste as a new layer on your working area
-
Layers- Merge- Merge Down
18.
Activate the tube ''au_bord_de_eau_tubed_by_thafs.pspimage''-
-
Image Mirror
-
Edit/copy-Edit paste as a new layer on your working area
With your move tool move to the right
19.
Layers- Arrange-Move Down 2x
Your work look like this now
- Layer Palette:activate the layer above ( Copy of
Raster 1)
20.
Selections - load/save selection - load selection from disk and choose my selection:''alexandra_2''
21.
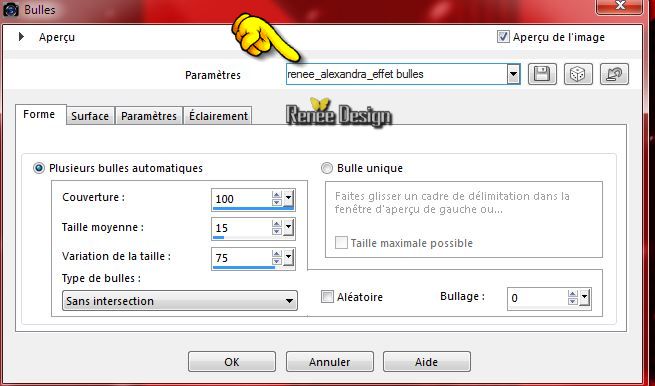
Effects -Artistic Effects -Balls and Bubbles - Use the preset: Preset_BallsAndBubbles_renee_alexandra_effet bulles" click on the preset and OK
(the preset is into the zipfile)
Selections- Deselect All
22.
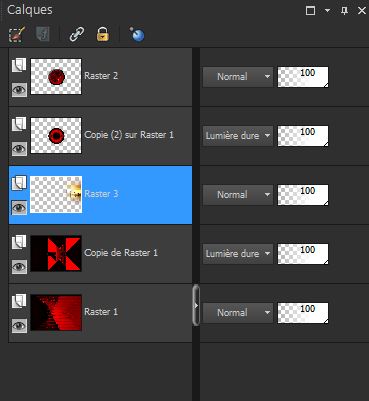
Layer-New Raster Layer
23.
Pot of Paint -Opacity 70%. Activate Flood Fill Tool and fill the layer with color white
24.
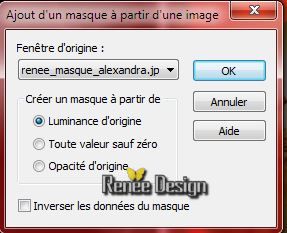
Layers-New Mask Layer From Image and choose Mask:''renee_masque_alexandra"
-
Layers -Merge-Merge Group
25.
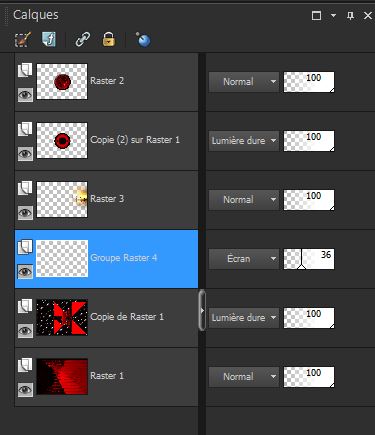
Layer Palette -Double click on this Layer and set the Blend Mode to "Screen " Reduce the opacity of this layer to 36%
Your work look like this now
- Activate the top of the layer-palette
26.
Activate your tube "Camara"
ore take mine ''camera''renee_double_camera.pspimage''
activate raster 1 of the tube
Edit/copy-Edit paste as a new layer on your working area
-
With your move tool move to the right
28.
Reduce the opacity of this layer to:65%
29.
Activate the tube'' Alies 1FP562-Dandelion-26062013.pspimage''
-
Edit/copy-Edit paste as a new layer on your working area
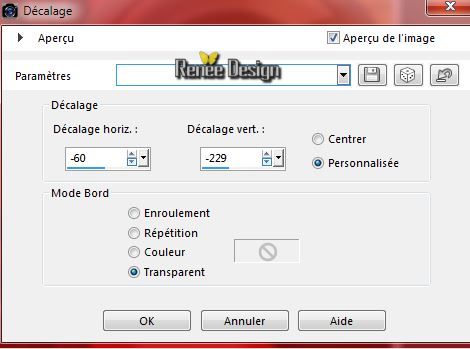
30.
Effects- Image Effects- Offset with these settings
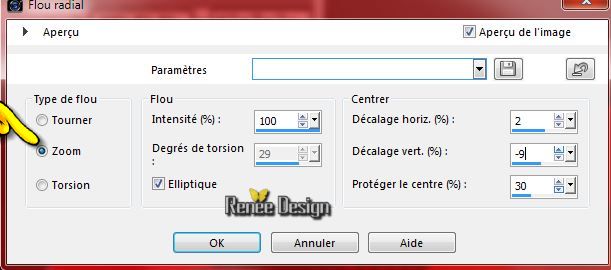
31.
Adjust -Blur-Radial Blur use settings below
32.
Activate the tube ''Alies 1FA668-woman-17092013.pspimage''
Edit/copy-Edit paste as a new layer on your working area
33.
Effects- Image Effects- Offset with these settings : H= -286 and V = -11
34.
Effects-Plugins -EyeCandy 5 Impact -perspective
shadow-Tab-Settings-User Settings and choose my preset ''alexandra_persp"
35.
Activate Brush:''pinceau_alexandra_camera.jpg''
File- Export Custom Brush (Give it a name) pinceau_alexandra_camera.jpg''
36.
Activate Brush Tool and select my file:pinceau_alexandra_camera.jpg'' use settings below

37.
Layer-New Raster Layer
-Change the foreground color into color black. Stamp the brush as shown below
38.
Activate Brush: ''pinceau_alexandra_camera_2.jpg''
-
File- Export Custom Brush (Give it a name) pinceau_alexandra_camera._2
39.
Activate Brush Tool and select my file:
"
pinceau_alexandra_camera_2"

40.
Layer-New Raster Layer
-
Change the foreground color into color white .Stamp the brush on the left side
41.
Layer Palette -Double click on this Layer and set the Blend Mode to"Screen " Reduce the opacity of this layer to: 42%
42.
Activate the tube ''
renee_camera_alexandra_lentille_centre''
- activate mine - than choose raster 3
43.
Edit/copy- Edit/ paste as new layer (do not move it is in the right place)
44.
Layer Palette -Double click on this Layer and set the Blend Mode to"Screen "
45.
Layers-Duplicate and place to the right side Layer Palette -Double click on this Layer and set the Blend Mode to "Soft Light "
46.
Image - Add borders-Symmetric checked: 1 pixel color black
47.
Image - Add borders-Symmetric checked: 10 pixels color white
48.
Image - Add borders-Symmetric checked: 1 pixel color black
49.
Image - Add borders-Symmetric checked:60 pixels color white
50.
Image - Add borders-Symmetric checked: 1 pixel color black
51.
Activate the Text-Edit - Copy -Edit - Paste as new layer on your working area and move .Ore write your own text
52.
Layers - Merge - Merge all
53.
Image Resize 995 pixels Width.
Save as JPG
24/09/2014
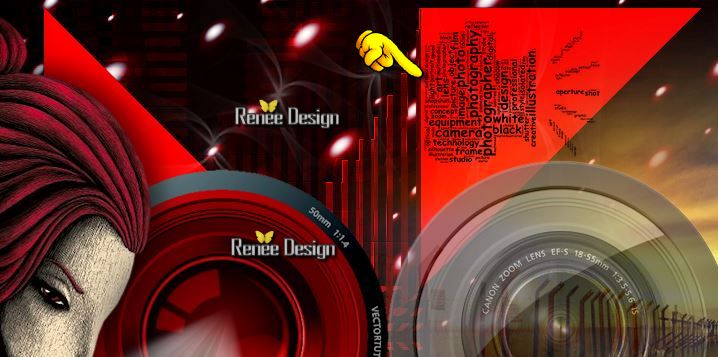
I hope you enjoyed this lesson
Renée
This lesson was written by Renée 24/09/2014
Created the
09/2014
*
Any resemblance with an existing lesson is merely a coincidence *
* Don't forget to thank the people who work for us and with us. I named the tubeurs - Testers and the translators.
Thanks Renée.
*
|
 Translations


 All rights reserved