|
Let's start the lesson.
- Preparation
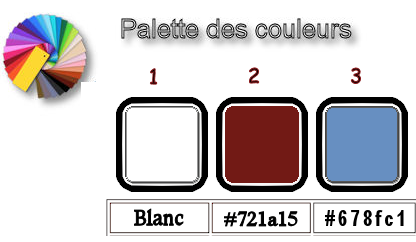
- Material Properties: Set your foreground color to ffffff= Nr1 - Set your background color to # 721a15 = Nr 2
1. Open the Image ‘’Fond_Automne_2018-07-24 - Window - Duplicate (or shift+D) - Close the original and proceed on the copy
-Promote Background Layer =Raster 1
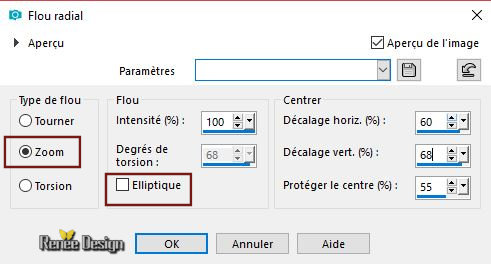
2.
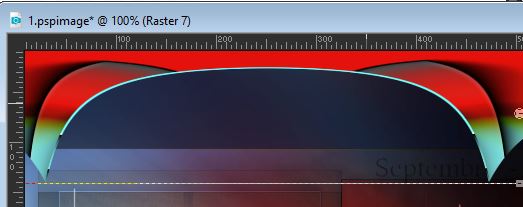
Adjust- Blur-Radial Blur use the settings below
3.
Activate the tube ‘’Automne2018_Image1’’
-Edit - Copy- Activate your work -Edit - Paste as a new layer
-
Do not move, it is in the right place
4.
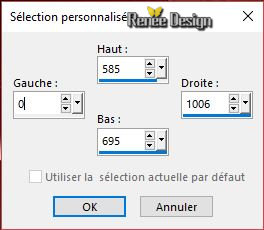
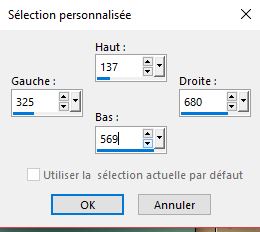
Activate Selection Tool -Custom Selection (S) -Rectangle with these settings

5. Selections- Invert
6.
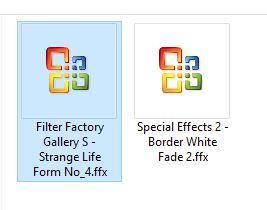
Effects –Plugins- Unlimited 2.0 –ICNETFILTERS-Special Effects 2-
Border White Fade 2 using the default settings
7.
Selections- Invert
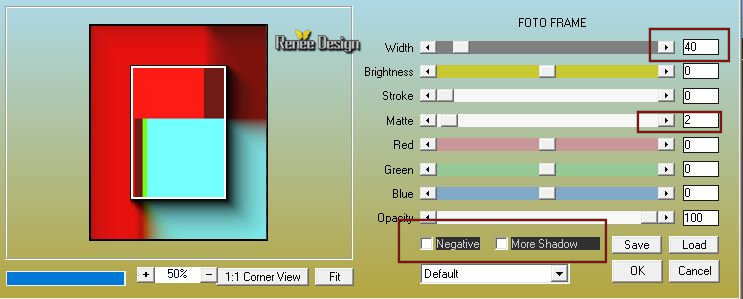
8. Effects- Plugins – AAA Frame – Photo Frame use the settings below

9. Effects –3D- Effects – Drop Shadow with these settings : 5/5/85/32 color black
10.
Selections- Promote selection to layer
Selections- Deselect All
-Activate the layer underneath = ( Raster 2)
11.
Effects- Plugins – Simple – 4 Way average
12.
Layers-Properties-Set the Blend Mode to " Overlay "
13.
Layers- New Raster Layer
14.
Selections –load/save selection –load selection from disc and select my selection:‘’Automne_2018_1’’
15.
Activate Flood Fill Tool  Flood Fill the selection with the foreground color #ffffff
Selections- Deselect All
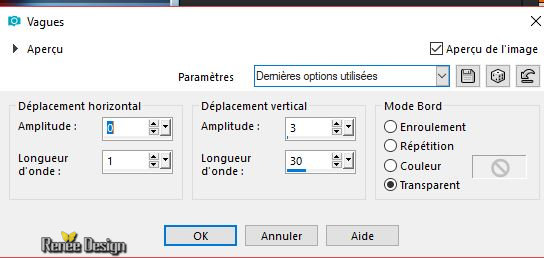
16.Effects- Distortion Effects- Wave use the settings below
17.
Activate the tube ‘’Automne_2018_feuille ‘’
-Edit - Copy- Activate your work -Edit - Paste as a new layer
18.
Objects -Align-Left and go slightly down
19.
Layers- Duplicate
20.
Image -Free Rotate 30° Right
21.
Image - Negative Image
-
To replace the top of the layer-palette
22.
Activate Text Tool -Font Calisto MT ( your choice)- Size 36 
Write: Septembre – Octobre ….as shown in the example below

23.
Convert to Raster Layer
24.
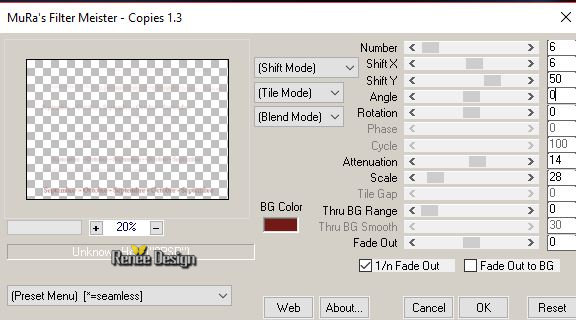
Effects- Plugins – Mura’s Meister – Copies (
click first on reset before the setting of this filter)
If your filter does not give the same result /The effect is included with the material ’’Effet-Muras Copies.pspimage’’
Paste it as a new layer on your working area
then remove the text layer from line 22
25.
Layers-Properties-Set the Blend Mode to " Multiply "or "Hard Light" -Lower the Opacity to 64%
26.
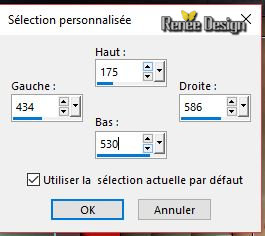
Activate Selection Tool -Custom Selection (S) -Rectangle with these settings
27.
Selections-Promote Selection to Layer
28.
Layers-Properties-Set the Blend Mode to " Normal "-Lower the Opacity of the layer to 53%
Selections- Deselect All
29.
Layers- New Raster Layer
30.
Activate Selection Tool -Custom Selection (S) -Rectangle with these settings

31.
Activate Flood Fill Tool Flood Fill the selection with the foreground color #ffffff
Selections- Deselect All
32.
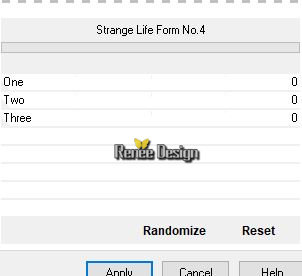
Effets –Plugins- Unlimited2.0 -Filter Factory Gallery S -
Strange Life Form No.4
33.
Layers-Properties-Set the Blend Mode to " Overlay "
– Lower the Opacity of the layer to 48%
34.
Activate Selection Tool -Custom Selection (S) -Rectangle with these settings
35.
Effects- Plugins –AAA Frame - Foto Frame use the settings below
36.
Selections- Modify-Contract 40 Pixels
37.
Effects- Plugins –AAA Frame - Foto Frame (with the same settings )
38.
Selections- Modify-Contract 40 Pixels
39.
Effects- Plugins – AAA Frame - Foto Frame (with the same settings)
Selections- Deselect All
40.
Effects- 3 D Effects- Drop Shadow with these settings : 3/3/50/20 color black
41. Layers- Duplicate
42. Layers-Properties-Set the Blend Mode to "Normal " Opacity 100%
43.
Effects- Plugins –Simple – Pizza slice Mirror
-.
Repeat this filter a second time
44.
Activate Selection Tool -Custom Selection (S) -Rectangle with these settings
45.
Edit -Cut -Edit- Paste as a new Layer
Selections- Deselect All
46.
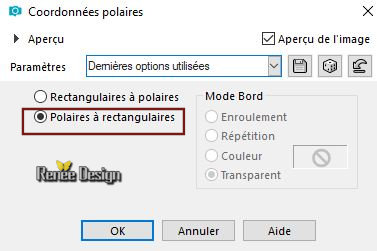
Effects- Distortions Effects-Polar Coordinates-Polar to Rectangular
47.
Press K on your Keyboard to activate the Pick Tool (Raster Deform Tool in older versions of PSP)
Position the tube like this:
(Hit the M key of your Keyboard to deselect the tool)
48.
Layers-Properties-Set the Blend Mode to " Luminance -Legacy "
Activate the layer underneath = (Copy of Raster
6)
49.Layers- Duplicate
-
Layers- Merge- Merge Down
50.
Effects- 3 D Effects- Drop Shadow with these settings : 1/1/100/2 color black
51.
Layers-New Raster Layer
52.
Activate Brush Tool and and choose the brush: ‘’Automne1’’and
‘’Automne2’’
Stamp with the foreground #ffffff
-
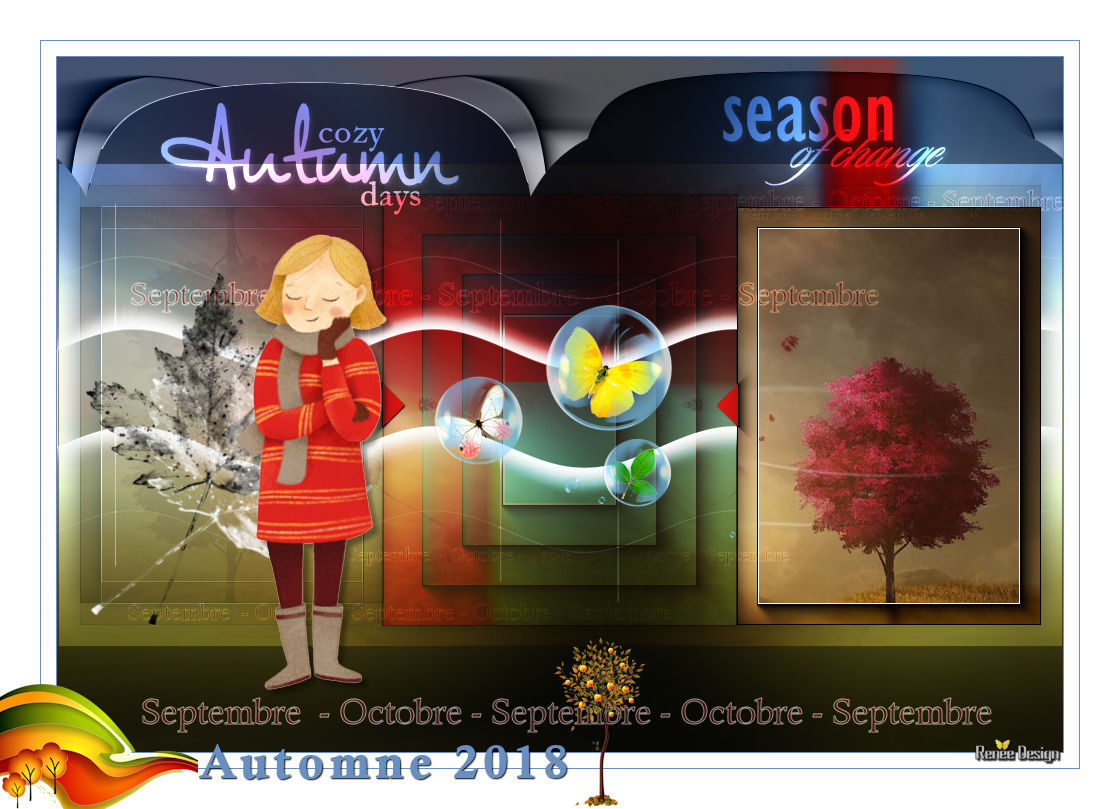
And move it in the right place (see finished Image )
53.
Layers-Properties-Set the Blend Mode to " Overlay "
54. Layers- Duplicate – (Leave the Blend Mode on "Overlay" )
55.
Activer le tube ‘’
Renee_TUBES_Fillette_Automne_2018.pspimage’’
-Edit - Copy- Activate your work -Edit - Paste as a new layer
-
Activate your Move Tool (M) place the tube at the right place
56.
Activate the tube ‘’ Renee_TUBES_papillons_Automne_2018.pspimage’’
-Edit - Copy- Activate your work -Edit - Paste as a new layer
-
Activate your Move Tool (M) move it in the right place (see finished image )
57.
Layers- Merge- Merge Visible
View - Toolbars - Script checked !! in your psp
Put the script in your script folder –restricted script from PSP
58. Activate toolbar Script, choose my file in the list ‘’ Automne_2018.PspScript’’
- Click the little blue arrow and let the script run

59. Activate the "titre"-Edit - Copy- Activate your work -Edit - Paste as a new layer and move
60.
Layers- Merge- Merge All (flatten)
Save as JPG
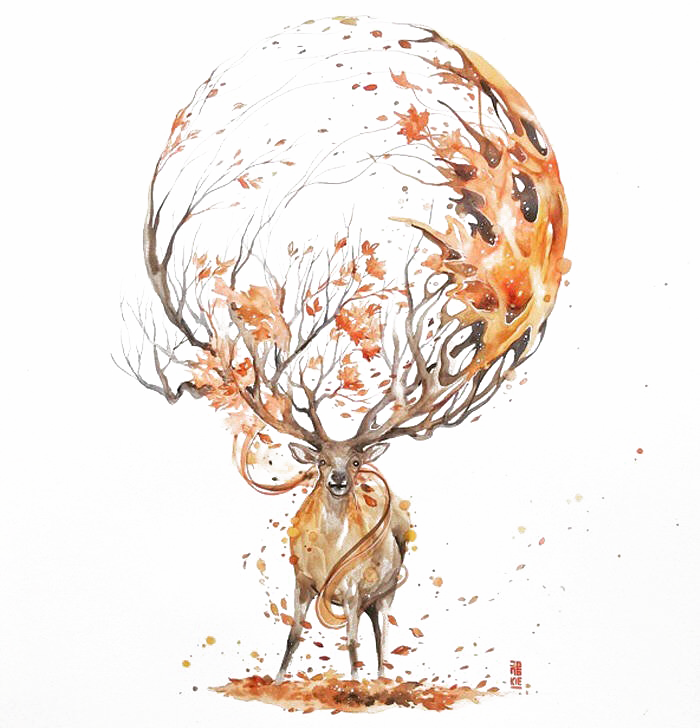
I hope you enjoyed this lesson
Renée
This lesson was written by Renée 26 July 2018
Edited and Update
2018
*
Any resemblance with an existing lesson is a coincidence
* Do not forget to thank the people who work with us and for us I have appointed the tubeurs and translators
Thanks
*
| 
 Translations


 If a plugin supplied appears with this icon it must necessarily be imported into Unlimited *