|
Let's start the lesson.

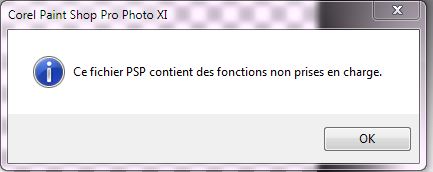
It is easy to install this filter
First : To install the filter DCE tool ( included into the zip )
Unzip and install the filter
Starting the PSP and open a picture.
Activate Filter DCE TOOLS-ATTENTION !!!! Click to ReDynaMix !!!!!! -
Exactly in this order
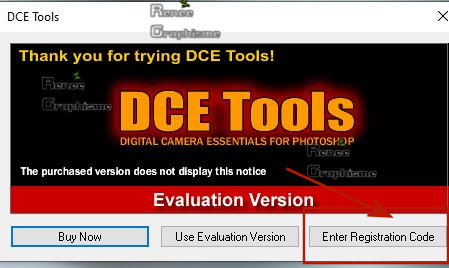
Click to >>Enter
Registration Code
The window opens
Name : Any
Serial:
138930243624112
Code =Unlock :
140742413993224
Click >Apply - Ok
-Now the filter is ready for use
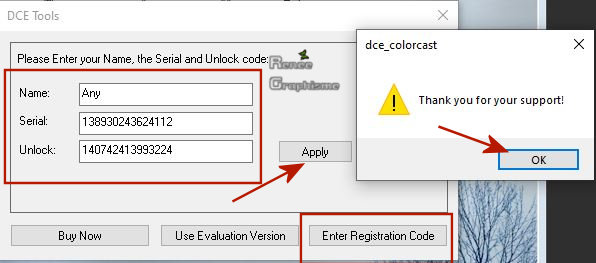
These codes are valid for all filter presets
Let's start the lesson.
-Preparation
- Color Palette: Set your Foreground color to color #ffffff – Set your Background color to color #8eb4d6=2
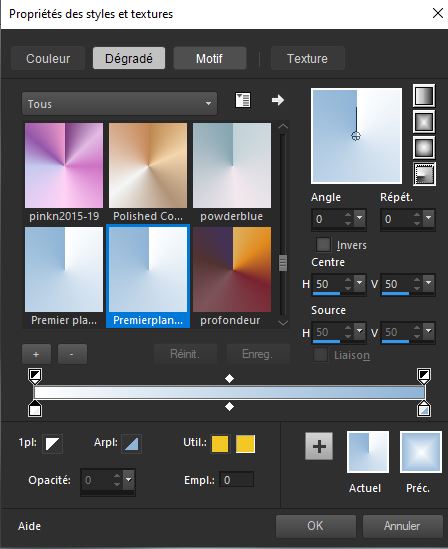
- Set your Foregroundcolor to foreground-background rectangular gradient configured like this

1. File– Open a new Transparent image 900 x 600 Pixels
2. Activate Flood Fill Tool
 –
Flood fill the layer with the gradient –
Flood fill the layer with the gradient
3. Effects –Plugins-
Unlimited 2.0 – FunHouse - Radial Mirror using the default settings
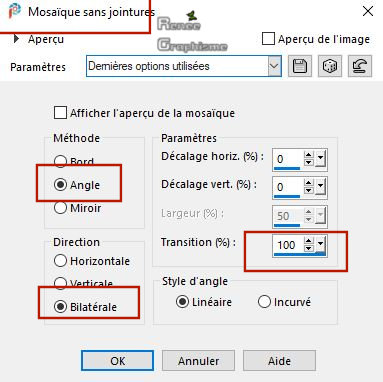
4. Effects – Image Effects –Seamless tiling with these settings
5. Effects – Distortion Effects – Twirl – Degrees : 116
6. Effects – Artistic Effects – Chrome use the settings below

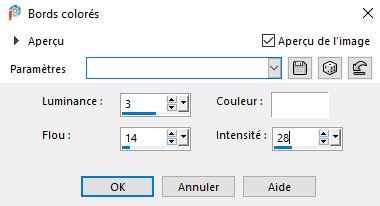
7. Effects – Artistic Effects – Colored Edges use the settings below-Color White
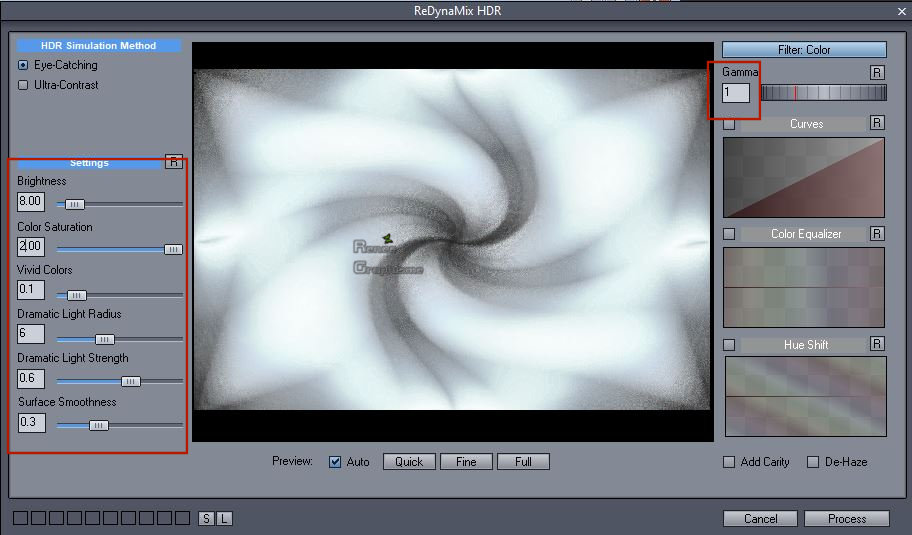
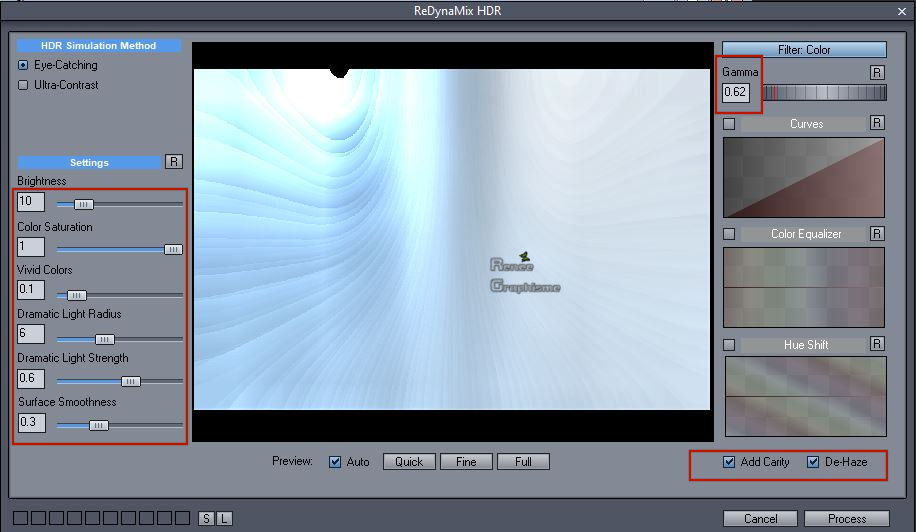
8. Effects – Plugins – DCE Tools – RedynaMix use the settings below
9. Adjust-Blur- Gaussian Blur: Radius 25
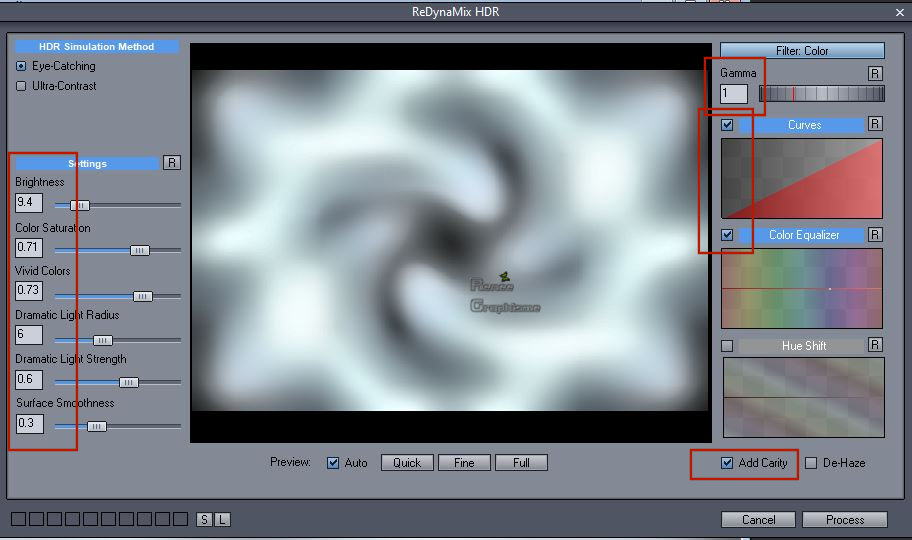
10. Effects – Plugins – DCE Tools – RedynaMix use the settings below
- Material of the foreground: change your rectangular gradient into a linear gradient configured like this
11. Layers- New Raster Layer
12. Activate Flood Fill Tool
–Flood fill the layer with the gradient
13. Adjust- Blur- Gaussian Blur: Radius 100
14. Effects – Plugins – DCE Tools – RedynaMix use the settings below
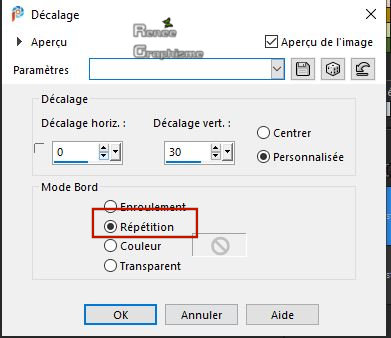
15. Effects – Image Effects – Offset with these settings
16. Layers-Properties-Lower the Opacity of the layer to 75
17. Activate the tube
‘’ Bonjour-Hiver- Image 1’’
- Edit - Copy- Activate your work -Edit - Paste as a new layer
18. Objects – Align
-Top
- Stay on this layer
-Attention Swap your materials, so the dark color #8eb4d6 =2 is on the bottom
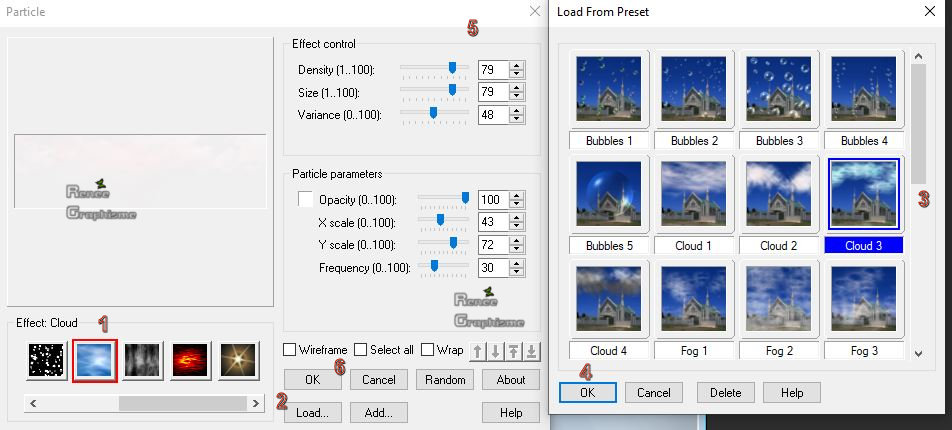
19. Effects – Plugins – Ulead Effects – Particle ( install explanation of this filter
Here)
1. Select >> Effect
Cloud
2. Click Load –
to open the second window and select – Cloud 3
Ok
3. Check the settings as in the example below
Ok
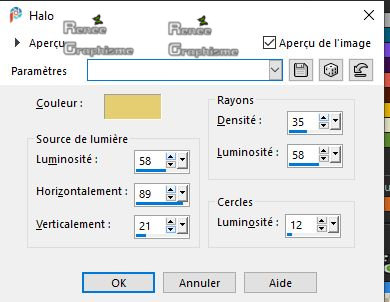
20. Effects –Illumination Effects – Sunburst with these settings– Color #e5ce71
21. Open the tube‘’Bonjour-Hiver-
Image 2.pspimage’’ -Edit - Copy- Activate your work -Edit - Paste as a new layer
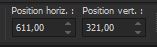
22. Pick Tool: (K) on your keyboard -Enter these parameters for the X:611,00 and Y:321,00 positions on the Toolbar - Press any key to close the Pick Tool
23. Layers- New Raster Layer
24. Selections –load/save selection –load selection from disc and select my selection: ‘’Bonjour-hiver 1’’
25. Activate Flood Fill Tool
–
Flood fill the selection with color White (2 clicks)
Selections- Select None
26. Layers- New Raster Layer
27. Selections –load/save selection –load selection from disc and select my selection: ‘’Bonjour-hiver 2’’
28. Activate Flood Fill Tool
-
Flood fill the selection with color White
Selections- Select None
- Attention:
Swap your materials, so the dark color #8eb4d6 =2 is on top
- Layers- New Raster Layer
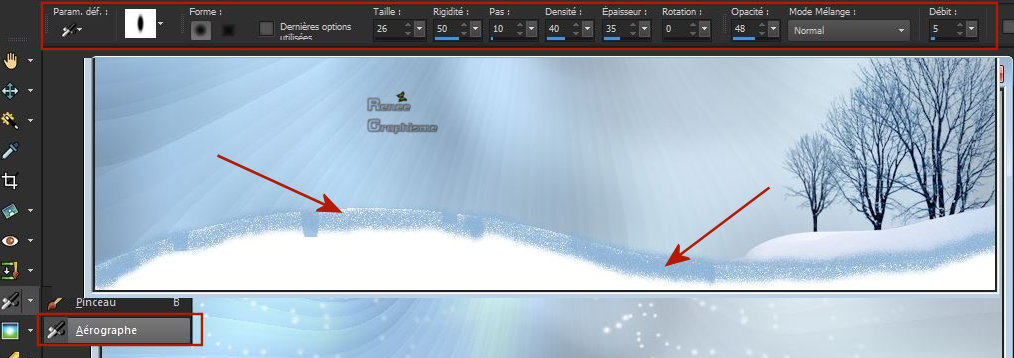
30. Activate the Tool Airbrush use the settings below
-With the left button of the mouse pressed glide gently over your image from the left side to the right side as shown in the example below (order to obtain this effect as shown in the example below )
31. Adjust- Blur- Gaussian Blur: Radius 22
32. Layers-Properties-Set the Blend Mode to " Multiply"
Your work and Layer Palette look like this now-You should have this result

- In the Layer-Palette-activate Raster 6
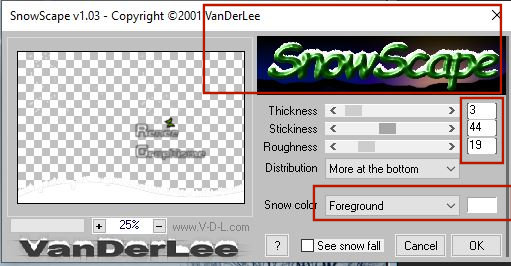
33. Effects – Plugins – VDL- Adrenaline – SnowScape use the settings below
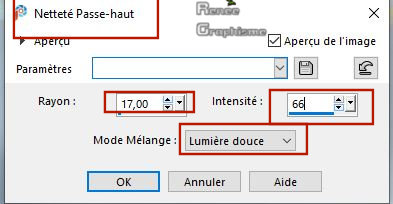
34. Adjust –Sharpness-Hih-Pass-Sharpen use the settings below
- To replace the top of the layer-palette
35. Open the tube ‘’Bonjour-Hiver-
Image 3.pspimage’’ -Edit - Copy- Activate your work -Edit - Paste as a new layer
- Image
Resize to 60% - all layers not checked 
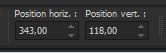
36. Pick Tool: (K) on your keyboard -Enter these parameters for the X:343,00 and Y:118,00 positions on the Toolbar - Press any key to close the Pick Tool
- Material Properties: Set your foreground color to color #ffffff = 1 – Set your background color to color #1e2637=3
37. Layers- New Raster Layer
38. Selections –load/save selection –load selection from disc and select my selection: ‘’Bonjour-hiver 3’’
39. Activate Flood Fill Tool
–Flood fill the selection with the background color =3
Selections- Select None
41.Layers- Duplicate
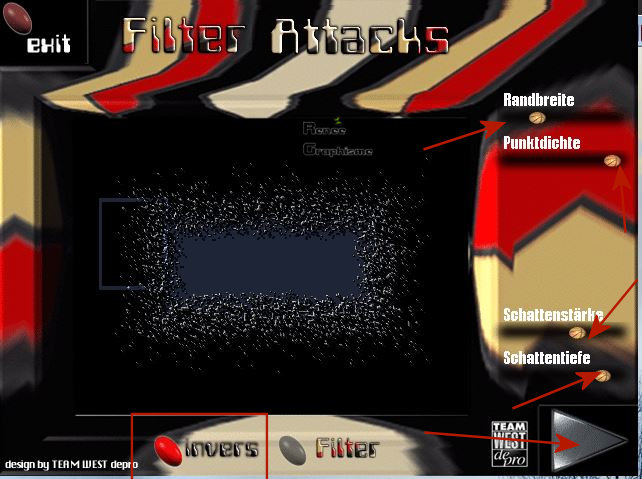
42.Effects -Plugins – Filter Attacks- Pay attention to the four aspects of the filter in the right window
Click -Randbreite,Punktdichte,Schattenstärke,Schattentiefe and Invers and OK
( install explanation of this filter
Here)
43. Effects – Edge Effects – Enhance More
44. Layers- Merge- Merge Down
45. Open the tube ‘’Bonjour-Hiver-
Image 4.pspimage’’ -Edit - Copy- Activate your work -Edit - Paste as a new layer
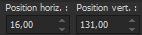
- Pick Tool: (K) on your keyboard -Enter these parameters for the X:16,00 and Y:131,00 positions on the Toolbar - Press any key to close the Pick Tool
- Layers- Arrange- Move Down
- Leave the Blend-Mode in Overlay
- To replace the top of the layer-palette
46. Activate the Magic Wand with these settings

– Select the inside of your frame
- Open
the image -‘Bonjour-Hiver- Image 5.pspimage’’ in your Psp
- Select a Image of your choice
47. Layers- New Raster Layer
48. Edit - Copy- Activate your work -Edit - Paste into Selection
Selections-Select None
- For Renée -I have set the Blend Mode on Multiply (but it's up to you to decide what is best for you)
49. Layers- New Raster Layer
50. Selections –load/save selection –load selection from disc and select my selection: ‘’Bonjour-hiver4’’
51. Activate Flood Fill Tool
–
Flood fill the selection with color White
Selections-Select None
52. Effects - 3 D Effects – Drop Shadow with these settings : 1/1/50/4 Color #00364a
53. Open the tube
‘’ TUBES_DECOS_Bonjour hiver’’
- Activate the layers – ‘’barriere – branche – fille – patineuse
–promeneuse ‘of the tube
- Copy it and Paste it as a new Layer and move -Make sure everything is in the right place (see finished image )
54. Layers-New Raster Layer
55. Paint Brush Tool and select my file -Activer Pinceau
‘’ Reneegraphisme_Hiver’’

- Stamp with the white color - the settings are OK( see finished image )
56. Effects – Edge Effects – Enhance
57. Image - Add borders-Symmetric checked 1 Pixel Color # 1e2637= 3
58. Image - Add borders-Symmetric checked 20 Pixels -Color White
59. Image - Add borders-Symmetric checked 1 Pixel Color #8eb4d6 =2
60. Image - Add borders-Symmetric checked 30 pixels -Color White
61. Windows-Duplicate (You may minimize your working area for a moment, but do not close)
62. Layers -Promote Background Layer
63. Effects -Plugins-
Unlimited 2.0 – ICNETFILTERS – Edges, Square -Square
Edge 04
64. Effects - 3 D Effects – Drop Shadow with these settings : 0/0/46/26 Color Black
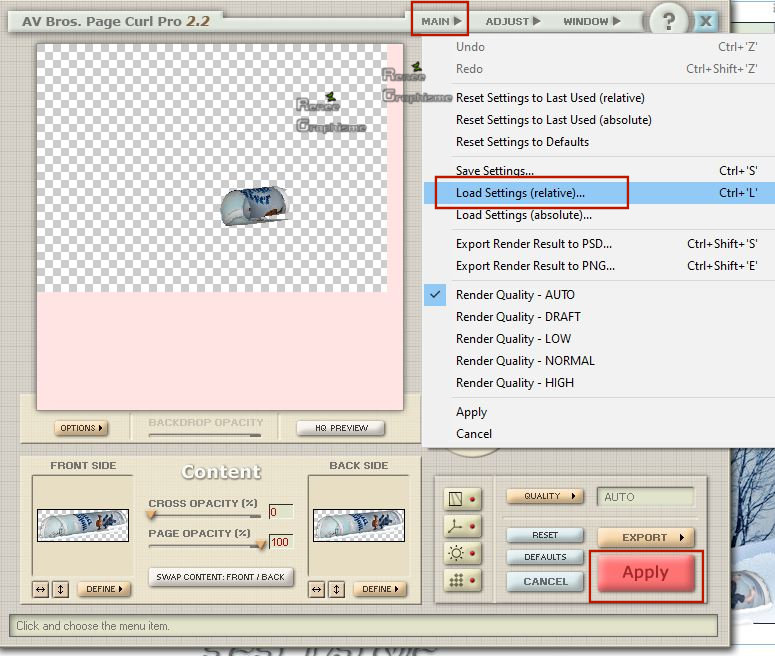
65. Effects – Plugins - AV Bros – AV Bros page Curl Pro 2.2 (Preset "bonjour_Hiver-Renee.avcpsclic")
-First: Click on the Icon Main -Click Load
Setting (relative)
- select my Preset "bonjour_Hiver-Renee.avcpsclic" –
can be used in any folder of your choice by clicking it. And - Apply
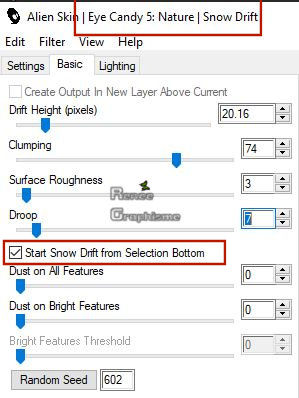
66. Effects – Plugins- Eyecandy Nature – Snow Drift use the settings below
67. Image
-Resize to 345 pixels
68. Edit -Copy !!!!!! -Activate your minimized Image of point 61 (Original)-Edit- Paste as a new Layer /With the move tool, move it in the bottom right corner
69. Effects – Plugins – Alien skin- Eyecandy 5 Impact – Perspective
shadow –Settings- Preset :Reflect in Front, Short
70. Open the tube ‘’Deco final’’ -Edit - Copy- Activate your work -Edit - Paste as a new layer/do not move
-Layers-Merge- Merge All ( flatten)
Save as JPG
I hope you enjoyed this lesson
Renée
This lesson was written by Renée 5/10/2019
Edited and Update
2019
*
Any resemblance with an existing lesson is a coincidence
* Do not forget to thank the people who work with us and for us -I have appointed the tubeurs and translators
Thanks
*
|

 Translations


 If a plugin supplied appears with this icon it must necessarily be imported into Unlimited *