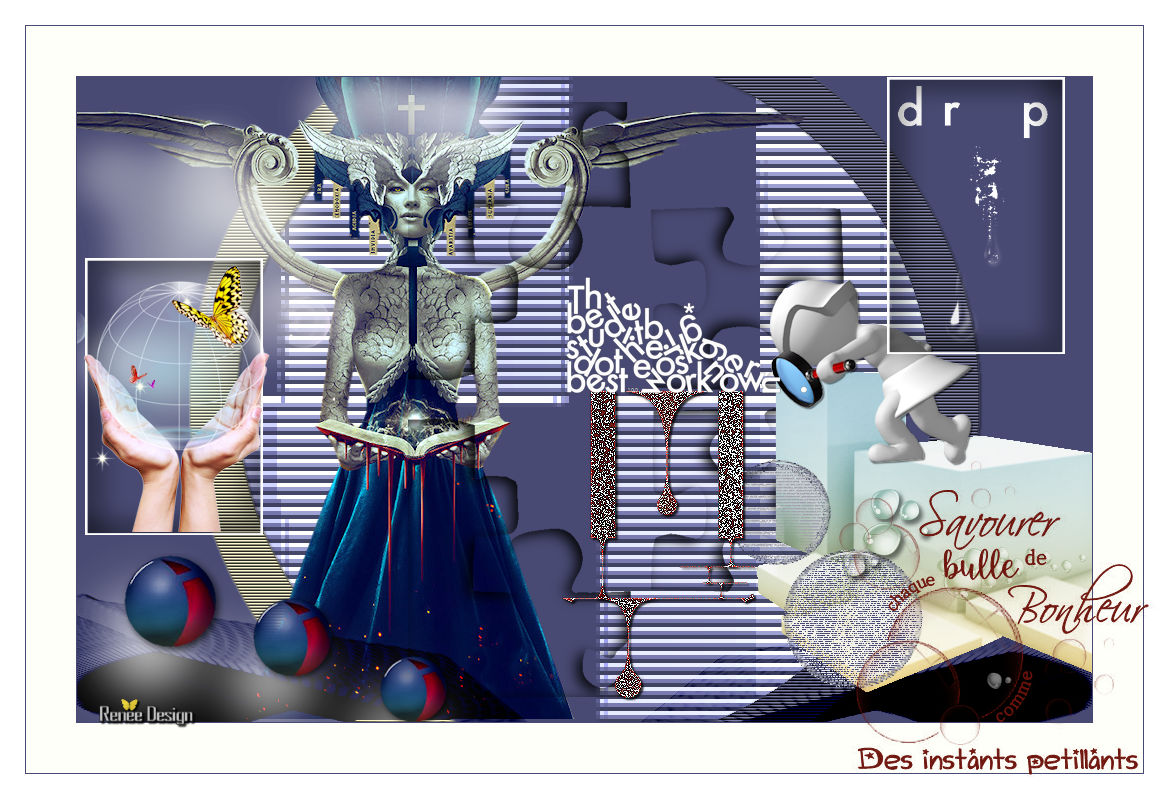
|
Let's start the lesson.
-
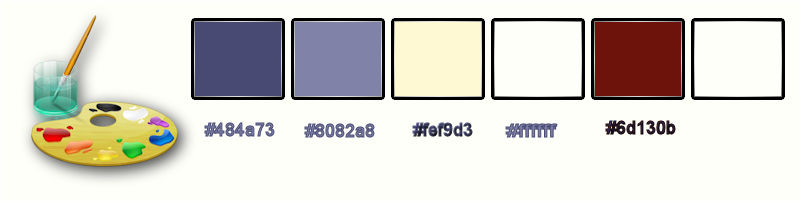
Color Palette- Set your foreground color to color
#484a73
- Set your background color to color#8082a8
1.
File: Open New Transparent Image 1015 x 645 Pixels
-
Activate Flood Fill Tool and fill the layer with the foreground color
2.
Layers - New Raster Layer
-
Color Palette- Set your Foregroundcolor to #ffffff -Activate Flood Fill Tool and fill the layer with the foreground color #ffffff
- Open the Mask ‘’masktutorialechoes_camerontags’’
and minimize in your Psp
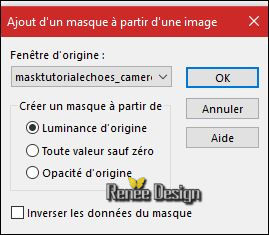
3. Layers - New Mask Layer - From Image and choose my file :
« masktutorialechoes_camerontags.pspimage »
-Effects –Edge Effects- Enhance More
-
Layers- Merge- Merge Group
4.
Layers- Duplicate
5.
Image Flip (CTRL+I)– Image Mirror (CTRL+B)
-
Layers- Merge- Merge Down
6.
Effects – Geometric Effects – Circle /
transparent checked
7.
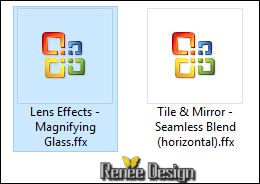
Effects –Plugins - Unlimited – ICNET FILTERS - Tile & Mirror -
Seamless Blend (horizontal)
-
Set the layer Opacity of this layer to 30%
8. Effects –
Texture Effects –Blind use settings below- Color black
9. Layers- Duplicate
-
Layer Palette -Double click on this layer and set the Blendmode to " Dodge "-Set the layer Opacity of this layer to 71#
10. Layers- Merge - Merge Visible
11. Effects
–Plugins - Unlimited – ICNET FILTERS - Lens Effects- Magnifying
Glass using the default settings 46/168/64
- Color Palette- Set your foreground color to color
#fef9d3
12. Activate your Magic Wand Tool-with these settings

-
Select the black part of the left side
13. Layers - New Raster Layer
14. Activate Flood Fill Tool and fill the selection with the foreground color
15. Effects – Texture Effects –Blind with the same settings
Selections- Deselect All
- Replace to the Merged Layer
16. With the Magic Wand Tool select the black part of the right side
17. Layers - New Raster Layer
18. Activate Flood Fill Tool and fill the selection with the background color
19. Effects – Texture Effects –Blind with the same settings
Selections- Deselect All
- To replace the top of the layers palette (=Raster 1)
- Layers- Merge- Merge Down ( 2 parts of the circle)
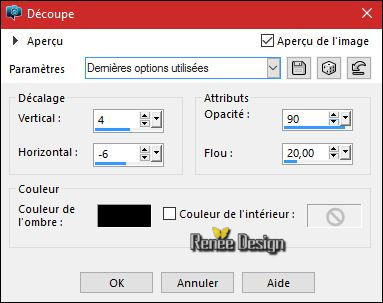
20. Effects –3D Effects – Drop Shadow with these settings: 2/2/50/2 black
- Repeat Drop Shadow -2/-2
21. Layers - New Raster Layer
22.
Selections –load/save selection –load selection from disc and select my selection: ‘’
Renee_bulle’’
23. Effects- 3 D Effects- Cutout use settings below
Selections- Deselect All
24. Layers- Duplicate
- Image
Flip(CTRL+I)
25. Layers- New Raster Layer
- Properties Forground; Set your Foregroundcolor to #000000 -Activate Flood Fill Tool and fill the layer with the foreground color
26. Layers - New Mask Layer - From Image and choose my file :
‘’Renee_Masque_Bulle’’
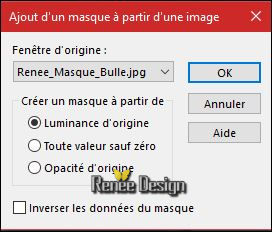
-
Layers- Merge- Merge Group
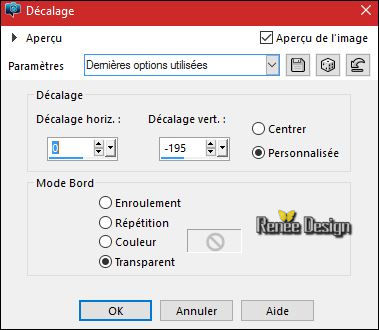
27. Image –Negative Image
28.Effects- Image Effects- Offset with these settings:
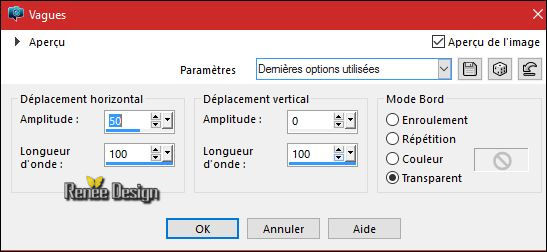
29. Effects- Distortion Effects- Wave use settings below
30. Layers- Duplicate
- Image
Mirror(CTRL+B)
- Layers- Merge- Merge Down
-
Preset Deform ‘’Preset_Pick_Bulle_renee_deformation’’/( C:\Users\YourName\Documents\My PSP-files\extract into the folder preset -Included into the zipfile )
31. Press (K) on your Keyboard to activate the Pick Tool (Raster Deform Tool in older versions of PSP) and select my file:
« Bulle_renee_deformation’’ Click OK
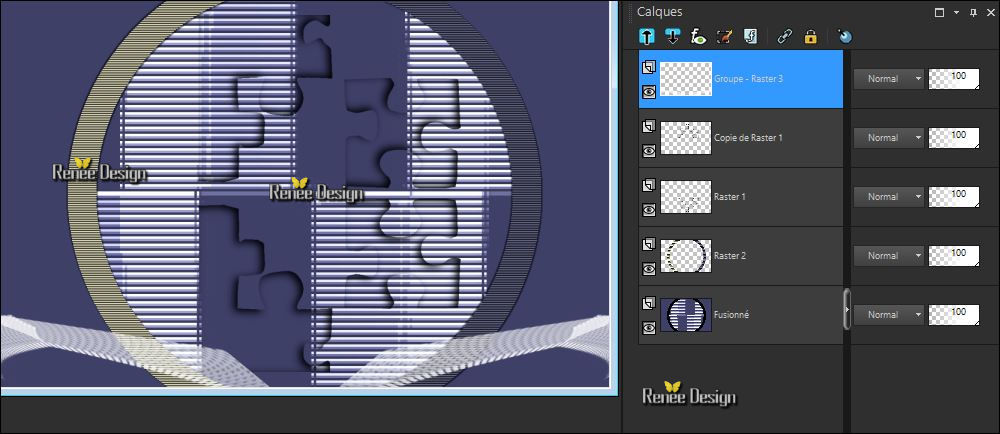
32. Layers- Duplicate
- Image
Mirror (CTRL+B)
- Layers- Merge- Merge Down
- Your work and Layer Palette look like this now-You should have this result
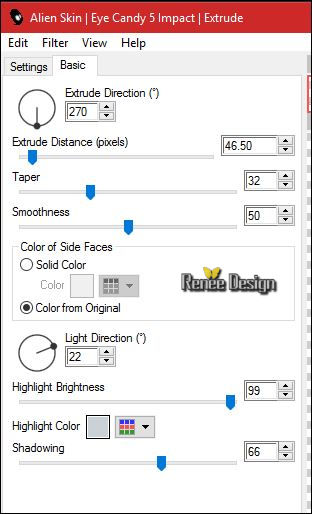
33. Effects
–Plugins – EyeCandy 5 – Impact – Extrude
-tab Settings/User settings choose my Preset
‘’Renee_bulle_extrude
Or manual settings as shown in the example below-Color
#cbd2d7
34. Layer Palette -Double click on this layer and set the Blendmode to " Burn"
Open the
tube ‘’ Deco_bulles_tubes’’(do not close, we will need it again soon)
35. Activate layer ‘’ Mur_cubes’’of the tube
-Edit/ Copy-Edit - Paste as new layer on your working image
- Move Tool / place your tube to the bottom right side of your image
36. Activate layer ‘’deco_bulle_1’’of the tube
-Edit/ Copy-Edit - Paste as new layer on your working image
- Move Tool / place your tube to the bottom left side of your image
37. Layers - New Raster Layer
38.
Selections –load/save selection –load selection from disc and choose my selection:‘’ Renee_bulle_1’’
- Color-Palette:set your foreground color to color #484a73
39. Activate Airbrush with these settings ( ‘’Aerographe ‘’)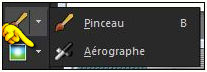

-
With the foreground color –Put your cursor as in the example// Go lightly against the edge(2 ore 3 clicks)
To obtain this effect as shown in the example below

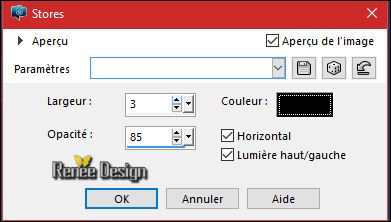
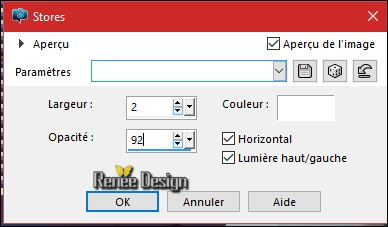
40. Effects
– Texture Effects –Blinds with these settings - Stores /Color #ffffff
41.
Effects – Plugins –EyeCandy 5 – Impact – Glass/Preset
‘’Clear, No Drop Shadow”
Selections- Deselect All
42. Layers- Duplicate
- Image
Resize 75 % all layers not checked
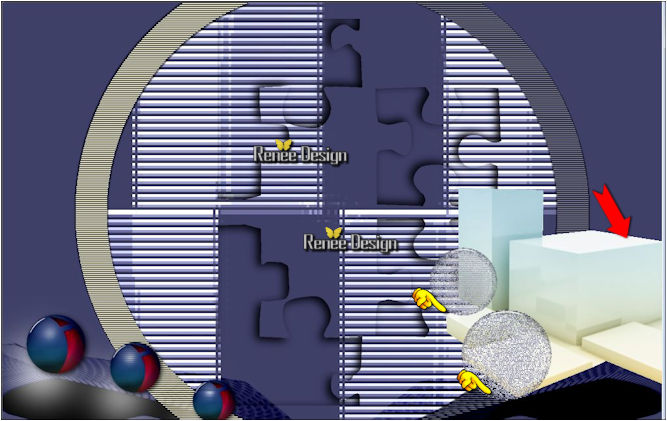
- Move Tool / place it as shown in the example below
- You have this as a result
- Back on the tube ‘’DECO’’
43. Activate the layer ‘’ deco-bulle_2’’of the tube
-Edit/ Copy-Edit - Paste as new layer on your working image
- Move Tool / place your tube as shown in the example above
44. Activate the layer ‘’ deco-bulle_3’’
-Edit/ Copy-Edit - Paste as new layer on your working image
45.Effects- Image Effects- Offset with these settings:

- Double click on this Layer and set the Blend Mode to " Screen "
46. Open the tube ‘’ Renee_tube_le_livre’’
- Image
Resize to 645 pixels height
- Layer-Palette: make raster 2 active
- Edit/ Copy-Edit - Paste as new layer on your working image
47. Effects
– Image Effects-Offset with these settings: H = - 175 and V = 0
48. Layers- Arrange- Move Down (the tube is placed above the circle layer )
-Activate the top of the layer palette
- Back on the tube " DECO"
49. Active the layer ‘’ deco_bulle_4’’ of the tube
- Edit/ Copy-Edit - Paste as new layer on your working image
-
With the move tool, move it in the right place
50. Activate the layer ‘’ deco_bulle_5’’of the tube
- Edit/ Copy-Edit - Paste as new layer on your working image
- With the move tool, move it in the right place
51. Layers - New Raster Layer
52.
Selections –load/save selection –load selection from disc and choose my selection: ‘’
Renee_bulle_2’’
53. Color Palette- set your foreground color to color #ffffff
54.
Effects –Plugins – EyeCandy 5 Impact – Perspective
Shadow/ Preset “Drop Shadow Low’’
- Repeat this filter
Selections- Deselect All
55. Open the tube ’’bulle_cadre »
- Edit/ Copy-Edit - Paste as new layer on your working image
- Move against the top edge
- Back on the tube ‘’DECO’’
56. Activate the layer ‘’deco_bulle_6’ of the tube
- Edit/ Copy-Edit - Paste as new layer on your working image
- Place in the left frame
57. Image - Add borders-Symmetric checked:1 Pixel #484a73
58. Image - Add borders-Symmetric checked:50 pixels #ffffff
59. Image - Add borders-Symmetric checked:1 Pixel #484a73
60. Image - Add borders-Symmetric checked:25 pixels #ffffff
- Color Palette- Set your foreground color to color
#6d130b
61. Activate Brush Image’ Renee_pinceau_bulle’’ in your Psp
- File- Export -Custom Brush - Give it a name "bulle’’
62. Layers - New Raster Layer
63. Activate Brush Tool and select my file in the list: "Bulle " with these settings

- Stamp your brush at the bottom right corner by using your foreground color
64. Layers- Merge- Merge All ( flatten)
Save as JPG
I hope you enjoyed this lesson
Renée
This lesson was written by Renée 28/07/2016
Edited and Update
2016
*
Any resemblance with an existing lesson is a coincidence
* Do not forget to thank the people who work with us and for us I have appointed the tubeurs and translators
Thanks Renée *
*
| 
 Translations


 If a plugin supplied appears with this icon it must necessarily be imported into Unlimited

 All rights reserved