|
Let's start the lesson.
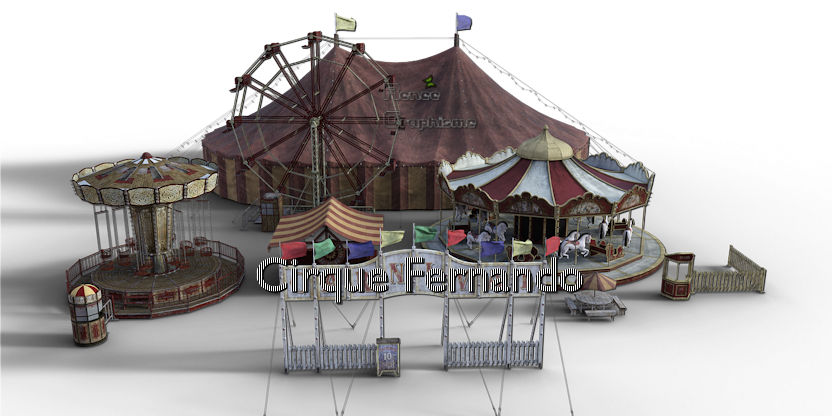
Cirque Fernando/Circus Fernando
1. Open the BG-Image ‘’image-Acrobats’’-
Window - Duplicate (or shift+D) - Close the original and proceed on the copy -Promote Background Layer =Raster 1
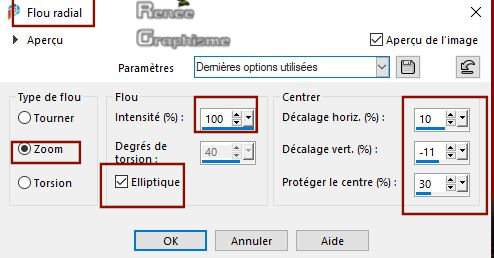
2. Adjust- Blur-Radial Blur use the settings below
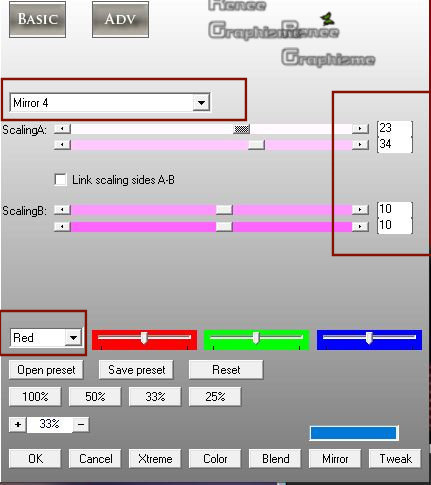
3. Effects – Plugins- AP[Utlity]- Utility Reflections –Mirror 4
with these settings
4. Effects – Plugins– Graphic Plus- Cross shadow use the settings below
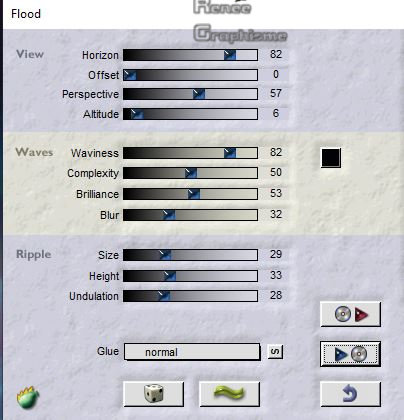
5. Effects – Plugins – Flaming Pear- Flood –Click on the red arrow>>select my file –Preset :
Cirque_Fernando-Flood settings-Can be used in any folder of your choice by clicking it. -3 Open it will be ok in your filter
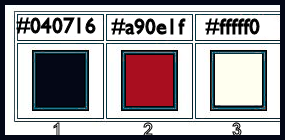
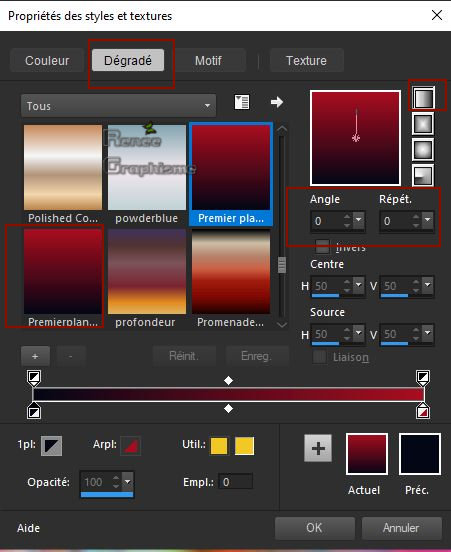
- Material Properties: Set your foreground color to color #040716 = 1 – Set your background color to color #a90e1f =2
- Set your Foregroundcolor to foreground-background linear gradient configured like this
6. Layers- New Raster Layer
7. Selections –load/save selection –load selection from disc and select my selection: ‘’Cirque Fernando’’
8. Activate Flood Fill Tool  –
Fill the selection with the gradient (2 clicks) –
Fill the selection with the gradient (2 clicks)
Selections- Deselect All
DO NOT ADD NEW LAYER
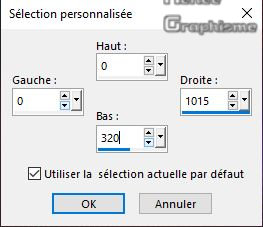
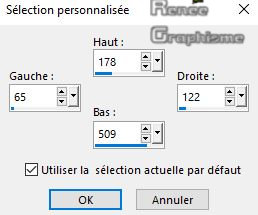
9. Activate Selection Tool -Custom Selection (S) -Rectangle with these settings
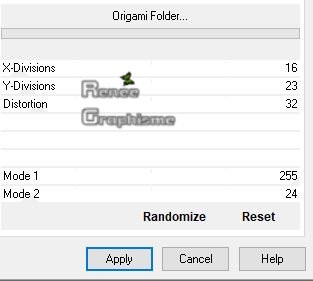
10. Effects –Plugins-
Unlimited 2.0 – VM Instant Art - Origami Folder..use the settings below.
11. Edit-Cut !!!! Edit- Paste as New Layer (Do not move )
12. Effects –Plugins
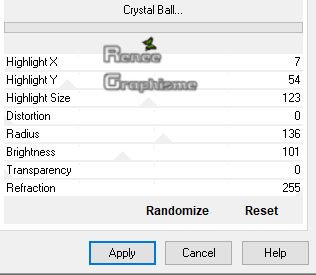
(NOT in Unlimted 2.0 (then it turns white and must turn red) - VM Toolbox Crystal Ball..use the settings below .
Selections- Deselect All
13. Effects – Geometric Effects Circle- Transparent
14. Effects– 3D- Effects– Drop Shadow with these settings : 25/0/100/1 Color White !!!
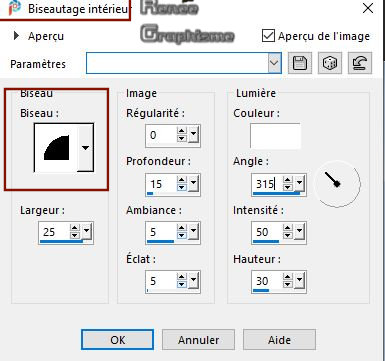
- In the Layer-Palette- Activate the Layer underneath= ( Raster 2)
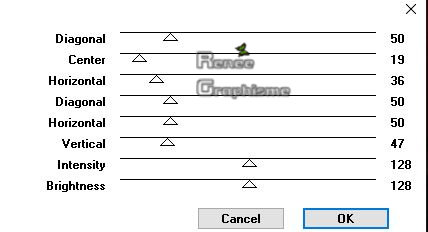
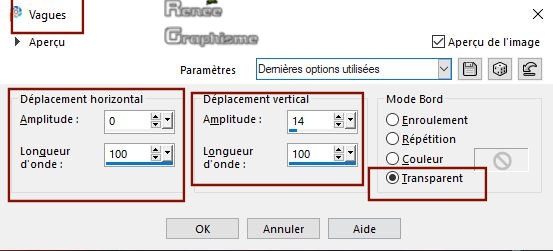
15. Effects –Distortion Effects – Wave use the settings below
16. Objects – Align
- Top
17. Layers-Properties-Change the Blend Mode to " Screen "
18. Layers- New Raster Layer
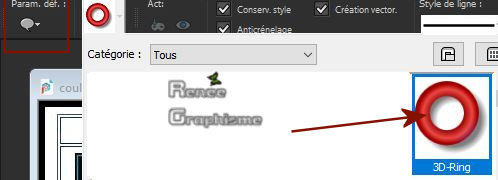
19. Activate the Preset Shape Tool ( P) and select – ‘’3D-Formen.jsl’’
- Choose the 3D- Ring shape
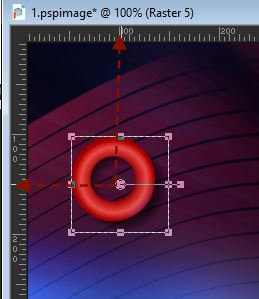
-View-Rulers active !!! -Draw this shape- Convert to Raster Layer -Adjust the shape if necessary
- Move in the right place
20. Effects – Plugins - AP[Lines] Lines – Silverlining – GridPaper use the settings below

21. Effects – Plugins – Alien skin Eye Candy 5 Impact – Extrude –Preset :
Small Offset, No Smoothing
22. Layers- Duplicate
23. Image - Mirror - Mirror Horizontal (Image - Mirror in older versions of PSP)
24. Layers- Merge- Merge- Down
25. Layers- New Raster Layer
26. Selections –load/save selection –load selection from disc and select my selection: ’Cirque Fernando-1’’
27. Activate Flood Fill Tool -Fill the selection with the gradient
28. Selections
-Modify - Contract 1 pixel
29. Effects – 3 D Effects– Inner Bevel with these settings
Selections- Deselect All
30. Effects – 3D Effects –Drop Shadow with these settings ; 0/0/85/32 Color Black
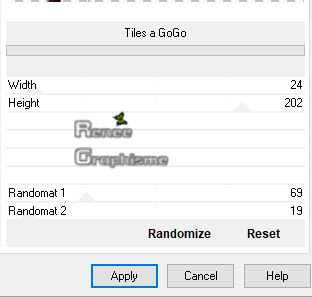
31. Effects –Plugins-
Unlimited 2.0- VM Texture - Tiles a GoGo use the settings below
32. Layers- Duplicate
33. Image - Mirror - Mirror Horizontal (Image - Mirror in older versions of PSP)
34. Layers- Merge- Merge- Down
35. Effects - Edge Effects – Enhance
36. Layers-Properties-Change the Blend Mode to " Overlay "
37. Layers- Arrange- Bring to Top
38. Layers- New Raster Layer
39. Activate Selection Tool -Custom Selection (S) -Rectangle with these settings

40. Activate Flood Fill Tool
-Fill the selection with the gradient
41. Selections -
Modify - Contract 1 Pixel
42. Effects – 3 D Effects– Inner Bevel with the same settings
43. Effects –Edge Effects – Enhance
Selections- Deselect All
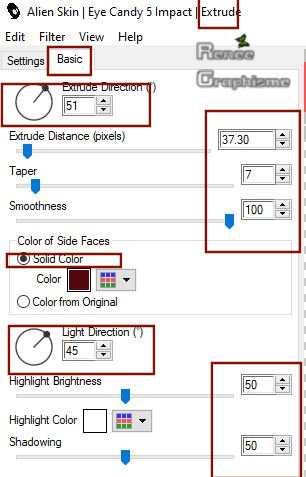
44. Effects –Plugins – Alien Skin Eyecandy 5 Impact - Extrude use the settings below –
Color #54080e
45. Layers-Properties-Change the Blend Mode to " Multiply "
46. Open the tube ‘’Renee_TUBES_
Circus-fernando-rideau.’’ -Edit - Copy- Activate your work -Edit - Paste as a new layer
47. Objects -Align -Top ( Leave in Soft Light Mode )
48. Open the tube ‘’Renee_TUBES_
Circus-fernando-spots’’. -Edit - Copy- Activate your work -Edit - Paste as a new layer
49. Objects - Align -Top
50. Open the tube ‘’Affiche ‘’ (feel free to choose one Logo) -Edit - Copy- Activate your work -Edit - Paste as a new layer un tube
(Renée has chosen tube 1 )
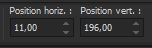
51. Pick Tool: (K) on your keyboard -Enter these parameters for the X: 11,00 and Y:196,00 positions on the Toolbar
52. Layers- New Raster Layer
53. Activate Selection Tool -Custom Selection (S) -Rectangle with these settings
54. Properties foreground: Set your Foreground color to color #ffffff=3
Activate Flood Fill Tool –
Fill the selection with the foreground color=3
Selections- Deselect All
55. Effects – Plugins – Toadies – What are you 20/20
- Repeat this Filter with the same settings
56. Layers-Properties-Set the Blend Mode to " Hard Light "
57. Layers- Merge- Merge- Down
58. Effects – Plugins – Alien Skin – EyeCandy 5 Impact –
Perpespective shadow-Tab- Settings- User Settings and select -Preset : Circus-Shadow
59. Open the tube ‘’ Renee_TUBES_
CIrque Fernando’’ Edit - Copy- Activate your work -Edit - Paste as a new layer
60. Image
Resize to 60% - Resize all layers not active
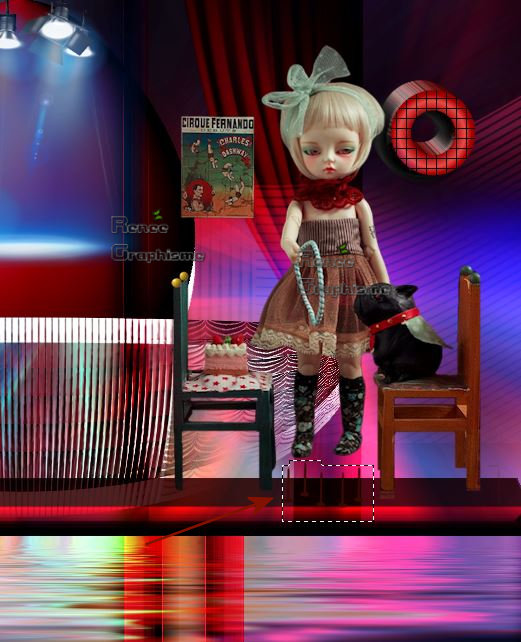
Move Tool-Move as shown in the example below
61. Activate Free hand Selection Tool =Lasso– Mode =Point to Point-Select this part (only the nails) as shown in the example below
62. Activate Color Changer Tool -Apply one click in the selection with the foreground color #ffffff (to change the color of the nails)
Selections- Deselect All
Do you have problems with this- Tube " clous en blanc " is into the zipfile
Select the nails as capture – Delete - Open the tube ’clous
en blanc’’ -Edit -Copy-Edit- Paste as New Layer on your working image and move in the right place
63. Open the tube ’’ Renee_TUBES_Doll-108’’ - Edit - Copy- Activate your work -Edit - Paste as a new layer.
- Activate Move Tool-Move it in the right place (see finished image )
64. Activate the tube "Titre/Text "/Edit/copy-Edit paste as a new layer on your working area / Ore write your own text
65. Layers- Merge- Merge All ( flatten)
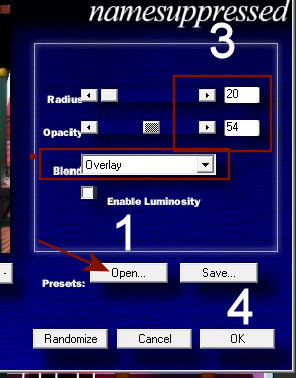
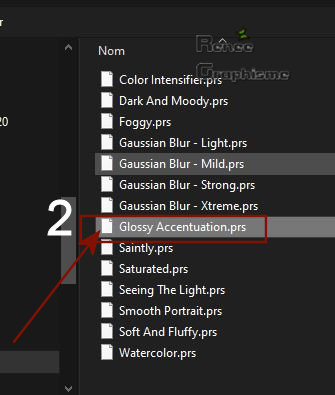
66. Effects – Plugins – Namesuppressed - Softner
1 Click Open
2. Select "Glossy Accentuation.prs "
3. Use these Settings -Radius 20 and Opacity 54-Blend-Overlay
4. Click OK
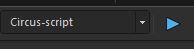
67. View - Toolbars - Script checked in your Psp!!
Activate Toolbar Script, choose my file in the list''Circus'' Click the little blue arrow and let the Script run
Apply your signature/Save as JPG
I hope you enjoyed this lesson
Renée
This lesson was written by Renée 18-11- 2019
Edited and Update
2019
*
Any resemblance with an existing lesson is merely a coincidence
* Do not forget to thank the people who work with us and for us. I have appointed the tubeurs and translators
Thanks
Renée
*
|

 Translations


 If a plugin supplied appears with this icon it must necessarily be imported into Unlimited *