|
Let's start the lesson
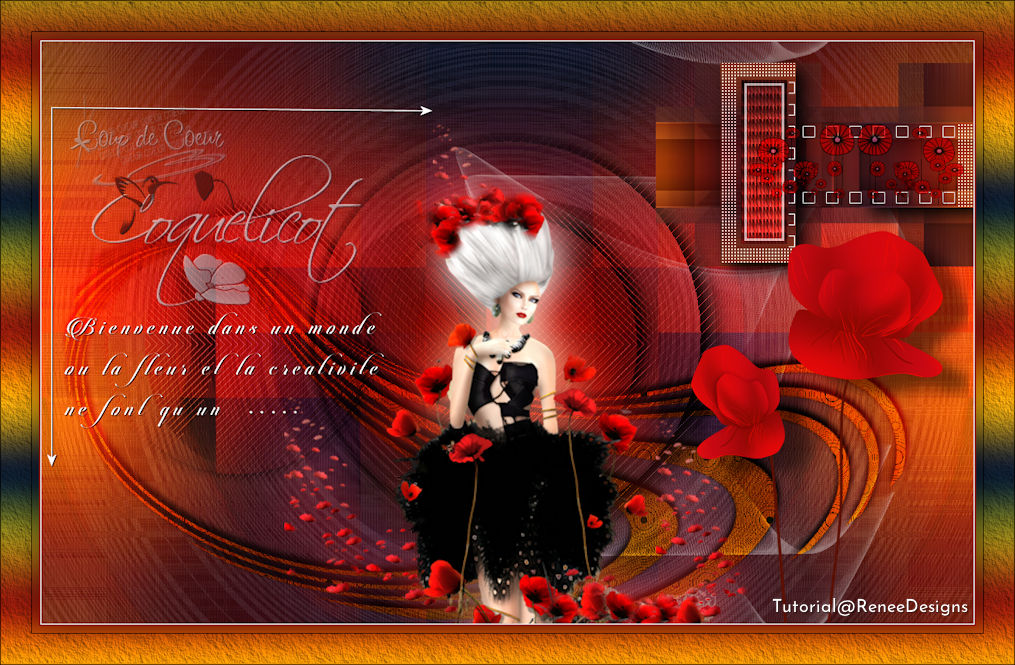
Coquelicots/Poppies
- Preparation
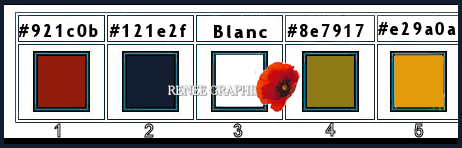
- Material Properties: Set your foreground color to color #921c0b= 1 – Set your background color to color #121e2f = 2
1. Open the Background Image ‘’Fond-Coquelicot’’-
Promote Background Layer =Raster 1
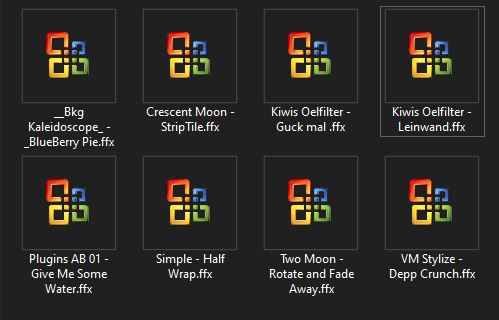
2. Effects –Plugins-
Unlimited 2.0 - Simple – Half Wrap
3. Effects –Plugins-
Unlimited 2.0- VM Stylize – Deep Crunch with these settings: 35/ 161/ 205
/153
4. Effects –Plugins-
Unlimited 2.0 - Kiwis Oelfilter - Guck mal ...using the default settings
5. Effects – Plugins – Vanderlee Unplugged X – Defocus with these settings

6. Effects –Plugins-
Unlimited 2.0 - Two Moon - Rotate and Fade Away...94/146
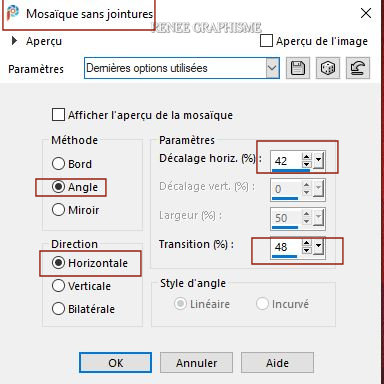
7.
Selections –load/save selection –load selection from disc and select my selection:
‘’coquelicot-1’’
- Selections- Promote Selection to Layer
8. Adjust-Blur-Gaussian Blur : Radius 45
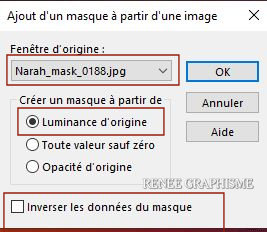
9. Layers- New Mask Layer -From Image and select Mask
‘’Narah_mask_0188’’
- Layers- Merge- Merge Group
10. Effects – 3D-Effects – Drop Shadow with these settings: 10/10 / 100/49 Color Black
11. Layers-Properties-Change the Blend Mode to " Multiply "
Selections- Deselect All
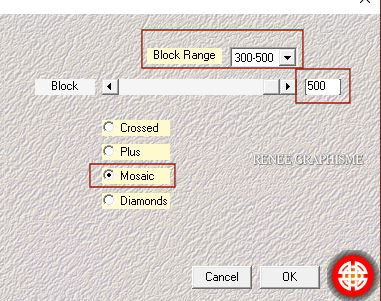
12. Effects-Plugins- AP[Lines] Lines Silverling use the settings below

13. Layers- Duplicate
14. Effects –Plugins-
Unlimited 2.0 - Crescent Moon – Strip Tile with these settings: 45/0/0
15. Image - Free Rotate 90° Left
16. Image
- Resize 67 % -Resize all layers not checked
17. Effects- Image Effects- Seamless Tiling use the settings below
18. Layers-Properties-Set the Blend Mode to " Overlay "
19. layers- New Raster Layer
20. Selections –load/save selection –load selection from disc and select my selection: ‘’coquelicot-2’’
21. Color-Palette-Set the Foreground color to color # e29a0a=5
Flood Fill Tool  –
Fill the selection with the Foreground color =5 –
Fill the selection with the Foreground color =5
Selections- Deselect All
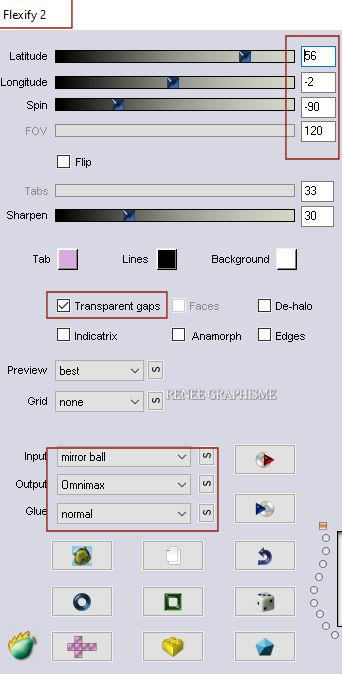
22. Effects – Plugins – Flaming Pear - Flexify 2 use the settings below
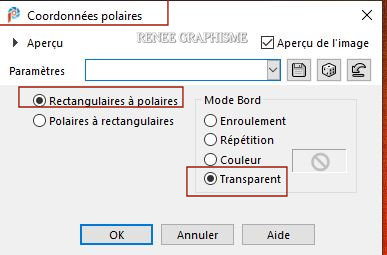
23. Effects- Distortion Effects-Polar Coordinates-Rectangular to Polar-Transparent
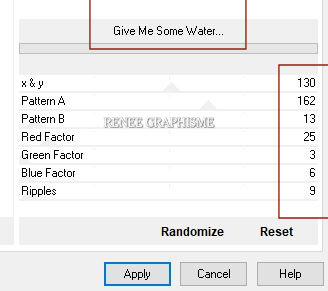
24. Effects –Plugins -
Unlimited 2.0 - Plugins AB 01 - Give Me Some Water..use the settings below
25. Layers-Properties-Set the Blend Mode to " Overlay "
26. Effects – 3D-Effects – Drop Shadow with these settings: -5 / 1 /100 /12 Color Black
27. Layers- New Raster Layer
28. Selections –load/save selection –load selection from disc and select my selection: ‘’coquelicot-3’’
29. Color-Palette-Set the Foreground color to color # ffffff=3
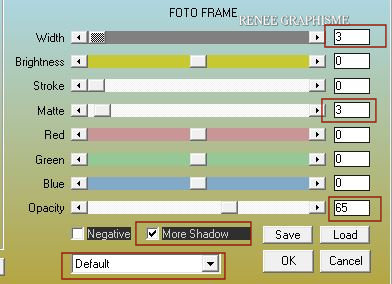
Flood Fill Tool –
Fill the selection with the Foreground color=3
Selections- Deselect All
30. Effects – 3D-Effects – Drop Shadow with these settings: 1 / 1/ 100 /0 Color Black
31. Open the tube ‘’Renee-coquelicots-image 1’’ -Edit - Copy- Activate your work -Edit - Paste as a new layer
32. Pick Tool: (K) on your keyboard -Enter these parameters on the toolbar
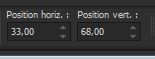 33
/ 68 33
/ 68
-Press ( M ) to close the Pick Tool
33. Activate Pen Tool- Line Style "Arrowhead end" -FG-Color White

- Hold down the Shift key while drawing - Draw two lines around the text (see finished image)
- Convert to Raster Layer
34. Effects – 3D-Effects – Drop Shadow with the same settings
- Activate the bottom of the layer palette= Raster 1
35. Layers- Duplicate
36. Layers- Arrange- Bring to Top
37. Effects – Plugins- Medhi – Sorting Tile use the settings below
38. Effects –Plugins- Unlimited 2.0 - &<Bkg Kaleidoscope> - @BlueBerry
Pie
39. Effects – Plugins - PhotoShopFunII – Kylie
255/0
40. Effects –Plugins (Or Plugins-Unlimited) Toadies
– What are you 20/20
41. Image - Resize 35 % Resize all layers not checked
42. Pick Tool: (K) on your keyboard -Enter these parameters on the toolbar
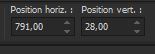 791/28 791/28
- Press ( M ) to close the Pick Tool
43. Selections –load/save selection –load selection from disc and select my selection: ‘’coquelicot-4’’
44. Effects -
Plugins – AFS Import – sqborder2 with these settings
45. Effects – 3D-Effects – Drop Shadow with these settings: 10/10/100/32 Color Black
46. Layers- New Raster Layer
47. Selections –load/save selection –load selection from disc and select my selection: ‘’coquelicot-5’’ (she will cancel the previous one)
48. Flood Fill Tool
–
Fill the selection with the Foreground color =3
Selections- Deselect All
- Activate the bottom of the layer palette= Raster 1
49. Selections –load/save selection –load selection from disc and select my selection: ‘’coquelicot-6’’
50. Selections- Promote Selection to Layer
51. Layers- Arrange- Bring to Top
52. Effects –plugins-Unlimited 2.0 - Kiwis Oelfilter – Leinwand 243 /0 /0
53. Effects- Plugins- AAA Frame – Foto Frame use the settings below
54. Layers- New Raster Layer
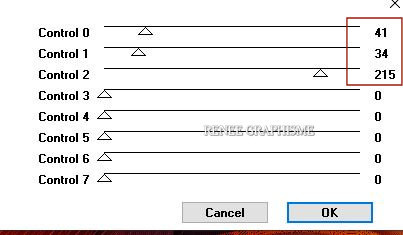
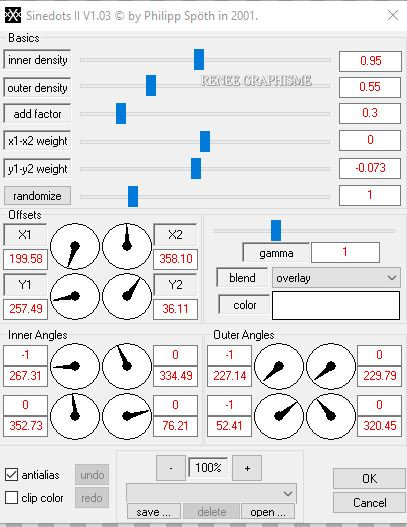
55. Effects – Plugins – DragonFly Sinedots II use the settings below
Do you have problems with this- Image is into the zip file and paste as a new layer on your working area and and go on to the next sentence 55a
55a. Pick Tool: (K) on your keyboard -Enter these parameters on the toolbar
 358
/ 171 358
/ 171
56. Layers-Properties-Set the Blend Mode to " Screen " – Reduce the Opacity of this layer to 36%
57. Layers- Arrange- Move Down-Above Raster 5 as shown in the example below
- Your work and Layer Palette look like this now-You should have this result
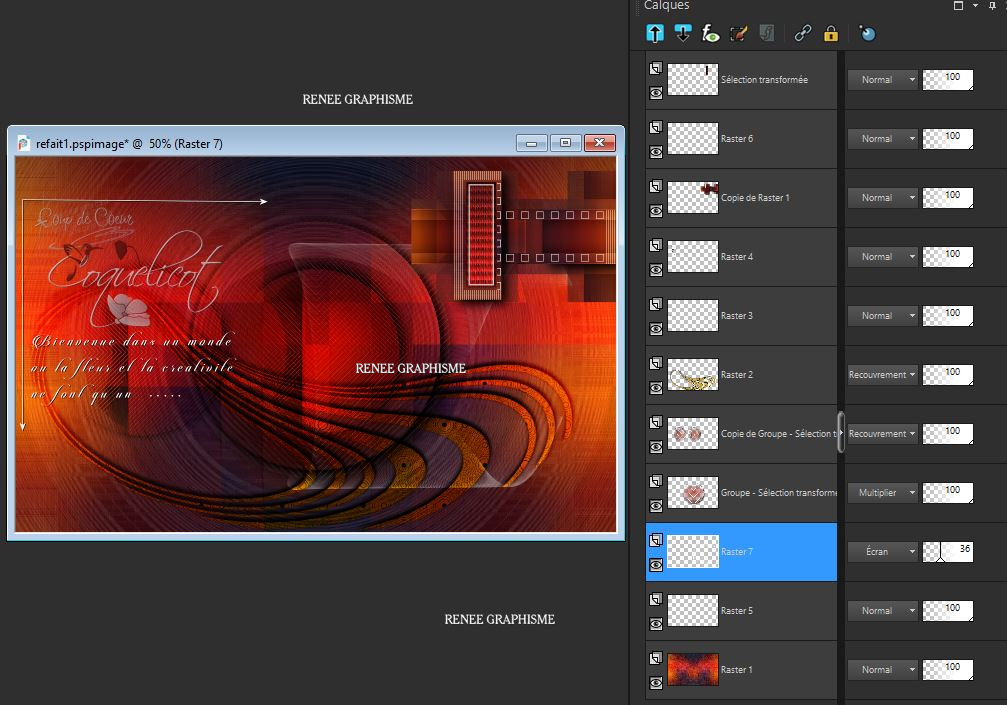
58. Layers- Duplicate (Raster 7)
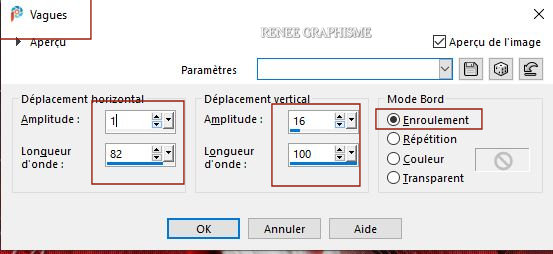
59. Effects – Distortion Effects – Wave use the settings below
- Activate the top of the layer palette
60. Open the tube
‘’Renee-coquelicots-image 2’’ -Edit - Copy- Activate your work -Edit - Paste as a new layer
- With the move tool, move it in the upper right corner ( see finished image)
61. Layers-Properties-Set the Blend Mode to " Hard Light "
62. Open the tube
‘’Renee-coquelicots-image 3’’ -Edit - Copy- Activate your work -Edit - Paste as a new layer
-Move Tool-move to the right side ( see finished image)
63. Open the tube ‘’
Renee-TUBES-femme-aux-coquelicot-3’’ -Edit - Copy- Activate your work -Edit - Paste as a new layerI have several tube layers to use taste .(You can use your own tube)
64. Layers- Duplicate
65. Layers- Arrange- Move Down
66.Adjust- Blur- Gaussian Blur;Radius 25
67. Layers-Properties-Set the Blend Mode to "Screen "
68. Image - Add borders-Symmetric checked: 1 Pixel Color White
69. Image - Add borders-Symmetric checked: 2 Pixels Color #921c0b =1
70. Selections- Select All
71. Image - Add borders-Symmetric checked: 50 Pixels Color White
72. Selections -
Invert
73. Selections-
Promote Selection to Layer
74. Effects –Plugins - Medhi - Wavy lab 1 use the settings below

75. Selections -
Invert
76. Effects – 3D-Effects – Drop Shadow with these settings: 0/0/42/65 Color Black
Selections- Deselect All
77. Effects-Plugins - AAA Frame – Texture Frame using the default settings
78. Layers- Merge- Merge All
79.
Image - Resize -1015 Pixels Width
Save as JPG
I hope you enjoyed this lesson
Renée
This lesson was written by Renée 15/01/2021
Edited and Update
in 2021
*
Any resemblance with an existing lesson is a coincidence
* Do not forget to thank the people who work with us and for us
I have appointed the tubeurs and translators
Thanks
*
|

 Translations