|
Let's start the lesson.
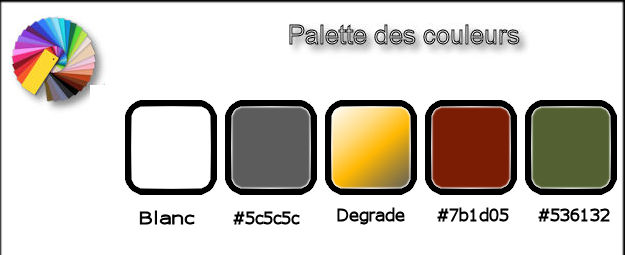
Used Colors
Preparation:
Material palette:Set your foreground color to #ffffff - Set your background color to
#5c5c5c
1.
File - New - Open a new transparent image of 1005 x 665 pixels
2.
Selections- Select All
-
Open the image ‘’ textured-blue-brown’’
-
Edit - Copy- Activate your work -Edit - Paste into selection
Selections- Deselect All
3.
Adjust- Blur- Radial Blur use settings below

4.
Layers- Duplicate
5. Effects –
Plugins – Alphaworks- Horizontal Fade Out /
150
6.
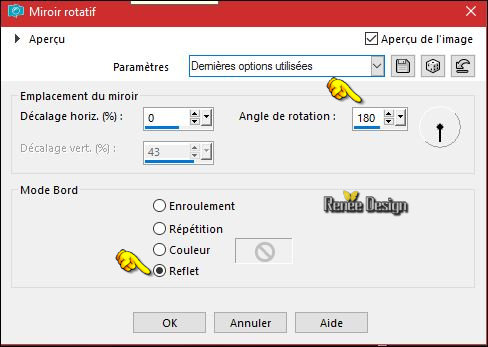
Effects- Reflection Effects – Rotating Mirror
7.
Layers-Properties-Set the Blend Mode to " Hard Light "
8. Layers- Merge- Merge Down
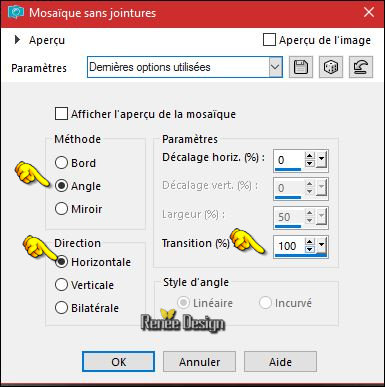
9. Effects- Image Effects- Seamless Tiling with these settings
10. Effects- Edge Effects- Enhance
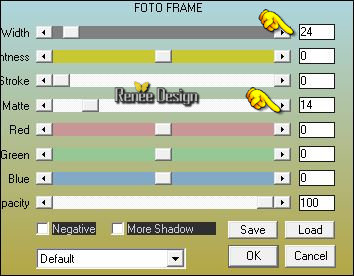
11. Effects
-Plugins – AAA Frame –Foto frame use settings below
12. Layers- Duplicate
13. Image Resize to 75 % Resize all Layers not checked
14. Effects
– plugins – Simple 4 way average
15. Layers- Duplicate
- Close the top layer in the layer palette (Copy (2) of Raster 1
-Activate the layer underneath (Copy of raster 1 )
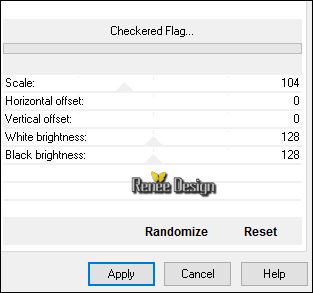
16.
Effects –Plugins -Unlimited –Shapes- Checkered
Flag..use settings below .
17.
Effects - Plugins - Flaming Pear – Flexify2 /Preset
Death_Valley_Flexify 2 settings
click on the red arrow
 select my file preset Death_Valley_Flexify 2 settings can be used in any folder of your choice by clicking it. select my file preset Death_Valley_Flexify 2 settings can be used in any folder of your choice by clicking it.
3 Open it will be ok in your filter 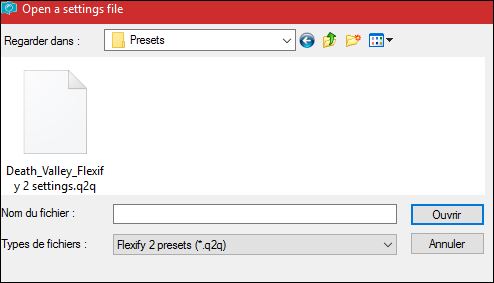
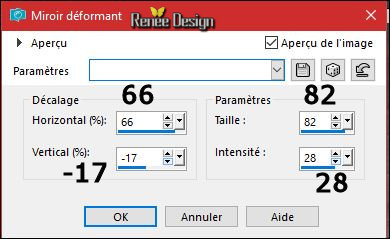
18. Activate Pick Tool (K) –Choose my Preset ‘’Death_Valley_Deformation’’
( included in the zip, put in your preset folder of psp)
- Click on the preset and effect will apply (Or manual settings as shown in the example below)

- To replace the top of the layers palette (Copy (2) of raster 1)
- Open this layer and keep this layer active
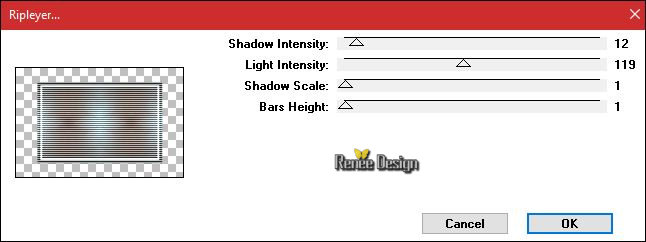
19.
Effects –Plugins - Rorshack-
Ripleyer
20. Image Resize to 75% Resize all Layers not checked
21. Effects
– Image Effects - Offset with these settings H = 0 and V = 125
22.
Effects –Plugins - Unlimited - VM Stylize- Zoom Blur 11/26
23.
Layers-Properties-Set the Blend Mode to " Hard Light "
24. Effects
– Edge Effects – Enhance
- Activate the layer underneath = ( Copy of Raster
1)
25. Attention !!!!!Selections –load/save selection –load selection from disc and select my selection: ‘’Death_valley_1’’
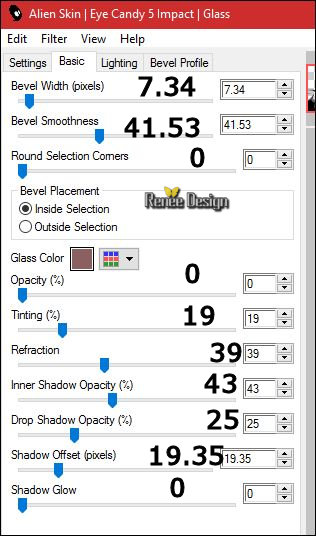
26.
Effects –Plugins –EyeCandy Impact –
Glass-tab Settings/User settings choose my /Preset’’ Death valley_glass’’
Selections- Deselect All
27.Selections –load/save selection –load selection from disc and select my selection: ‘’Death_valley_0’’
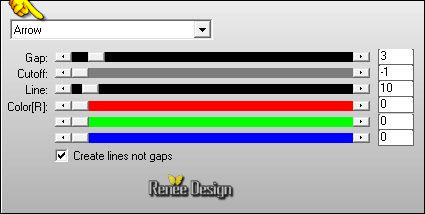
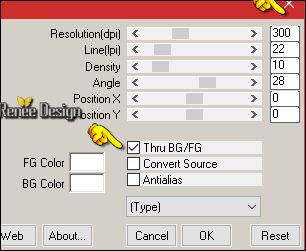
28. Effects
–Plugins - AP [Lines]Silverling use settings below
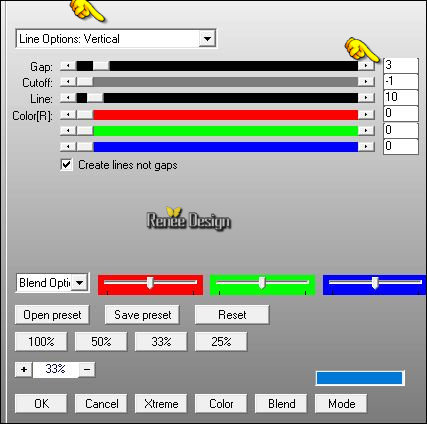
29. Effects
– Plugins - AP [Lines]Silverling use settings below
Selections- Deselect All
- To replace the top of the layers palette
30. Activate the tube ‘’ Renee_tube_oiseaux_Steampunk.pspimage’’ activate the layer "raster 4"of the tube
-Edit - Copy- Activate your work -Edit - Paste as a new layer
- (do not move it is in the right place)
31. Activate the tube ‘’ Renee_tube_Death_valley_texte.png’’
-Edit - Copy- Activate your work -Edit - Paste as a new layer
32. Effects-Image Effects- Offset with these settings H = 337 and V = 112
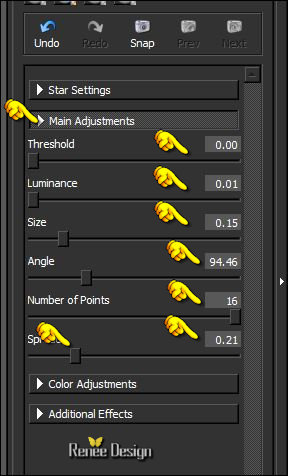
33. Effects
–Plugins - Topaz – Stars Effect
Explanation this filter
Extract the zip in a folder
Open the text file Serials, in your taskbar.
-Setup
-Open your Psp
Activate your filter Topaz stars effects
Click on "Menu" (bottom left )
In the window, choose "Enter Key "
First Empty both fields
Fill out your name and numbers manually
Do not copy!!!!
And OK
-
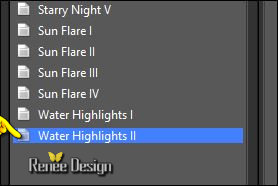
Click on Presets - choose >> Water Highligts
II
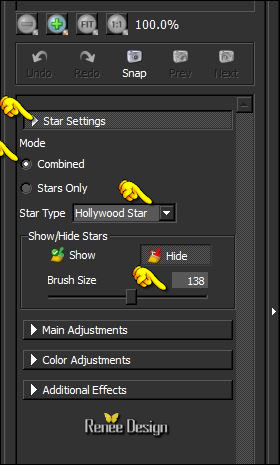
-Click on "Star Settings" with these settings
-Click on -"Main Adjustements" and make the settings and Apply and OK
34. Activate the tube ‘’ Renee_tube_Death_valley_dune’’
-Edit - Copy- Activate your work -Edit - Paste as a new layer
- With the move tool, move it on the bottom left
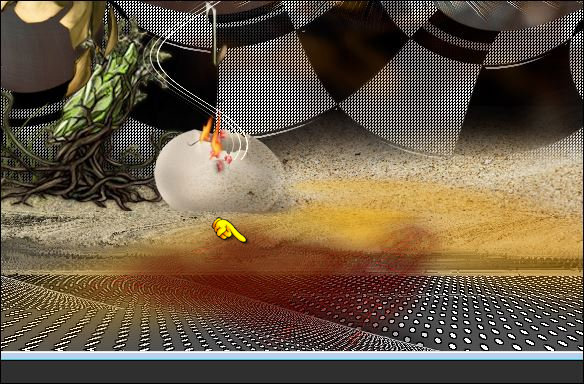
35. Activate the tube ‘’ ’ Renee_tube_Death_valley_oeuf’’
-Edit - Copy- Activate your work -Edit - Paste as a new layer
- With your move tool , place it in the right place as shown in the example below
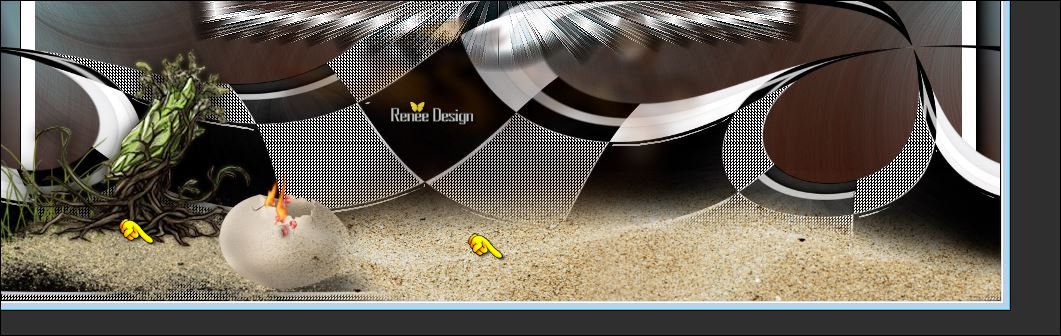
36. Activate the tube ‘’ Renee_tube_Death_valley_cercle_feu’’
- Edit - Copy- Activate your work -Edit - Paste as a new layer
37. Effects-Image Effects- Offset with these settings H = - 315 and V = 42
38. Layers- New Raster Layer
39.Selections –load/save selection –load selection from disc and select my selection: ‘’Death_valley_2’’
40. Activate Flood Fill Tool and fill the selection with the foreground color #ffffff
Selections- Deselect All
41. Layers- Duplicate
42. Layers- Merge- Merge- Down
43. Layers- Merge- Merge- Visible
- Color-Palette from the beginning -Foreground color #ffffff and Background color
#5c5c5c
44. Image- Canvas Size with these settings

45. Activate the Magic Wand with these settings

and select the transparent part
46. Layers- New Raster Layer
47. Activate Flood Fill Tool and fill the selection with the background color
48. Effects
–Plugins – Mura’s Meister – Tone with these settings ( 2 colors white )
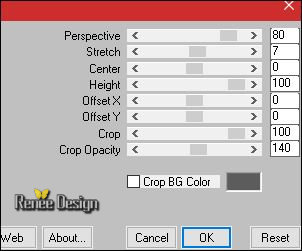
49. Effects
–Plugins – Mura’s Meister – Perspective Tilling with these settings
Selections- Deselect All
50. Effects- Edge Effects- Enhance More
51. Layers- Duplicate
52. Effects
– Distortion Effects –Warp with these settings
53. Effects- 3 D Effects- Drop Shadow with these settings 2/4/65/36 black
- Repeat: Drop Shadow with the same settings
54. Layers- Duplicate
55. Effects-Image Effects- Offset with these settings: H = -315 and V = 42
56. Layers- Merge- Merge Visible
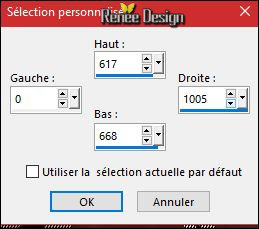
57.
Activate Selection Tool -Custom Selection (S) -Rectangle with these settings
58.
Selections- Promote selection to Layer
59.
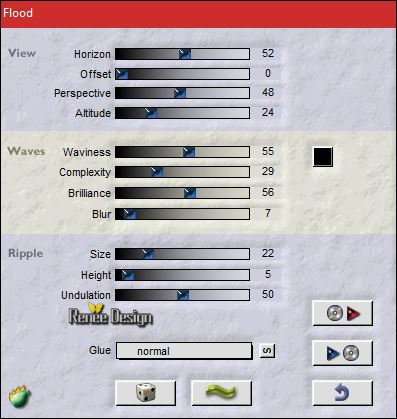
Effects – Plugins – Flaming pear flood/ select my Preset ‘’
Death_valley_Flood settings’’/ color black
Selections- Deselect All
60. Layers- Duplicate
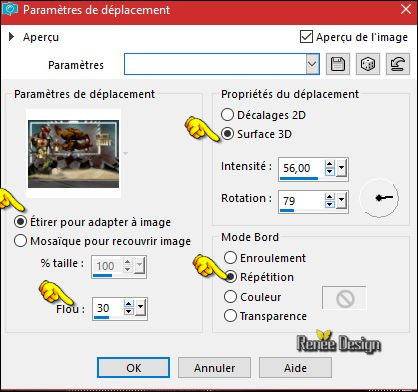
61. Effects
– Distortion Effects – Displacement Maps with these settings
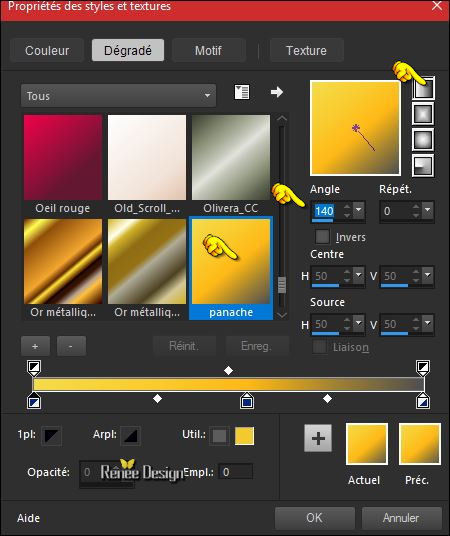
- Properties foreground: Change foreground material into gradient and select ‘’
panache’’
-
Prepare a linear gradient configured like this.
62. Layers- New Raster Layer
63.
Selections –load/save selection –load selection from disc and select my selection:‘’Death_valley_3’’
64. Activate Flood Fill Tool and fill the selection with the gradient
Selections- Deselect All
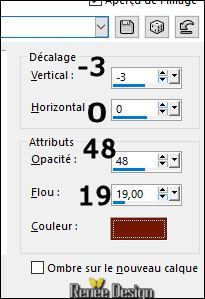
65. Effects- 3 D Effects- Drop Shadow with these settings / Color #7b1d05
66. Activate the tube ‘’
Renee_tube_Death_valley_tache_rouge.png’’
-Edit - Copy- Activate your work -Edit - Paste as a new layer
- With your move tool , place it in the right place as shown in the example below
67. Layers- Duplicate
68. Effects-Image Effects- Offset with these settings H = 200 and V = 0
Material palette:Set your foreground color to #5c0700 -Set your background color to #536132
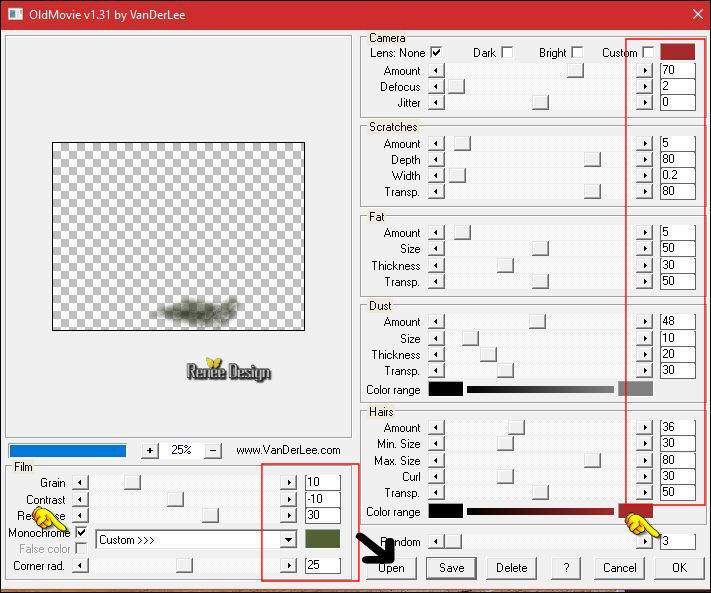
69.
Effects –Plugins – Vanderlee – Old Movie/Preset ‘’
Death valley_OldM’’
-Click
Open >>select my file preset ‘’
Death valley_OldM’’ can be used in any folder of your choice by clicking it. Open it will be ok in your filter
70.
Set the Opacity of this layer to 79%
71. Activate the tube ‘’ Death_valley_Goat-skull’’
-Edit - Copy- Activate your work -Edit - Paste as a new layer
- Activate your Move Tool (M) place it in the right place
72.
Layers-Properties-Set the Blend Mode to " Multiply "
73. Effects
–User Defined Filter - Emboss 3 using the default settings
74. Activate the tube ‘’ Renee_tube_Death_valley_soleil.png’’
-Edit - Copy- Activate your work -Edit - Paste as a new layer
- With the move tool, move it in the upper right corner
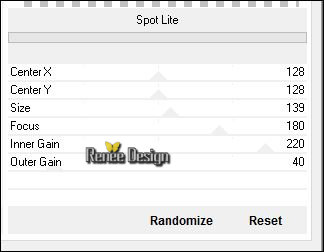
75.
Effects –Plugins- Unlimited – Graphic plus - Spot
Lite
76.
Layers-Properties-Set the Blend Mode to " Screen "
77. Layers- Duplicate
78. Effects
–Plugins -Unlimited - &<BKg Designer sf10 II>- Polar
Convergance 02 with these settings 188/82
- Layers- Arrange- Move Down
79.
Layers-Properties-Set the Blend Mode to " Hard Light "
-To replace the top of the layers palette
80. Activate the tube ‘’ Renee_tube-23.pspimage’’
- Image Resize to 40%
- Edit - Copy- Activate your work -Edit - Paste as a new layer -and move to the bottom right
81. Activate the tube’’’
Renee_tube_Death_valley_triangle_lumiere.png’’
-Edit - Copy- Activate your work -Edit - Paste as a new layer (leave opacity
at 61)
82. Effects-Image Effects- Offset with these settings H = 336 and V = -50
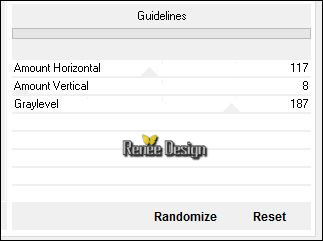
83.
Effects – Unlimited- &<BKg Designer sf10 II>-
Guidelines
84. Layers- Duplicate
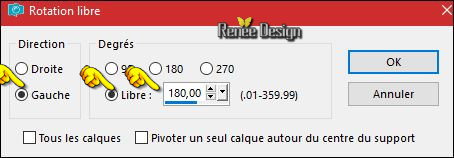
85. Images
-Free Rotate 180 left
86. Image - Add borders-Symmetric checked: 1 pixel #000000
87. Image - Add borders-Symmetric checked: 2 pixels #ffffff
88. Image - Add borders-Symmetric checked: 1 pixel #000000
89. Image - Add borders-Symmetric checked: 30 pixels #ffffff
90. Image - Add borders-Symmetric checked: 1 pixel #000000
91. Image - Add borders-Symmetric checked: 2 pixels #ffffff
92. Image - Add borders-Symmetric checked: 1 pixel #000000
93. Image Resize to 999 Pixels width.
Save as JPG
***
I hope you enjoyed this lesson
Renée
This lesson was written by Renée 21/02/2017
Edited and Update
2017
*
Any resemblance with an existing lesson is a coincidence
* Do not forget to thank the people who work with us and for us I have appointed the tubeurs and translators
Thanks Renée *
*
| 
 Translations


 If a plugin supplied appears with this icon it must necessarily be imported into Unlimited *

 All rights reserved