|
Let's start the lesson
Fantôme dans ma tête
/Ghost in my head
- Preparation
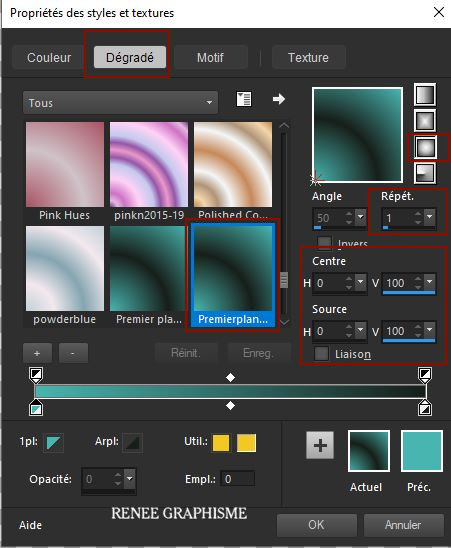
- Material Properties: Set your foreground color to color #49b5b0= 1 – Set your background color to color #181f1a =2

-Prepare a foreground/background sunburst gradient configured like this
1. File: Open a new transparent image in this size: 1100 x 800 Pixels
2. Activate Flood Fill Tool
 -
Fill the layer with the gradient -
Fill the layer with the gradient
3. Effects –Plugins-
Unlimited 2.0 – Graphic Plus – Cross Shadow using the default settings
4. Layers- Duplicate
5.
Image – Resize – Resize with 75 % - Resize all layers not checked
6. Effects –Plugins-
Unlimited 2.0 - Andrew's Filters 1 – Boxed with these settings:
236/232/212/194
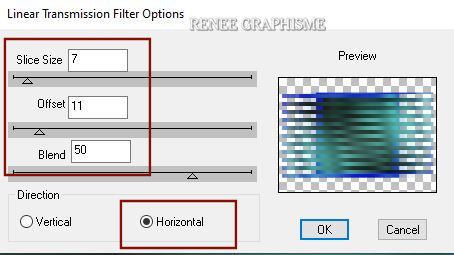
7. Effects –Plugins – DSB Flux- Linéaire Transmission use the settings below
8. Effects – Edge Effects – Enhance
9. Layers- Duplicate
10. Adjust- Blur- Radial Blur with these settings

11. Layers- New Raster Layer
12. Foreground properties -Turn off the gradient
Activate Flood Fill Tool – Fill the layer with the foreground color =1
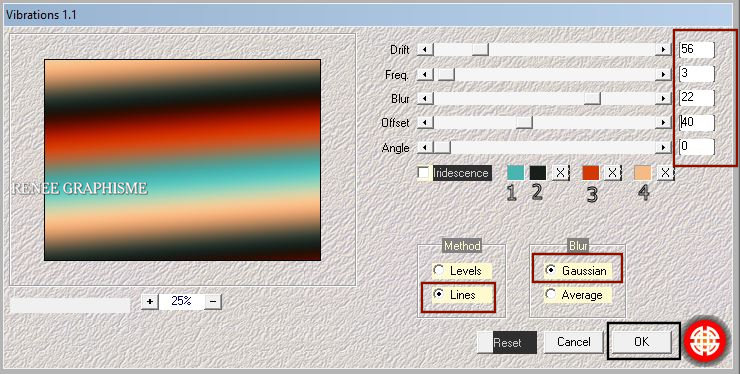
13.Effects- Plugins – Medhi – Vibrations 1.1 use the settings below
14. Effects-Plugins-
Unlimited 2.0 – Mock – Windo à 128/193/25/25/25/25
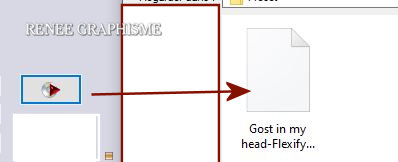
15. Effects – Plugins- Flaming Pear – Flexify 2 – Preset : Gost in my
head-Flexify 2 settings"
click on Red Arrow and select my file-Preset : Gost in my
head-Flexify 2 settings
Note: If the Preset doesn't work for you, use the settings below

16. Layers-Properties-Change the Blend Mode to " Overlay " and Lower the Opacity to 95%
17. Open the tube ‘’Gost in my
head-Image 1’’ -Edit - Copy- Activate your work -Edit - Paste as a new layer
(Leave the blend mode on "Hard Light)"
18. Effects –Plugins-
Unlimited 2.0 - Distortion Filters - Ink Blots: 20
19.Layers- Arrange-Move Down
20. Layers-Properties-Change the Blend Mode to " Hard Light " and Lower the Opacity to 57%
- Activate the top layer in the layer palette
21. Layers-New Raster Layer
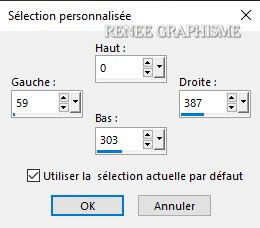
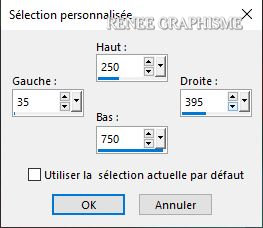
22.Activate Selection Tool -Custom Selection (S) -Rectangle with these settings 
23. Activate Flood Fill Tool
-
Fill the selection with the foreground color =1
Selections- Deselect All
24. Effects –Plugins-
Unlimited 2.0 - Filter Factory Gallery A- Zoom In using the default settings
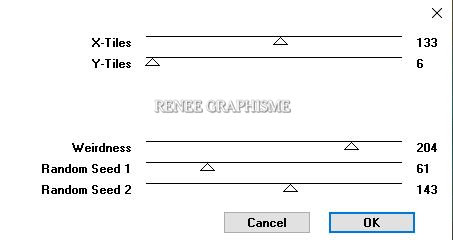
25. Effects –
Unlimited 2.0- VM Distorsion - Tilomat 2000 use the settings below
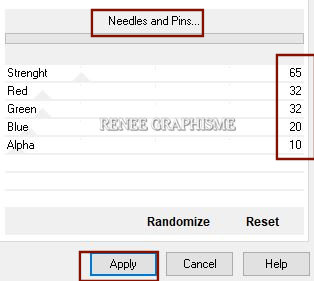
26. Effects -Plugins-
Unlimited 2.0 - VM Experimental - Needles and Pins..use the settings below.
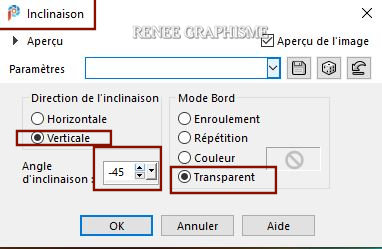
27. Effects – Geometric Effects- Skew use the settings below
28. Effects – Distortion Effects– Wave use the settings below
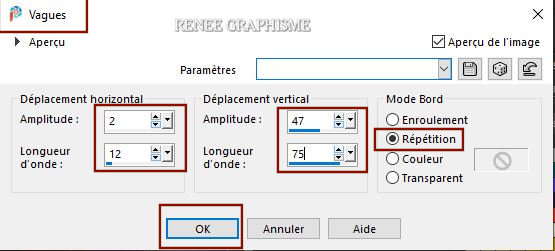
29. Open the tube ‘’ Gost in my
head-Image 2’’ -Edit - Copy- Activate your work -Edit - Paste as a new layer
30.
Pick Tool: (K) on your keyboard -Enter these parameters on the toolbar
 108/
14 108/
14
-Press ( M ) to close the Pick Tool
31. Effects – Texture Effects – Soft plastic with these settings

32. Open the tube ‘’ Gost in my
head-Image 3’’ -Edit - Copy- Activate your work -Edit - Paste as a new layer
- Place to your liking
33. Layers- New Raster Layer
34.Activate Selection Tool -Custom Selection (S) -Rectangle with these settings
35.Material Properties:
Set your foreground color to color #ffffff=5
Flood Fill Tool –
Opacity 20%- Fill the selection with the foreground color #ffffff=5
Selections- Deselect All
36. Effects –Plugins-
Unlimited 2.0- Déformation- Fluttering Flag..using the default settings
37. Selections –load/save selection –load selection from disc and select my selection: ’’Gost in my head-1’’
38. Effects-
3D Effects– Drop Shadow with these settings: 0/0/72/45 Color Black
39. Effects –Plugins-
Unlimited 2.0 - It@lian Editors Effect- Rete -
www.italianeditors.com 35/78
Selections- Deselect All
- Move a little to the left ( see finished image )
40. Open the tube ‘’ Renee-TUBES-Mai2021-8.pspimage’’ ( or another one at your choice)
(First resize the image !!! )-Image
Resize with 60%
-Edit - Copy- Activate your work -Edit - Paste as a new layer
41.
Pick Tool: (K) on your keyboard -Enter these parameters on the toolbar
 35/213
-Press ( M ) to close the Pick Tool
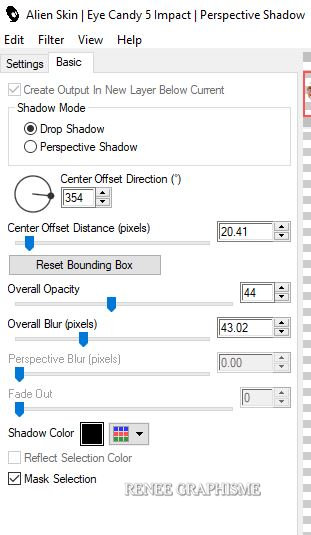
42. Effects- Plugins – Alien Skin EyeCandy 5 Impact- Perspective
Shadow use the settings below
43. Layers-New Raster Layer
44. Selections –load/save selection –load selection from disc and select my selection: ’’Gost in my head-2’’
45. Activate Flood Fill Tool
–
Opacity 100% – Fill the selection with the foreground color #ffffff=5 ( 2 clicks)
Selections- Deselect All
46. Effects-
3D-Effects – Drop shadow with these settings: 1/1/100/1 Color Black
47. Layers-New Raster Layer
48. Selections –load/save selection –load selection from disc and select my selection: ’’Gost in my head-3’’
49. Activate Flood Fill Tool
–
Fill the selection with the foreground color #ffffff=5
Selections- Deselect All
50. Adjust-Blur- Gaussian Blur : Radius 5
51. Effects –Plugins-
Unlimited 2.0 - Kohan's Filters - Autointerlace v1.0 with these settings:
2/168
52. Layers-New Raster Layer
53. Selections –load/save selection –load selection from disc and select my selection: ’’Gost in my head-4’’
54. Activate Flood Fill Tool
–
Fill the selection with the foreground color #ffffff=5
Selections- Deselect All
55.Effects- 3D-Effects – Drop shadow with the same settings
56. Open the tube ’’ Gost in my
head-Image 4’’ -Edit - Copy- Activate your work -Edit - Paste as a new layer
57. Pick Tool: (K) on your keyboard -Enter these parameters on the toolbar  197/
395 197/
395
58. Open the tube ’’ Gost in my
head-Image 5’’ -Edit - Copy- Activate your work -Edit - Paste as a new layer
59. Pick Tool: (K) on your keyboard -Enter these parameters on the toolbar  483/586 483/586
60. Layers-New Raster Layer
61. Selections –load/save selection –load selection from disc and select my selection: ’’Gost in my head-5’’
62. Activate Flood Fill Tool
–
Fill the selection with the foreground color #ffffff=5
Selections- Deselect All
63. Image - Add borders-Symmetric checked: 5 Pixels Color White
-Image - Add borders-Symmetric checked: 1 Pixels # 181f1a = 2
-Image - Add borders-Symmetric checked: 5 Pixels Color White
-Image - Add borders-Symmetric checked: 1 Pixel # 181f1a = 2
-Image - Add borders-Symmetric checked: 40 Pixels Color White
-Image - Add borders-Symmetric checked: 1 Pixels # 181f1a = 2
-Image - Add borders-Symmetric checked: 10 Pixels Color White
Paste the author's watermark on your work and your own watermark
Layers- Merge- Merge All (flatten)
Layers- Resize 1005 Pixels width
Save as JPG
I hope you enjoyed this lesson
Renée
This lesson was written by Renée 18/04-2021
Edited and Update
2021
*
Any resemblance with an existing lesson is a coincidence
*
Do not forget to thank the people who work with us and for us I have appointed the tubeurs and translators
Thanks
*
|


 Translations


