Let's start the lesson
1. Open the image Fond ''fond_fraicheur_ete". Promote Background Layer= raster 1
- Layers- Duplicate
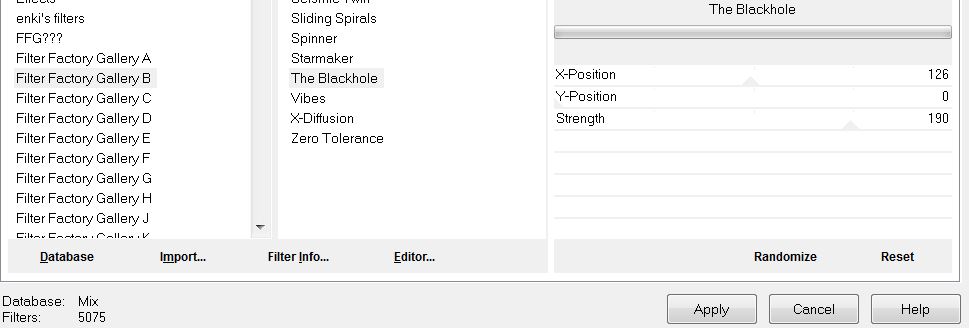
2. Effects-Plugins Unlimited 2.0 - Filter Gallery Factory-
gallery B - The Blackhole
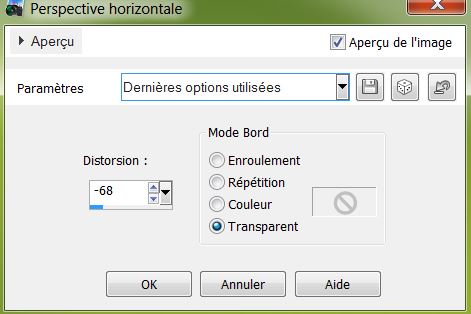
3. Effects -Geometric Effects-Perspective-Horizontal use settings below
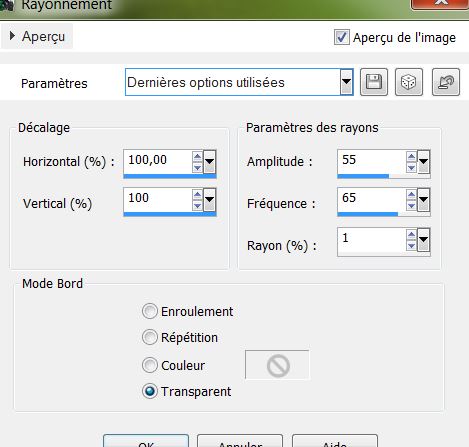
4. Effects - Distortion Effects - Spiky Halo use settings below
5. Adjust-Sharpness-Sharpen
6. Material Properties: Foreground color to color: #276604. Background color to color: #240f03
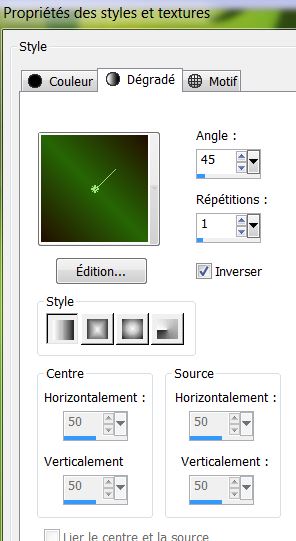
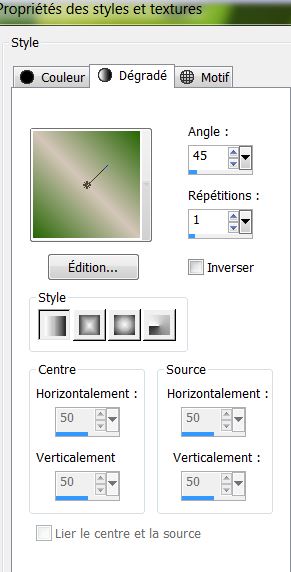
7. Prepare a linear gradient configured like this.
8.Layers - New raster layer / Selections - load/save selection - load selection from disk and choose '' fraicheur_ete''. Activate flood fill tool and fill the selection with the gradient /Selections - Deselect all
9. Effects-Plugins - Eyecandy 5 -Perspective shado -in the settings tab, click on the Preset ''fraicheur_ete_perps''
10. Layers- Duplicate
11. Adjust-Blur-Gaussian Blur: Radius 5
12.Layers - New raster layer
13. Selections - load/save selection - load selection from disk and choose
''fraicheur_ete_2''
14. Material Properties: Background color to color: #d4c6b9 . Prepare a linear gradient configured like this.
15. Activate flood fill tool and fill the selection with the gradient
16. Selections-Deselect All
17. Effects- Plugins EyeCandy 5 Impact - Gradient Glow in the settings tab, click on the Preset
''fraicheur_ete_gradientglow''
18. Open the tube ''
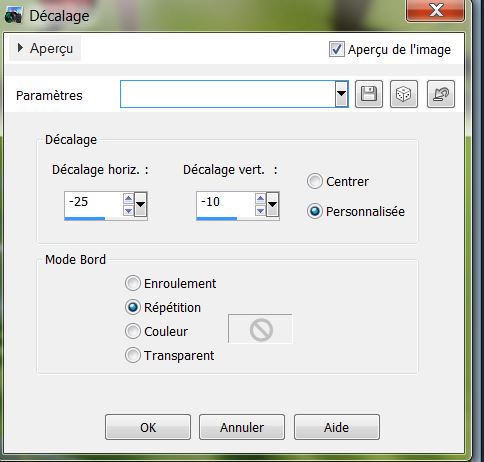
coccinelle'"Edit - Copy-Edit - Paste as new layer on your working area and move
19. Layers - New raster layer .Activate flood fill tool and fill the layer with color #276604
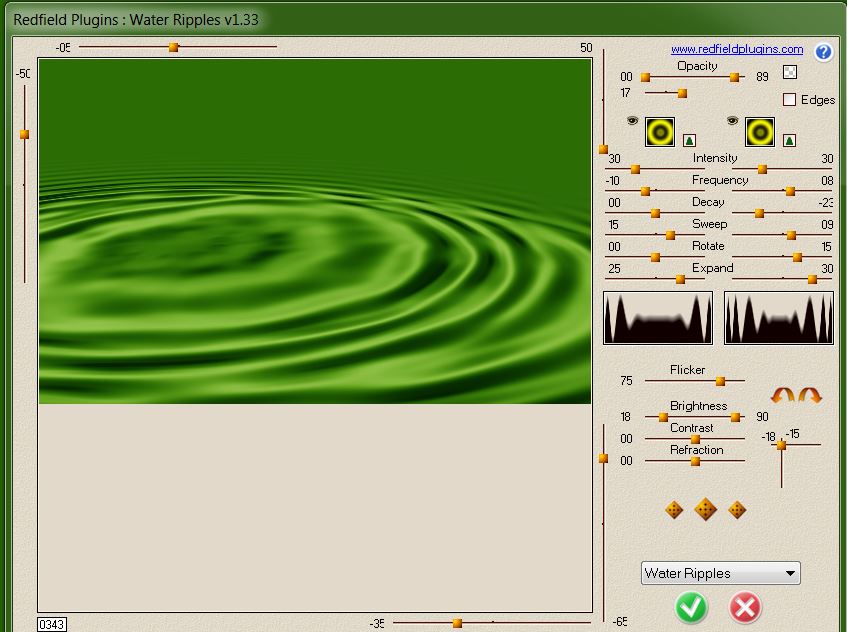
20. Effects-Plugins Redfield- Water Ripplesv1.33 use settings below
Another version of Redfield

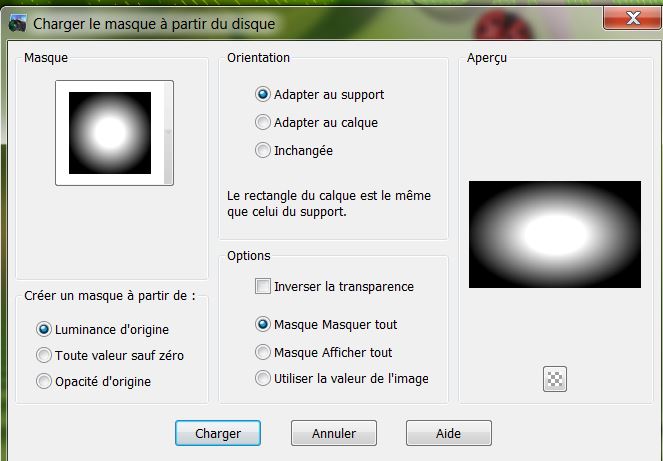
21. Layers-Maske- Load/Save Mask -Load Mask From Disk and choose''20.20''
22. Layers-Merge -Merge Group
23. Effects- Image Effects-Offset use settings below
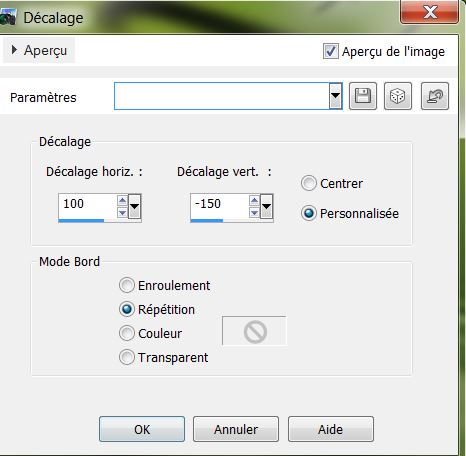
24. Open the tube ''nenuphar''
Edit - Copy-Edit - Paste as new layer on your working area and move
25.Layers - New raster layer
26. Selections - load/save selection - load selection from disk and choose ''
fraicheur_ete_3' Activate flood fill tool and fill the selection with color: #c0c0c0
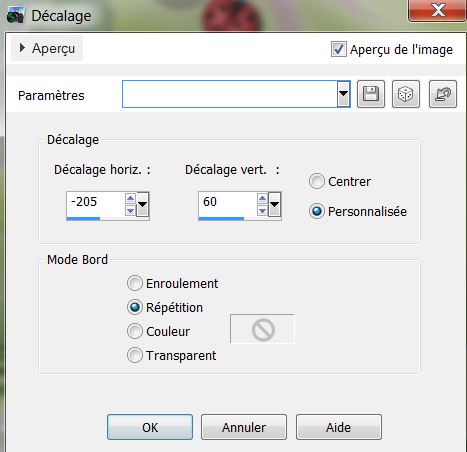
27. Selections-Deselect All
28. Effects-Plugins EyeCandy 5 Impact - Glass-in the settings tab, click on the Preset - Aqua
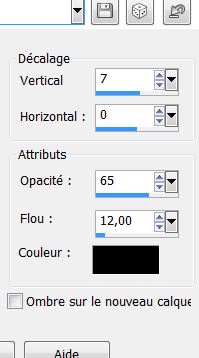
with reflexion
29. Open the tube ''feuille_double
''Edit - Copy-Edit - Paste as new layer on your working area
30. Effects- Image Effects-Offset use settings below
31.Layers - New raster layer. Activate flood fill tool and fill the layer with color #f4fbf3
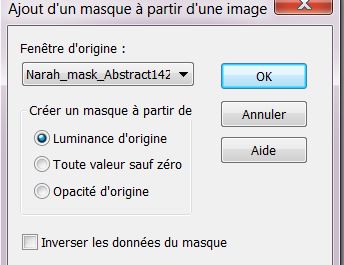
32. Layers- New Mask layer from Image and choose:Narah_mask_Abstract142.jpg''
Layers-Merge-Merge -Group
33. Effects- Edge Effects-Enhance
34. Open the tube ''bille_verte"Edit - Copy-Edit - Paste as new layer on your working area
35. Effects- Image Effects-Offset use settings below
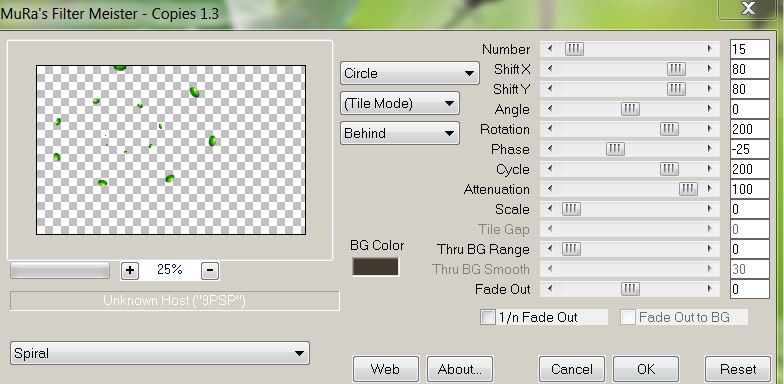
36. Effects-Plugins Mura's Meister Copies use settings below
37. Effects- 3D Effects- Drop Shadow/black
38. Open the tube "angeldesign_animaux23'' coller
Edit - Copy-Edit - Paste as new layer on your working area move on the right side
39. Open the tube ''insect '' Edit - Copy-Edit - Paste as new layer on your working area and move
40. Open the tube ''chenille_c54_L'' activate
raster 1 of the tube /Edit - Copy-Edit - Paste as new layer on your working area /Image - Flip-and move
41.Layers - New raster layer
42. Selections - load/save selection - load selection from disk and choose
''fraicheur_ete_4'' Activate flood fill tool and fill the selection with color: #f4fbf3
43 .Selections-Deselect All
44. Effects-Edge Effects-Enhance
45. Open the tube ''0_aa59e_9e0cf386_L'' Edit - Copy-Edit - Paste as new layer on your working area and move
46. Open the tube''gouttes_eau''
Edit - Copy-Edit - Paste as new layer on your working area and move
47. Open the tube''barbe_kermis_tube''
/Edit - Copy-Edit - Paste as new layer on your working area and move
48. Everything is in place?
49. Layers - Merge - Merge Visible
50. Image - Add Borders - Symmetric checked 5 pixels color
#54643b
51. Image - Add Borders - Symmetric checked 50 pixels color
#8ebd38
52. Image - Add Borders - Symmetric checked 5 pixels color
#54643b
53. Selections-Deselect All
54. Selections- Modify-Contract 55 pixels./
Selections- Invert
55. Effects-Plugins Unlimited
&<Bkj designer sf10 IV / Instant Tile/ default
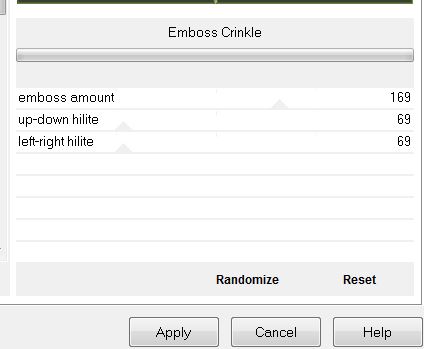
56. Effects-Plugins - Unlimited 2.0 / &<Bkjdesigner sf 10II>
emboss Crinkle
57. Open the tube Text /
Edit - Copy-Edit - Paste as new layer on your working area and move.Layers- Duplicate and move .Blendmode to your taste
C'est Terminé
Merci
Renée
le 28/07/2013


 Translations


