|
Let's start the lesson. Open the Color-Palette
- Material Properties: Foreground color to this color: #393f35 Background color to this color :#8b2b1b
1. File - New - New Transparent Image: 1015 x 615 pixels
2.
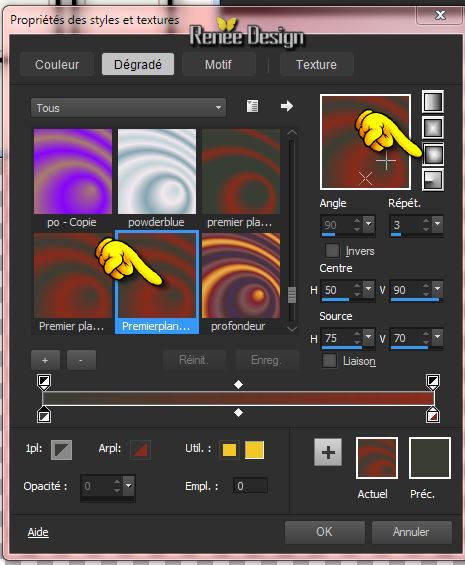
Prepare a Sunburst Gradient as configured
3. Activate Flood Fill Tool and fill the layer with the gradient
4. Effects- Plugins - Unlimited 2.0 -
&<Bkg Kaleidoscope> 4 QFlip Upper R
5.
Layers- Duplicate
6. Effects- Plugins - Unlimited 2.0-
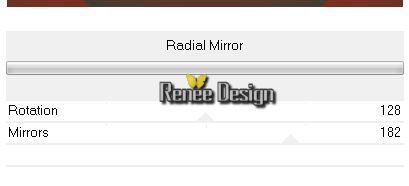
&<Bkg Kaleidoscope- Radial Mirror
7.
Layer Palette -Double click on this layer and set the Blendmode to Hard Light
8.
Layers- Merge- Merge- Down
9.
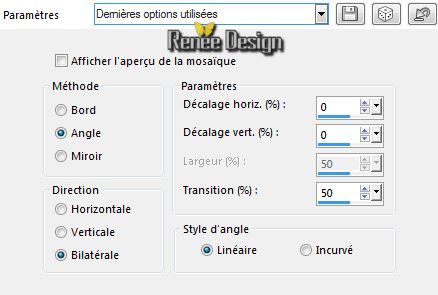
Effects-Image Effects-Seamless Tiling use the settings below
10.
Selections - load/save selection - load selection from disk and choose my selection:''gothique_10_1"
-Selections- Promote selection to Layer
11.
Adjust-Blur-Gaussian Blur: Radius 25
12.
Effects- 3D Effects-Buttonize with these settings-
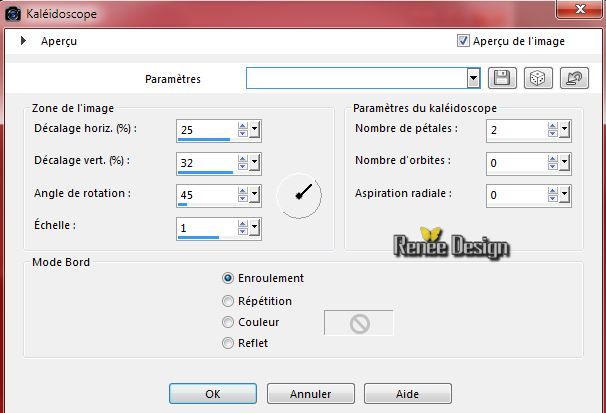
Selections- Deselect All
13.Effects- Reflection Effects-Kaleidoscope with these settings
14.
Effects- Plugins - Simple - 4 Way avarage
15.
Effects- Plugins - Eyecandy 5 Perspective -Tab- Settings-Basic- Drop
Shadow Blury

16.
Selections - load/save selection - load selection from disk and choose my selection:
''gothique_10_1"
17.
Selections- Promote selection to Layer
18.
Effects- Plugins -Mura's Meister-Perspective
Tilling -using the default settings
Selections- Deselect All
19.
Layers- Duplicate
20.
Layers-Arrange- Move Down
21.
Image Flip
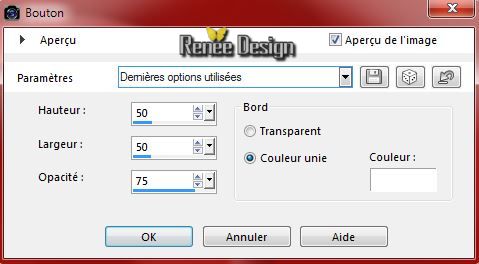
22
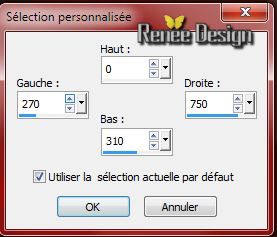
Selection Tool ( S ) Custom selection use settings below
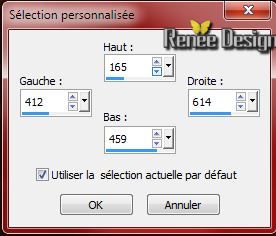
-
Press the delete button on your key board

- Activate the top of the layer-palette
23.
Layers- Merge- Merge Down
24.
Effects- Edge Effects- Enhance
25.
Layers-Arrange- Move Down
-Your work look like this now
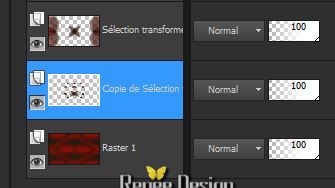
-- Activate the top of the layer-palette
26.
Layers - New raster layer
27.
Selection Tool ( S ) Custom selection use settings below
28.
Pot of Paint: Change the opacity of the color to 55% - Activate Flood Fill Tool and fill the selection with the background color
29.
Effects- Plugins - IDecay-Radial Glow use settings below

Selections- Deselect All
30.
Effects- Plugins -Vanderlee Unpluged X- Defocus
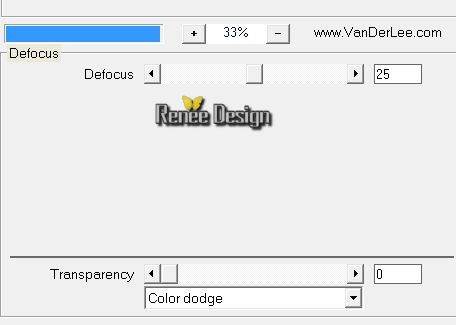
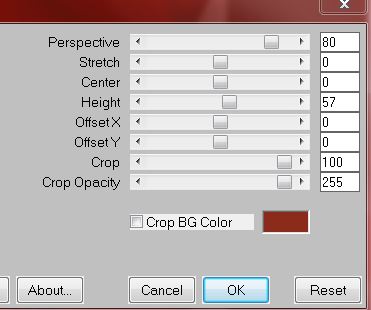
31.
Effects- Plugins - Mura's Meister -Perpective
Tilling
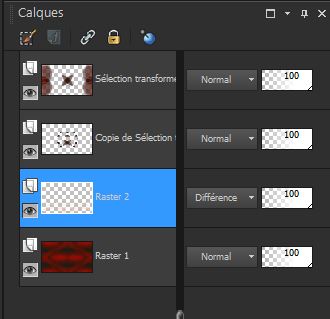
32.
Layers- Arrange- Move 2x Down ( above
Raster 1)
-
Layer Palette -Double click on this layer and set the Blendmode to "Difference "
-Your work look like this now
33.
Activate the tube ''Renee_tbe_mist_3015-girl''
-
Image Resize 60 %
34.
Edit/copy-Edit paste as a new layer on your working area
-
Activate the Pick Tool- move to the right side like this
35.
Layer Palette -Double click on this layer and set the Blendmode to "Difference " and set the layer opacity of this layer to 75%
- Activate the top of the layer-palette
36.
Activate the tube ''tube danimage winry.pspimage''
-
Image Mirror
-
Image Resize 75 %
37.
Edit/copy-Edit paste as a new layer. With your move tool move to the left
-
Material Properties: Foreground color to this color:#f8f7f3
38.
Layers - New raster layer
39.
Selections - load/save selection - load selection from disk and choose my selection:''gothique_10_2''
40.
Activate Pot of Paint
-Change the opacity of the color to :50% -Activate Flood fill tool and fill the selection with the Foreground color
Selections- Deselect All
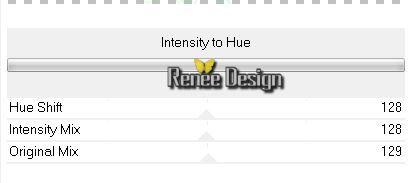
41. Effects- Plugins-Unlimited
-ICNET FILTERS - Color Effect - Intensity to Hue
42.
Layers - New raster layer
43.
Selections - load/save selection - load selection from disk and choose my selection:''gothique_10_3''
Pot of Paint: Change the opacity of the color to 100%- Activate Flood Fill Tool and fill the selection with this color #47767d
Selections- Deselect All
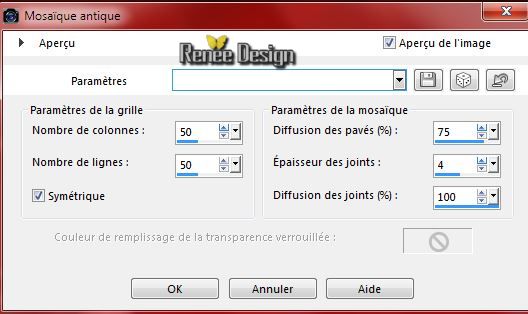
44.
Effects-Texture Effects- Mosaic-Antique with these settings
-
Material Properties: Foreground color to this color:#8b2b1b Background color to this color :#393f35
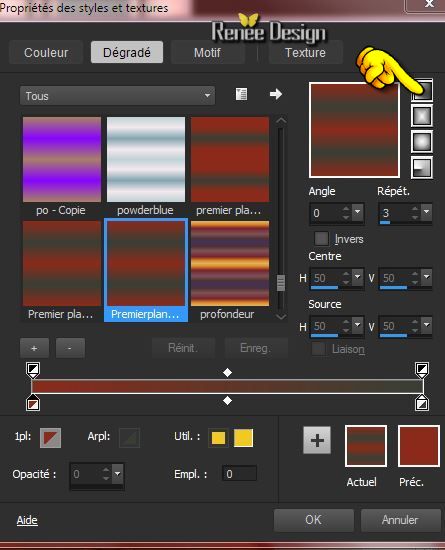
45.
Prepare a linear gradient configured like this.
46.
Layers - New raster layer
47.
Selections - load/save selection - load selection from disk and choose my selection:'' gothique_10_4''
-Activate Flood fill tool and fill the selection with the gradient
48.
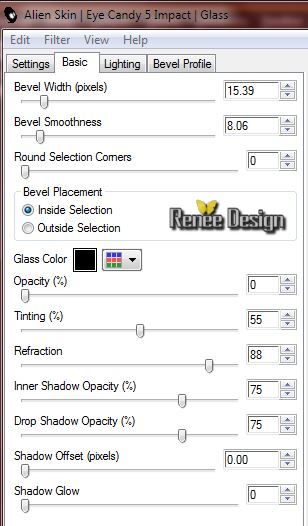
Effects- Plugins - EyeCandy 5 Impact - Glass -Tab-Settings-User Settings and choose my Preset
''renee_gothique10_glass''
-
Selections- Deselect All
50.
Effects - 3D Effects - Drop shadow with these settings : 5/5/45/17 color black
51.
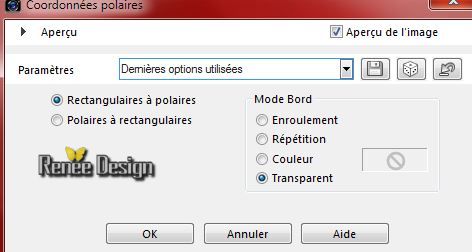
Effects- Distortions Effects-Polar Coordinates-Rectangular to Polar-Transparent
-
Layers- Arrange- Move Down underneath Raster 4 ( tube danimage)
-
Layer Palette -Double click on this layer and set the Blendmode to Overlay
52.
-Activate the top of the layer-Palette //Activate the tube ''Alice&MadHatter.pspimage''
-
Image Resize 75 %
53.
Edit/copy-Edit paste as a new layer on your working area and move
-
Material Properties: Foreground color to this color:#1d5967
54.
Layers - New raster layer
55.
Selections - load/save selection - load selection from disk and choose my selection:''gothique_10_5''
-
Pot of Paint: Change the opacity of the color to :100%
-
Activate Flood fill tool and fill the selection with the Foreground color #1d5967
( 2x click into selection )
-
Selections- Deselect All
56.
Activate Brush: '' renee_pinceau_GOTH10'' in your Psp
57.
File- Export Custom Brush (Give it a name)
-renee_pinceau_1_GOTH10''
File- Export Custom Brush (Give it a name) ''renee_pinceau_2_GOTH10''
58.
Properties Foreground: Foregroundcolor to this color #f8f7f3
Activate Brush Tool and select my file: '' renee_pinceau_1_GOTH10''

Stamp your brush in the upper left corner by using your Foreground color
59.
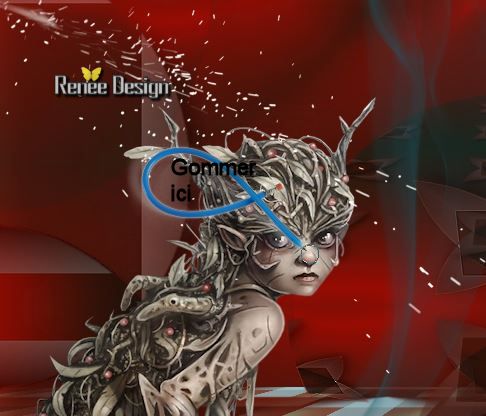
Activate Eraser Tool with these settings

Remove too much away from the face of the girl
60.
Activate Brush Tool and select my file: '' renee_pinceau_2_GOTH10''

61.Layers - New raster layer -
62.
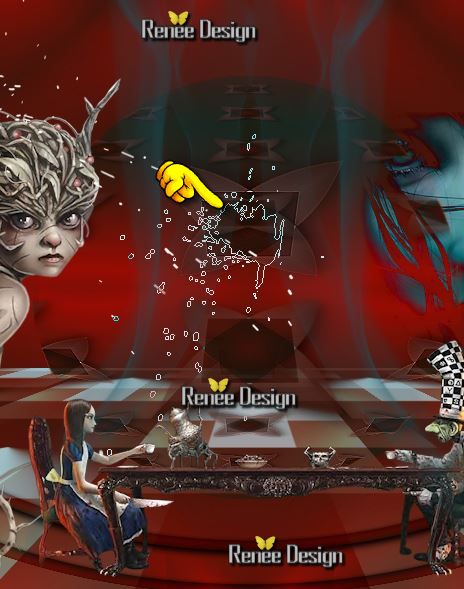
Properties Foreground: Foregroundcolor to this color #f8f7f3
-Stamp as shown on the print screen below by using your Foreground color
63.
Layers-Merge-Merge Visible
64.
Layers - New raster layer
-
Activate Flood fill tool and fill the layer with this color #393f35
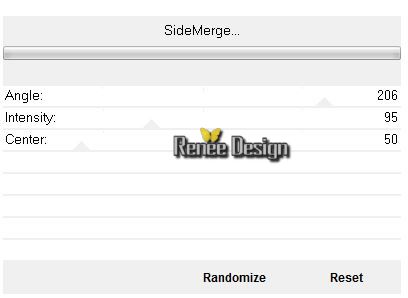
65. Effects-Plugins - Unlimited 2.0
- DC Layer- Side Merge
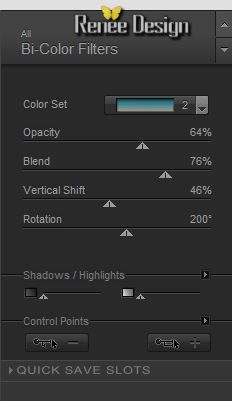
66. Effects- Plugins -Nick color effex Pro 3.0 - Bi color Filters-
Cool Warm - Color set 2
67.
Image - Add borders-Symmetric checked:2 pixels color white
68.
Image - Add borders-Symmetric checked:55 pixels color #47767d
69.
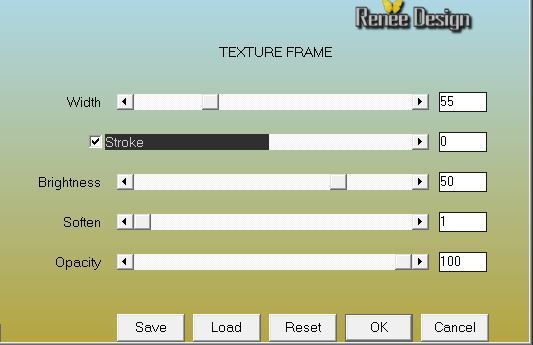
Effects- Plugins - AAA Frame - Textures Frames with these settings
70.
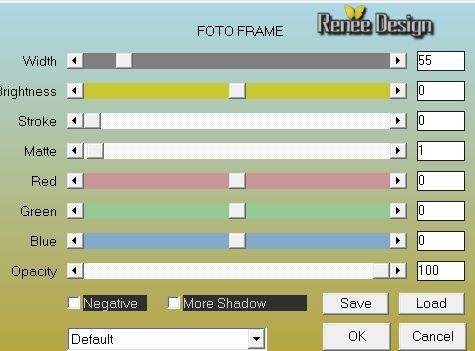
Effects- Plugins -AAA Frame - Foto Frame with these settings
71.
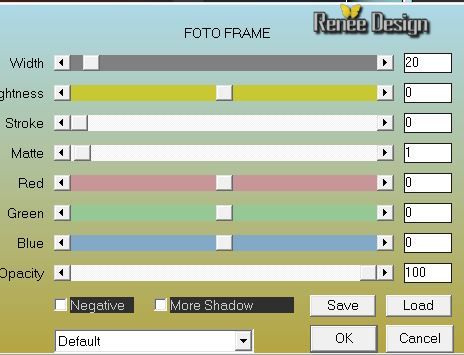
Effects- Plugins -AAA Frame - Foto Frame with these settings
72.
Activate Text Tool-Font '' wg_halloh_font "-Size 72
-write your text
73.
Effects- Plugins -Eye Candy 5 Impact -Glass-Tab-Settings- Basic use settings below
67.
Layers- Merge- Merge All
68.
Image Resize 995 pixels Width
Save as JPG
I hope you enjoyed this lesson
Renée
This lesson was written by Renée 1/11/2014
Placing
11/2014
Any resemblance with an existing lesson is merely a coincidence *
* Don't forget to thank the people who work for us and with us. I named the tubeurs - Testers and the translators.
Thanks Renée.
*
|
 Translations


 All rights reserved