|
Let's start the lesson.
Used Colors
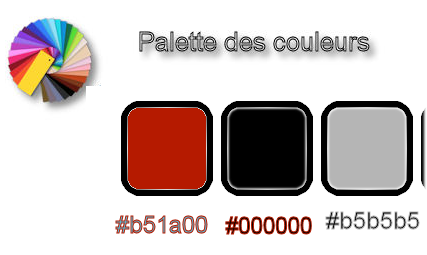
Preparation - Color Palette: Set your Foreground color to #b51a00 -Set your Background color to black
-
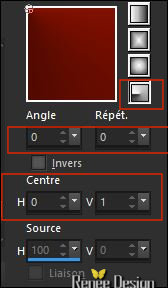
Prepare a radial gradient configured like this.
1.
File: Open a new transparent image 1005 x 685 pixels
2.
Activate Flood Fill Tool  and fill the layer with the gradient and fill the layer with the gradient
3.
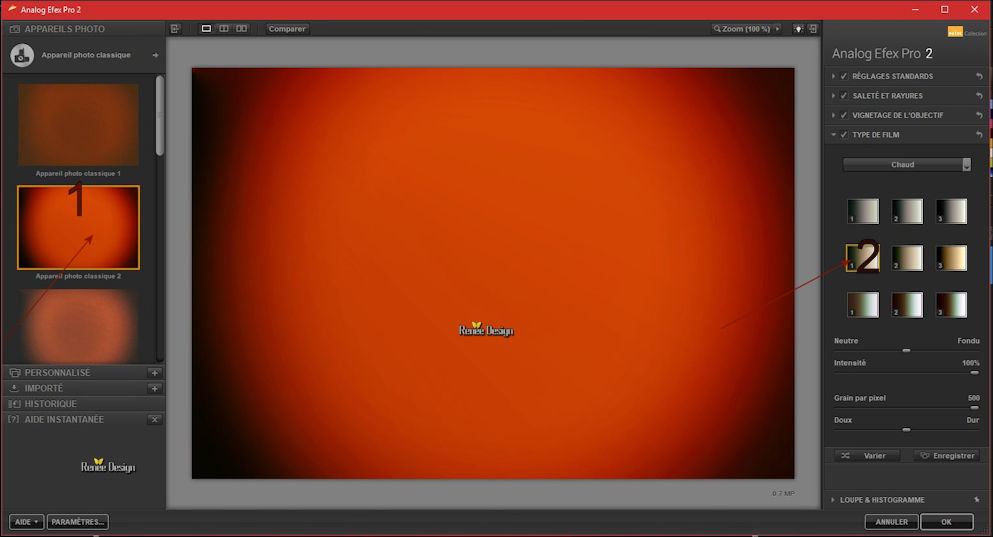
Effects –Plugins – Nick collection- Analog Efex Pro
2
- 1.
Click "vignette appareil photo classique 2 (left side)
presets'll run now
-
2 and the window opens and you can use ( 1 Second line) -than open "Type DE Film" and select ''Warm '' and OK
4.
Effects –Plugins - Unlimited - &<Bkg Designer sf10 I>- Corner
Half Wrap
5. Effects –
Image Effects- Seamless Tiling / Stutter diagonal

6. Effects- Edge Effects- Enhance More
7. Effects
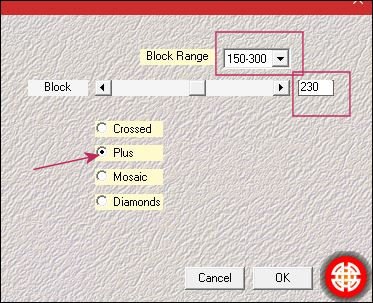
–Plugins – Medhi- Sorting Tiles
8.
Effects – Plugins -Unlimited - &<Bkg Kaleidoscope>- 4 QFlip
UpperR
9.
Layers-Duplicate
10.
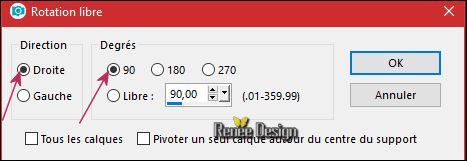
Image -Free Rotate
11.
Effects –Plugins - Unlimited -Horizonaus Mixed Bag-PutitintheCorner
0
12.
Effects -Plugins – Transparency – Eliminate
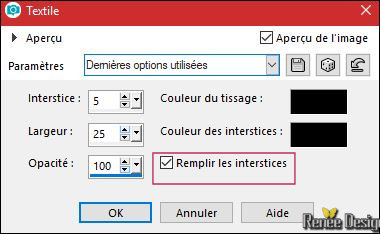
black
13. Layers-Duplicate
14. Image - Mirror - Mirror Horizontal (Image - Mirror in older versions of PSP)
Image - Mirror - Mirror vertical ( Image - Flip in older versions of PSP)
15. Layers- Merge- Merge Down
16.
Layers-Properties-Set the Blend Mode to " Overlay"
17. Layers- New Raster Layer
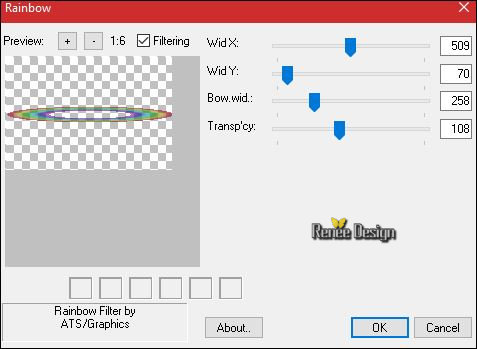
18. Effects
–Plugins – FF Formula – Rainbow use the settings below
19. Effects
– Image Effects -Offset with these settings H = 0 and V = -
250
20.Layers-Properties-Set the Blend Mode to " Soft Light "
21. Effects- Edge Effects- Enhance More
22. Layers-Duplicate
23. Layers- Merge- Merge Down
- Preparation - Color Palette: Set your Foreground color to #b5b5b5 -Set your Background color to #ffffff
24. Layers- New Raster Layer
25.
Selections –load/save selection –load selection from disc and select my selection: ‘’ Gothique_25_1’’
26. Activate Flood Fill Tool - and fill the selection with the the foreground color ( 2
clicks)
Selections- Deselect All
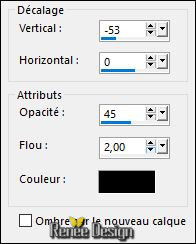
27. Effects – 3D Effects –Drop Shadow with these settings
- Layer palette – Make Raster 1 active
28.
Selections –load/save selection –load selection from disc and select my selection: ‘’ Gothique_25_2’’
29.
Selections- Promote selection to Layer
30.
Layers- Arrange- Bring to Top
31. Effects
– Plugins – L & K ‘s – Pia 2
32. Effects
– Edge Effects- Enhance
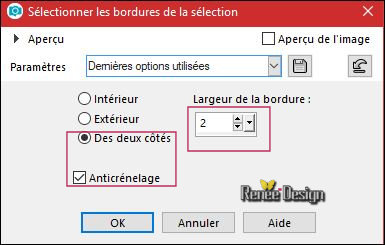
33.Selections- Modify-Select Selection Borders with these settings (2 Pixels)
34. Activate Flood Fill Tool and fill the selection with #ffffff
Selections- Deselect All
35.Layers- New Raster Layer
36.
Selections –load/save selection –load selection from disc and select my selection: ‘’ Gothique_25_3’’
37. Activate Flood Fill Tool and fill the selection with #ffffff
38. Effects
– Texture Effects– Weave use the settings below
Selections- Deselect All
39. Open the tube ‘’ Gothique_25_image1.png’’
- Edit - Copy- Activate your work -Edit - Paste as a new layer.
-
Move Tool / Move it in the middle down slightly (see finished image )
40.
Set the Opacity of this layer to 63%
41.Layers- New Raster Layer
42.
Selections –load/save selection –load selection from disc and select my selection: ‘’ Gothique_25_4’’
43. Activate Flood Fill Tool and fill the selection with #ffffff
Selections- Deselect All
44.
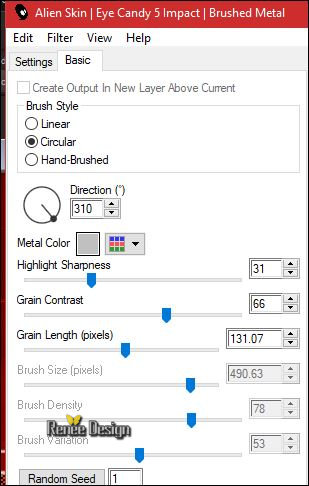
Effects – Plugins – EyeCandy 5 Impact – Brush Metal use the settings below /
color #c0c0c0
45. Effects – 3D Effects –Drop Shadow with these settings 1/1/100/1 #ffffff
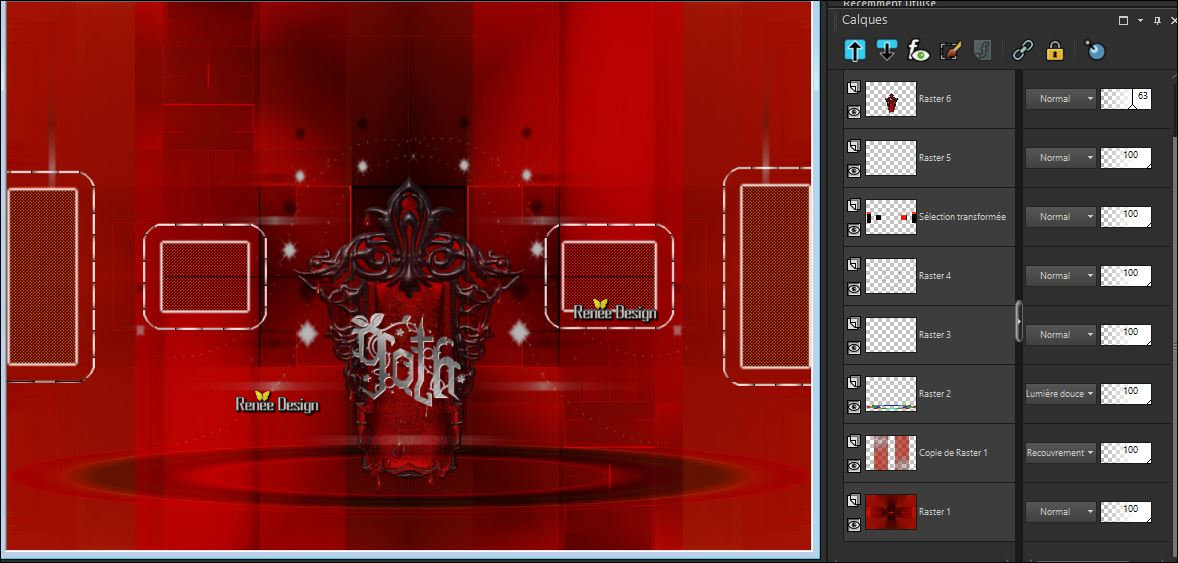
- You should have this result:
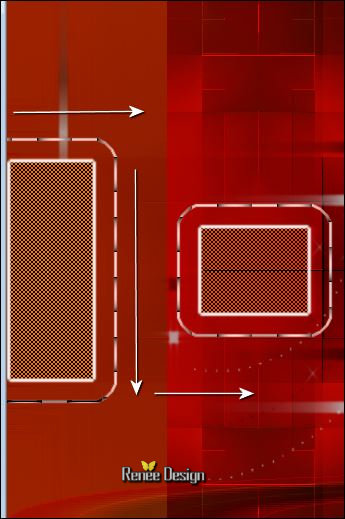
46. Activate Pen Tool -Line Style ‘’Arrowhead end " use the settings below-Size 2

-
Draw 3 lines as shown in the example below (Layers- Convert to raster layer )
47. Effects – 3D Effects –Drop Shadow with these settings 1/1/100/2 black
48. Layers- Duplicate
49. Image - Mirror - Mirror Horizontal (Image - Mirror in older versions of PSP)
- Layers- Merge- Merge Down
50. Open the tube ‘’Renee_Tubes_Gothique 25’’
- Image
Resize to 75%
- Edit - Copy- Activate your work -Edit - Paste as a new layer.
51. Effects- Image Effects- Offset with these settings H = 143 and V = - 36
52. Layers-Duplicate
53. Effects
–Plugins - Unlimited – Toadies – Darwin..

54. Effects- Image Effects- Offset with these settings H = 211 and V = -116
55.
Layers-Properties-Set the Blend Mode to " Overlay"
- Activate the layer underneath = (Raster 8)
56. Effects
– Plugins – Eyecandy 5 Impact – Perspective
Shadow use the settings below
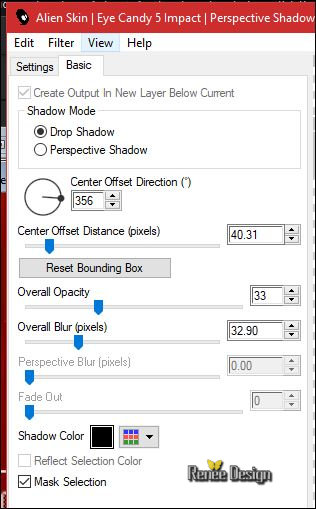
- Layer Palette – Make Raster 1 active
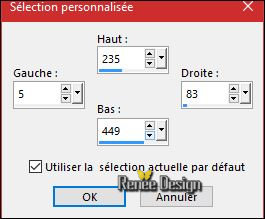
57.
Activate Selection Tool -Custom Selection (S) -Rectangle with these settings
58.
Promote Selection to Layer
59. Layers- Arrange- Bring to Top
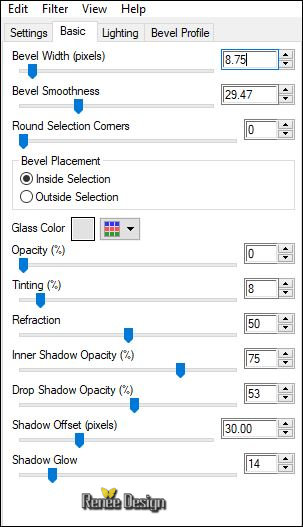
60. Effects
-Plugins – EyeCandy 5 Impact – Glass use the settings below / Color #e2e2e2
Selections- Deselect All
61. Layers-Duplicate
62. Image - Mirror - Mirror Horizontal (Image - Mirror in older versions of PSP)
63. Open the tube ‘’ Gothique_25_image2.png’’
- Edit - Copy- Activate your work -Edit - Paste as a new layer.
-
Layers-Properties-Set the Blend Mode to " Hard Light "
64. Open the tube ‘’ Gothique_25_image3.png’’
- Edit - Copy- Activate your work -Edit - Paste as a new layer.
65. Image - Add borders-Symmetric checked 1 pixel black
66.
Selections- Select All
67. Image - Add borders-Symmetric checked 60 pixels #ffffff
68. Effects – 3D Effects –Drop Shadow with these settings 0/0/50/30 black
69.
Selections- Modify-Expand 20 pixels
70. Effects – 3D Effects –Drop Shadow with the same settings
Selections- Deselect All
71. Open the tube "Text" - Edit - Copy- Activate your work -Edit - Paste as a new layer.Move Tool / place your tube to the top of your image
72. Open the tube "cadre"-Edit - Copy- Activate your work -Edit - Paste as a new layer ( do not move )
73. Layers- Merge- Merge All (flatten)
74. Image
Resize to 999 pixels width.
Save as JPG
I hope you enjoyed this lesson
Renée
This lesson was written by Renée
19/08/2017
Edited and Update
2017
*
Any resemblance with an existing lesson is a coincidence
*
Do not forget to thank the people who work with us and for us I have appointed the tubeurs and translators
Thanks
Renée
*
| 


 Translations


 If a plugin supplied appears with this icon it must necessarily be imported into Unlimited *


