|
Let's start the lesson.
-
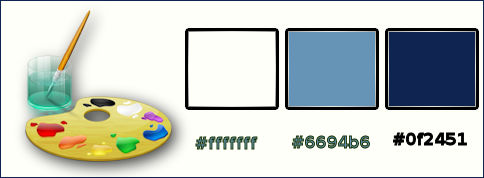
Color-palette:Set your foreground color to color #ffffff -Set your background color to color:#6694b6
1.
Open the image ‘’fond_in_fine_tempus’’/ Window - Duplicate (or shift+D) - Close the original and proceed on the copy -Promote Background Layer =Raster 1
2.
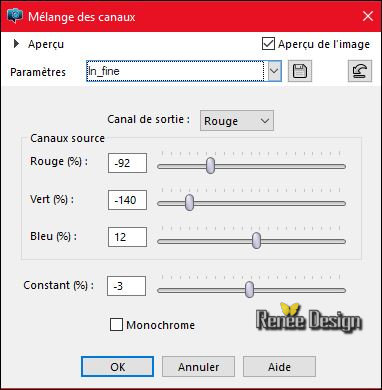
Adjust-Color-Channel Mixer /select my preset ‘’in –fine’’ in your (default settings) and uncheck monochrome
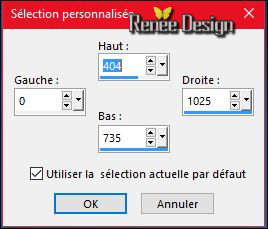
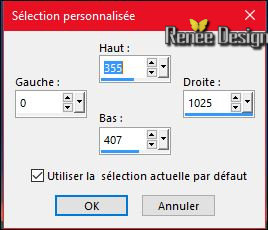
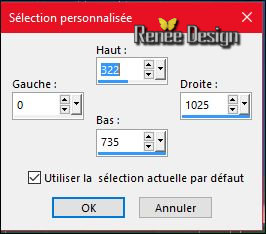
3.Activate Selection Tool -Custom Selection (S) Rectangle with these settings 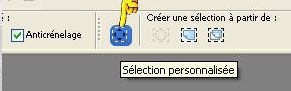
4.
Selections-Promote Selection to Layer
Selections- Deselect All
5.
Layer Palette - Double click on this Layer and set the Blend Mode to" Exclusion"
6.
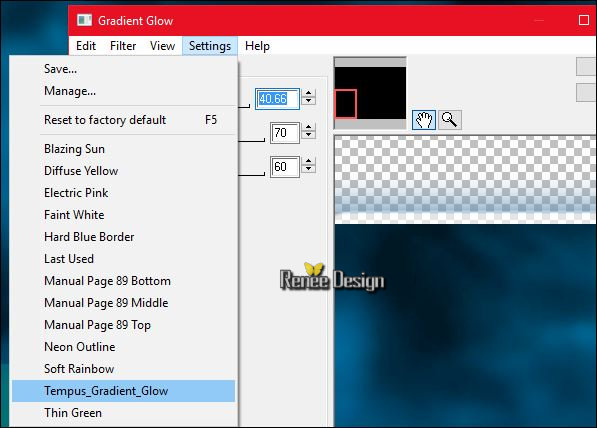
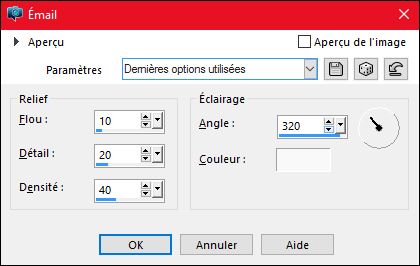
Effects –Plugins – Eye Candy 4000- Gradient Glow
/preset ‘’ Tempus_Gradient_Glow’'
This preset does not automatically square with a simple click you must go to place it into the Settings folder 
In the filter menu / Settings / Click on the preset and effect will apply
Or manual settings as shown in the example below-Color is white
7.
Activate Selection Tool -Custom Selection (S) Rectangle with these settings
8.
Selections-Promote Selection to Layer
9.
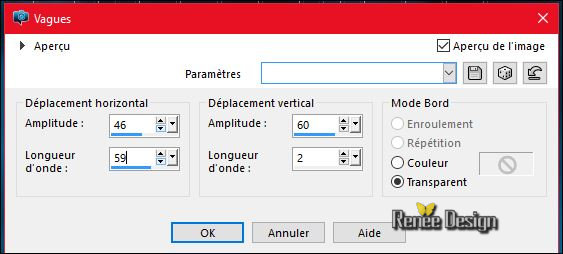
Effects- Distortion Effects- Wave use settings below
Selections- Deselect All
10.
Activate Selection Tool -Custom Selection (S) Rectangle with these settings
11.
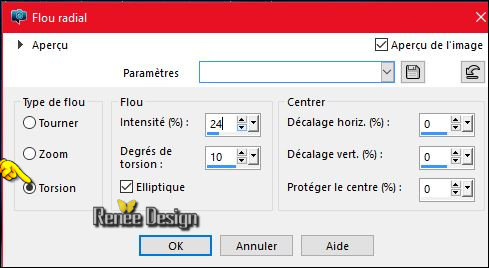
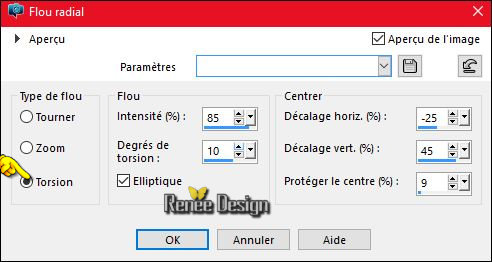
Adjust- Blur- Radial Blur use settings below
12.
Effects- User Defined Filter – Emboss 3 using the defauls settings
Selections- Deselect All
13.
Layer Palette - Double click on this Layer and set the Blend Mode to "Hard Light "
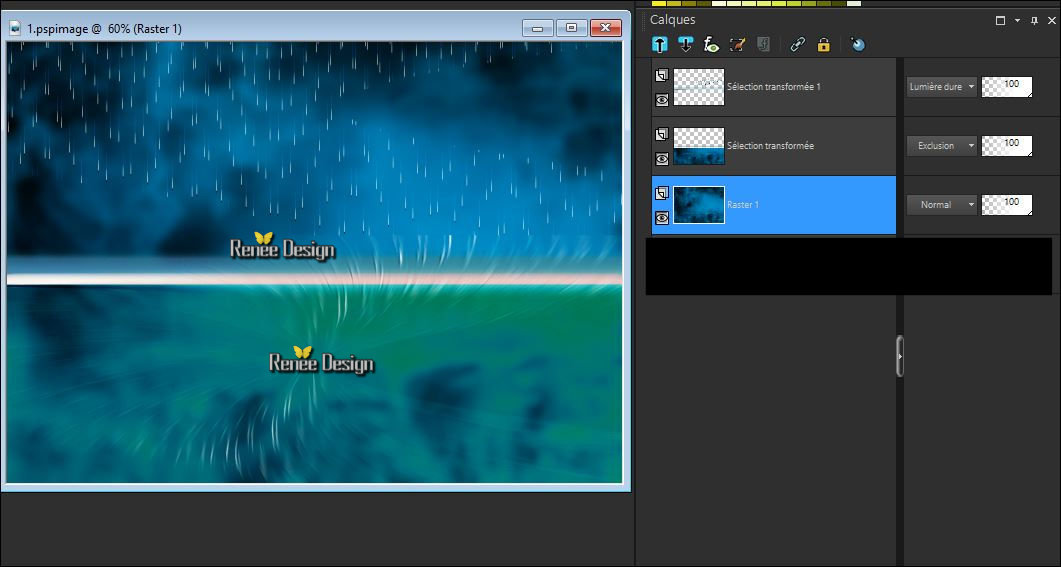
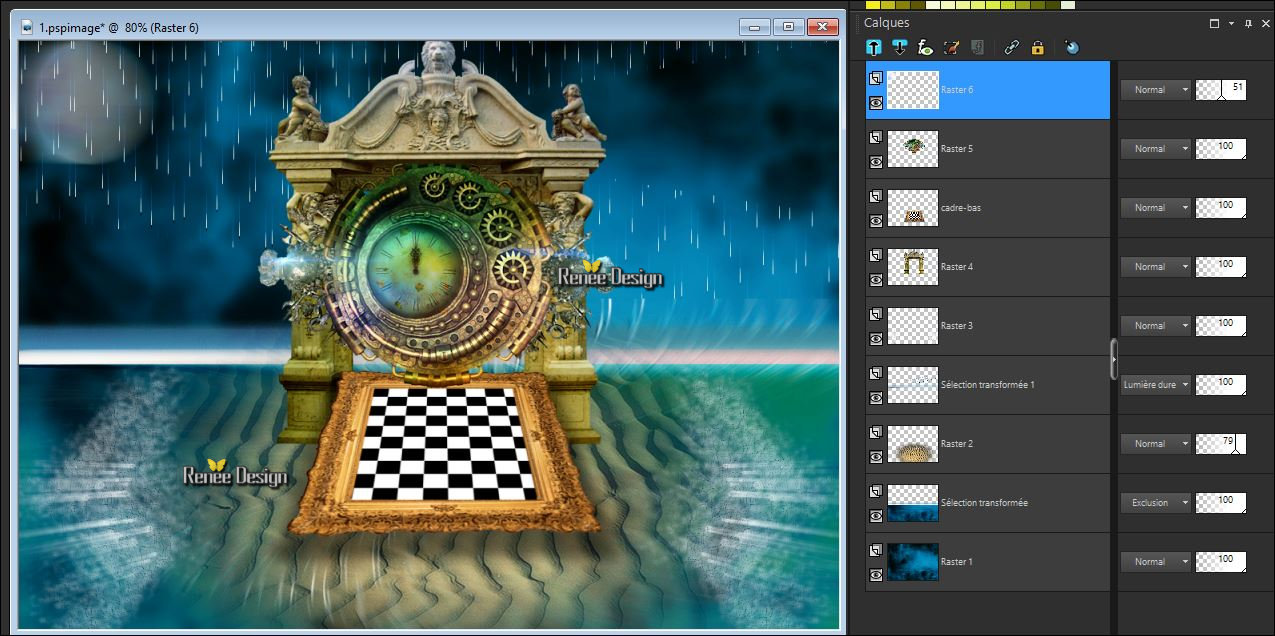
Your work and Layer Palette look like this now
-
In the Layer-Palette-Activate Raster 1
14.
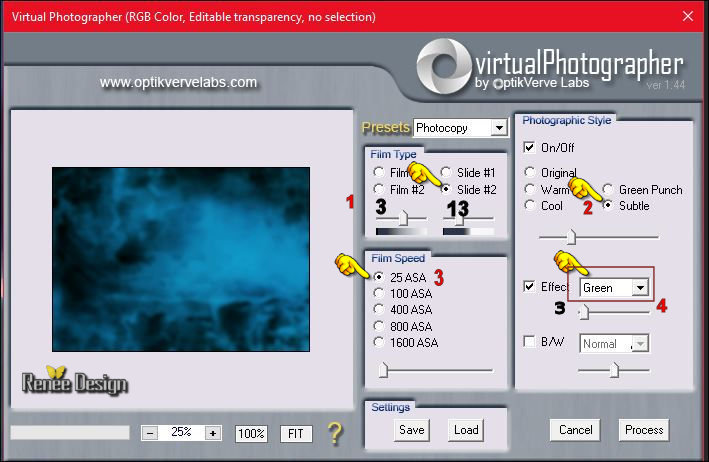
Effects - Plugins – optikverveLaps - Virtual
Photographer
(For measures placing your mouse over the slider and this will allow you to see and adjust the figure)
care for this filter follow the directions step by red
Step 3 select >> Effect / Green then / and then put the cursor 3 (which will give the blue color requested here)
-
Activate the top of the layer palette
15.
Open the tube ‘’ In_fine_tempus-sable’’
–
Edit/ Copy-Edit - Paste as new layer on your working image
16.
Effects- Image Effects- Offset with these settings H = 0 and V = - 175
- transparent
17.
Effects –Plugins-ICNET FILTERS- Image Enhancement- Sharpen
with these settings 192
18. Layers- Arrange- Move Down
19.
Effects- 3 D Effects- Drop Shadow with these settings: 2/-2/100/11 black
- Set the layer opacity of this layer to 79%
-
Activate the top of the layer palette
20.
Layers- New Raster Layer
21.
Selections –load/save selection –load selection from disc and select my selection:‘’ In fine
tempus_1 »
22.
Pot of Paint: Change the opacity of the color at 55% – Activate Flood Fill Tool and fill the selection with the foreground color white
Selections- Deselect All
23.
Effects –Texture Effects –Fine Leather with these settings -Color
#c6b999
24.
Layers- Duplicate – Image Mirror (CTRL B)
-
Layers- Merge Merge Down
25.
Effects –Plugins– EyeCandy 5 Impact –
Blacklight-tab Settings/User settings choose my Preset ‘’ In fine tempus
–blacklight’’
-
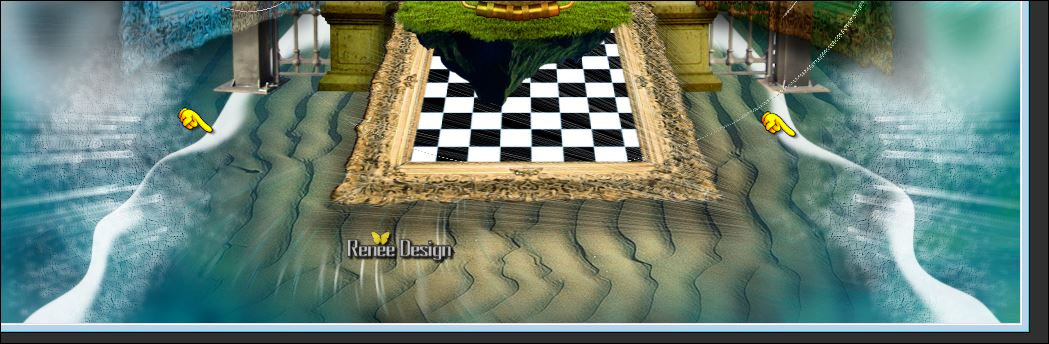
Put the image aside for now, we will need it later..
- We will work on the frame tube
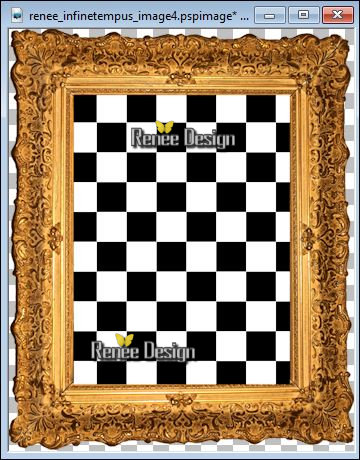
26. Open the tube ‘’renee_infinetempus_image4’’
27.
Activate Magic Wand and select inside the rectangle
28. Layers- New Raster Layer
29. Pot of Paint: Change the opacity of the color at 100% - Activate Flood Fill Tool and fill the selection with the foreground color white
30. Effects
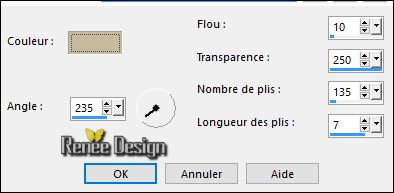
–Plugins – L & K’s – Pia a 46
Selections- Deselect All
31. Layers- Arrange- Move Down
32. Layers- Merge- Merge Visible
33. Image
Resize to 65%
You should have this result-Edit-Copy !!
-
Activate your minimized image
34. Edit/ paste as new layer (do not move it is in the right place)
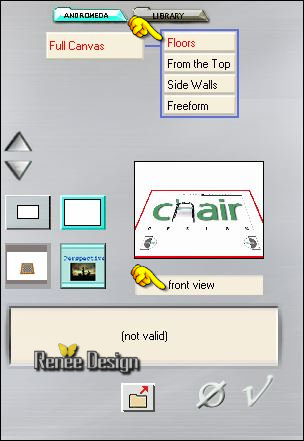
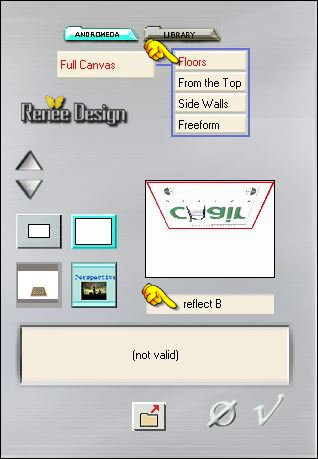
35. Effects-Plugins – Andromeda _Perspective –Floors- front
view
-Repeat a second time this filter
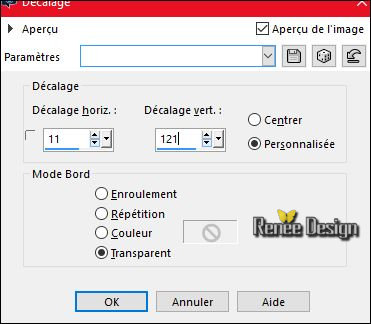
36. Effects- Image Effects- Offset with these settings H = 0 and V = -55 Transparent
37.
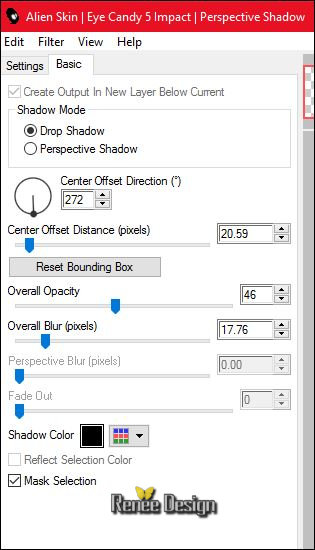
Effects –Plugins - Alien Skin/ Eye Candy 5 Impact
–Perspective Shadow-tab Settings/User settings choose my Preset’’ In fine tempus
_shadow”
- Rename this layer ‘’Cadre_bas ‘’
38.Open the
tube ‘’
In_fine_tempus_gategates_png’’
- Edit/ Copy-Edit - Paste as new layer on your working image
39. Effects- Image Effects- Offset with these settings
40. Layers- Arrange- Move Down
41.
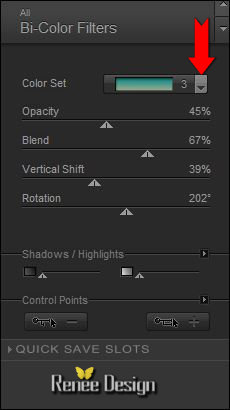
Effects –Plugins– Nick Softwar - Color Effex- Bi-
Color Filters - Cool/Warm /Color Set 3
-Activate the top of the layer palette
42. Open the tube ‘’Renee_tube_horloge’’
- Activate layer 1 of the tube
- Image
Resize to 62%
- Edit/ Copy-Edit - Paste as new layer on your working image
- Place in the center of the arch
43. Back on the tube
- Activate the layer 2 (lune=Moon)
- Edit/ Copy-Edit - Paste as new layer on your working image
- Activate your Move Tool (M) place it in the top left corner -See printscreen
44. Effects-Distortion Effects-Wind/Winddirection From Left 100
45. Set the layer opacity of this layer to 53%
- Your work and Layer Palette look like this now
- In the Layer-Palette-Make Raster 3 active
46. Open the tube ‘’ In_fine_tempus_barriere.pspimage »
- Edit/ Copy-Edit - Paste as new layer on your working image
47.Effects- Image Effects- Offset with these settings H = 14 and V = 0
48. Effects
–Plugins – Graphic Plus – Cross Shadow using the default settings
- Layer palette - activate layer named ‘’cadre bas ‘’
49. Layers- Duplicate ( rename this layer " cadre haut")
50. Effects
–Plugins – Andromeda – Perspective- Floors- reflect
B
- Layers- Arrange- Bring to Top
- Layer palette - Activate layer named ‘’cadre
bas’’
51. Layers- Duplicate
52. Image
Free Rotate 90° to the right
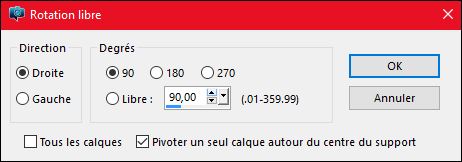
- Rename this layer ‘’cadre gauche’’
- Effects- Image Effects- Offset with these settings H = - 156 and V = 71 (make sure it is the right place)
53. Layers- Duplicate
- Image
Mirror (CTRL B) (Rename this layer ‘’cadre droit’’)
- Effects- Image Effects- Offset with these settings H = 20 and V = 0
Attention
54. - In the Layer-Palette: Activate layer "Cadre
droit" >>Double click on this Layer and set the Blend Mode to "Multiply"
-In the Layer-Palette: Activate layer " Cadre gauche"
>>>Double click on this Layer and set the Blend Mode to "Luminance " Set the layer opacity of this layer to 71%
55. - In the Layer-Palette: Activate layer "Cadre
bas" /
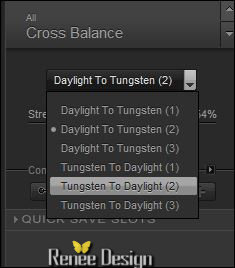
Effects -Plugins – Nick Color Effex – Cross
Balance /Stength at 54 %
56. Layer- Palette-Activate the layer ‘Cadre du haut ‘ Set the layer opacity of this layer to 77%
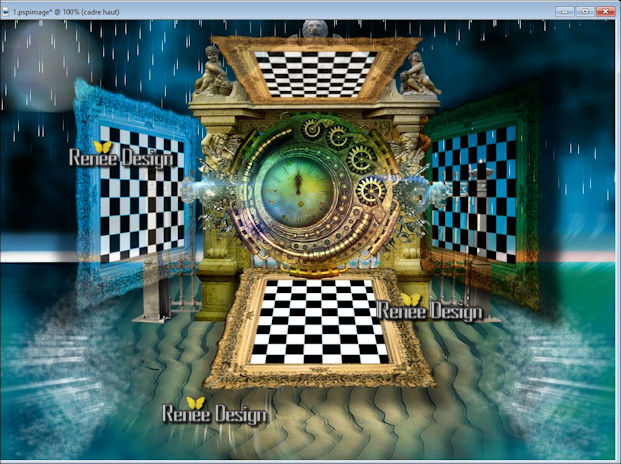
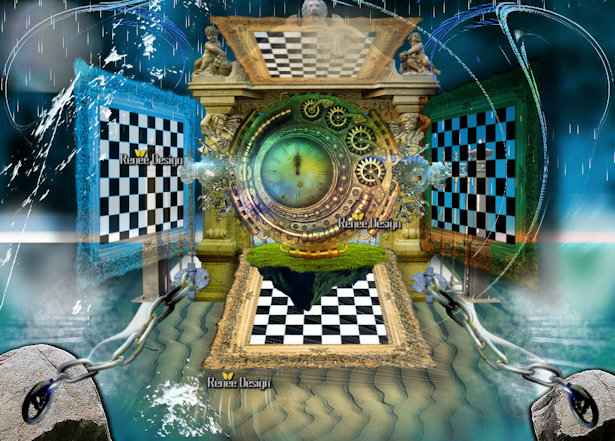
You should have this result
-Stay on this layer named "Cadre haut"
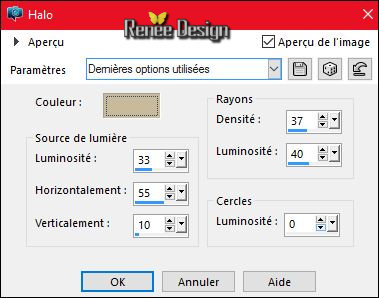
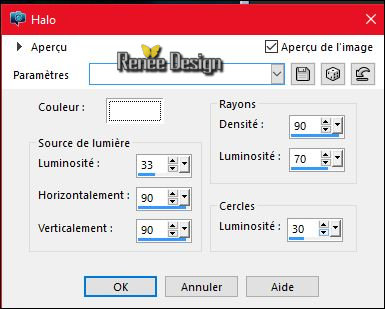
57. Effects- Illumination Effects- Sunburst with these settings-Color #c6b999
58. Layer- Palette-Activate the layer '‘Cadre du bas ‘'
- Effects- Illumination Effects- Sunburst with these settings-Color white
- Activate the top of the layer palette
- Color-palette:Set your foreground color to color #ffffff -Set your background color to color:#0f2451
59. Layers- New Raster Layer
60. Selections –load/save selection –load selection from disc and select my selection: ‘’ In fine
tempus_2’’
61. Pot of Paint: Change the opacity of the color at 100% -Activate Flood Fill Tool and fill the selection with the background color #0f2451
Selections- Deselect All
62. Effets
– Edge Effects- Enhance More
63. Layers- Duplicate
64. Effects
-Plugins – Distort - Twirl... a 999
- Layer Palette - Double click on this Layer and set the Blend Mode to "Luminance"
- Adjust- Blur- Gaussian Blur: Radius 5
65. Layers- New Raster Layer
66. Selections –load/save selection –load selection from disc and select my selection:’’ In fine
tempus_3’’
67. Pot of Paint: Change the opacity of the color at 60% -Activate Flood Fill Tool and fill the selection with the foreground color white
Selections- Deselect All
68. Layers- Duplicate –Image Mirror (CTRL B)
69. Layers- Merge- Merge Down
- Open the tube ‘’ In-fine_tempus_DECOS.pspimage’’(Do not close we need it later for the rest of the work (some are hidden layers to lighten the weight of the tube simply open))
70. Activate the layer ‘’raster 1 ‘’ of the tube DECO
- Edit/ Copy-Edit - Paste as new layer on your working image
- Layers - Arrange under the layer of Raster 5 (horloge)- and move (see completed)
-In the Layer -Palette- Make Raster 7 active (Fence )
71. Layers- New Raster Layer
72. Selections –load/save selection –load selection from disc and select my selection:’’ In fine
tempus_4 »
73. Pot of Paint: Change the opacity of the color at 100%
- Activate Flood Fill Tool and fill the selection with the foreground color white (2 clicks )
Selections- Deselect All
74. Layers- Duplicate
75. Adjust- Blur- Radial Blur use settings below
76. Layers- Duplicate
- Layers- Merge -Merge Down
- Layer Palette - Double click on this Layer and set the Blend Mode to "Screen "
Layer-Palette: Activate the Layer Underneath = (Raster 11)
77. Activate Warp Tool-with these settings- Size 135

Go against the edges and slightly deform
To have something like this as a result- the 2 sides and confirm ok -See Printscreen
- Activate the top of the layer palette
78. Open the tube ’’In_fine_tempus_2 pierres’’
- Edit/ Copy-Edit - Paste as new layer on your working image
- Effects- Image Effects- Offset with these settings: H = -19 and V = -323 /-
Transparent
79. Effects- 3 D Effects- Drop Shadow with these settings: 2/ -5 /100 /8 black
- Repeat - 3 D Effects- Drop Shadow with these settings: -2/5/100/8 black
80. Effects
–Plugins- Unlimited – Tools- Lomo with these settings 77/146
81. Effects
– Edge Effects- Enhance
- Back on the tube ‘’ In-
fine_tempus_DECOS.pspimage’’
82. Activate
the layer ‘’le Raster 2’’of the tube
- Edit/ Copy-Edit - Paste as new layer on your working image
- Move Tool-Move on the left (see printscreen step
85)
- Back on the tube "DECOS"
83. Activate the layer ‘’Raster 3 »of the tube (chaine)
- Edit/ Copy-Edit - Paste as new layer on your working image
- With your Move Tool (M) move to the left
84. Layers- Duplicate – Image Mirroir(CTRL B) and move
85. Layers- Merge- Merge Down
- You should have this result
86. Back on the tube "DECOS"
-
Activate the layer ‘’Raster 4 »of the tube
- Edit/ Copy-Edit - Paste as new layer on your working image
- Move to the bottom right against the rock (see completed)
87. Layers- New Raster Layer
88. Selections –load/save selection –load selection from disc and select my selection:’’ In fine
tempus_5
89. Pot of Paint: Change the opacity of the color at 100% –Activate Flood Fill Tool and fill the selection with the foreground color white
Selections- Deselect All
90. Layer Palette - Double click on this Layer and set the Blend Mode to" Exclusion"
91. Back on the tube "DECOS"
-
Activate the layer ‘’Raster 7 »of the tube
- Edit/ Copy-Edit - Paste as new layer on your working image
- Move on the rightside of the frame
92. Effects- 3 D Effects- Drop Shadow with these settings: 1/1/60/1 black
93. Effects
– Artistic Effects - Enamel with these settings –Color #f9f8f7
94. Effects- Edge Effects- Enhance
95. Back on the tube DECOS
-
Activate the layer ‘’Raster 5 » (Many thanks for this beautiful tube Tatie )
-
Edit/ Copy-Edit - Paste as new layer on your working image
- Move Tool / place your tube on the right side
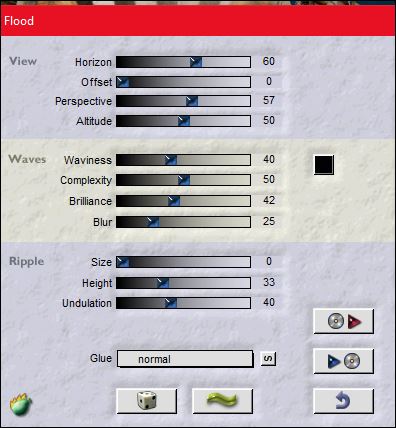
96. Effects
–Plugins- Flaming Pear –Flood use settings below (
(The filter settings "Horizon "depends where the tube is placed))
97. Back on the tube "DECOS"
-
Activate the layer ‘’Raster 6 »of the tube
- Edit/ Copy-Edit - Paste as new layer on your working image
- Move Tool / place your tube on the left side of your image
98. Layers- New Raster Layer
99. Selections –load/save selection –load selection from disc and select my selection:’’ In fine
tempus_6’’
100.
Activate Flood Fill Tool and fill the selection with the foreground color white
Selections- Deselect All
ATTENTION: BEFORE CONTINUING TO CONTROL THE LOCATION OF YOUR FRAMES-correct if necessary
101. Image - Add borders-Symmetric checked: 1 pixel black
102. Image - Add borders-Symmetric checked: 25 Pixels white
103. Image - Add borders-Symmetric checked: 1 pixel black
104. Image - Add borders-Symmetric checked: 45 Pixels white
105. Back on the tube ''DECOS '
- Activate the layer 8 of the tube-to create your panels ‘’ IN FINE et TEMPUS’’ if you want it
Or...
Open my 2 tubes already created d ‘’in
fine’’ et’’ tempus ‘’en png and paste as new layer on your working image
- and place to your taste
103.
Layers- Merge- Merge All (flatten)
104. Effects
–Plugins – AAA Frame – Foto Frame use settings below
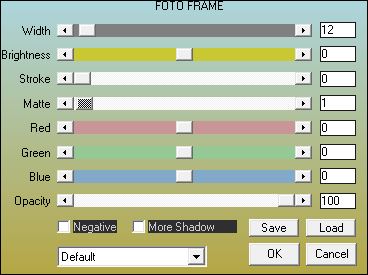
Save as JPEG
I hope you enjoyed this lesson
Renée
This lesson was written by Renée 09/04/2016
Edited and Update
2016
*
Any resemblance with an existing lesson is a coincidence
* Do not forget to thank the people who work with us and for us I have appointed the tubeurs and translators
Thanks Renée
*
| 
 Translations


 When you see this logo the filter is imported in Unlimited

 All rights reserved