|
Let's begin
Open your color palette in your psp. It is very easy to have it there.
1. Open image fond
''instant_magique_fond'' / Promote to background layer Raster
1
2. Layers - new raster layer
3. Selections - load/save selection - load selection from disk and choose ''instant_magique1''
4. Color Palette: Foreground color:
#ddd4b5
5.With the the flood fill tool: opacity to 35/ fill the selection with your foreground color
6.Selections - Deselect all
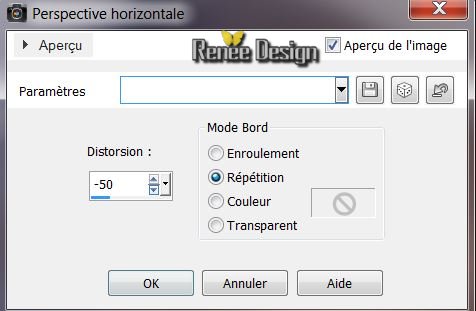
7. Effects - Geometric Effects /Perspective-Horizontal
8.Image-Mirror
- Repeat - Effects Geometric Effects / Perspective / Horizontal -
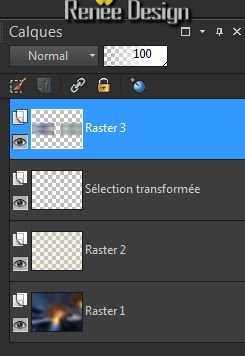
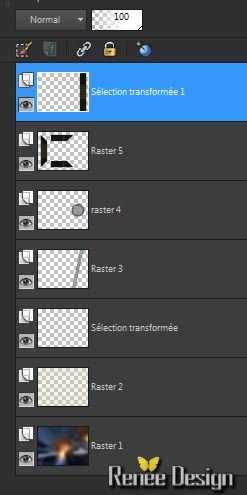
9. On the same layer
(raster 2)
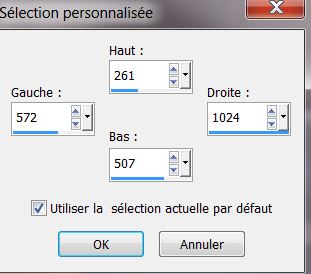
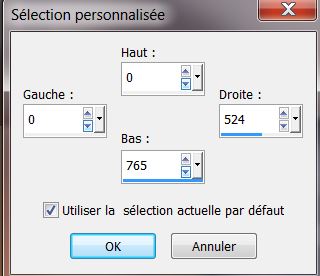
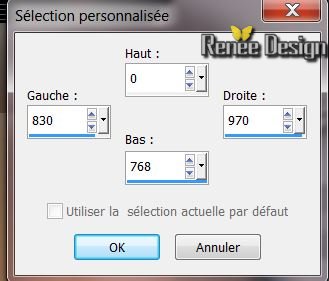
10. Selections-Custom selection with these settings

11. Adjust - Blur - Gaussian Blur 100
12. Selections- Promote selection to layer
13. Selections - Deselect all
14. Effects -Plugins Toadies / What are you /with these setting
32/32
15. Effects - Geometric Effects -Perpective Horizontale

16. Layers - Duplicate /Image mirror
17. Layers-Merge-Merge Down
18. Effects - Edge Effects/Enhance More
19. Open the tube
''instant_magique_image1' edith/copy- edith/ paste as new layer (do not move it is in the right place)
20. Effects - Plugins Theph's
Trick/ Slide X 50 %
This is the result
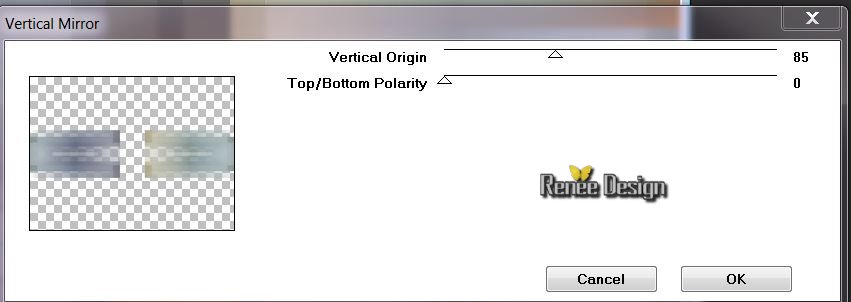
21. Effects - Plugins Graphic
plus / Vertical Mirror
22. Activate the layer raster 3
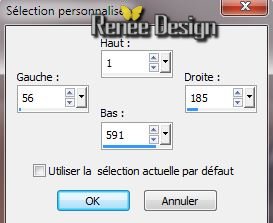
Selections-Custom selection with these settings
23. Effects - Plugins Simple - Center Tile
24.Effects - Geometric Effects-
Circle - cocher transparent
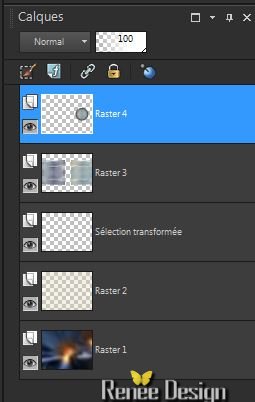
24. Selections-Promote selection to layer /rename this layer
raster 4
25. Effects - 3D effects - Drop Shadow
4/2/65/12 black
26. Effects -Plugins Eye Candy 5 Imapct
/Glass -Take my preset: Preset '' instant _magique_glass''
27. Selections - select none
This is the result
28. Activate the layer underneath
(raster 3)
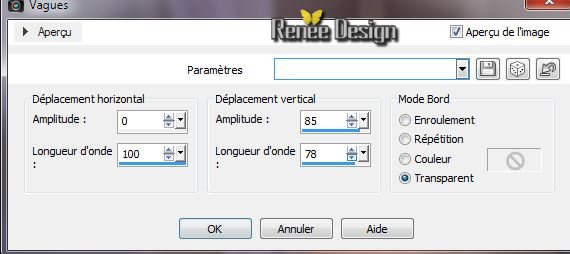
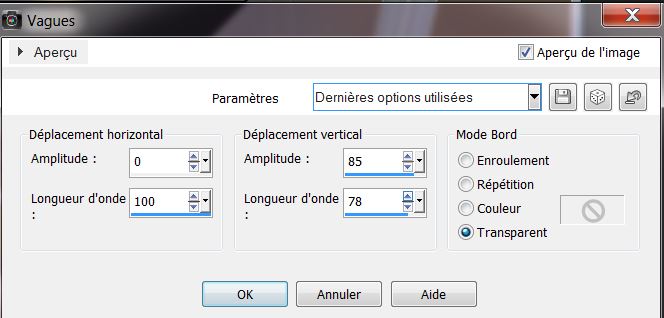
29. Effects - Distortion Effects-Wave
30. Stay on this layer (raster3)
Selections-Custom selection with these settings
31. DELETE
32. Selections- select none
33. Effects - 3D effects - drop shadow
0/0/65/ 35 black
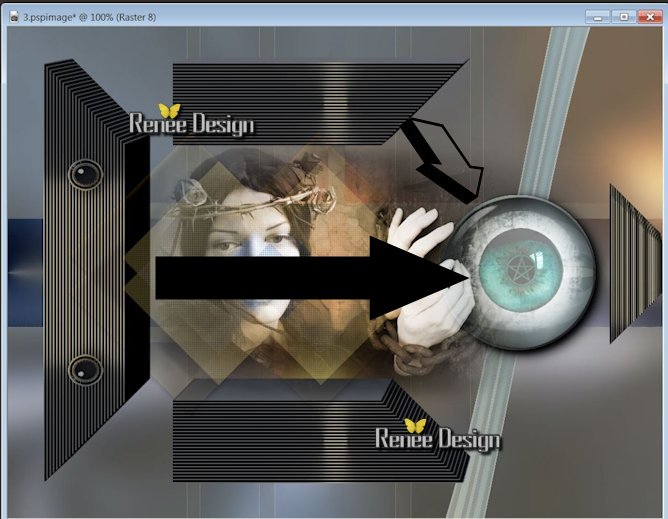
Activate your top layer
34.. Layers - new raster layer (Raster5)
35. Selections-Custom selection with these settings
Color Palette: Foreground color: #f0d68f -Background color : #626670
36. Prepare a radial gradient configured like this
.jpg)
37. Fill the selection with the gradient
/
opacity paint tool / 100
38. Effects- Plugins Ap01 Innovation - Lines
Silverling
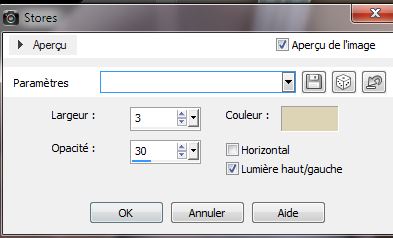
.jpg)
39. Selections - select none
40 Layers- Duplicate - Image flip
41.Layers-Merge-Merge Down
42. Effects-Plugins Simple -Pizza slice Mirror
43. Stay on this layer ( raster 5)
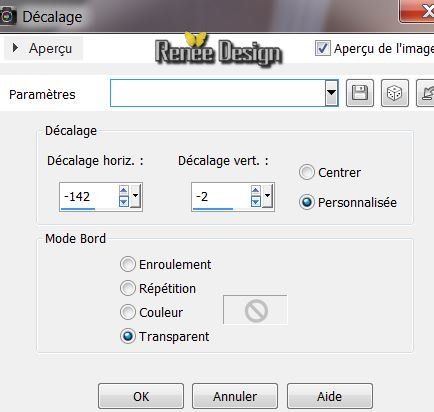
Selections-Custom selection with these settings
44. Selections-Promote selection to layer
45. Activate the layer underneath (raster5) / Delete
46 Selections - Deselect all
47. Activate your top layer in your layer palette( promoted selection 1 )
This is the result
48. Effects - Distortion Effects-Punch-
/ 100
49. Effects - Plugins Simple - Blintz
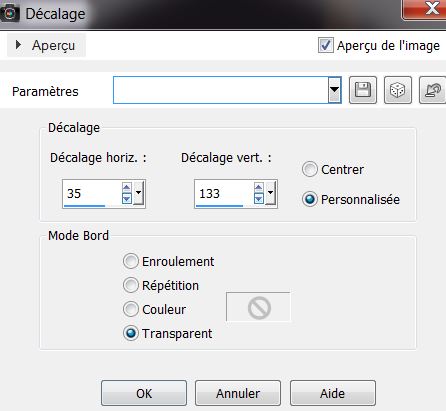
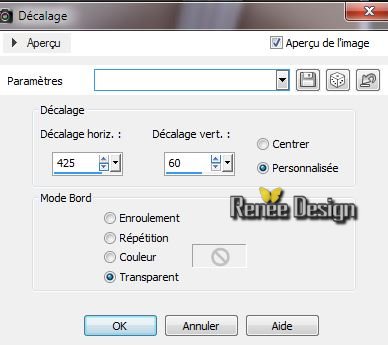
50. Effects- Image effects-Offset
51. Layers-Merge-Merge Down
52. Effects - Plugins EyeCandy 5 Impact - Extrude
/Preset -"Instant_ magique _extrude''( raster 5)
53. Layers - New raster layer
54. Selections - load/save selection - load selection from disk and choose''instant_magique3''
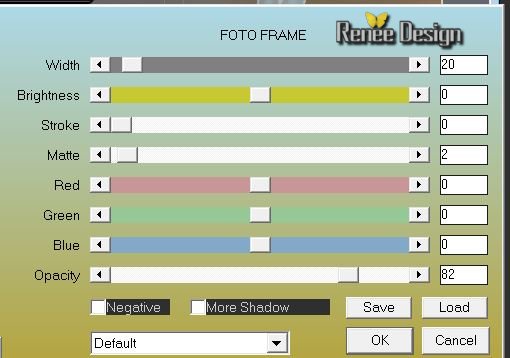
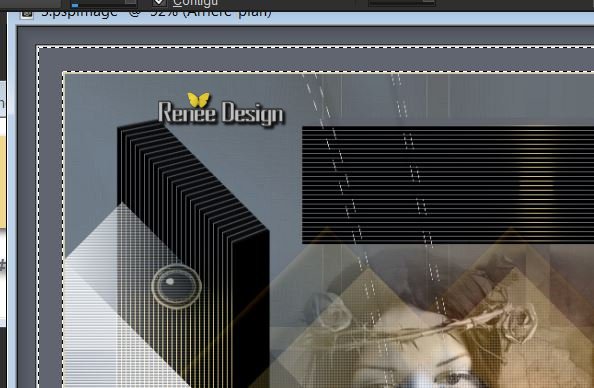
55. Color Palette/Repeat the radial gradient / uncheck but invert / Fill the selection with the gradient
56. Effects- Plugins EyeCandy 5 Impact /preset
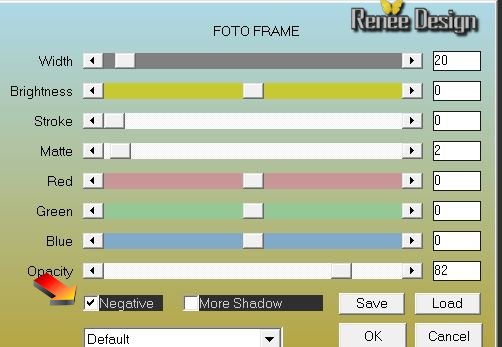
''instant _magique_glass2''
57. Selections - select none
58. With your magic wand select the
intérieur du cercle to the preview

Flood Fill tool: Fill the selection with the background color: #5a5f68
59. Effects - Plugins EyeCandy 5 Glass -
preset ''instant _magique_glass2''
Selections - select none
60.Layers-Duplicate-Image Flip
61. Layers-New raster layer
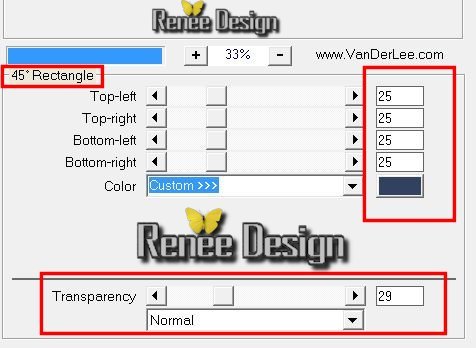
62. Effects - Plugins Vanderlee Unplugged X/ 45° with color: #32415f
63. Effects - Plugins Toadies
What are you / 50/20
64. Blend mode to "Hard Light"
65. Layers - Duplicate /Image
resize 80% all layers not checked
66. Layers-Merge-Merge Down
67. Effects - Texture effects-Blinds store/foreground color
68. Effects - Plugins EyeCandy 5
-Impact -Perspective shadow/ Preset
"instant_magique_shadow''
and the opacity to 55%
69. Open the tube
''TriziaTube_All_th_queens_are_not_free'' edit/ copy- edit/ paste as new layer (do not move it is in the right place)
Blend Mode of this layer: "Luminance Legacy"
Stay on top of the layer in your layer palette
70. Open the tube
''instant_magique_image2'' edit/ copy - edit/paste as a new layer-
place right on the ball/Blend Mode of this layer" Hard Light "does not change!
71. Open the tube
''TriziaTubed-WITCHEYE'' (activate raster 1 of your tube )
edit/ copy - edit/paste as a new layer- / place to have this result /and the opacity to 69%
72.. Open the tube ''instant
magique_image3'' edit/ copy - edit/paste as a new layer
73. Effects- Image effects-Offset

74. Effects - Texture effects-Blinds -
(with the background color: #5a5f68)
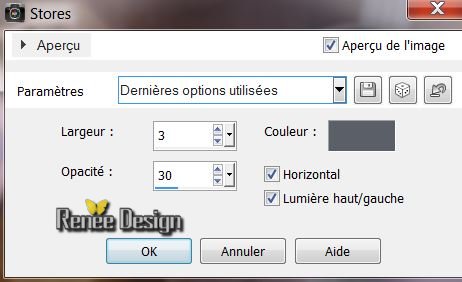
and the opacity to 53%
75. Ouvrir et coller en place comme
nouveau calque le tube ''''instant magique_image4''
76. Effects - Image effects-Offset
72. Effects - Distortion effects-Wave
73 . Back on the bottom layer ( le
raster 1)
74. Selections - load/save selection - load selection from disk and choose''instant_magique_2''
75. Selections-Promote selection to layer
76. Selections - Deselect all
77. Layers-Arrange-Bring to Top
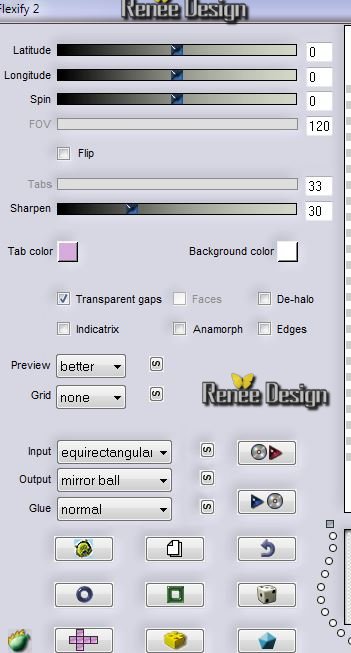
78. Effects -Plugins Flaming Pear /Flexify2
79. Effects - Plugins EyeCandy 5 -Impact -Glass
-Preset ''instant_magique_glass3''
80. Effects - Image Effects-Offset
81.. Open the tube ''My oh my-devil
tube'' /image resize 45% - edit/copy-edit /paste as a new layer
82.. Open and edit/copy-edit /paste as a new layer
'''instant magique_image5'' /Image -Free rotate 15°a left and place
83.. Back on the bottom layer
(Raster1)
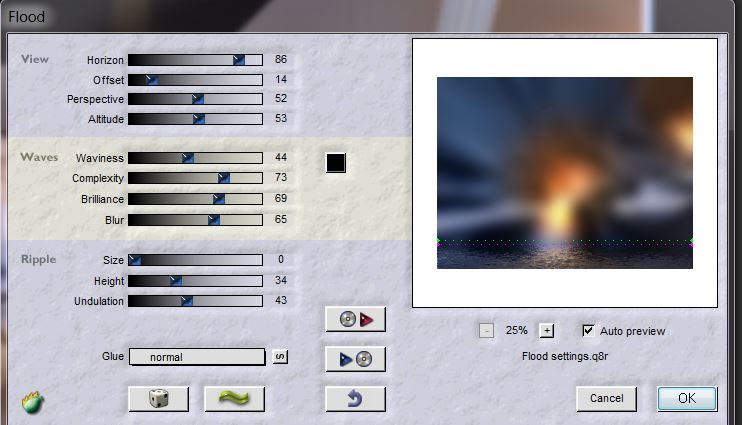
84. Effects - Plugins Flaming Pear Flood
85. Effects - Edge Effects/Enhance More
86. Image - add borders symmetric 2
pixels color 1
87. Image - add borders symmetric 50
pixels color 2
88. Effects -Plugins AAA Fraame -Foto
Frame
89. With your magic wand select the small inner border(like this)
90. Effects -Plugins AAA Frame - Foto
frame
91. Selections - Deselect all
92.Open tube titre edit/ copy - edit/paste as a new layer or take mine (
font that is used here ''Oh Lucille DNA'')
93. Image redimensionner a 1015 pixels Width
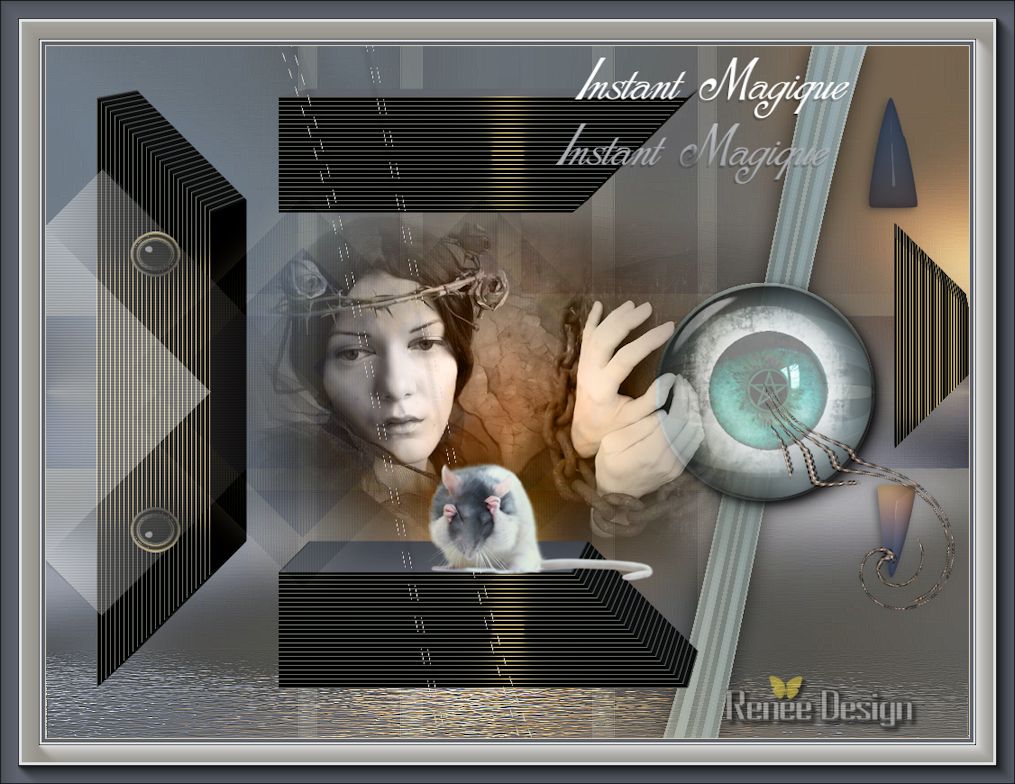
All Finished
Renée
This lesson was written by Renée
Created the
5/12/2013
*
Any resemblance with an existing lesson is merely a coincidence
*
Don't forget
to thank the people who work for us and with us.
I named the tubeurs - Testers and the translators
Thank you

| 

 Traduit