|
Let's start the lesson.
-
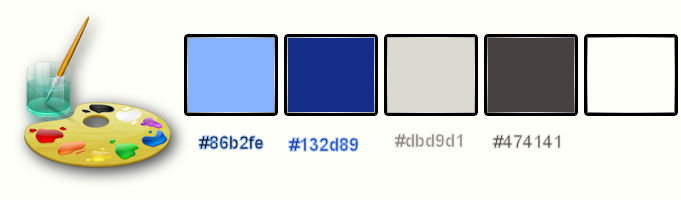
Color Palette- Set your foreground color to color #86b2fe
- Set your background color to color #132d89
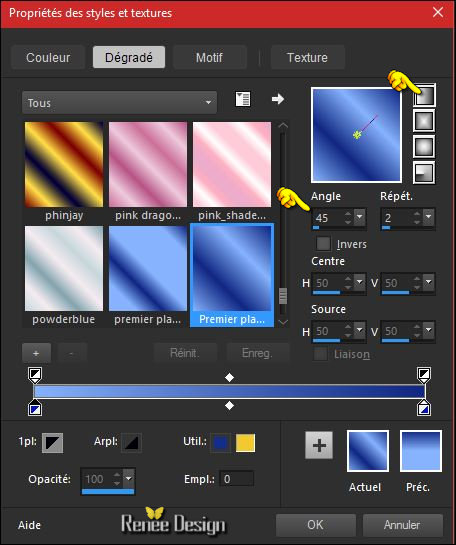
-Properties Foreground; Set your Foregroundcolor to foreground-background linear gradient,configured like this.
1.
File: Open New Transparent Image 1005 x 655 Pixels
2.
Activate Flood Fill Tool and fill the layer with the gradient
3.
Adjust- Blur-Gaussian Blur: Radius 50
4.
Adjust-Add/Remove Noise-Add Noise use settings below
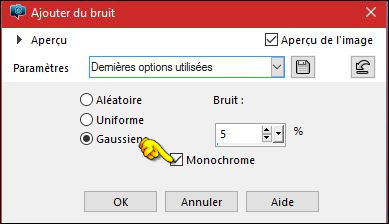
5.
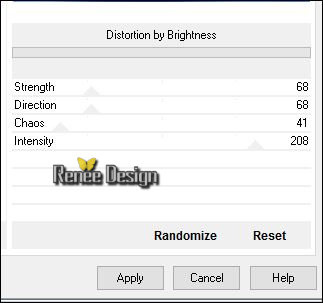
Effects –Plugins - Unlimited – VM Distorsion – Distortion by
Brightness
6.
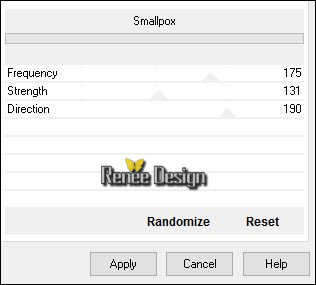
Effects –Plugins- Unlimited – VM Distorsion -
Smallpox
7. Effects –Edge Effects- Enhance More
- Open the mask ’Renee_Masque_Jules_verne’’- in your PSP and minimize it
8. Layers- New Raster Layer
- Color Palette- Set your Foregroundcolor to #ffffff
-Activate Flood Fill Tool and fill the layer with the foreground color #ffffff
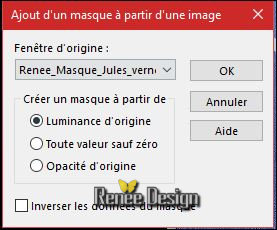
9. Layers - New Mask Layer - From Image and choose my file :
‘-‘’Renee_Masque_Jules_verne «
- Layers- Merge- Merge Group
10. Effects
–3D Effects – Drop Shadow: 2/2/50/4 black
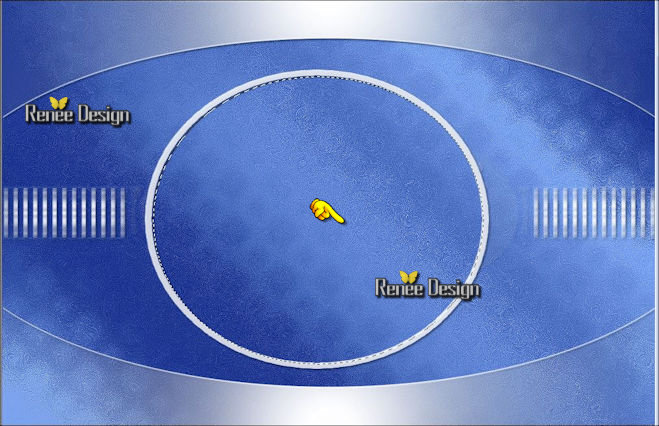
11. Activate your Magic Wand use settings below

Select this part as shown in the example below
12. Layers- New Raster Layer
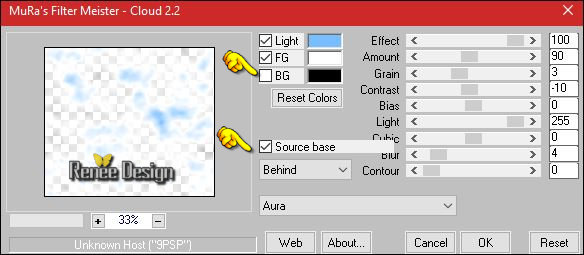
13. Effects
–Plugins – Mura’s Meister – Clouds use settings below
Note: This filter remembers the previous settings when opening your PSP - First, click Reset, and then enter the new settings
Color: # 77bdff - #FFFFFF - (The third color is not used.)
14. Layers- New Raster Layer
15. Open the tube ‘’Renee_tube_Jules Verne_1 »
- Edit-Copy-Back to your work -Edit Paste Into Selection
Selections- Deselect All
-
Set the layer Opacity of this layer to 75%
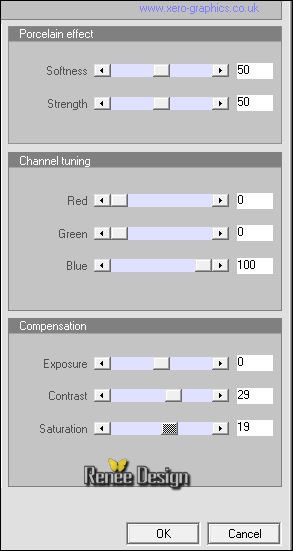
16. Effects
–Plugins– Xero XL – Porcelaine with these settings
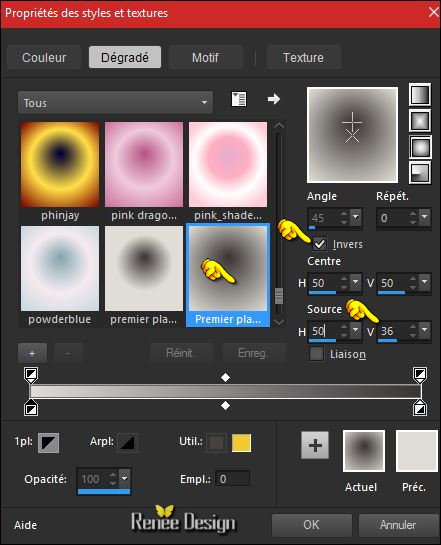
- Color Palette- Set your foreground color to color #dbd9d1 - Set your background color to color#474141
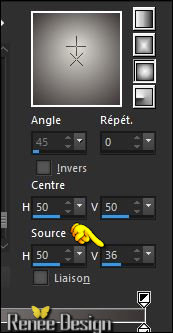
- Color Palette: Set your Foregroundcolor to gradient-Prepare a sunburst gradient configured like this.
17. Layers- New Raster Layer
18.
Selections –load/save selection –load selection from disc and select my selection: ‘’
Renee_JV_1 »
19.
Selections- Modify-Contract 4 Pixels
20. Activate Flood Fill Tool and fill the selection with the gradient
Selections- Deselect All
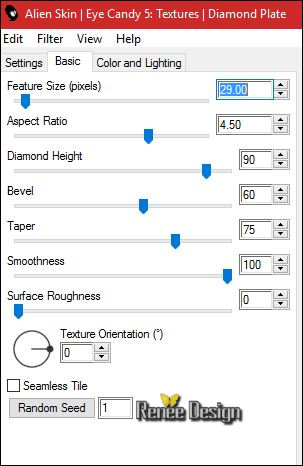
21.
Effects –Plugins– EyeCandy 5 – Textures – Diamond
Plate-tab Settings/User settings choose my Preset ‘’ Renee_JV-Diamond_Plate’’
22. Double click on this Layer and set the Blend Mode to " Overlay"
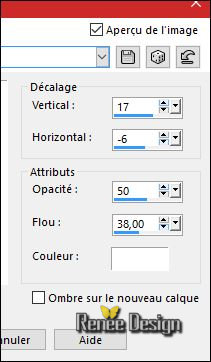
23. Effects –3D Effects – Drop Shadow with these settings:
24. Open the tube ‘’ Renee_tube_JV_mer’’
- Edit/ Copy-Back to your work-Edit - Paste as new layer on your working image
- Move Tool /place your tube on the bottom of your image
25. Open the tube ‘’ JV_sous-marin-nautilus.pspimage’’
- Image
Resize to 75 %
- Edit/ Copy-Back to your work-Edit - Paste as new layer on your working image
- Move tool / place your tube on the left side of your image
26.
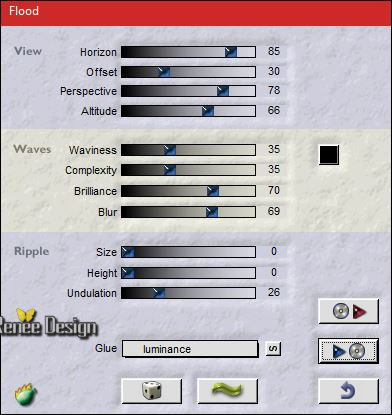
Effects –Plugins – Flood /click on the red arrow>
 >select my file Preset ‘’ JV_Flood
settings.q8r’ ’ can be used in any folder of your choice by clicking it.
>select my file Preset ‘’ JV_Flood
settings.q8r’ ’ can be used in any folder of your choice by clicking it.
-3 Open it will be ok in your filter
27. Open the tube ‘’ JV-Mongolfiere’’
- Edit/ Copy-Back to your work- Edit - Paste as new layer on your working image
- Move Tool / place your tube on the left side of your image ( on submarine)
-
Layer Palette -Double click on this layer and set the Blendmode to " Hard Light "
28. Layers- New Raster Layer
29.
Selections –load/save selection –load selection from disc and select my selection: ‘’
Renee_JV_2 ‘’
- Color Palette- Set your foreground color to color #ffffff
30. Activate Flood Fill Tool and fill the selection with the foreground color #ffffff (2 clicks )
Selections- Deselect All
- Double click on this Layer and set the Blend Mode to " Overlay"
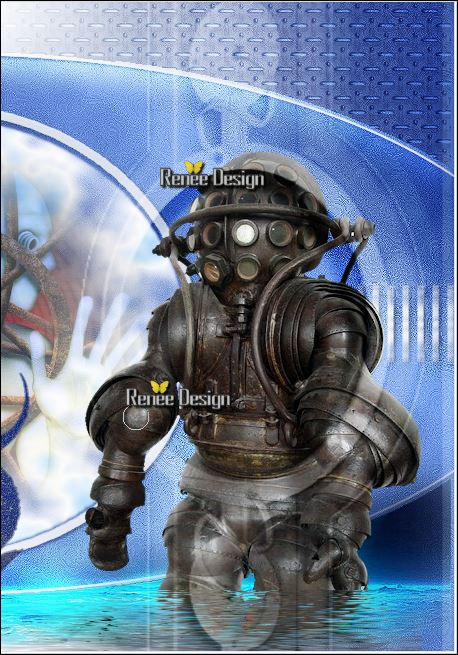
31. Open the tube ‘’ Renee_tube_JV_scaphandrier’’
- Image
Resize to 65 %
- Edit/ Copy-Back to your work -Edit - Paste as new layer on your working image
- Effects- Image Effects-Offset with these settings: H = 325 and V = - 47
32.
Effects –Plugins – Flaming Pear – Flood- select my file -Preset ‘’
JV_Flood settings.q8r’’
- Color-Palette- Resume sunburst gradient (point 16) / same settings /but Invert not checked
33.
Layers- New Raster Layer
34.
Selections –load/save selection –load selection from disc and select my selection: ‘’
Renee_JV_3 ‘’
35. Activate Flood Fill Tool and fill the selection with the gradient
Selections- Deselect All
- Color Palette- Set your background color to color #132d89 (
it is the color that will give the color effect of the following filters )
36. Effects
–Plugins-Unlimited –ICNET FILTERS - Noise Filters- X-Noise
120
37.
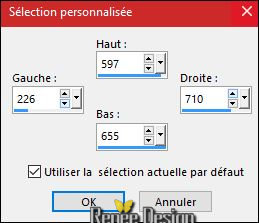
Activate Selection Tool -Custom Selection (S) -Rectangle with these settings
38. Effects>Distortion Effect>Wind - From Left - Wind strength 100
Selections- Deselect All
39. Open the tube ‘’ Renee_tube_JV_sas’’
- Edit/ Copy-Back to your work -Edit - Paste as new layer on your working image
40. Effects- Image Effects-Offset with these settings: H = 300 and V = 0
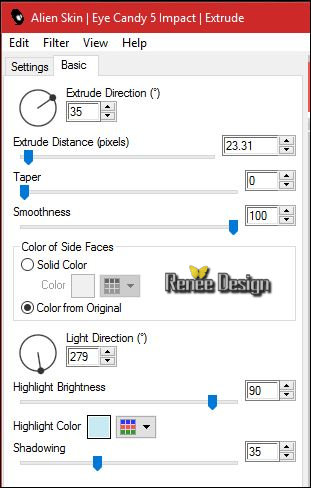
41. Effects
–Plugins – EyeCandy 5 Impact – Extrudes-use settings below / Color:#c7eaf3
- Layer Palette -Double click on this layer and set the Blendmode to " Soft Light "-Set the layer Opacity of this layer to 100%
42. Layers- Duplicate
- Layers- Merge- Merge Down
43. Activate Eraser Tool ,Size 30, and remove part of the circle displayed on the viewer's left arm -see below screen
44. Effects
–3D Effects – Drop Shadow 8/16/50/20 black
45. Effects –Edge Effects- Enhance
46. Layers- New Raster Layer
47.
Selections –load/save selection –load selection from disc and select my selection: « Renee_JV_4 »
- Color Palette- Set your foreground color to color #ffffff
48. Flood Fill Tool (Match mode-None ) Activate Flood Fill Tool and fill the selection with the foreground color #ffffff (If necessary, zoom in)
49. Effects
–3D Effects – Inner Bevel use settings below
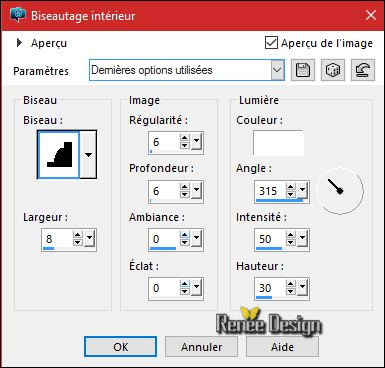
Selections- Deselect All
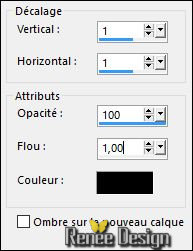
50. Effects –3D Effects – Drop Shadow with these settings:
51. Layers- Merge- Merge Layers Visible
52. Image - Add borders-Symmetric checked: 2 pixels #132d89
-
Selections- Select All
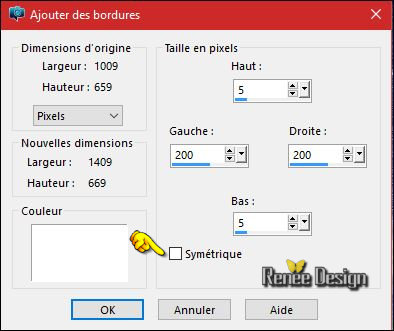
53. Image - Add borders-Symmetric NOT checked with these settings-#ffffff
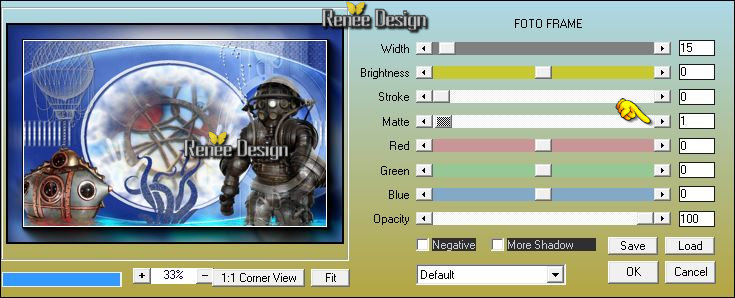
54. Effects
-Plugins – AAA Frame - Foto Frame use settings below
-
Promote Background Layer=Raster 1
54.
Selections- Invert
55. Layers- New Raster Layer
56. Open the tube ‘’fond_JV.Jpg »
- Edit-Copy-Back to your work -Edit Paste Into Selection
Selections- Deselect All
57. Open the tube ‘’JV_DECOS »(do not close, we will need it again soon)
- Activate layer ‘’ Renee_tube_JV_3.jpg’’ of the tube
- Edit/ Copy-Back to your work -Edit - Paste as new layer on your working image
- With the Move Tool, move it to the right side
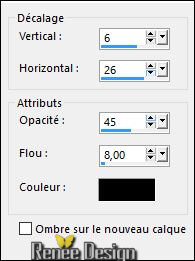
58. Effects –3D Effects – Drop Shadow with these settings: 0/7/43/8 black
59. Activate layer ‘’ logo_JV 1.pspimage’’ of the tube
-Edit/ Copy-Back to your work -Edit - Paste as new layer on your working image
- With the Move Tool, move it to the right side
60. Effects –3D Effects – Drop Shadow with these settings: 5/6/65/3 black
61. Activate layer ‘’ Renee_tube_JV_2 ‘’ of the tube
- Edit/ Copy-Back to your work-Edit - Paste as new layer on your working image /With the Move Tool, move it to the left side
62. Effects –3D Effects – Drop Shadow with these settings:
Activate layer ‘’ Renee_tube_JV_4 ‘ ’ of the tube
- Edit/ Copy-Back to your work -Edit - Paste as new layer on your working image /With the Move Tool, move it to the left side
63. Effects
–3D Effects – Drop Shadow: 20/10/30/3 black
64. Image - Add borders-Symmetric checked: 10 pixels #ffffff
65. Open the tube ’’titre_Jules_Verne’’
-Edit/ Copy-Back to your work -Edit - Paste as new layer on your working image /With the Move Tool, move it to the top of your image
66.
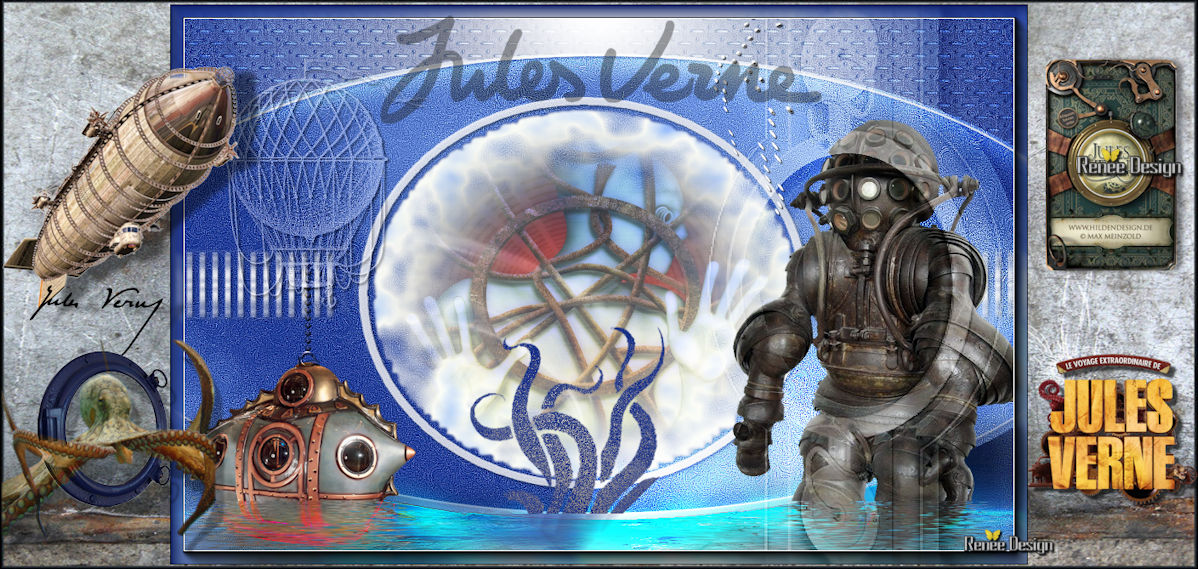
Layers- Merge- Merge All (flatten)
67. Image
Resize to 85%
Save as JPG
I hope you enjoyed this lesson
Renée
This lesson was written by Renée 03/08/2016
Edited and Update
2016
*
Any resemblance with an existing lesson is a coincidence
* Do not forget to thank the people who work with us and for us I have appointed the tubeurs and translators
Thanks Renée *
*
| 

 Translations


 When you see this logo the filter is imported in Unlimited

 All rights reserved