|
Let's start the lesson
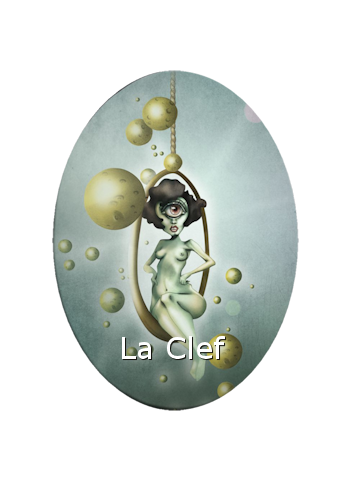
La clef/The key
- Preparation
- Material Properties: Set your foreground color to color #e4dec3= 1 – Set your background color to color #85362e= 2

-
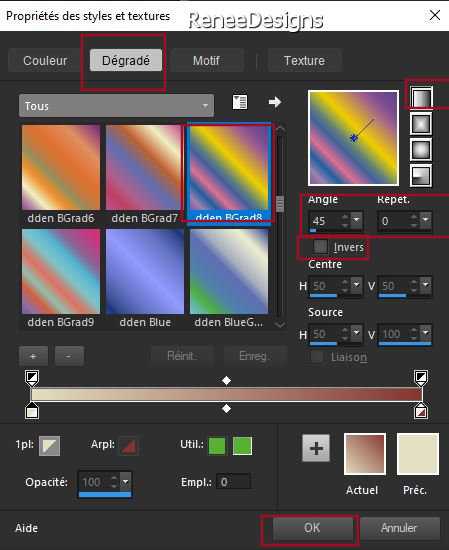
Change Foreground color into a foreground-gradient and choose gradient ‘’dden BGrad8’’
Style
Linear use the settings below
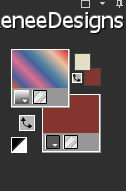
-Your Material palette looks like this
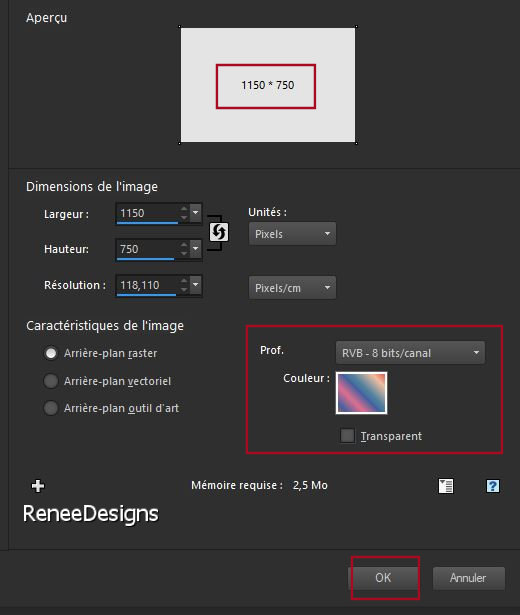
1. File - New -Image 1150 x 750 Pixels -Set the color to the Gradient (Right Mouse click and choose the Foreground Gradient)
2. Adjust - Blur - Gaussian Blur: Radius 45
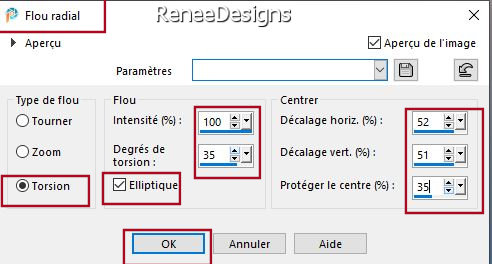
3. Adjust-Blur- Radial Blur use the settings below
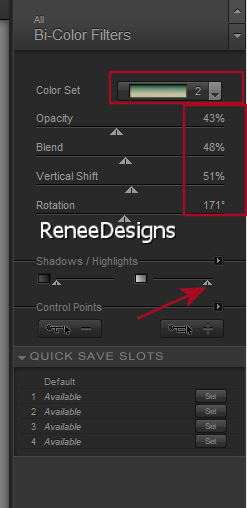
4. Effects-Plugins - Nick Softwar Color Effex Pro.3 0/Bi-Color
Filters/Color set/Green/Brown 2 use the settings below
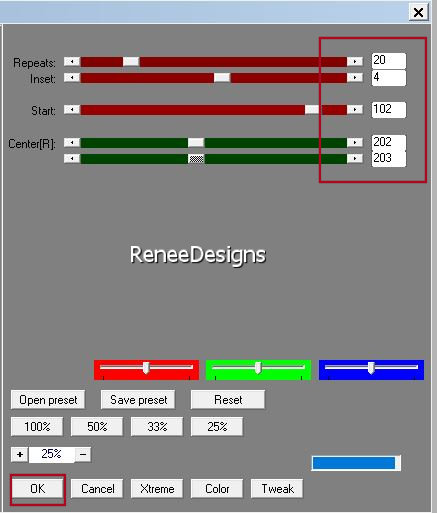
5. Effects-Plugins- AP [Utility]Utility – Repeats4 use the settings below
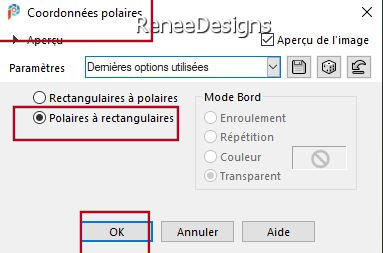
6. Effects -Distortion Effects - Polar Coordinates Polar to Rectangular
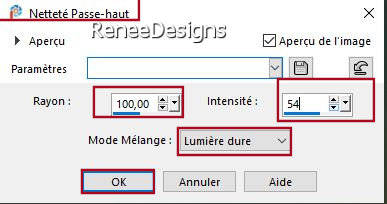
7. Adjust-Sharpness-High Pass Sharpen use the settings below
8. Image - Mirror - Mirror vertical ( Image - Flip in older versions of PSP)
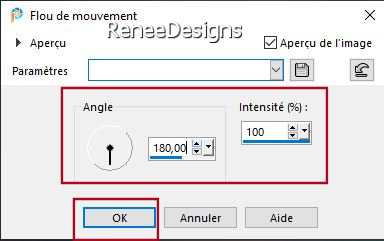
9. Adjust- Blur -
Motion Blur use the settings below
10. Layers- Duplicate
11. Effects –Plugins -
Unlimited 2.0 – Visual Manipulation – Transmission with these settings:
150/25/0
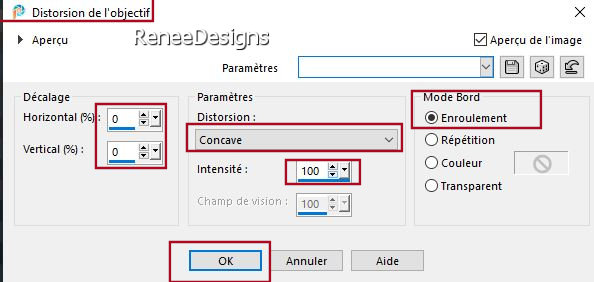
12. Effects – Distortion Effects -Lens Distortion- Pincushion use the settings below
13. Layers-Properties-Change the Blend Mode to " Overlay " – Lower the Opacity to 73%
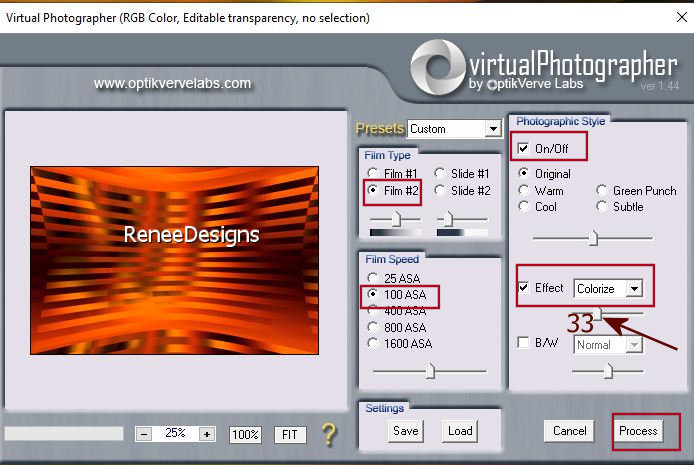
14. Effects – Plugins – OptikVerveLaps- Virtual Photographer -Effect-
Colorize at 33
- Material Palette: Change Foreground color into color #ffffff=5
15. Layers- New Raster Layer
16. Activate Paint Brush Tool and choose the Brush –''Renee-Pinceau-Laclef''
If it doesn't work : File- Export -Custom Brush (Give it a name) and OK
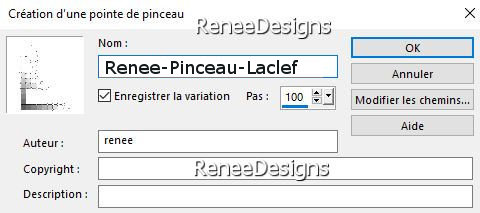
Activate Paint Brush Tool and choose the Brush ''Renee-Pinceau-Laclef'' Size 405

- Stamp with the white Foreground color (Left Mouse Click) on your image (don't worry about its location)
17. Objects – Align
– Bottom
- Objects –Align –
Left
18. Layers- Duplicate
19. Layers-Merge- Merge Down
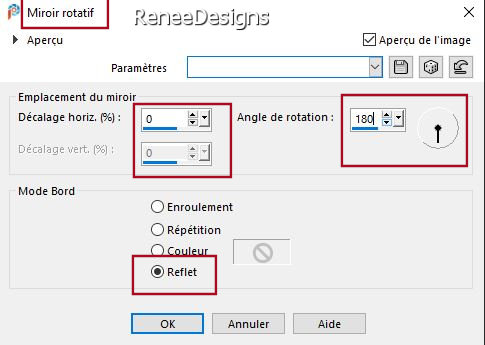
20. Effects- Reflection Effects – Rotating Mirror use the settings below
21. Effects- Reflection Effects – Rotating Mirror with these settings
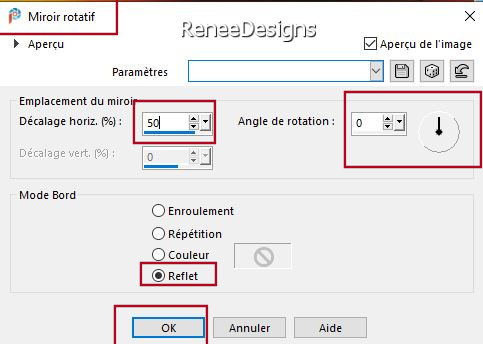
- Repeat: Effects- Reflection Effects – Rotating Mirror with the same settings
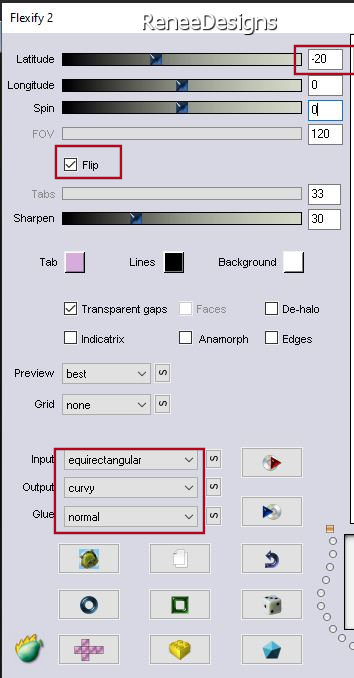
22. Effects – Plugins– Flaming Pear – Flexify 2 use the settings below
23. Image - Mirror - Mirror vertical ( Image - Flip in older versions of PSP)
24. Pick Tool: (K) on your keyboard -Enter these parameters on the toolbar
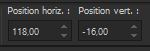 118/ -16
-Press ( M ) to close the Pick Tool
25. Effects- 3 D-Effects-Drop Shadow with these settings: 10/10/50/7 Color Black
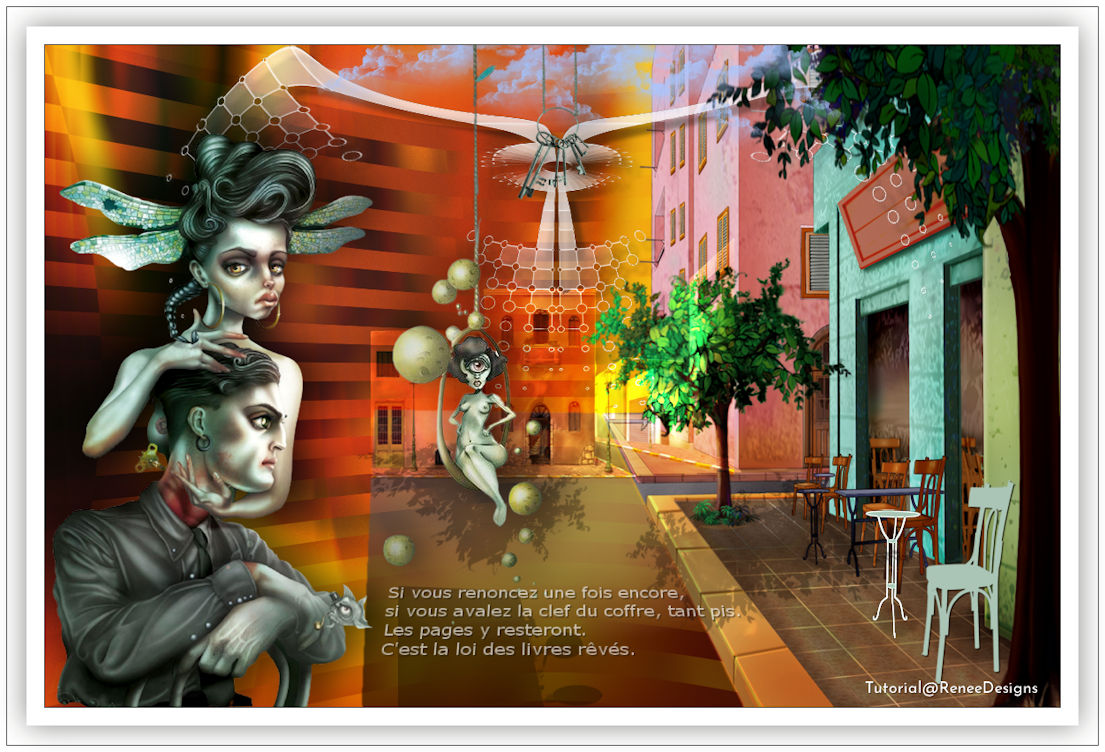
26. Open Tube ‘’Renee-TUBES-la-clef-Immeuble’’ --Edit - Copy- Activate your work -Edit - Paste as a new layer
27. Objects – Align
– Right
28. Layers- Arrange-Move Down
- Material Palette: Change Foreground color into color # 726e74=4
29. Layers- New Raster Layer
30. Selections –load/save selection –load selection from disc and select my selection: ‘’LaClef-1’’
31. Activate Flood Fill Tool
 –
Fill the selection with the Foreground color =4 (2 clicks) –
Fill the selection with the Foreground color =4 (2 clicks)


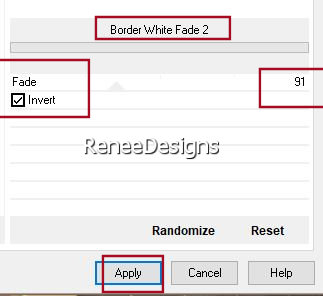
32. Effects –Plugins-
Unlimited 2.0 - Special Effects 2- Border White Fade 2-Fade 91-Invert checked
- To replace the top of the Layer-Palette
33. Open Tube ‘’Renee-TUBES-la-clef-Image1’’ -Edit - Copy- Activate your work -Edit - Paste as a new layer
34. Pick Tool: (K) on your keyboard -Enter these parameters on the toolbar
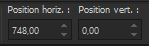 748/0 748/0
-Press ( M ) to close the Pick Tool
35. Open Tube ‘’Renee-TUBES-la-clef-Image2’’ -Edit - Copy- Activate your work -Edit - Paste as a new layer
36. Pick Tool: (K) on your keyboard -Enter these parameters on the toolbar
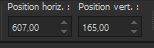 607/
165 607/
165
- Press ( M ) to close the Pick Tool
37. Layers- New Raster Layer
38. Selections –load/save selection –load selection from disc and select my selection: ‘’LaClef-2’’
39.Material Palette: Change Foreground color into color #ffffff=5
Activate Flood Fill Tool
–
Fill the selection with the Foreground color=5
40.Activate Tool - Color Changer
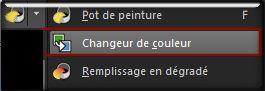 and colorize to your taste (the small table) and colorize to your taste (the small table)
(Renée colored with color #aac5b6=3)
41. Effects- Edge Effects - Enhance
42. Layers- New Raster Layer
43. Selections –load/save selection –load selection from disc and select my selection: ‘’LaClef-3’’
44. Material Palette: Change Foreground color into color #aac5b6=3
Activate Flood Fill Tool
–Fill the selection with the Foreground color=3
45. Effects- 3 D-Effects-Drop Shadow with these settings: 1/1/100/1 Black
46. Open Tube ‘’ Renee-TUBES-la-clef-Image3’’ -Edit - Copy- Activate your work -Edit - Paste as a new layer
47. Pick Tool: (K) on your keyboard -Enter these parameters on the toolbar
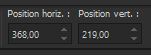 368/219
-Press ( M ) to close the Pick Tool
- Leave the Blend Mode on "Overlay"
48. Layers- New Raster Layer
49. Selections –load/save selection –load selection from disc and select my selection: ‘’LaClef-4’’
50.Material Palette: Change Foreground color into color #000000=6
Activate Flood Fill Tool
–Fill the selection with the Foreground color=6
51. Layers-Properties -Reduce the Opacity of this layer to 29%
52. Layers- New Raster Layer
53. Selections –load/save selection –load selection from disc and select my selection: ‘’LaClef-5’’
54. Activate Flood Fill Tool
–
Fill the selection with the Foreground color=6 (1 or 2 clicks in each selection)
55. Open Tube ’’Renee-Laclef-Nuages" -Edit - Copy- Activate your work -Edit - Paste as a new layer
Place at the top of your work
-Renée duplicated the layer and moved it slightly to the right
56. Open Tube
‘’ Renee-TUBES-La-Clef-Tuto ’'(Do not close, we need the tube again)
- Activate Raster 1 of this tube
- Image - Resize - 65%
- Edit - Copy- Activate your work -Edit-Paste as a new layer
- Place at the bottom left
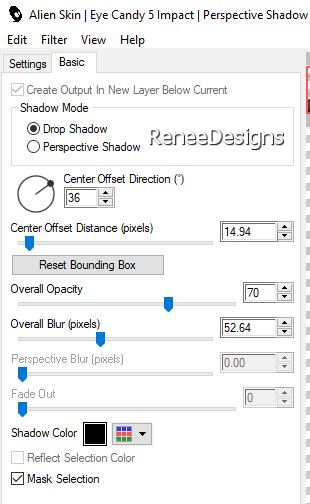
57. Effects – Plugins – Alien Skin EyeCandy 5 Impact- Perspective
Shadow use the settings below
- Back to the tube
‘’ Renee-TUBES-La-Clef-Tuto ’’ and go to Raster Layer 2 of the Tube
58. Edit - Copy- Activate your work -Edit-Paste as a new layer
- Move it in the right place( see finished image)
59. Repeat: Effects –Plugins– Alien Skin EyeCandy 5 Impact- Perspective
Shadow with thes same settings
60. Open the tube ‘’Renee-TUBES-la-clef-trousseau’’ ( The Keys) -Edit - Copy- Activate your work -Edit-Paste as a new layer
- Move it in the right place( see finished image)
61. Drop shadow of your own choice
62. Open the tube "texte" - Edit - Copy- Activate your work -Edit-Paste as a new layer
- Move it in the right place( see finished image)
63.Image - Add borders-Symmetric checked: 1 Pixel Color Black
64.Image - Add borders-Symmetric checked: 50 Pixels Color White
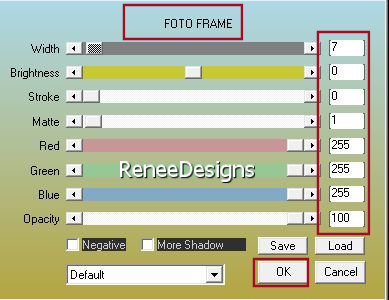
65. Effects – Plugins- AAA – Frame – Foto Frame use the settings below
66. Selections
-Select All -Selections -
Modify– Contract 30 Pixels
67. Effects- 3 D-Effects-Drop Shadow with these settings: 0/0/50/50 Color Black
68. Paste the author's watermark on your work and your own watermark
Layers-Merge-Merge All ( flatten)
Image - Resize - 1105 Pixels Width
-Save as JPG
That's it - Thank you / I hope you enjoyed this lesson
Renée
This lesson was written by Renée 20/10/2021
Edited and Update
in 2021
*Any resemblance with an existing lesson is a coincidence
* Do not forget to thank the people who work with us and for us
-I have appointed the tubeurs and translators
Thanks
*
|
 Translations