|
Let's start the lesson .
- Material Properties: Foreground color to this color: #6b393b- Background color to this color : #dcbac1
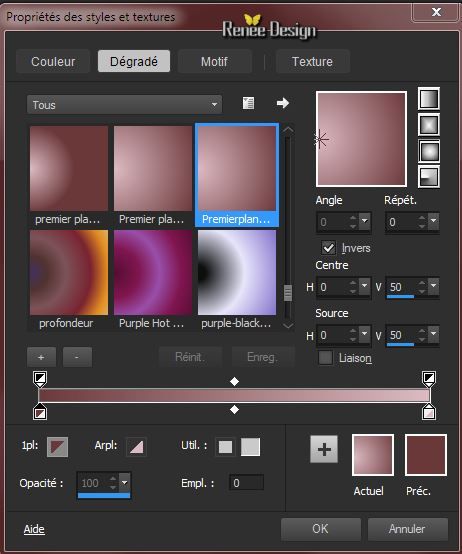
1. Prepare a Sunburst Gradient as configured like this.
2. Open a new transparent image of 995
x 585 pixels
3. Activate Flood Fill Tool and fill the layer with the gradient
4. Effects-Plugins - Unimited 2.0 -
Andrew's Filters 8- Tow the Line

5. Open the tube ''le
_grenier_athe_image1''
- Edit/copy- Edit/ paste as new layer (do not move it is in the right place)
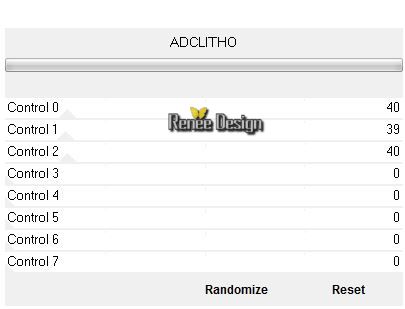
6. Effects-Plugins - AFS IMPORT - ADCLITHO with these settings
7. Layers-Duplicate
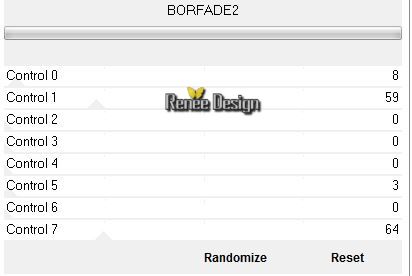
8. Effects-Plugins - AFS IMPORT- BODERFADE2
9. Effects-Plugins -
Simple
-Zoom
out and Flip
10.
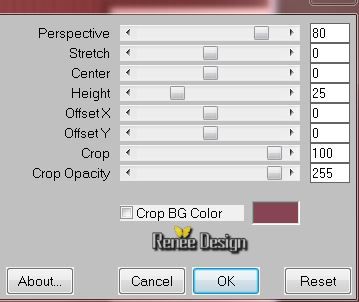
Effects-Plugins - Muras meister -
perspective tilling
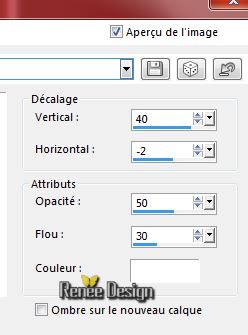
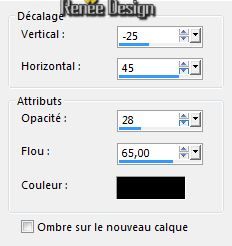
11. Effects - 3D Effects - Drop shadow with these settings:
12. Effects-Plugins - EyeCandy 5- Blacklight- -in the settings tab, click on the preset ''grenier_athe_BL''
13.
Layers- New Raster layer
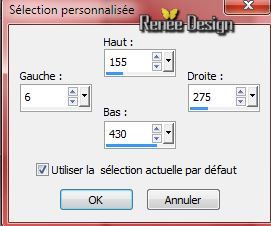
14.
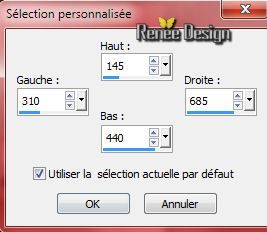
Selection Tool ( S ) Custom selection use settings below
15.
Open the tube ''grenier_renee'' - Edit/copy-Edit paste into selection
16.
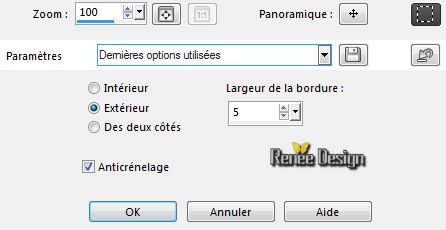
Selections-Modify-Select-Selection Borders with these settings
17.
Layers- New Raster layer
Activate Flood fill tool and fill the selection with the foregroundcolor
Selections-Deselect All
18.Layers-Duplicate
19.
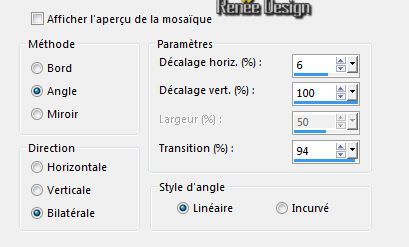
Effects-Image Effects-Seamless Tiling use the settings below
20.
Layers-Merge-Merge Down
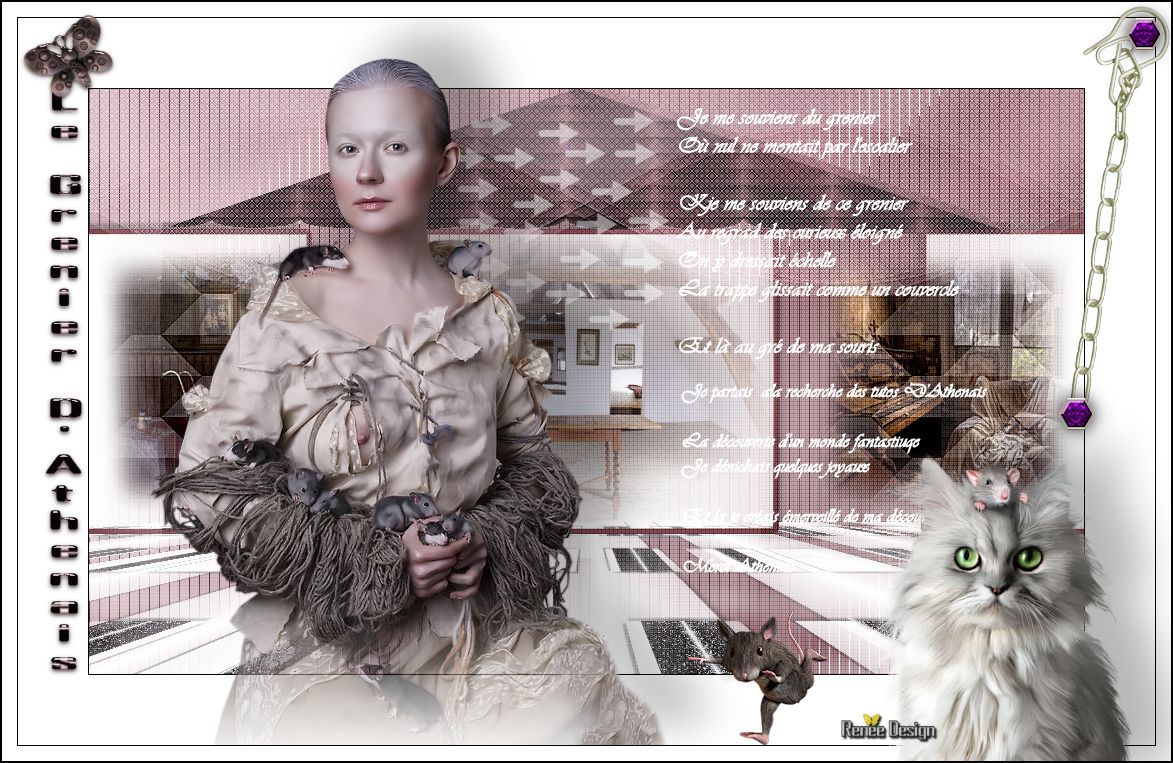
Your work look like this now
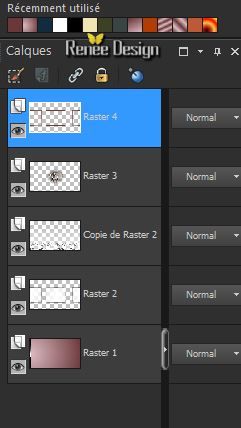
-
Layer Palette: activate Raster 2
21.
Layers-Duplicate
22.
Effects-Plugins - Mura's Meister -
Perspective Tilling (with the same settings )
- Activate the top of the Layer-Palette
23.
Layers- New Raster layer
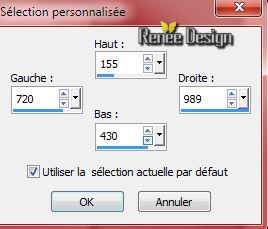
24.
Selection Tool ( S ) Custom selection use settings below
25.
Open the tube ''Mina@.mist.halloween2.24.10.pspimage''-
Edit/copy-Edit paste into selection
Selections-Deselect All
26.
Layers- New Raster layer
27.
Selection Tool ( S ) Custom selection use settings below
28.
Open the tube ''Mina@.mist.halloween1.24.10.pspimage''-
Edit/copy-Edit paste into selection
Selections-Deselect All
29.
Layers- Merge- Merge Down
30.
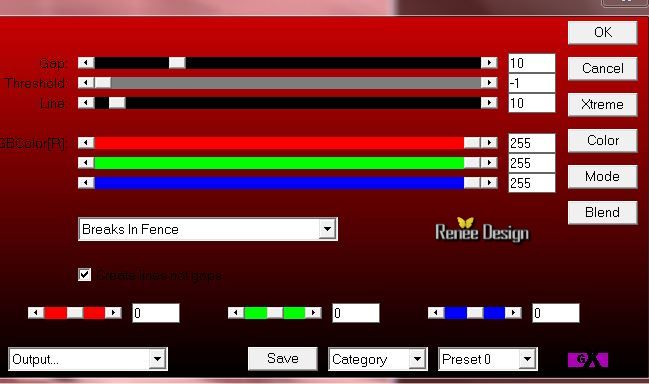
Effects-Plugins - Graphic Plus - Cut
Glass 15/ 18
31.
Adjust-Sharpness-Sharpen More
32.
Open the tube "grenierAT_imageeffet''
-
Edit/copy- Edit/ paste as new layer (do not move it is in the right place)
33.
Material Properties:Foregroundcolor to color:#4a4e58
Prepare a Radial Gradient as configured like this.
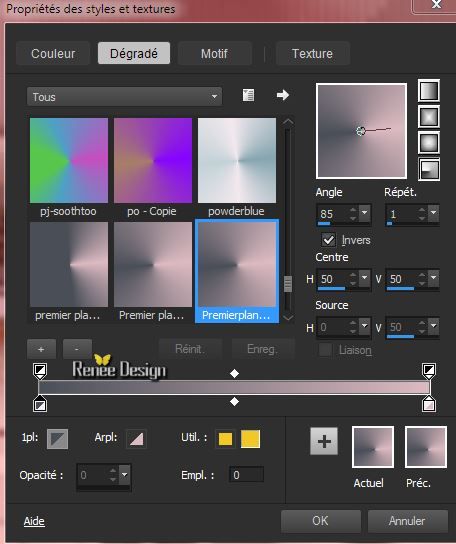
34.
Layers- New Raster layer
-Activate Flood Fill Tool and fill the layer with the gradient
35.
Adjust-Blur-Gaussian Blur: Radius: 50
36.
Effects-Plugins - Screenworks -Boxet dot
-
Layer Palette -Double click on this Layer and set the Blend Mode to Screen
37.
Layers-Merge-Merge Down
-Layer Palette -Double click on this Layer and set the Blend Mode to Soft Light
38.
Layers- New Raster layer
39.
Selections - load/save selection - load selection from disk and choose my selection: ''grenier_athe_1''
Activate Flood fill tool and fill the selection with the foregroundcolor #4a4e58
40.
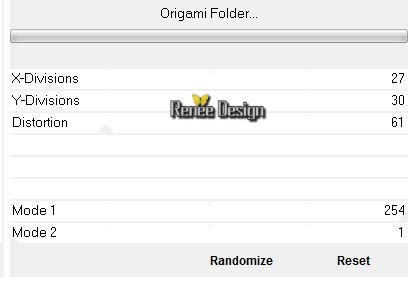
Effects-Plugins - VM Instant Art-
Origami Folder
Selections-Deselect All
-Layer Palette -Double click on this Layer and set the Blend Mode to Luminance
41.
Effects-Plugins - Eycandy5- Extrude-in the settings tab, click on the preset ''grenier_AT_extrude''
42.
Layers- Merge-Merge Visible
43.
Open the tube '' grenier_athe_effetrideaux''
-Edit/copy- Edit/ paste as new layer on your working area
44.
Place it at the top of your work
-Layer Palette -Double click on this Layer and set the Blend Mode to Screen
45.
Effects-Plugins - AP01-Lines Silverling with these settings
46.
Reduce the opacity of this layer to 63%
47.
Effects- Edge Effects- Enhance More
48.
Open the tube texte ''texte_grenierAT" -Edit/copy-Edit paste as a new layer on your working area and move
49.
Activate Brush: '' arrow-brush-AT.jpg''
-
File- Export -Custom Brush >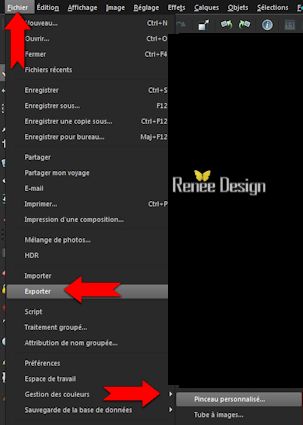
a window opens
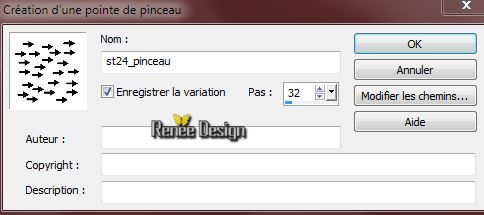 -
Give it a name -
Give it a name
50.
Activate your brush tool and activate the imported brush
-
Layers-New raster layer
-
Foreground color to color white/ Activate Brush Tool and select my file:arrow-brush-AT.jpg/Stamp the brush with the foregroundcolor white

-
Reduce the opacity of this layer to 48%
51.
Image - Add borders-Symmetric checked:1 pixel color black
52.
Image - Add borders-Symmetric checked:70 pixels color white
53.
Open the tube ''Athe_FM225 "activate tube
modifié
Edit/copy-Edit paste as a new layer on your working area /With your move tool move to the left
54.
Effects - 3D Effects - Drop shadow with these settings
55.
Image - Add borders-Symmetric checked:1 pixel color black
56.
Image - Add borders-Symmetric checked:15 pixels color white
57.
Open the tube '' Alies 1AN551-cat&mouse-20062013.pspimage''
-
Edit/copy-Edit paste as a new layer on your working area and move
58.
Effects - 3D Effects - Drop shadow ( with the same settings )
59.
Open the tube '' rat@I5.pspimage"
-
Edit/copy-Edit paste as a new layer on your working area and move
60.
Image - Add borders-Symmetric checked:1 pixel color black
61.
Open the tube ' titre ''and '' déco''
-Edit/copy-Edit paste as a new layer on your working area and move
62.
Layers-Merge-Merge All
63.
Image - Add borders-Symmetric checked:1 pixel color black
Save as JPG
I hope you enjoyed this lesson
Renée
This lesson was written by Renée 25/10/2014
Created the 10/2014
*
Any resemblance with an existing lesson is merely a coincidence *
* Don't forget to thank the people who work for us and with us. I named the tubeurs - Testers and the translators.
Thanks Renée.
*
|
 Translations


 All rights reserved