|

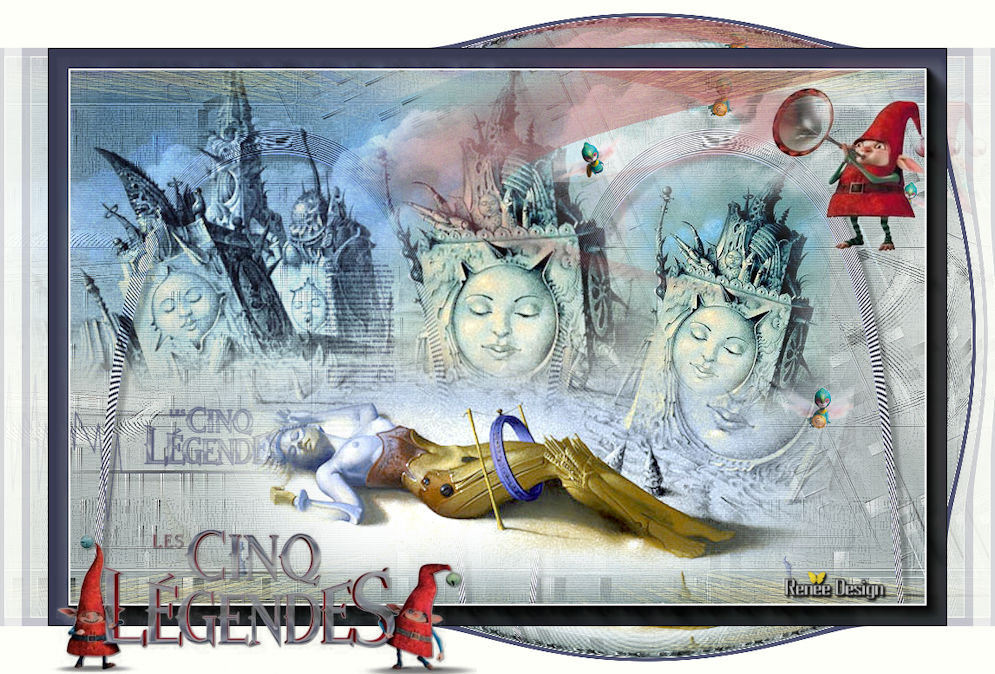
Let's start the lesson.Open color card
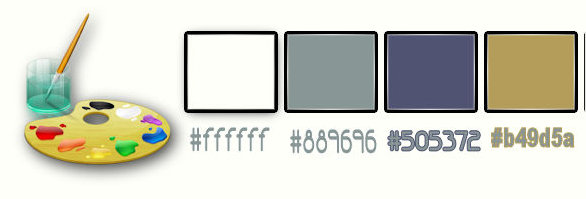
-Material Properties-Set your foreground to #ffffff -Set your background color to
#889696
-
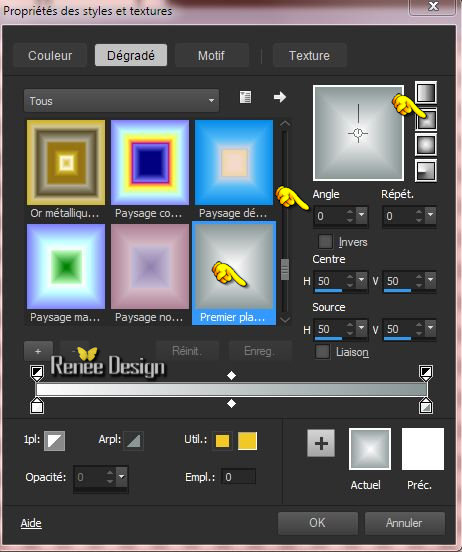
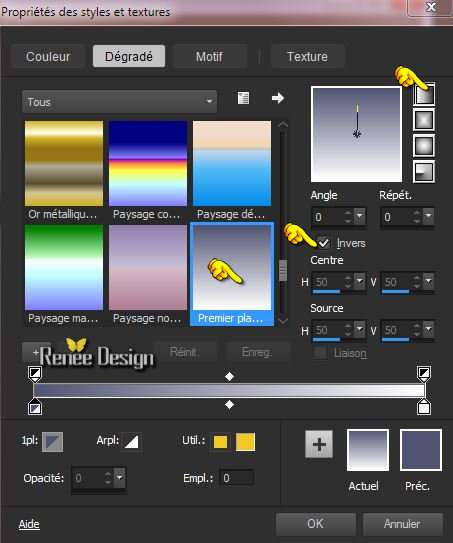
Set your foreground to gradient 'Foreground-background' Rectangular with these settings
1.
Open a transparent image of 1015 x 645 pixels
2.
Activate Flood Fill Tool and fill the layer with the gradient
3. Effects-Texture-effects -Straw Wall with these settings

4.
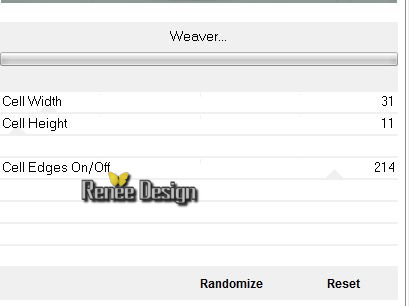
Effects-Plugins – Unlimited – Toadies – Weaver
5.
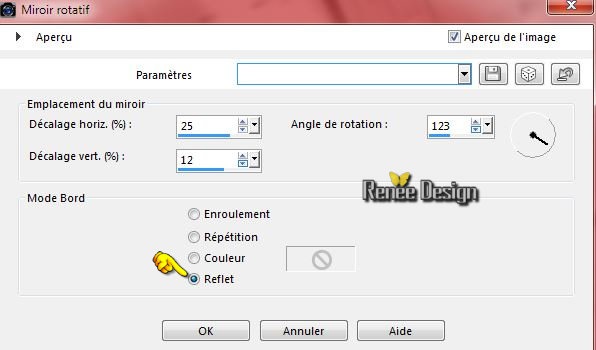
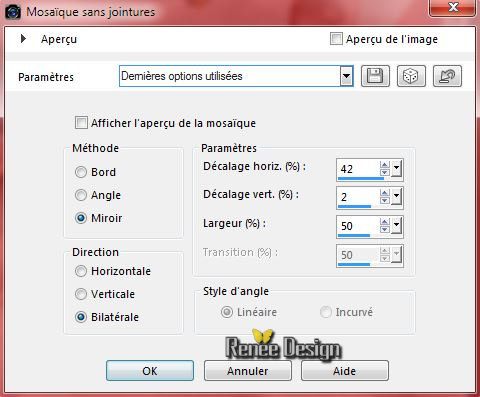
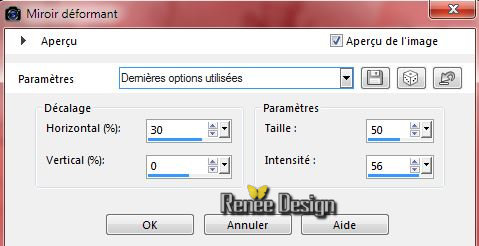
Effects-Reflection Effects-Rotating Mirror with these settings
6.
Layers- New Raster layer
7.
Selections –load/save selection –load selection from disc and choose: » cinq_legendes_1 »
8.
Activate Flood Fill Tool and fill the selection with the gradient
Selections-Deselect All
9.
Effects –Plugins – L and K’s – Elvida a
200
10.
Effects – Plugins– Toadies – What are you
20/20
11. Effects-Edge Effects-Enhance
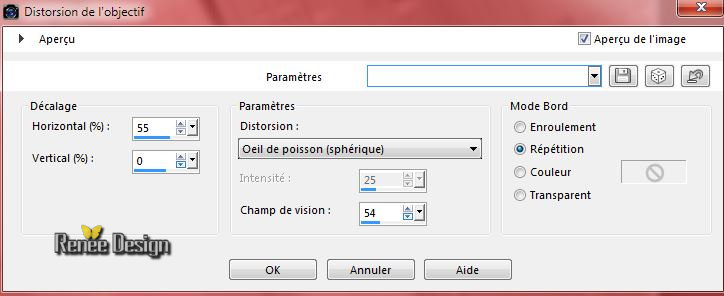
12. Effects-Distortion Effects-Lens Distortion-Fisheye ( Spherical) with these settings
13. Layers-Duplicate
–
Image Mirror
14. Layers- Merge- Merge Down
15. Effects
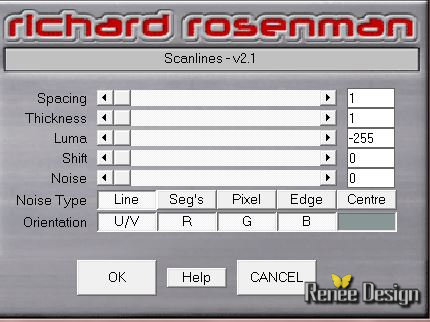
–Plugins – Richard Rosenman – Scanlines with these settings color
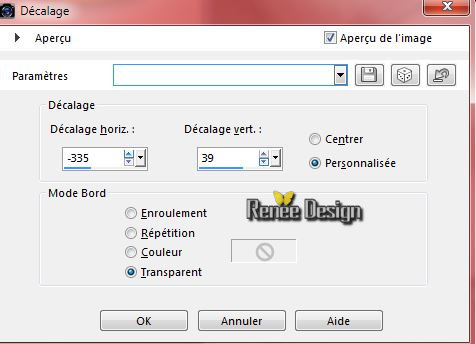
#889696
16. Layer Palette - Double click on this Layer and set the Blend Mode to "Hard Light" Set the layer opacity of this layer to 63%
17. Properties Foreground -Set your foreground color to
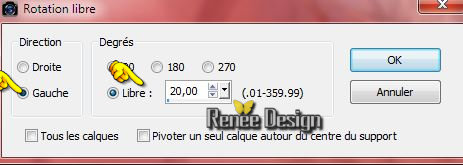
#ffffff
18. Layers- New raster layer
19. Activate Flood Fill Tool and fill the layer with the foreground color #ffffff
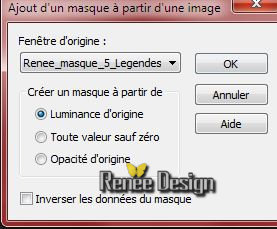
20. Layers- New Mask layer from Image and select Mask
‘’Renee_masque_5_Legendes’’
- Layers- Merge-Merge Group
21. Effects-Edge Effects-Enhance More
22.Layers-Duplicate
- Image
Flip
23. Layers- Merge- Merge Down
24. Effects- User Defined Filter-'‘Edge enhance ‘' using the default settings
- Material Properties-Set your foreground to #505372 -Set your background color to #ffffff
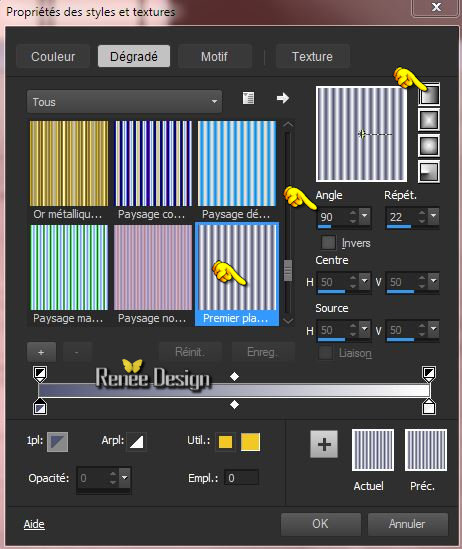
- Set your foreground to gradient 'Foreground-background' - Linear -with these settings
25. Layers- New raster layer
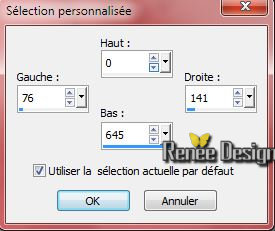
26.
Selection Tool ( S ) Custom selection with these settings
27. Activate Flood Fill Tool and fill the selection with the gradient
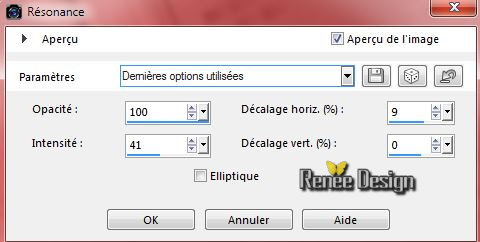
28. Effects- Reflection Effects- Feedback with these settings
Selections-Deselect All
29. Effects-Edge Effects-Enhance More
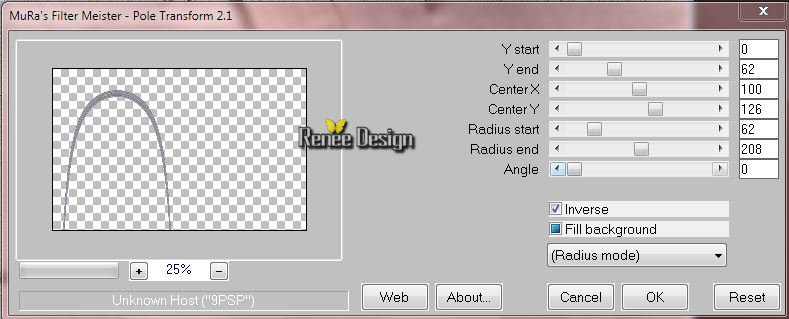
30. Effects
–Plugins– Mura’s Meister – Pole transformation with these settings
31. Layers-Duplicate
32. Image
Mirror
33. Layers- Merge- Merge Down
34. Effects - 3D-effect/ Drop shadow with these settings 8/8/25/5 black
35. Activate the tube ‘’ Renee_tube_Gil_buvel.pspimage’’
- Edit/copy- Edit/ paste as new layer on your working image
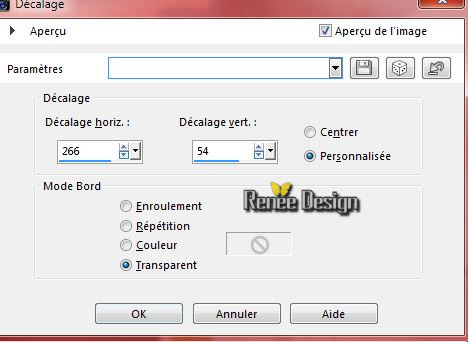
36. Effects-Image Effects-Offset with these settings
37. Layers-Duplicate
38. Image
Resize a 125% resize all layers not checked
39. Image Free Rotate-20 to the left
40. Effects-Image Effects-Offset with these settings
41. Activate the tube ‘’Renee_chaine’’
- Edit/copy- Edit/ paste as new layer on your working image
- With the move tool, move it to the bottom
42. Layers-Duplicate
43. Image
Flip
44. Layers- Merge- Merge- Down
45. Layer Palette - Double click on this Layer and set the Blend Mode to "Hard Light"
- Material Properties-Set your foreground to #505372 -Set your background color to #ffffff
46.Set your foreground to gradient 'Foreground-background' - Linear -with these settings
- Activate the bottom of the layer palette =Raster 1
47. Layers- New raster layer
48. Activate Flood Fill Tool and fill the layer with the gradient
49.
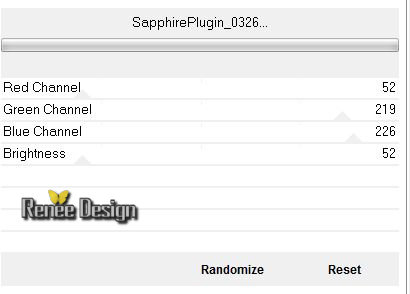
Effects –Plugins- Unlimited - Sapphire Filters 04-
SapphirePlugin_0326...
50. Effects-Edge Effects-Enhance More
51. Effects
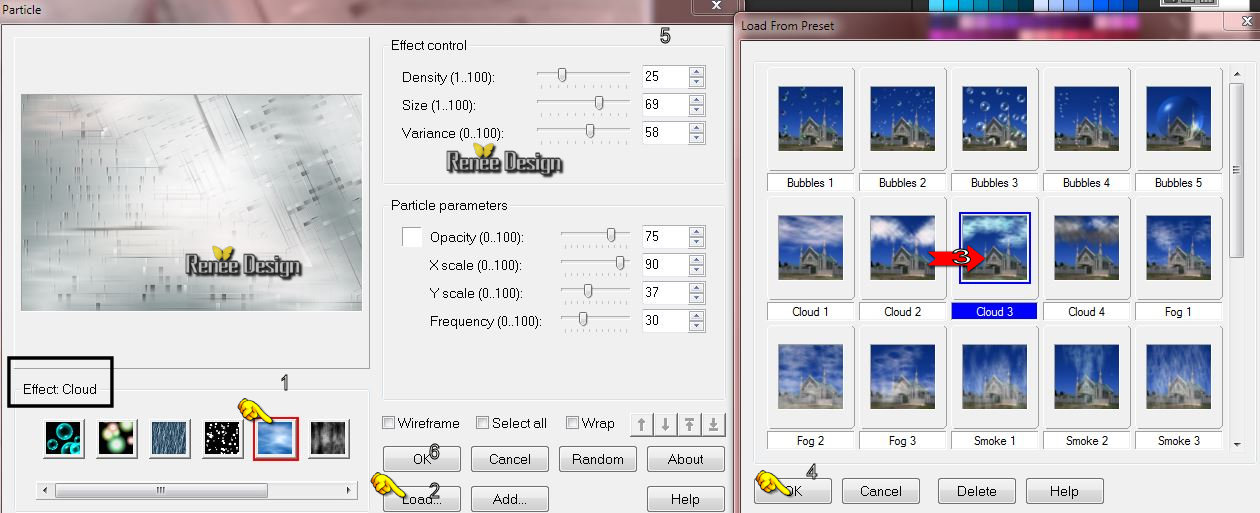
–Plugins – Ulead Effects – Particle **Attention for this filter **
-*1 -First: click on the icon = effects Cloud
- 2* Click on load >>the second window will open and choose Cloud 3 –Ok
-
3 *Control the settings in the first window and click OK
52. Double click on this layer and set the Blendmode to " Lighten "
- Activate the top of the layer-Palette
53. Activate the tube ‘’ nuage_tuto5Legendes’’
- Edit/copy- Edit/ paste as new layer on your working image
- With the move tool, move it in the right place
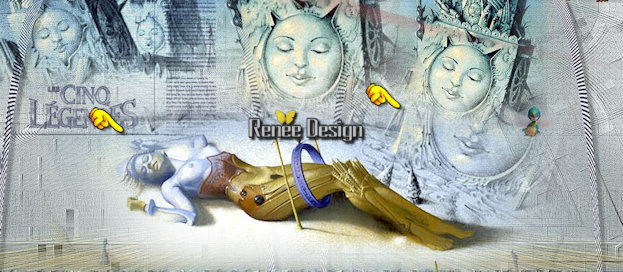
(see finished image)
54. Activate the tube ‘’5legendes_insectes’’
- Edit/copy- Edit/ paste as new layer on your working image - Move to the right side
55. Activate the Brush ‘’pinceau_5legendes’’in your PSP
- File- Export Custom Brush
- Give it a name
‘’5legendes’’
- Foreground color to #505372
56. Activate Brush Tool and select brush :‘’5legendes’’ with these settings -Stamp your brush by using your foreground color

57. Activate Pick Tool -(K) place your brush as shown in the example below
58. Layers-Duplicate
- Layers- Merge- Merge Down
59. Activate the tube
‘’image_5legendes_double_lune’’
No obligatory if you take the tube and no image go straight to item
60
to obtain this result and make the used tube out of it
-
Open the image base
- Image-Canvas Size with 50 pixels on both sides
-
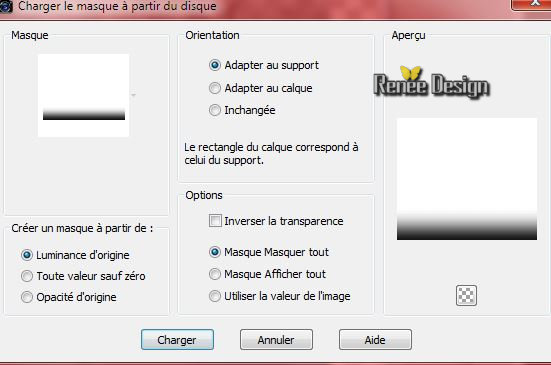
Layers-Load/Save Mask-Load mask from Disk and select !!!!.mask.ket-fadesuave»
-
-
Layers-Duplicate
-
Layers- Merge-Merge Group
-
Image Rotate Right
-
repeat the same effect of this mask and apply on the 4 sides
-
Then on the result
- Layers-Load/Save Mask-Load mask from Disk and select ‘’
!!!20-21’’
-

-
Layers-Duplicate
-
Layers- Merge-Merge Group
-
you have your tube and it is clean
******************************
60. Edit/copy- Edit/ paste as new layer on your working image ‘’tube
_5legendes’’ ore take mine
- With your move tool move to the upper left side
61. Layer Palette - Double click on this Layer and set the Blend Mode to "Hard Light"
62. Layers- New raster layer
63.
Selections –load/save selection –load selection from disc and choose: ‘’
cinq_legendes_2’’
64. Activer
le pot de peinture et avec la couleur avant plan #505372-
Remplir la sélection (3 clics)
Selections-Deselect All
65. Effects
–Plugins - Unlimited - Sapphire Filters 04- SapphirePlugin_0302...using the default settings
66.Layers-Duplicate
- Image
Mirror
67. Activate the Pick Tool (K) –Mode Scale select my file « Preset_Pick_Effet-5Legendes »
and OK
(Or manual settings as shown in the example below)

68. Activate the tube ‘’ sonneur_5legendes’’
- Edit/copy- Edit/ paste as new layer on your working image
- Move tool / place your tube as shown in the example below
69. Layers-Arrange-Move Down
- Layer palette – Make Copy of Raster 12 active
70. Activate your Eraser Tool- (X) - size 10 erase this part see example
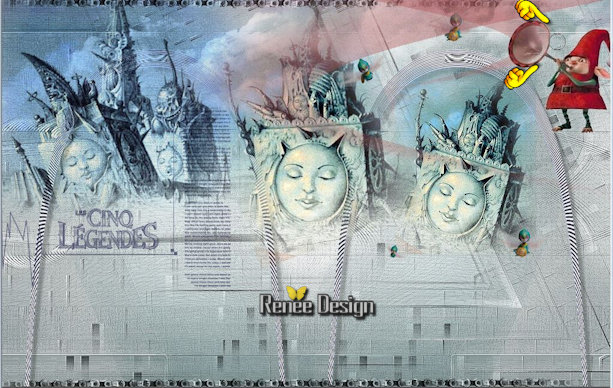
- Activate the top layer in the Layer palette
71. Layers- New Raster Layer
72.
Selections –load/save selection –load selection from disc and choose: ‘cinq_legendes_3’
- Material Properties-Set your foreground to #b49d5a
73. Activate Flood Fill Tool and fill the selection with thes foreground color #b49d5a
Selections-Deselect All
74. Effects-Image Effects-Seamless Tiling with these settings
75. Effects-Edge Effects-Enhance More
76. Activate the tube ‘’ Renee_tube_Femme-_5 -Legendes _tuto’’
- Edit/copy- Edit/ paste as new layer on your working image
- Move tool / place your tube as shown in the example below
77. Image - Add borders-Symmetric checked: 1 pixel #fffffff
78. Image - Add borders-Symmetric checked: 10 pixels #505372
79.
Selections-Select All
80. Image - Add borders-Symmetric checked: 55 pixels #ffffff
81.
Selections -Invert
82.
Effects –Plugins -Unlimited - ICNET FILTERS - Special Effects 1- Shiver
27/0
83. Effects-Distortion Effects-Warp with these settings
84.
Selections -Invert
85. Effects
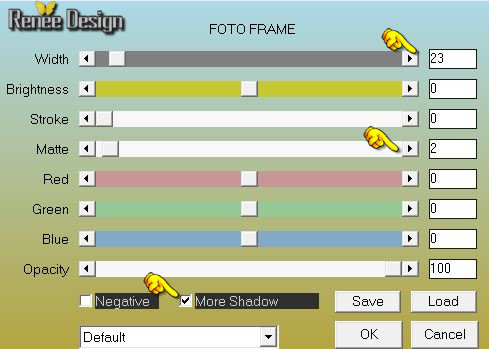
–Plugins– AAA Frame Foto Frame with these settings
Selections-Deselect All
86. Activate the tube Text‘’ les_5_legendes_titre.pspimage ore Text 2 of your choice
- Edit/copy- Edit/ paste as new layer on your working image and move
87. Layers- Merge- Merge All
88. Image
Resize 995 pixels width.
Save as JPG
I hope you enjoyed this tutorial .
Renée
This lesson was written by Renée 21/05/2015
edited and update
2015
*
Any resemblance with an existing lesson is merely a coincidence *
* Don't forget to thank the people who work for us and with us. I named the tubeurs - Testers and the translators.
Thanks Renée.
*
| 
 Translations


 When you see this logo the filter is imported in Unlimited

 All rights reserved