|
Let's start the lesson.
 Noel
en Folie 2024 Noel
en Folie 2024
Christmas Madness
Information: You have 2 folders with extra tubes in the same theme if you want to change.
- Material Properties: Set Foreground Color to Color no. 1 - Set Background Color to Color no. 2

- Replace your foreground color with a foreground/background linear gradient configured as follows
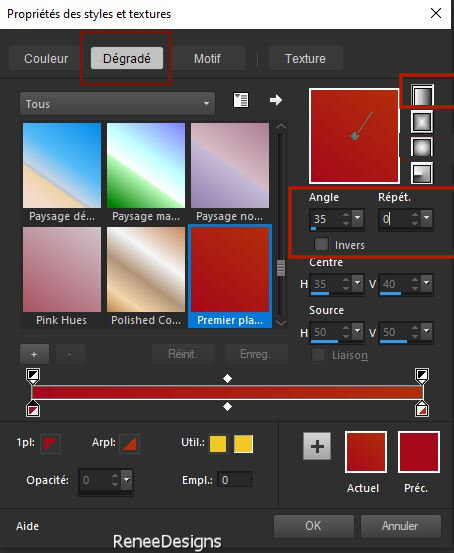
1. File-Open a new transparent image of this size:1050 x 765 Pixels
2. Acivate Flood Fill Tool
 – Flood fill the layer with the gradient
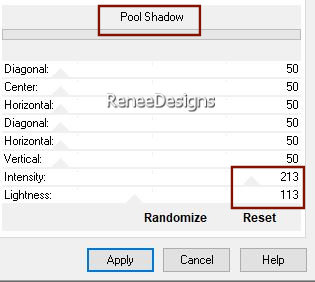
3. Effects - Plugins - Filters Unlimited 2.0 - Greg's Factory
Output Vol. II - Pool Shadow
4. Selections –load/save selection –load selection from disc and select my selection: ‘’ Noel-en-folie-2024-1’’
5. Selections – Promote selection to layer
6. Effects -Plugins- AP[Distort] Distort - Distort Wavy Cut
7. Effects – Edge Effects– Enhance (Repeat this again)

8. Reduce the opacity of this layer to 48
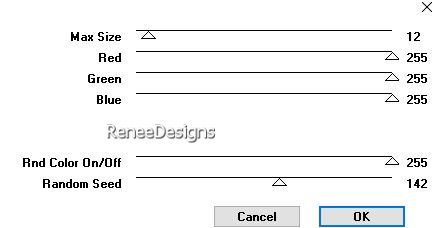
9. Effects - Plugins – VM Natural- Sparkles
10. Adjust-Sharpness-Sharpen More
11.Activate the tube ‘’Noel-Folie-2024-Image 1’’ -Edit- Copy - Edit- Paste as new layer
12. Objects – Align – Top
13. Ajust-Blur-Gaussian Blur-Radius 18
14. Reduce the opacity of this layer to 65
15. Layers-New Raster Layer
16. Selections –load/save selection –load selection from disc and select my selection: ‘’ Noel-en-folie-2024-2’’
17. Effects – 3D-Effects-Drop Shadow with these settings : 0/0/100/100 Color White
18. Selections – Invert
19. Effects – 3D-Effects-Drop Shadow with these settings : 0/0/100/100 Color White

20. Layers-Properties-Set the Blend Mode to Hard Light
21. Layers- Duplicate
22. Effects - Plugins- Filters Unlimited 2.0 - &<Bkg Designer sf10
III> - Radial Reflections 03 : 255
23. Layers-Properties-Set the Blend Mode to Screen -Reduce the opacity of this layer to 67
-Material Properties: Set Foreground Color to Color no. 5 - Set Background Color to Color no.4
- Activate Raster 1 in the layer palette
24. Layers-New Raster Layer
SELECTION- SELECT ALL
25. Acivate Flood Fill Tool  – Flood fill the selection with the foreground color no 5
26. Selections- Modify - Contract by 50 Pixels
27. Acivate Flood Fill Tool
 –Flood fill the selection with the background color no 4 –Flood fill the selection with the background color no 4
28. Selections- Modify - Contract by 50 Pixels
29. Acivate Flood Fill Tool
 –Flood fill the selection with the foreground color no 5 –Flood fill the selection with the foreground color no 5
30. Effects - Plugins- Filters Unlimited 2.0 - Alf's Power Grads - 4
Radial Grads... using the default settings

31. Effects –Plugins – Simple – Pizza Slice Mirror
- Repeat this again
32. Selections –load/save selection –load selection from disc and select my selection: ‘’ Noel-en-folie-2024-3’’
31. Selections –
Promote selection to layer
 33.
Effects – Plugins– Simple – Pizza Slice Mirror 33.
Effects – Plugins– Simple – Pizza Slice Mirror
34. Effects- Image Effects- Seamless Tiling using the default settings
35. Effects – 3D-Effects-Drop Shadow with these settings : 4/4/100/24 Color Black
36. Layers-Properties-Set the Blend Mode to Hard Light -Reduce the opacity of this layer to 51
37. Effects – Plugins– Carolaine &
Sensibility – CS - LDots
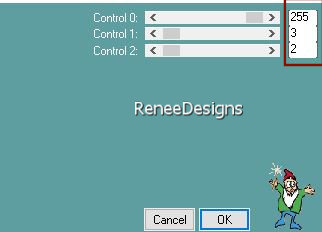
(Delete the layer below Raster 4)
-We are on Raster 1
38. Layers-New Raster Layer
39. Acivate Flood Fill Tool
 –
Flood fill the layer with the background color (Nr 4) –
Flood fill the layer with the background color (Nr 4)
40. Effects - Plugins- Filters Unlimited 2.0 - Alf's Power Toys -
Color Grid using the default setting
41. Effects - Plugins- Filters Unlimited 2.0 - Graphic plus –
Emboss - using the default setting
- Repeat this again
42. Effects –Plugins– Mura’s Meister – Perspective Tiling
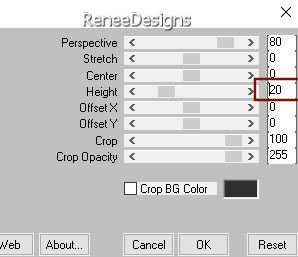
43. Reduce the opacity of this layer to 81
44. Effects – Edge Effects– Enhance More
- Repeat this again
45. Selections –load/save selection –load selection from disc and select my selection: ‘’ Noel-en-folie-2024-0’’
46. Adjust-Blur-Gussian Blur-Radius 25
47. Effects – 3D-Effects-Drop Shadow with these settings : 0/0/100/100 Color White

- Material Properties:Set your foreground color to color white
- Activate the top of the layer palette
48. Layers-New Raster Layer
49. Selections –load/save selection –load selection from disc and select my selection: ‘’ Noel-en-folie-2024-4’’
50. Acivate Flood Fill Tool
 –
Flood fill the selection with the foreground color white –
Flood fill the selection with the foreground color white

51. Layers-Properties-Set the Blend Mode to Soft Light
52. Effects – Reflection Effects - Feedback
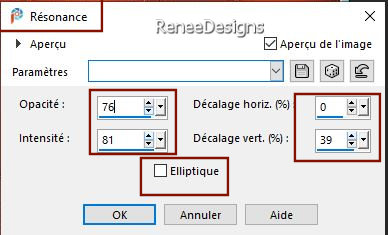
53. Effects-Edge Effects-Enhance More
54.
Effects – 3D-Effects-Drop Shadow with these settings : 1/1/100 / 2 Color Black
55.
Layers-New Raster Layer
56. Selections –load/save selection –load selection from disc and select my selection: ‘’ Noel-en-folie-2024-5’’
57. Activate the tube ‘’Noel-Folie-2024-Image 2’’ Edit - Copy - Activate your work - Edit - Paste into selection

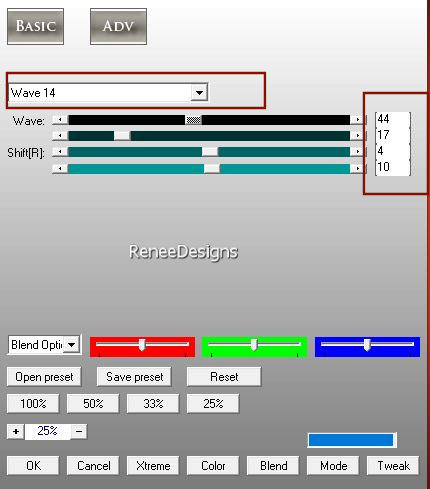
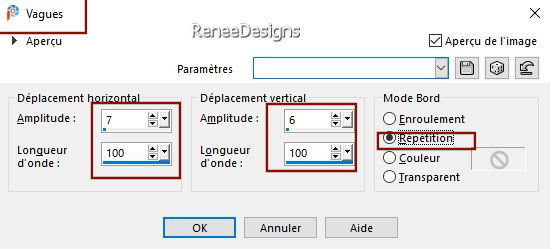
58. Effects – Distortion Effects– Wave use the settings below
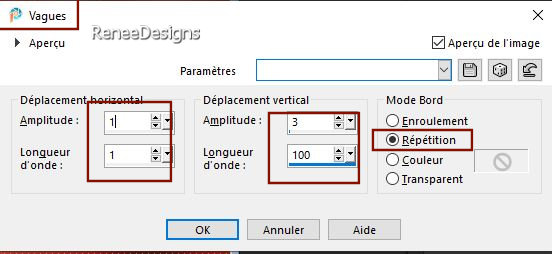
59. Layers - Duplicate
60.
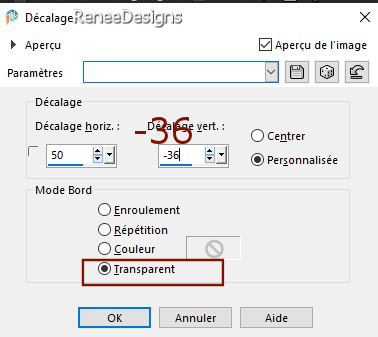
Effects –Image Effects- Offset with these settings
61. Layers-Merge- Merge Down
62. Ajust-Blur-Gaussian Blur-Radius 15
63. Reduce the opacity of this layer to 77
- Stay on this layer
64. Selections –load/save selection –load selection from disc and select my selection: ‘’ Noel-en-folie-2024-6’’
65. Selections- Promote selection to layer

66. Layers-Properties-Set the Blend Mode to Dissolve -Reduce the opacity of this layer to 46
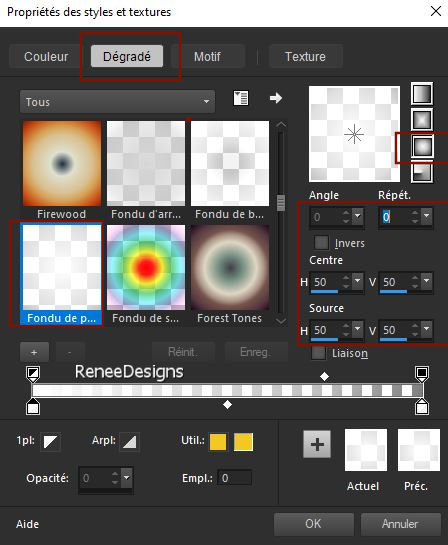
-Properties Foreground -Set your foreground color to fading foreground- sunburst gradient configured like this –(Corel -06-026)
67. Layers-New Raster Layer
68.Selections –load/save selection –load selection from disc and select my selection: ‘’ Noel-en-folie-2024-6’’
69. Acivate Flood Fill Tool
 –
Flood fill the selection with the gradient –
Flood fill the selection with the gradient
70.
Effects - Plugins - Filters Unlimited 2.0 -
ICNET-Filters - Color Filters - Blue Sky: 183/127
Keep selected
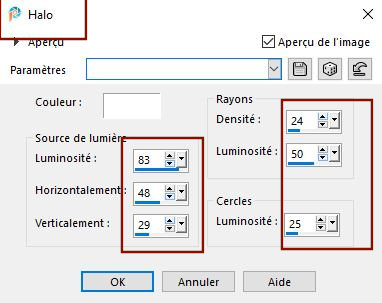
71. Effects –Illumination Effects– Sunburst

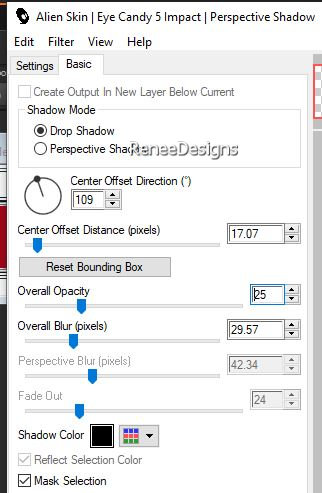
72. Effects - Plugins - Alien Skin EyeCandy 5 – Impact – Perspective
Shadow
- Activate Raster 1 in the layer palette
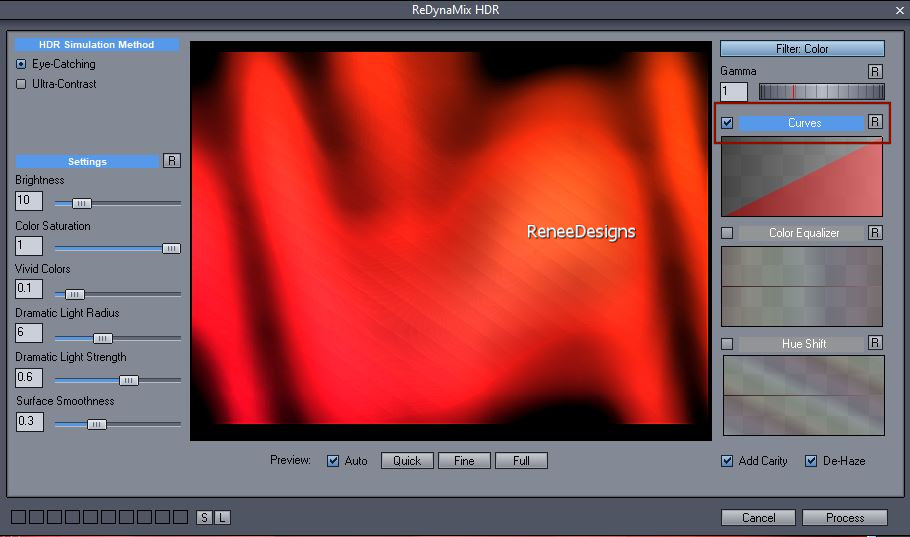
73. Effects – Plugins– DCE tools – RedynaMix-Curves checked
Click on Process
- Activate the top of the layer palette
74. Activate the tube -’’ Noel-Folie-2024-Image -
courbe- neige’’ -Edit - Copy- Activate your work -Edit - Paste as new layer
75. Objects – Align –
Left - Objects - Align – Bottom
76. Activate the tube -‘’Noel-Folie-2024-Image-Pere-
Noel-1’’ -Edit - Copy- Activate your work -Edit - Paste as new layer
77. Pick Tool: (K) on your keyboard - Enter the following parameters on the toolbar
 44/
63 44/
63
Press the ( M ) button to close the tool
78. Activate the tube ‘’Noel-Folie-2024-Image-Renne -1’’ -Edit - Copy- Activate your work -Edit - Paste as new layer
79. Move it in the right place (see finished image)
80.Activate the tube
’’Noel-Folie-2024-Image-2cadres’’ -Edit - Copy- Activate your work -Edit - Paste as new layer
81. Pick Tool: (K) on your keyboard - Enter the following parameters on the toolbar
 583
/142 583
/142
Press the ( M ) button to close the tool
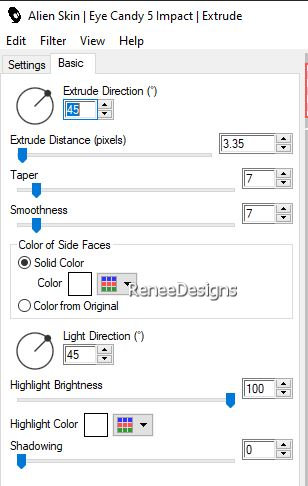
82. Effects - Plugins- Alien Skin EyeCandy 5 – Impact – Extrude
83. Open the tube ‘’Noel-Folie-2024-Image-Personnages -cadres.’’
Paste as new layer - Place in/on the frame (see finished image )
84. Text tool - use the Ariston font (according to the material) and write ''Noel and Folie 2024''
- or use a font of your choice and write your own text.
85. Effects- 3D- Effects- Drop Shadow with these settings: 1/1/100/1 Color Black
82. Effests – Distortion Effects– Wave with these settings
86. For decoration (Renée attached Tubes in separate folder) Or choose
Activate the tube -"Noel-Folie-2024-Image-Personnage-dans-Neige " and activate the tube
Noel-Folie-2024-Image-Petit-renne"Edit - Paste as new layer and move (or take a tube of your own )
87. Open the tube ‘’
Noel-Folie-2024-Image-Etoiles’’ -Edit - Copy- Activate your work -Edit - Paste as new layer
88. Objects – Align - Top
Paste 2024 optional but not mandatory
89.Image - Add Borders-Symmetric checked: 1 Pixels -Color Black
Image - Add Borders-Symmetric checked: 40 Pixels -Color White
Image - Add Borders-Symmetric checked: 2 Pixels -Color Red
Image - Add Borders-Symmetric checked: 20 Pixels -Color White
90. Selections –
Select All
91.Selections-Modify-Contract 35 Pixels
92. Effects – 3D-Effects –
Cutout with these settings
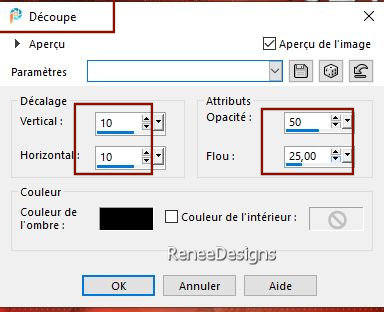
Repeat: Effects – 3D-Effects – Cutout minus
-10/-10
- Add the author's watermark to your work and your own watermark
93. Layers-Merge-Merge All (flatten)
94.Image -Resize to 1005 pixels wide. Resize all layers.
Save as JPG

Merry Christmas to everyone

I appreciate your attention and engagement with this lesson.
Renée
Renée wrote this lesson on 12/10/2024
I have edited and updated it.
in 2024
*
*
Any resemblance to an existing lesson is purely coincidental.
Do not forget to thank the people who work with us and for us.
I have appointed the tubeurs and translators
Thanks .
|


