|
Let's start the lesson.


-
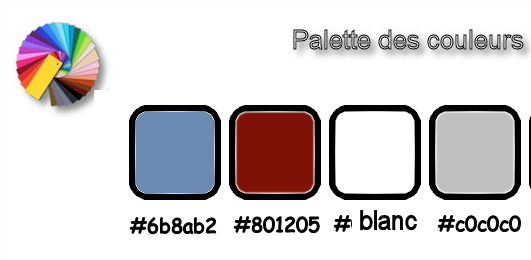
Preparation/ - Color Palette: Set your foreground color to #6b8ab2
/Set your background color to #ffffff
1.
Open the image ‘’Fond_Noel_2017’’- Window - Duplicate (or shift+D) - Close the original and proceed on the copy -Promote Background Layer =Raster 1
2.
Open the tube’’Noel_2017_sapin’’
-
Edit - Copy- Activate your work -Edit - Paste as a new layer (do not move )
3.
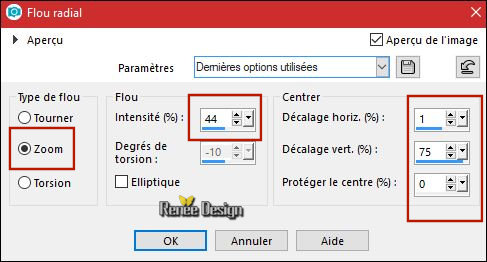
Adjust- Blur- Radial Blur use the settings below
-
Repeat : Adjust- Blur- Radial Blur with the same settings
4.
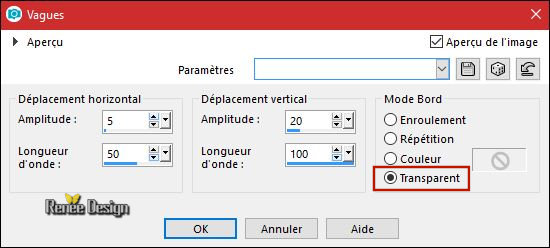
Effects-Distortion Effects- Wave use the settings below
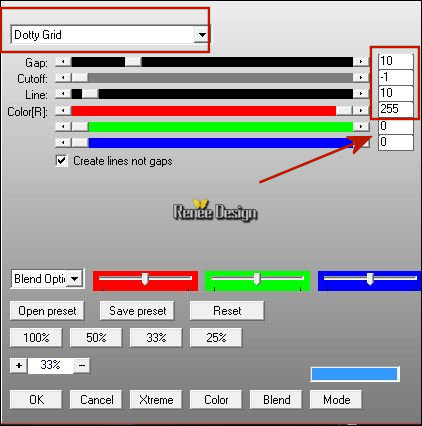
5.
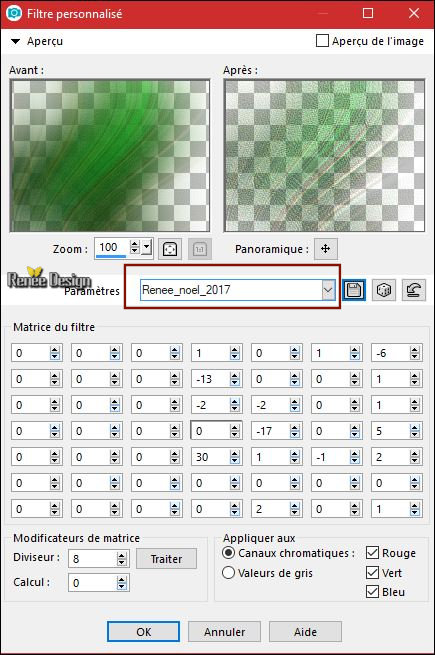
Effects – Used Defined Filter and choose my preset ‘’Renee_Noel_2017’’
-
Repeat: Effects – Used Defined Filter with the same settings
-
In the Layer-Palette-Make Raster 1 active
6.
Layers- Duplicate
7.
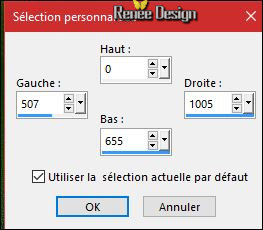
Activate Selection Tool -Custom Selection (S) -Rectangle with these settings
DELETE
Selections- Deselect All
8.
Selections –load/save selection –load selection from disc and select my selection: ‘’Noel_2017_1’’
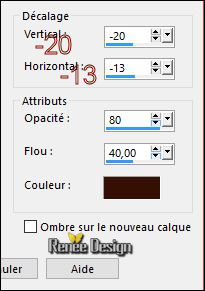
9. Effects – 3D Effects- Drop Shadow with these settings:
Selections- Deselect All
-
To replace the top of the layers palette
10.
Layers-New Raster Layer
11.
Selections –load/save selection –load selection from disc and select my selection: ‘’Noel_2017_2’’
12.
Activate the Flood Fill Tool and fill the selection with the foreground color #6b8ab2 (2
clicks)
-
Color-palette:Set your foreground color to color #801205
13.
Layers- New Raster Layer
14.
Selections –load/save selection –load selection from disc and select my selection: ‘’Noel_2017_3’’
15.
Activate the Flood Fill Tool and fill the selection with the foreground color
#801205
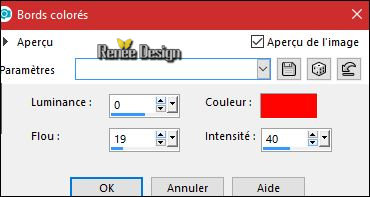
Selections- Deselect All
16.Effects – 3D Effects- Drop Shadow with these settings:1/1/100/1 black
-
Preparation - Color-palette:Set your foreground color to color #ffffff -Set your background color to color #c0c0c0
- Prepare a foreground/background rectangular gradient configured like this
17.
Layers-New Raster Layer
18.
Selections –load/save selection –load selection from disc and select my selection: ‘’Noel_2017_4’’
19.
Activate the Flood Fill Tool and fill the selection with the gradient
20. Selections- Modify-Contract 12 Pixels
21.
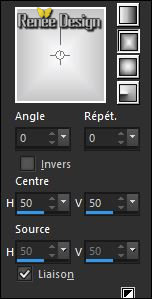
Effects –plugins – L & K’s- Palmyre
with these settings 9/2
22. Effects- Edge Effects- Enhance
Selections- Deselect All
23.
Open the tube ‘’ Noel_2017_miniatures’’
-
Select 4 balls (‘’boules ‘’) and paste as a new layer
-
Move Tool/move the balls on the Christmas tree.
24.
Layers-Merge-Merge down and repeat until one single layer with balls
25. Effects – 3D Effects- Drop Shadow with these settings:1/1/100/1
black
26.
Open the tube ‘’ Noel_2017-Grappe.png’’
-
Edit - Copy- Activate your work -Edit - Paste as a new layer
-
Move Tool/move the tube on the Christmas tree.(see finished image )
27.
Layers- Arrange- Move Down
-To replace the top of the layers palette
28. Layers- New Raster Layer
29.
Preset Shape Tool
-
Draw four shapes-according to your own taste(A new layer for every shape) Convert to Raster Layer
30.
Put a filter effect on every shape
-
I used the following filter
-
Effects -Plugins - Eyecandy 5 Impact –Brushed Metal and choose my
Preset ‘’Noel-2017-Brushed metal.f1s’’
- Effects
–Plugins – Eye candy 5 Impact – Glass and choose Preset
Clear
- Put the shapes in the right place and OK
- We continue
31. Open the tube "Decos "
(Do not close we need it later for the rest of the work )
Activate the layer ‘’attache’’ of the tube - Edit - Copy- Activate your work -Edit - Paste as a new layer
-Duplicate 3 times and move it above the shapes (see finished image )
- Layers-Merge-Merge down and repeat until one single layer with " Shapes and
Attaches "
(Do you have problems with this-Open the tube "Decos" and activate the layer "formes avec attaches " and paste as a new layer on your working area and move)
- Color Palette: Set your foreground color to #ffffff
32. Activate Pen Tool with these settings and select ‘’Line style –Diamond- Width 3/ #ffffff
(Press the Shift key for a straight line )

- Draw the lines as shown in the example below
- Convert to Raster Layer
33. In the Layer-Palette-Make Raster 1 active
34.
Selections –load/save selection –load selection from disc and select my selection:
‘’Noel_2017_5’’
35. Selections- Promote Selection to Layer
36.
Layers- Arrange -Bring to Top
37.
Effects- Artistic Effects -Colored Edges #ff0000
Selections- Deselect All
38.
Layers-Properties-Set the Blend Mode to "Dissolve "
-
In the Layer-Palette-Make Raster 1 active
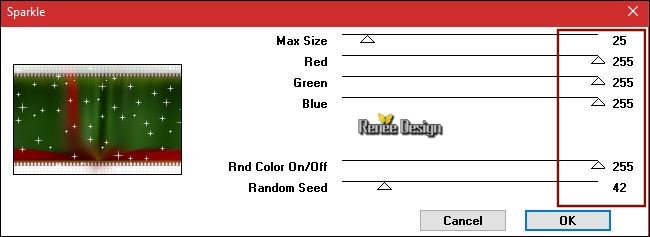
39.
Effects – Plugins – VM Natural
–Sparkle use the settings below
-
To replace the top of the layers palette
40.
Layers- New Raster Layer
41.
Activate the Flood Fill Tool/ Opacity 60% –Fill the Layer with the foreground color #ffffff
42.
Layers- New Maske Layer From Image and select Mask:
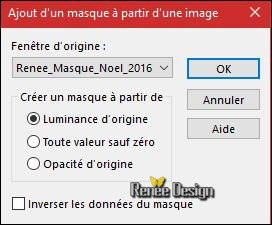
- Layers- Merge- Merge Group
43. Effects
–Plugins – AP [Lines] silverling use the settings below
44.
Layers-Properties-Set the Blend Mode to" Screen "-Set the Opacity of this layer to 44%
45. Back on tube " DECOS"
- Activate the layer ‘’voitures-Elf and
pingouin’’ of the tube //Edit - Copy- Activate your work -Edit - Paste as a new layer -Activate Move Tool (M) move it the right place ( see finished image )
46. Layers- New Raster Layer
47.
Selections –load/save selection –load selection from disc and select my selection:
‘’Noel_2017_6’’
48.
Effects –Plugins - EyeCandy 5 Nature – Snow Drift
and choose my
Preset ‘’ Noel_2017- Snow Drift.f1s’’
-Replace the car if necessary
Selections- Deselect All
49. Open the tube ‘’Noel_2017_arbres.png’’
- Edit - Copy- Activate your work -Edit - Paste as a new layer
- Move Tool (M) move it the right place
50. Open the tube ‘’ Noel_2017_effet_neige’’
- Edit - Copy- Activate your work -Edit - Paste as a new layer /Layers- Arrange-Move Down
- Move Tool (M) move it the right place (under the layer with the car)
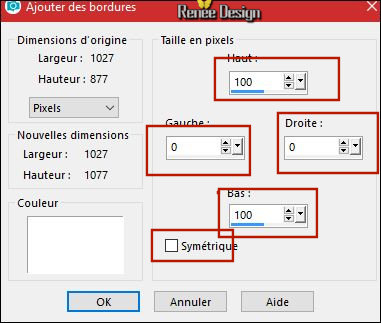
51. Image - Add borders-Symmetric checked1 Pixel #ffffff
52. Image - Add borders-Symmetric checked 10 Pixels #4a6b3b
53. Image - Add borders-Symmetric NOT checked #ffffff
54. Open the tube ‘’Cadre final’’
- Edit - Copy- Activate your work -Edit - Paste as a new layer
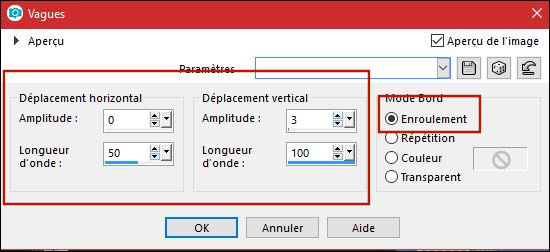
55. Effects-Distortion Effects- Wave use the settings below
56. Layers- Merge- Merge All
57. Open the tube Text ‘’ christmas-2017’ and paste as a new layer and move
58. Layers- Merge- Merge All ( Flatten)
I wish you all a Merry Christmas

I hope you enjoyed this lesson
Renée
This lesson was written by Renée 30/10/2017
Edited and Update
2017
*
Any resemblance with an existing lesson is a coincidence
* Do not forget to thank the people who work with us and for us I have appointed the tubeurs and translators
Thanks
*
| 


 Translations


 If a plugin supplied appears with this icon it must necessarily be imported into Unlimited *