|
Let's start the lesson.

For fun you can watch the video (Just ignore advertising ) .gif)
-
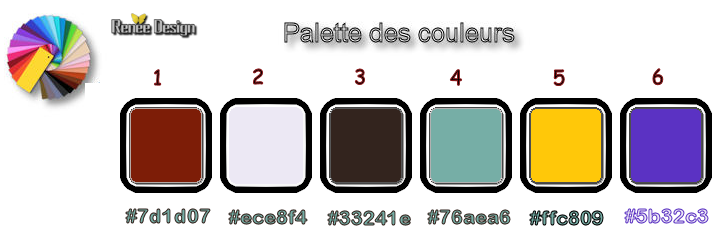
Preparation/ Material Properties: Set your foreground color to #7d1d07= Nr1 - Set your background color to # ece8f4 = Nr 2
1. Open the Image ‘’Fond_pajarito’’- Window - Duplicate (or shift+D) - Close the original and proceed on the copy -Promote Background Layer =Raster 1
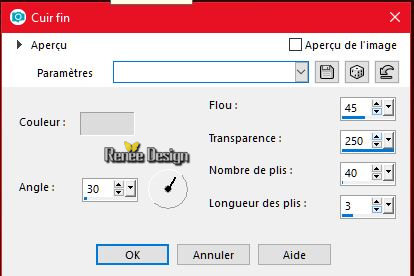
2. Effects- Texture Effects- Fur use the settings below

3. Effects- Edge Effects- Enhance More
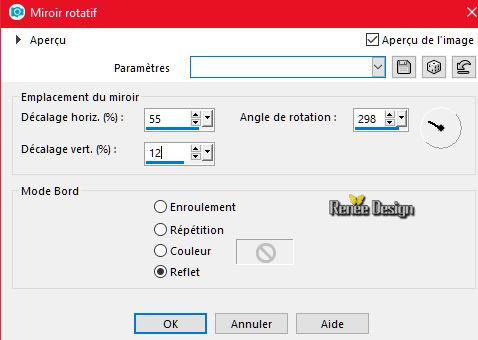
4. Effects- Reflection Effects-Rotate Mirror use the settings below
5. Layers- Duplicate
6. Image Resize to 88% - Resize all Layers not checked
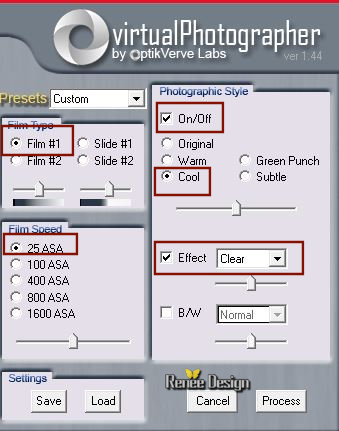
7. Effects Plugins – Optik Verve Labs- Virtual
Photographer
8. Activate the Magic Wand and select the white part
DELETE
Selections- Deselect All
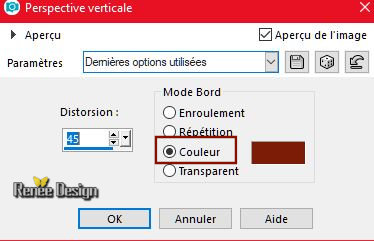
9. Effects- Geometric Effects- Perspective Vertical use the settings below- Color =FG-Color
10. Effects- 3 D Effects- Drop Shadow with these settings: 1/10/65/2 black
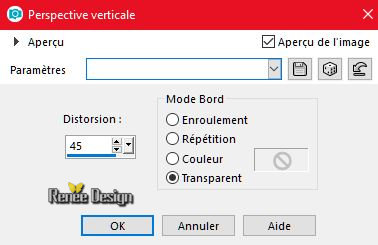
11. Effects- Geometric Effects- Perspective Vertical with these settings- Transparant
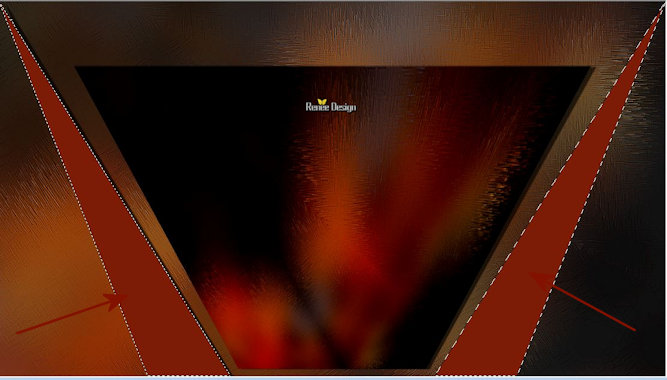
12. Activate the Magic Wand (Add shift )
select the two parts
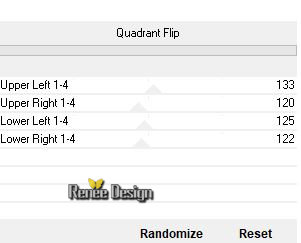
13. Effects –Plugins- Unlimited – Mirror rave – Quadrant
Flip
Selections- Deselect All
14. Effects- Plugins – Mura’s Meister
–Perspective Tilling using the default settings
15. Image - Mirror - Mirror vertical ( Image - Flip in older versions of PSP)
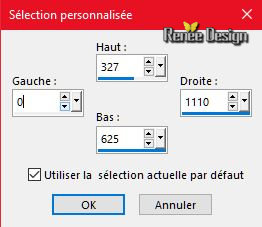
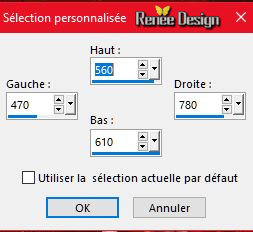
16. Activate Selection Tool -Custom Selection (S) -Rectangle with these settings
17. Edit- Cut !!
- Edit - Paste as a New Layer
Selections- Deselect All
18. Effects- Geometric Effects- Circle -Transparant
19. Effects- Image Effects- Offset with these settings : H = 0 and V = -
18
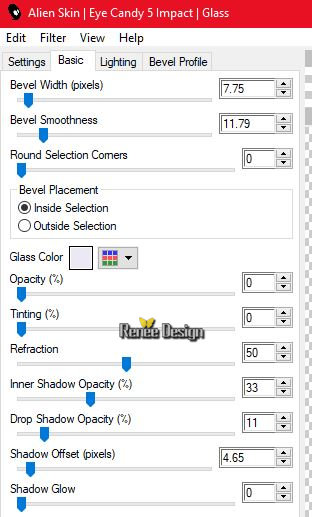
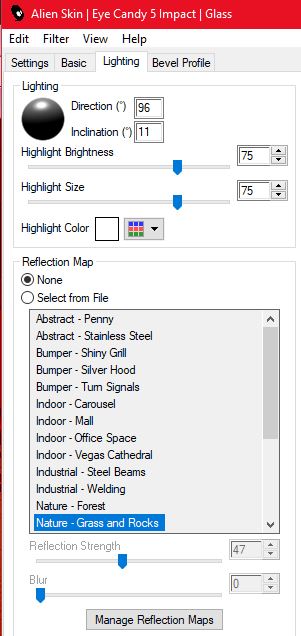
20. Effects- Plugins – EyeCandy 5 impact –
Glass-Tab- Settings- User Settings and choose my Preset’’Pajarito_Glass’
-
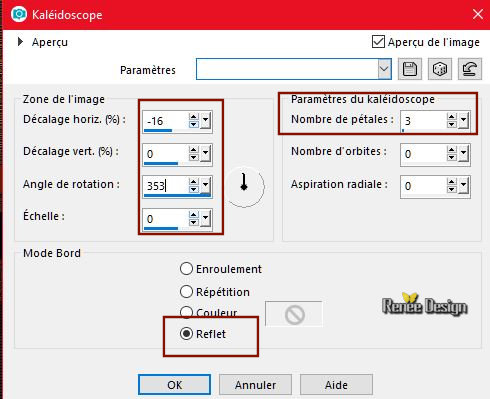
Activate the bottom Layer = Raster 1
21. Layers- Duplicate
22. Effects –Plugins - Simple – Top left Mirror
23. Layers-Properties-Set the Blend Mode to " Dodge"
- Layers- Merge- Merge Down
-
Stay on this Layer= Raster
1
24. Activate Selection Tool -Custom Selection (S) -Rectangle with the same settings
25. Effects –Plugins- Unlimited- Distortion Filters -
Smelter 1: 165
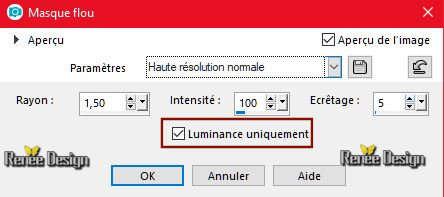
26. Adjust- Sharpness- Unsharp Mask use the settings below
Selections remains active
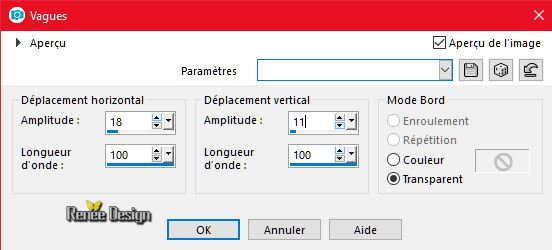
27. Effects –Distortion Effects –Wave use the settings below
27. Adjust- Blur- Gaussian Blur - Radius:28
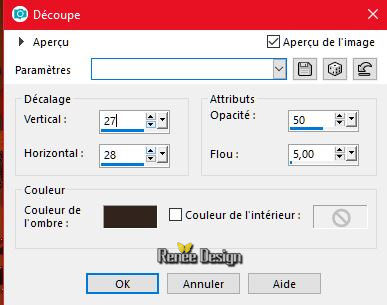
28. Effects –3 D Effects- Cutout use the settings below -Color
#33241e
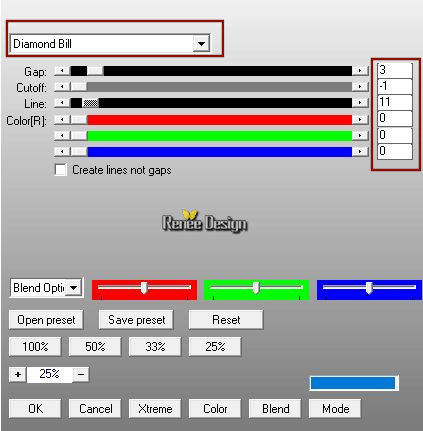
29. Effects – Plugins – AP[Lines] Silverling use the settings below
30.
Effects –Plugins - FM Tiles Tools – Blend
emboss using the default settings
Selections- Deselect All
- To replace the top of the Layer- Palette
30a. Layers- New Raster Layer
31.Selections –load/save selection –load selection from disc and select my selection:
‘’pajarito_1’’
32.
Activate Flood Fill Tool  Fill the selection with the background color #ece8f4 = Nr 2 Fill the selection with the background color #ece8f4 = Nr 2
Selections- Deselect All
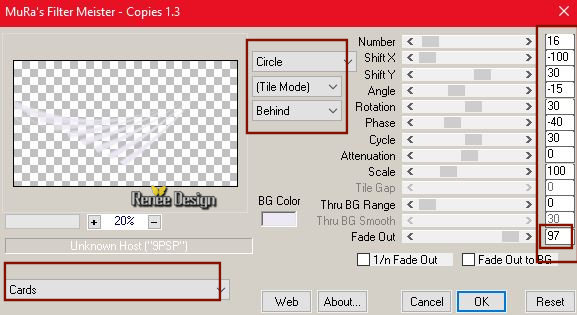
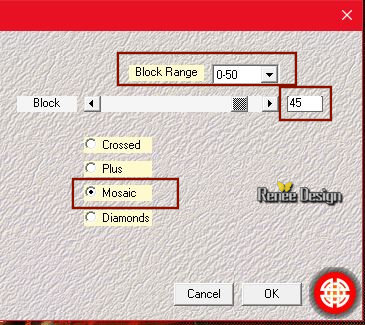
33. Effects –Plugins - Mura’s Meister –
Copies use the settings below
34. Effects- Image Effects- Offset with these settings : H = -17 and V = -85
35. Layers-Properties-Set the Blend Mode to " Dodge " -Lower the Opacity of the layer to
67%
36. Layers- Duplicate
37. Effects- Reflection Effects- Kaleidoscop with these settings
38. Lower the Opacity of the layer to 48%
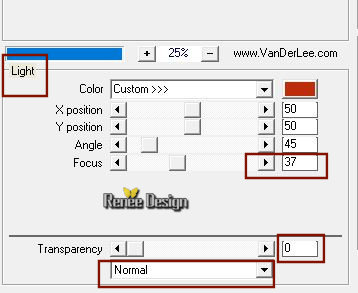
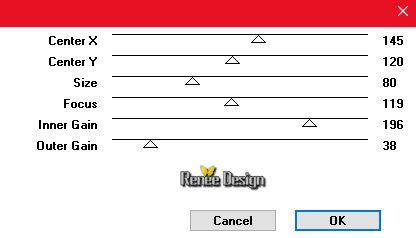
39. Effects –Plugins – Vanderlee – Unplugged
X– Light -Color #bd2c0b
40. Layers- New Raster Layer
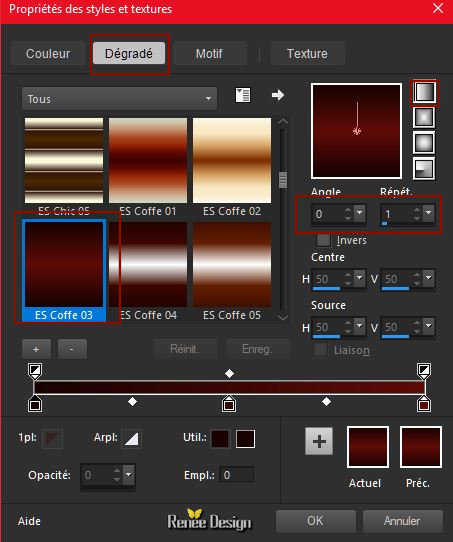
-Material from the foreground – click tab gradient and choose ‘’ ES
Coffe 03.PspGradient’’ / Prepare a foreground linear gradient use the settings below
41. Activate Flood Fill Tool Fill the Layer with the gradient
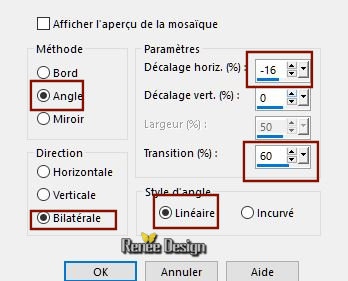
42.Effects- Image Effects- Seamless Tiling use the settings below
43. Adjust- Blur- Gaussian Blur : Radius 25
44.Effects- Texture Effects- Fine Leather use the settings below- Color
#dcdcdc
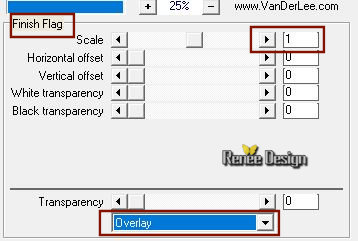
45. Effects – Plugins - Vanderlee – Unplugged X/
Finish Flag
46. Activate the Magic Wand with these settings

select the black parts
DELETE
Selections- Deselect All
47. Activate your Pick Tool (K)-select the preset ‘’Pajarito’ click on the preset and OK

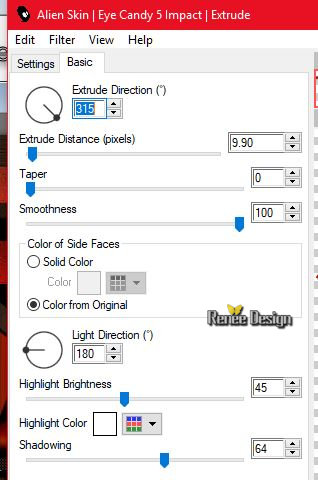
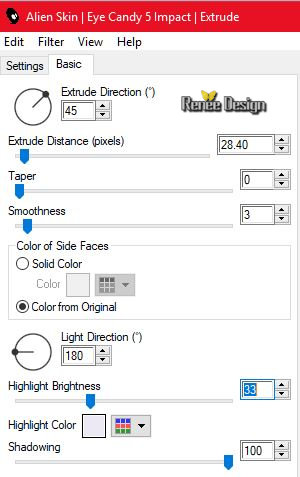
48. Effects – Plugins – EyeCandy 5 Impact -
Extrude use the settings below
49. Activate the tube
‘’Renee_TUBES_pajarito.pspimage’’
-
Images Resize to 78 %
-
Edit - Copy- Activate your work -Edit - Paste as a new layer
- With the Move Tool (M), move it in the bottom left corner
50. Activate the tube ‘’ Renee_TUBES_Rouge.pspimage’’
-
Image -Resize to 563 Pixels Height
-
Edit - Copy- Activate your work -Edit - Paste as a new layer
- With the Move Tool (M), move it in the bottom right corner
51. Lower the Opacity of the layer to 54%
52. Effects – Plugins – Graphic plus – Spot
Lite
53. Layers- New Raster Layer
53a Activate Selection Tool -Custom Selection (S) -Rectangle with these settings
54. Activate Flood Fill Tool Fill the selection with the gradient
55. Effects -Plugins - Medhi - Sorting
tiles
Selections- Deselect All
56. Effects – Plugins - Eyecandy 5 Impact –
Extrude use the settings below
57. Effects- Edge Effects- Enhance More
58. Activate the tube ‘’ pajarito_oeufs’’
-
Edit - Copy- Activate your work -Edit - Paste as a new layer
-
With the Move Tool (M), move it in the right place
59. Activate the tube ‘’ pajarito
_texte.png’’
-
Edit - Copy- Activate your work -Edit - Paste as a new layer
-
With the Move Tool (M), move it in the right place
60. Activate the tube "titre "
Edit - Copy- Activate your work -Edit - Paste as a new layer /Or write your own text
61. Image - Add borders-Symmetric checked 1 pixel Nr
2
62. Image - Add borders-Symmetric checked 2 pixels Nr
1
63. Image - Add borders-Symmetric checked 45 Pixels #ffffff
64. Image - Add borders-Symmetric checked 1 pixel Nr 1
65. Image - Add borders-Symmetric checked 10 pixels #ffffff
66.Image Resize to 1005 pixels Width .
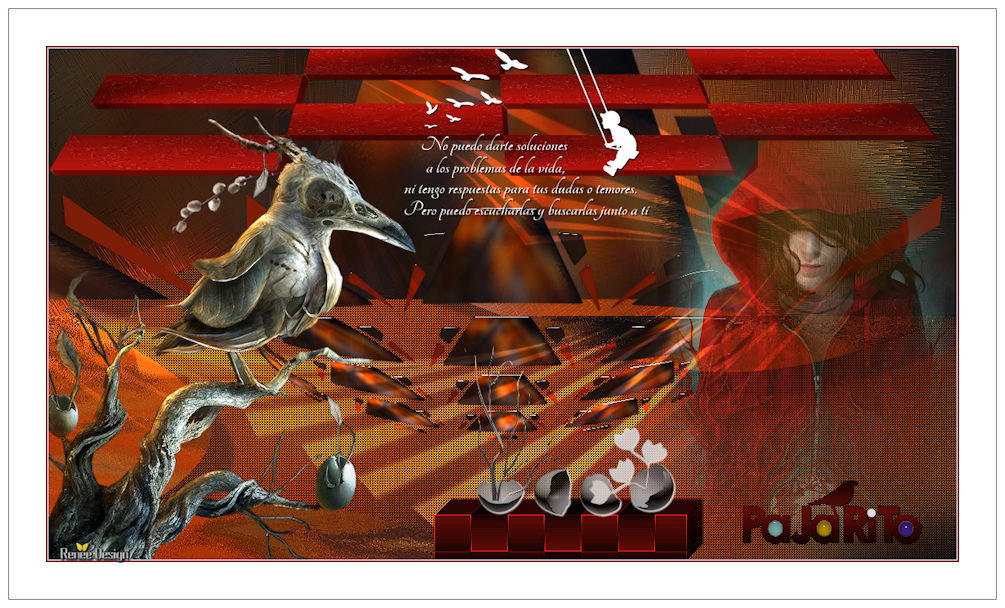
Save as JPG
I hope you enjoyed this lesson
Renée
This lesson was written by Renée 20 April 2018
Edited and Update
2018
*
Any resemblance with an existing lesson is a coincidence
* Do not forget to thank the people who work with us and for us I have appointed the tubeurs and translators
Thanks
*
| 
 Translations


 If a plugin supplied appears with this icon it must necessarily be imported into Unlimited *