|
Let's start the lesson
Perception du paysage/Perception of the landscape

1.
Open the background image ‘’Fond-Perception-du-paysage’’- Promote background layer = Raster 1
2.
Layers- Duplicate
3.
Layers - New mask layer - From image and select mask:’
’Masques-Perception du paysage’’
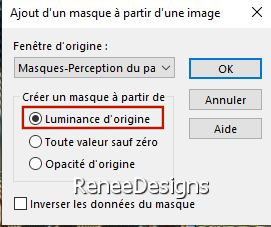
-
Layers- Merge- Merge Group ( You can't see anything, but it's normal.)
4.
Effects – Edge Effects – Enhance
5.
Effects- Plugins- FM Tile tools- Saturation
Emboss
-
Material Properties: Set your foreground color to color No.1 ( White)– Set your background color to color No. 2
-
Replace your foreground color with a Foreground/Background Radial gradient. Configure it as follows
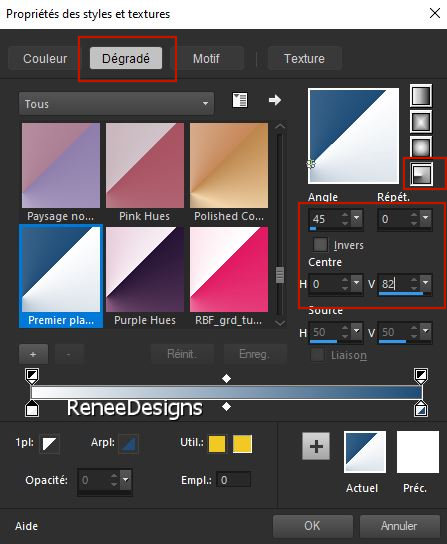
6.
Layers- New Raster Layer
7. Activate Flood Fill Tool
 –
Flood fill the layer with the gradient –
Flood fill the layer with the gradient
8.
Effects - Plugins- Filters in Unlimited 2.0 -
Filter Factory Gallery H - Stigmatism... 195/ 0
9.
Adjust- Blur- Radial Blur use the settings below
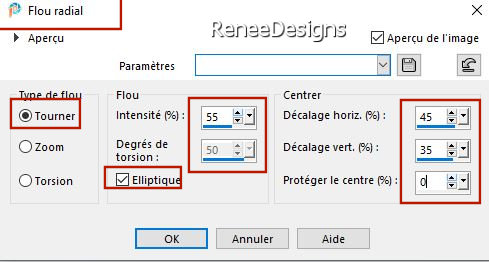
10.
Layers- Duplicate
11.
Image - Mirror - Mirror Horizontal (Image - Mirror in older versions of PSP)
12.
Layers-Properties-Reduce the opacity of this layer to 55%
13.
Layers- Merge- Merge Down
14.
Effects - Plugins- Filters in Unlimited 2.0 -
Filter Factory Gallery D – Mirror It using the default settings
15.
Effects – Edge Effects – Enhance More
16.
Effects- Distortion Effects- Wave use the settings below
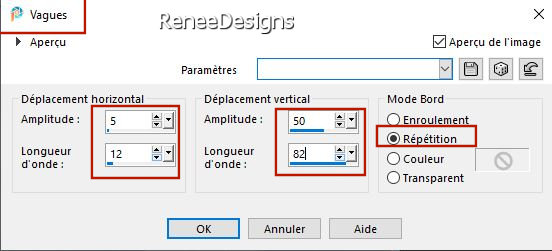
17.
Layers-Properties-Set the Blend Mode to Overlay
18.
Adjust- Sharpness-Sharpen More
19.
Layers- New Raster Layer
20.
Selections –load/save selection –load selection from disc and select my selection: ‘’Perception – 1’’
21.
Activate Flood Fill Tool
 –
Flood fill the selection with color #ffffff (White) –
Flood fill the selection with color #ffffff (White)

22.
Effects - Plugins- Alien Skin EyeCandy 5 -
Impact - Backlight use the settings below
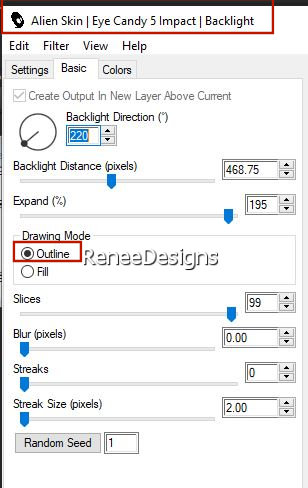
23.
Effects- Distortions Effects-Polar Coordinates-Rectangular to Polar-Transparent
24.
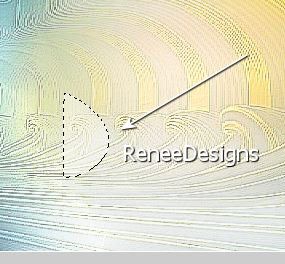
Selections –load/save selection –load selection from disc and select my selection: ‘’Perception – 2’’


25.
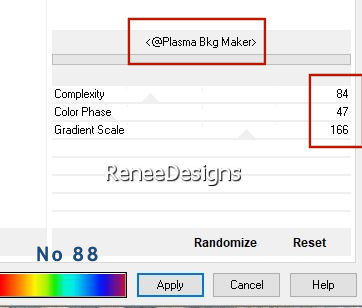
Effects - Plugins- Filters in Unlimited 2.0- &<Bkg
Designers sf10 IV> - <@Plasma Bkg Maker>
-At the bottom of the filter, select Texture / No 88 from the menu.
26.
Adjust- Blur- Gaussian Blur- Radius 3
27. Activate the tube
‘’Perception-Image 1’’ - Edit - Copy- Activate your work -Edit - Paste as new layer
28.
Pick Tool: (K) on your keyboard -Enter these parameters on the toolbar
 211/
146 211/
146
- Press the ( M ) button to close the tool.
- Activate Raster 1 in the Layer palette
29.
Layers- Duplicate
-
Layers- Arrange- Bring to Top
30.
Effects - Plugins - Filters in Unlimited 2.0 -
Tramages ( ou Factory A) - Holidays in Egypt... 128
31.
Effects - Plugins - Simple – Blintz
32.
Effects - Reflection Effects - Rotating Mirror use the settings below
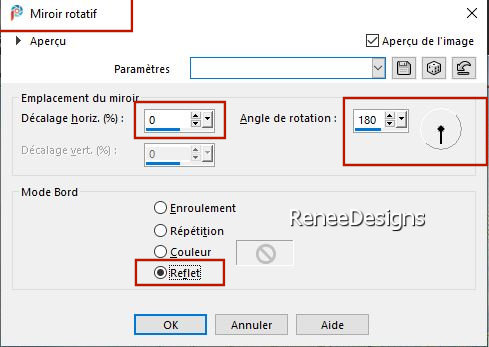
33.
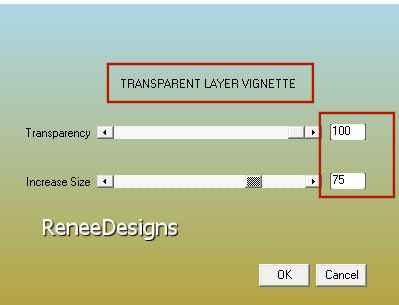
Effects- Plugins– AAA Filters – Transparent
Vignette use the settings below
34.
Effects- Image Effects- Seamless Tiling using the default settings
35.
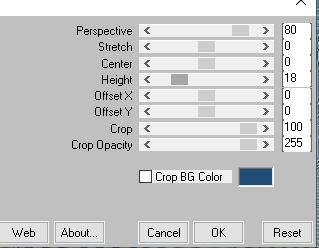
Effects- Plugins– Mura’s Meister – Perspective
Tiling use the settings below
36.
Effects - Plugins - Filters in Unlimited 2.0 -
Tramage -Waffle... 34/35
37.
Activate your Magic Wand – Tolerance at 0 and Feather at 35
Select the empty part / Hit your delete key 5 times


-
Material Properties: Set your foreground color to color No. 2 – Set your background color to color No. 3
-
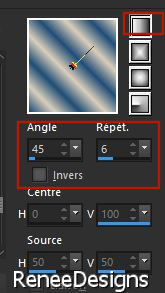
Replace your foreground color with a Foreground/Background linear gradient. Configure it as follows
38.
Layers- New Raster Layer
39.
Selections –load/save selection –load selection from disc and select my selection: ‘’Perception – 3’’
40.
Activate Flood Fill Tool
 –
Flood fill the selection with the gradient –
Flood fill the selection with the gradient
41.
Effects - Plugins- Filters in Unlimited 2.0 -
Tramages -Panel Stripes...with these settings: 37/130/154

42.
Layers- Duplicate
43.
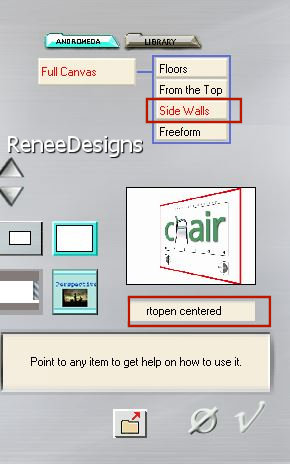
Effects- Plugins– Andromeda – Perspective-Side Walls-rtopen centered
44.
Layers- Arrange- Move Down
- Activate the top of the layer palette
45.
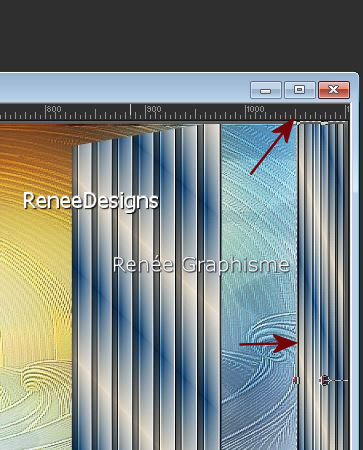
Selection tool ( K)-Mode-Scale-push the left center node to the right to 1050 px see image below
46.
Effects - Plugins- Filters in Unlimited 2.0 -
DCspecial - Book...with these settings: 0/31
- Activate the layer underneath
47.
Effects- Image Effects-Offset use the settings below
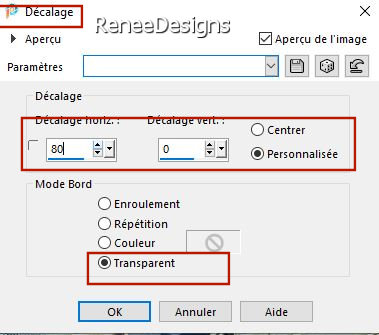 (
if necessary, stretch slightly to the right to position against the other band) (
if necessary, stretch slightly to the right to position against the other band)
48.
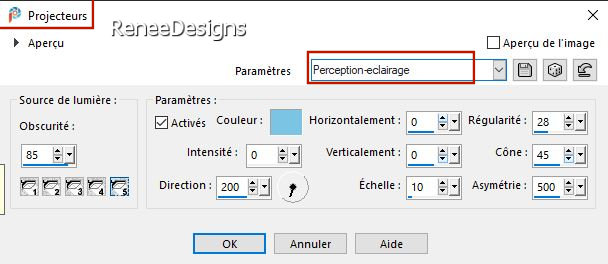
Effects- Illumination Effects-Lights- select my file -Preset :
‘’Perception-eclairage’’- Color #7cc4e4
- Activate the top of the layer palette
49.
Layers- New Raster Layer
50.
Selections –load/save selection –load selection from disc and select my selection: ‘’Perception – 4’’
51.
Activate the tube ‘’
Perception-Image2’’ - Edit - Copy- Activate your work -Edit - Paste into Selection
52.
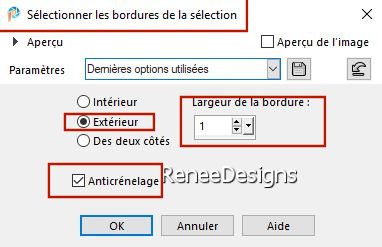
Selections - Modify - Select Selection Borders use the settings below
-
Material Properties: Set your foreground color to color White
53.
Activate Flood Fill Tool
 –
Flood fill the selection with color White –
Flood fill the selection with color White

54.
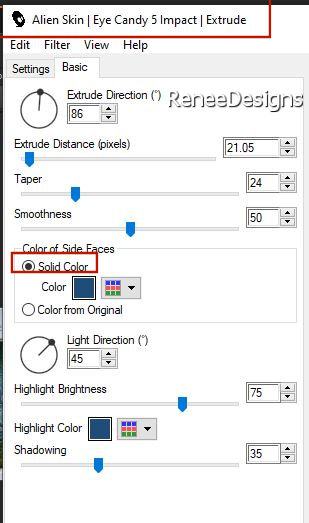
Effects - Plugins- Alien Skin EyeCandy 5 -
Impact - Extrude -use the settings below -Color #1f4d78
55.
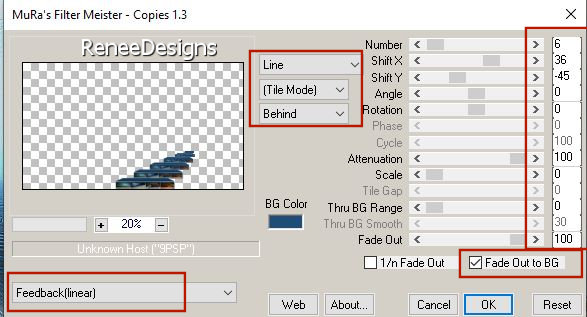
Effects- Plugins– Mura’s Meister – Copies use the settings below
56.
Activate the tube
‘’Perception-Image3.’’ -Edit - Copy- Activate your work -Edit - Paste as new layer
57.
Pick Tool: (K) on your keyboard -Enter these parameters on the toolbar
 781/
281 781/
281
- Press the ( M ) button to close the tool.
58.
Layers- Arrange- Move Down
59. Activate the tube
‘’Perception-Image-Nuages’’ - Edit - Copy- Activate your work -Edit - Paste as new layer
60.
Pick Tool: (K) on your keyboard -Enter these parameters on the toolbar
  653/
82 653/
82
- Press the ( M ) button to close the tool.
61.
Effects - Plugins- Filters in Unlimited 2.0
&<Background Designers IV> - @Night Shadow Pool using the default settings
62.
Activate the tube ‘’Perception-Image-Nuage-Blanc’’ - Edit - Copy- Activate your work -Edit - Paste as new layer
-
Place the clouds under the stairs layer.Or Activate -Pick Tool: (K) on your keyboard -Enter these parameters on the toolbar
 305
/417 305
/417
- Activate the top of the layer palette
63.
Activate the tube
‘’Perception-Image-2 hommes’’ - Edit - Copy- Activate your work -Edit - Paste as new layer
-
Place the two men on the stairs ( see finished image)
64.
Effects - Plugins- Alien Skin EyeCandy 5 –
Impact-Perspective Shadow –Tab- Settings- User Settings and select my file - Preset : ‘’Perception-Shadow’’
65.
Layers- New Raster Layer
66.
Selections –load/save selection –load selection from disc and select my selection: ‘’Perception – 5’’
-Material Properties: Set your foreground color to color No. 3 – Set your background color to color No. 2
67.
Activate Flood Fill Tool
 –
Flood fill the selection with the foreground color No. 3 –
Flood fill the selection with the foreground color No. 3
68.
Effects -Plugins -Filters in Unlimited 2.0 -
ICNET-Filters – Render - Clouds (fore-/background color)
114/128
69.
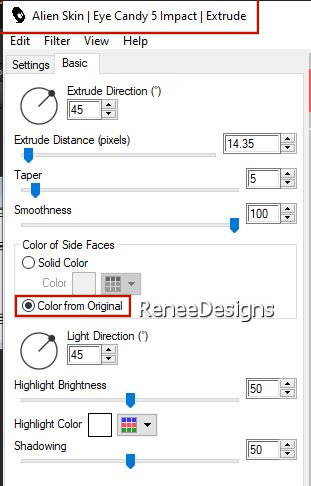
Effects -Plugins- Alien Skin EyeCandy 5 –
Impact – Extrude use the settings below
70.
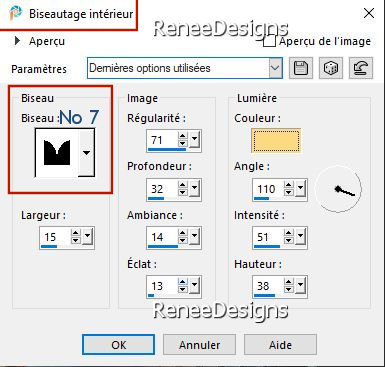
Effects-3D-Effects-Inner Bevel use the settings below– Color
#fcda81

71.
Effects – Edge Effects – Enhance More
72.
Activate the tube ‘’
Perception-Image-4’’ - Edit - Copy- Activate your work -Edit - Paste as new layer
73.
Pick Tool: (K) on your keyboard -Enter these parameters on the toolbar
 115/271 115/271
- Press the ( M ) button to close the tool.
74.
Activate the tube ‘’
Perception-Image-Forme-lignes’’ - Edit - Copy- Activate your work -Edit - Paste as new layer
75.
Place the tube up against the edge
Or - Activate Pick Tool: (K) on your keyboard -Enter these parameters on the toolbar
H = 58 and V = - 23
76.
Activate the tube ‘’Perception—divers’’- Edit - Copy- Activate your work -Edit - Paste as new layer
Move the tube in the right place( see finished image)
Or you can use the pen tool to draw vertical lines as you wish. Then open the Shapes tube - select and place the shapes of your choice.
77.
Activate the tube ‘’Perception-texte –Paste as new layer-or write your own text
78.
Image - Add Borders-Symmetric checked: 1 Pixel -Color no.2
79.
Image - Add Borders-Symmetric checked: 2 Pixels -Color no.5
80.
Edit - Copy
81.
Open the tube (Frame)''cadre '' in your Psp
82.
Activate your Magic Wand – Tolerance at 0 and Feather at 0 -Click in the empty center of the frame
83.
Selections – Modify – Expand 1 Pixel
84.
Layers- New Raster Layer
85.
Edit - Paste into Selection

86.
Layers- Arrange- Move Down
87.
Layers- Merge- Merge Visible
-
Add the author's watermark to your work and your own watermark
88.
Layers- Merge- Merge All ( flatten)
89.
Layers - Resize to 1005 pixel width -Resize all layers checked
Save as JPG
Thanks for your time and enjoyment of this lesson.
Renée
This lesson was written by Renée 25/11/2024
Edited and Update
in 2024
*
*
* Any resemblance to an existing lesson is purely coincidental.
* Don't forget to thank the people who work with us and for us - the testers and translators
Thanks
|


