|
Let's start the lesson
Pinocchio

- Preparation
-Material Properties: Set your Foreground color to color #3895c2=color 1 – Set your Background color to color #09445c=2
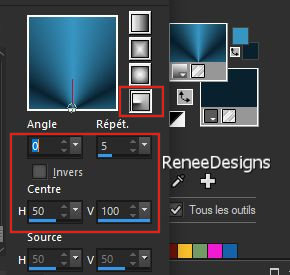
- Replace your Foreground color with a Foreground/Background Radial gradient configured like this
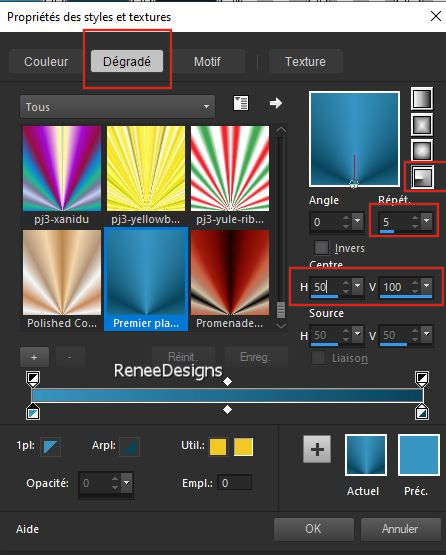
1. File-Open a New Transparent Image in this size : 1100
x 700 Px
2. Flood Fill Tool
 –
Fill the layer with the Gradient –
Fill the layer with the Gradient
3.Effects- Image Effects- Seamless Tiling use the settings below
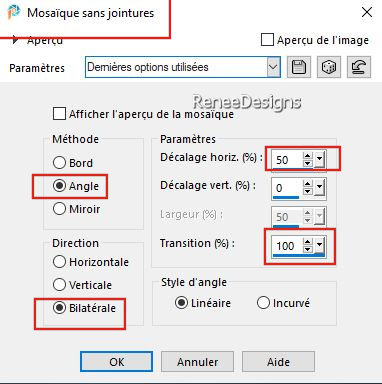
4. Repeat -Effects- Image Effects- Seamless Tiling with the same settings
5. Layers – Duplicate
6. Image - Mirror - Mirror Horizontal (Image - Mirror in older versions of PSP)
7. Layers-Properties-Set the Blend Mode to " Hard Light " -Reduce the opacity of this layer to 57%
8. Layers- Merge- Merge Down
9. Effects – Illumination Effects– Lights –select my file- Preset : Pinocchio-eclairage’’
10. Layers – Duplicate
11. Effects- Plugins – Medhi- Wavy Lab 1.1 use the settings below
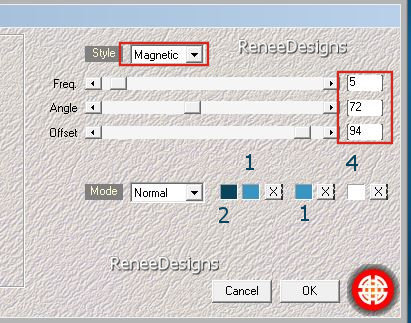
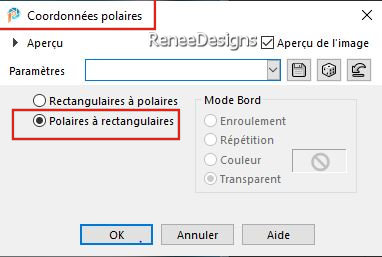
12. Effects– Distortion Effects– Polar Coordinates-Polar to Rectangular checked
13. Layers-Properties-Set the Blend Mode to " Overlay " -Reduce the opacity of this layer to 69%
14. Selections –load/save selection –load selection from disc and select my selection:‘’Pinocchio-1’’
15. Adjust- Blur-Gaussian Blur-Radius 100%
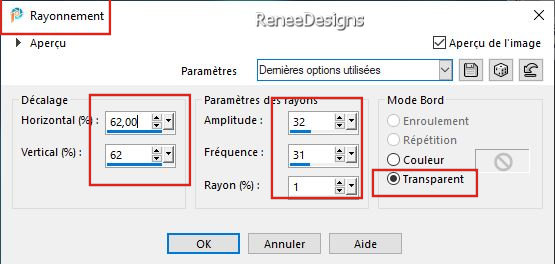
16. Effects– Distortion Effects– Spiky Halo use the settings below
17. Selections-Promote Selection to Layer

18. Effects – Edge Effects – Enhance More
- Activate the layer underneath ( Copy of Raster 1)
19.Effects- Plugins – AlphaWorks- Vertical Fadeout : 255
Activate the top of the layer palette
20. Layers – Duplicate
21.Image - Mirror - Mirror Horizontal (Image - Mirror in older versions of PSP)
22. Layers- Merge- Merge Down
23. Effects- Plugins – AlphaWorks- Vertical Fadeout: 147
24. Layers- New Raster Layer
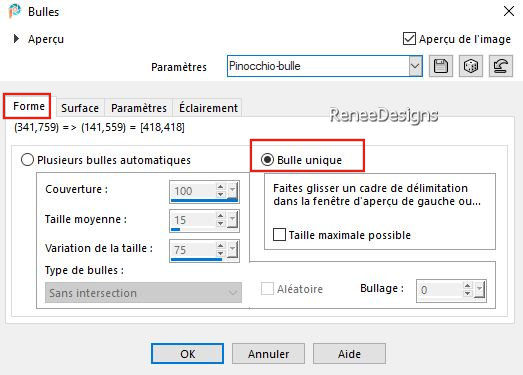
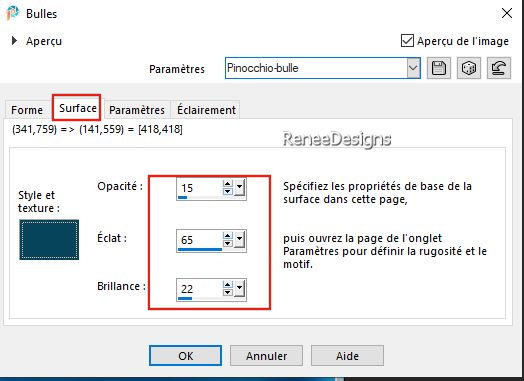
25. Effects –Artistic Effects– Balls and Bubbles- select my file-Preset : Pinocchio-Bulles
or set manually – Color #09445c=
2
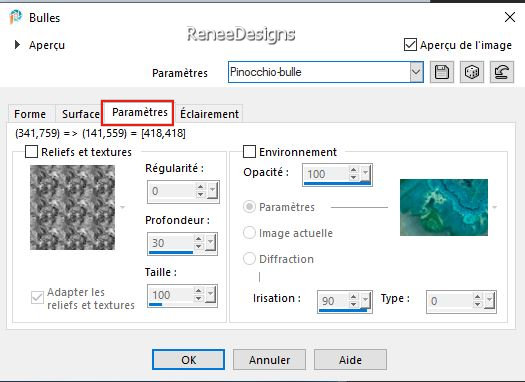 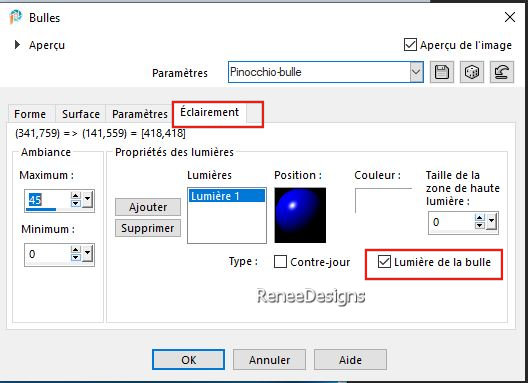
26. Layers - Duplicate
27. Layers- Merge- Merge Down
28. Layers- New Raster Layer
29. Selections –load/save selection –load selection from disc and select my selection:‘’Pinocchio-2’’
30. Open the tube ‘’Pinocchio-image 1’’ - Edit - Copy- Activate your work -Edit - Paste into Selection

31. Layers- Arrange- Move Down
32. Layers-Properties-Set the Blend Mode to " Luminance " -Reduce the opacity of this layer to 71%
- Activate the top of the layer palette
33. Layers- Merge- Merge Down
34.Image - Resize - to 45% - Resize all layers-NOT Checked
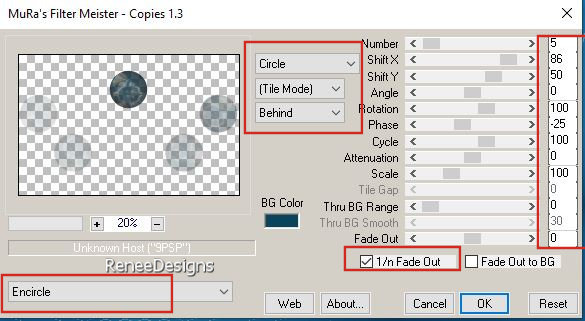
35. Effects- Plugins – Mura’s Meister – Copies use the settings below
36. Effects- 3D- Effects- Drop Shadow with these settings: -25/ 29/
30 /5 Color #ffffff ( white)
37. Layers-Properties-Set the Blend Mode to " Luminance Legacy "
- Material Properties: Set your Background color to color #0b212f= 3
The Result
38. Layers- New Raster Layer
39. Flood Fill Tool
 –
Fill the layer with the Gradient –
Fill the layer with the Gradient
40. Effects- Plugins – EyeCandy 4000 – Weave use the settings below
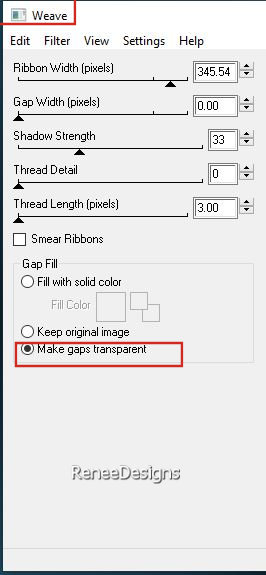
41. Effects – Edge Effects – Enhance More
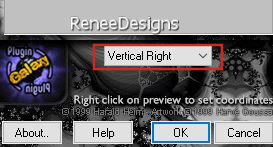
42.Effects- Plugins -
Plugin Galaxy - Instant Mirror use the settings below
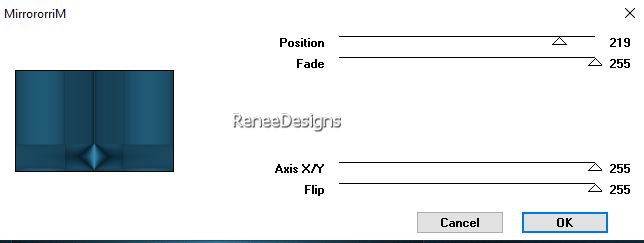
43. Effects- Plugins - Filters in Unlimited 2.0 – VM Toolbox –
MirrororriM use the settings below
44. Layers- Duplicate
45. Image - Mirror - Mirror vertical ( Image - Flip in older versions of PSP) –Reduce the opacity of this layer to 50%
46. Layers- Merge- Merge Down
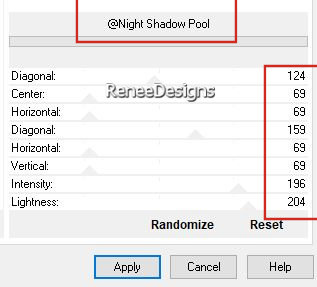
47. Effects- Plugins - Filters in Unlimited 2.0 - &<Background
Designers IV>- @Night Shadow Pool use the settings below
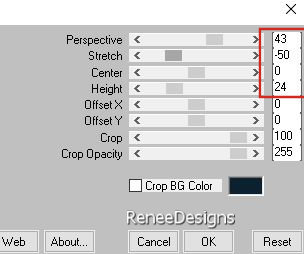
48.Effects- Plugins – Mura’s Meister – Perspective Tiling use the settings below
49. Activate your Magic Wand – Tolerance at 0 and Feather at 60
Hit your delete key 6 to 7 times


50. Layers-Properties-Set the Blend Mode to " Difference" – -Reduce the opacity of this layer to 57%
51. Layers - Arrange - Move Down- Move this layer above Raster 1 in the layer palette
- Replace at the top of the layers palette
- Material Properties: Set your Foreground color to color #0b212f=color 3 – Set your Background color to color #ffffff=4
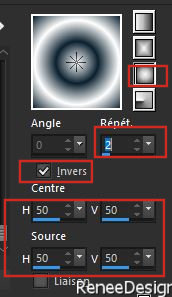
- Replace your Foreground color with a Foreground/Background Sunburst Gradient configured like this
52. Layers- New Raster Layer
53. Selections –load/save selection –load selection from disc and select my selection:‘’Pinocchio-3’’
54. Flood Fill Tool
 - Opacity 60 % –
Fill the selection with the Gradient
55. Effects- Plugins - Filters in Unlimited 2.0 – Tools – Interlace...
Using the default settings

56. Layers-Properties-Set the Blend Mode to " Hard Light " -Reduce the opacity of this layer to 75%
57. Open the tube ‘’Pinocchio-Image-Boules’’ -Edit - Copy- Activate your work -Edit - Paste as new layer
58. Pick Tool: (K) on your keyboard -Enter these parameters on the toolbar
 19/33
19/33
Press ( M ) to close the tool
59. Layers- New Raster Layer
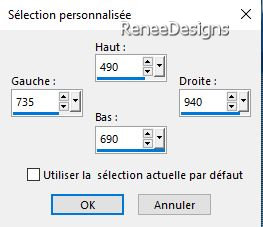
60. Activate Selection Tool -Custom Selection (S) -Rectangle with these settings

61. Flood Fill Tool
 –
Opacity 100% – Fill the selection with the Gradient –
Opacity 100% – Fill the selection with the Gradient
62. Adjust- Blur- Gaussian Blur -Radius 12%

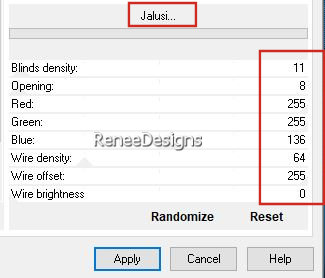
63. Effects- Plugins - Filters in Unlimited 2.0 – Tools- Jalusi use the settings below
64. Effects – Edge Effects -Enhance
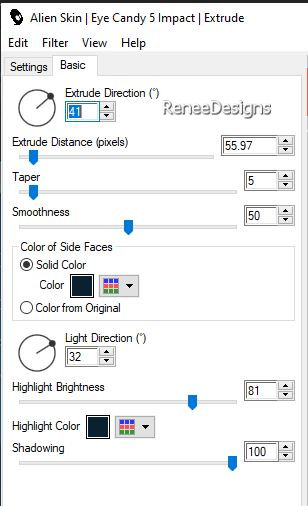
65. Effects- Plugins - Alien Skin EyeCandy 5 – Impact – Extrude use the settings below -Color #0b212f=
3
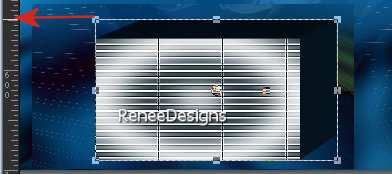
66. Pick Tool: (K) on your keyboard -Vieuw-Rulers checked –the upper middle node should be at 550 pixels/as shown in the example below
67.Layers-Properties-Set the Blend Mode to " Overlay "
68. Open the tube‘’pinocchio-640’’ - Edit - Copy- Activate your work -Edit - Paste as new layer
- Pick Tool: (K) on your keyboard -Enter these parameters on the toolbar 247/166 247/166
69. Effects- Plugins – FM Tile Tools - Saturation Emboss Using the default settings
70. Layers-Properties-Set the Blend Mode to " Hard Light "
- Activate the folder
‘’Reserves -Steampunk-2024-Pinocchio’ (Renée attached 47 Pinoccio Tubes in separate folder)
71. Activate the tube of your choice -(Renée chose this tube) ‘’ Renee-TUBES-STP-Pinocchio-6’’
-Image- Resize- 55%
- Edit - Copy- Activate your work -Edit - Paste as new layer – Place it on the stud(see finished image)
72. Effects- 3D- Effects- Drop Shadow with these settings: – 34 /
20 /24 /12 Color #ffffff (color white)
- Material Properties:
Set your Foreground color to color #09445c=color 2 – Background color remains at color #ffffff=4
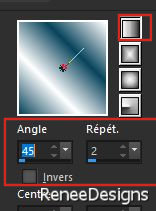
- Replace your Foreground color with a Foreground/Background Linear Gradient configured like this
73. Layers- New Raster Layer
74. Selections –load/save selection –load selection from disc and select my selection:‘’Pinocchio-4’’
75. Flood Fill Tool
 –
Fill the selection with the Gradient –
Fill the selection with the Gradient
76. Effects- Plugins - Alien Skin EyeCandy 5 – Textures –Weave –select-Preset :
Satin, Transparent Fill
77. Effects- Plugins - Alien Skin EyeCandy 5 – Impact –Perspective
Shadow –select- Preset : Drop Shadow , Blurry

78. Layers - Duplicate
79. Image - Mirror - Mirror Horizontal (Image - Mirror in older versions of PSP)--
– Image - Mirror - Mirror vertical ( Image - Flip in older versions of PSP)
80. Pick Tool: (K) on your keyboard -Enter these parameters on the toolbar
 120
/ 14 120
/ 14
Press ( M ) to close the tool
- Layers- Merge- Merge Down
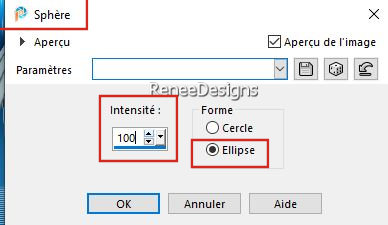
81. Effects- Geometric Effects-Spherize with these settings
82. Layers- New Raster Layer
83. Effects– Distortion Effects– Wind-Wind direction from right-Wind strength 100%
84. Layers- Arrange- Move Down
85. Layers-Properties-Set the Blend Mode to " Screen"
86.-Open 2 tubes by choice (for Renée ‘’ Renee-TUBES-STP-Pinocchio-41 - Renee-TUBES-STP-Pinocchio-40"
-Image- Resize- 55%
-Edit - Copy- Activate your work -Edit - Paste as new layer
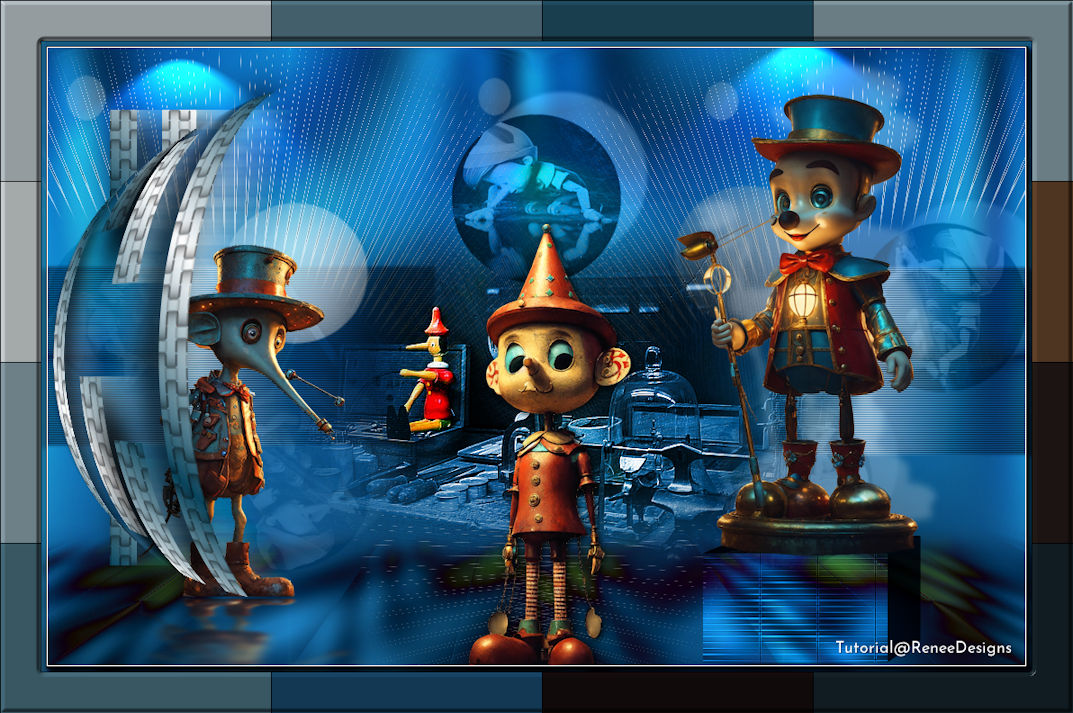
- Move the tube in the right place ( see finished image)
-
Drop shadow of your own choice
-
For Renée-Left one -Effects- Plugins- Eyecandy 5 -
Perspective Shadow - Reflect in front
- For the middle one -Effects- Plugins -Eyecandy 5 - Perspective Shadow – Preset - of your choice
87. Image - Add Borders-Symmetric checked: 1 Pixel -Color #3895c2=1
88. Selections –
Select All
89. Image - Add Borders-Symmetric checked: 45 Pixels -Color #ffffff=4
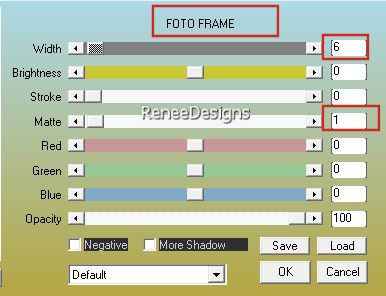
90. Effects- Plugins - AAA Frame - Foto frame use the settings below
91. Selections - Invert
92. Flood Fill Tool
 -
Fill the selection with the Gradient -
Fill the selection with the Gradient
93. Effects- Plugins – L & K - Jouri with these settings: 129/130/128
94. Effects- Plugins - Alien Skin EyeCandy 5 – Impact – Bevel –select -
Preset : Flat Edge, Small
95. Paste the author's watermark on your work and your own watermark
96. Layers- Merge- Merge All ( flatten)
97. Image - Resize - to 90% - Resize all layers- Checked
Save as JPG
23/15/2023
I hope you enjoyed this lesson
Renée
This lesson was written by Renée 23-12- 2023
Edited and Update
in 2023
*
*
Any resemblance with an existing lesson is a coincidence
* Do not forget to thank the people who work with us and for us -
I have appointed the tubeurs and translators
Thanks
|
 Translations


