|
Let's start the lesson
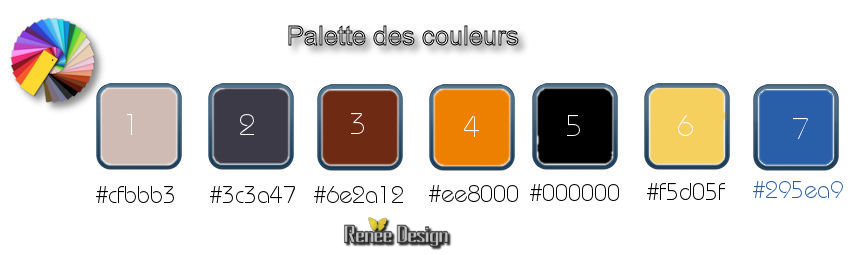
Start with these colors.
Color Palette- Set your foreground color to #cfbbb3 (number 1) - Set your background color to #3c3a47(number 2)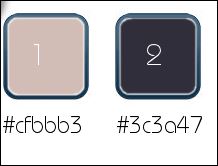
1. Open Image ‘’ Fond_ Remain_ of a dream’’/ Window - Duplicate (or shift+D) - Close the original and proceed on the copy -Promote Background Layer = Raster 1
2.
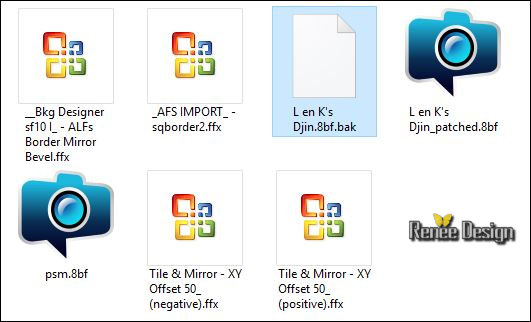
Effects –Plugins- Unlimited ICNET FILTERS - Tile & Mirror- XY
Offset 50% (positive)
3.
Effects –Plugins– simple – Pizza slice
Mirror
4.
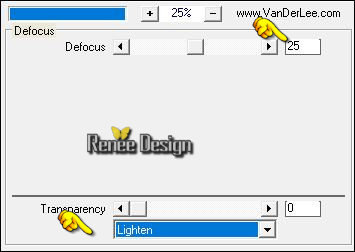
Effects –Plugins – Vanderlee Unplugged X –
Defocus
5.
Effects –Plugins- Unlimited ICNET FILTERS - Tile & Mirror -XY
Offset 50% (negative)
6.
Effects -Plugins- Unlimited - &<Bkg Designer sf10 I> -
ALFs Border Mirror Bevel 168-255
7.
Selections –load/save selection –load selection from disc and select my selection: ‘’ Remain 1’’
8.
Selections- Promote selection to Layer
Selections - Select none.
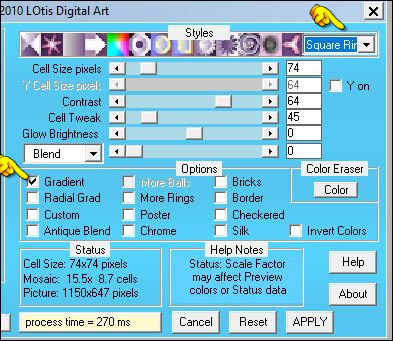
9.
Effects –Plugins – LOtis filters – Mosaic Toolkit-
Squares Rings –
Do you have problems with this- Image is into the zipfile and paste as a new layer on your working area and move
10. Layers- Duplicate
- Image
Mirror(CTRL+B)
11. Layers- Merge- Merge- Down
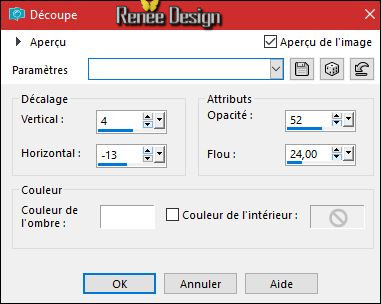
12. Effects- 3 D Effects- Drop Shadow with these settings :
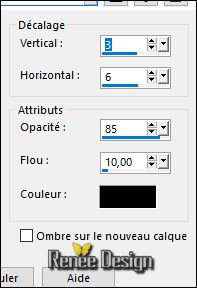
- Repeat the Drop Shadow effect-Negative -3 and – 6
- Activate the bottom layer in the layer palette = Raster 1
13.
Activate Selection Tool -Custom Selection (S) -Rectangle with these settings
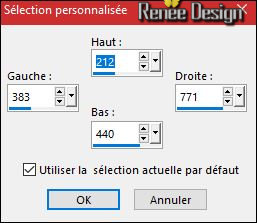
14.
Selections- Promote selection to Layer
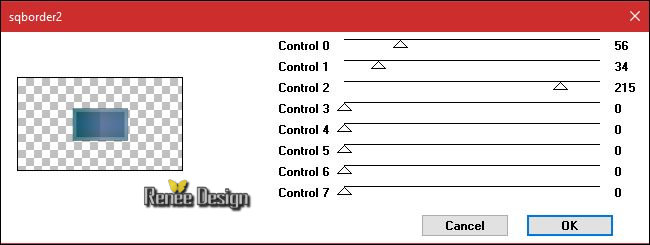
15. Effects
–Plugins – AFS Import sqborder2
Selections - Select none.
16.Effects- 3 D Effects- Drop Shadow with these settings
- Repeat the Drop Shadow effect-Negative -3 and – 6
-You may minimize your working area for a moment, but do not close, we will need it again soon
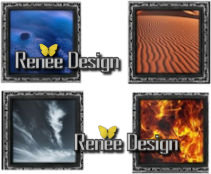
17. Open the tube "cadre"
-Window - Duplicate the frame 3 times to have 4 frames in total
18. Activate Magic Wand -Click in the first frame

- Open the folder containing the pictures
- Now open the first image and activate it
- Use the Selection Tool -Rectangle - Cut out the desired image part
- Edit- Copy-Activate your frame -Edit Paste into selection
Selections - Select none.
- The size is 83 x 85 pixels obligatory (frames and image)
- Repeat this again with the other 3 frames and images to get 4 different frames
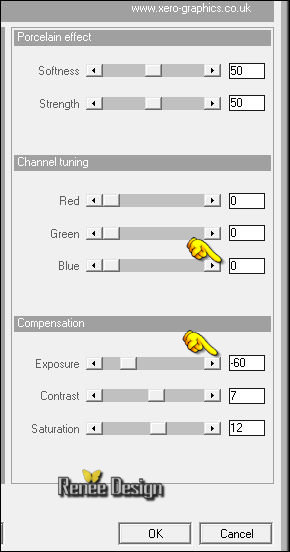
( The idea that these four elements - earth, water, air, and fire - made up all matter was the cornerstone of philosophy, science, and medicine for two thousand years.
)
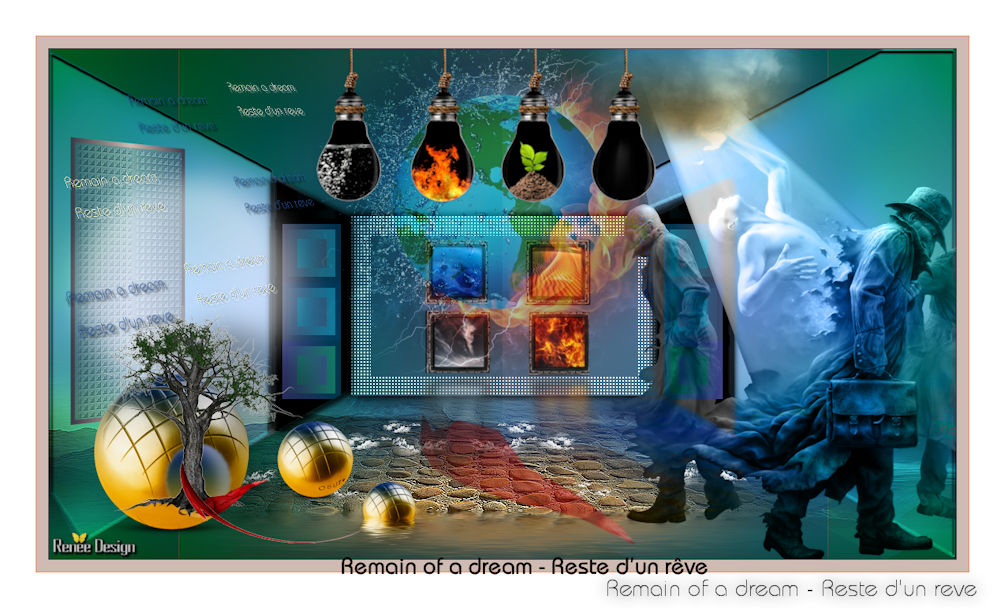
The Result
19. Activate the first frame image -Edit- Copy- Activate your minimized image you created earlier on in the lesson -Edit- Paste as a new Layer and move
- Repeat this process for all images
-Merge these 4 frames into a single layer
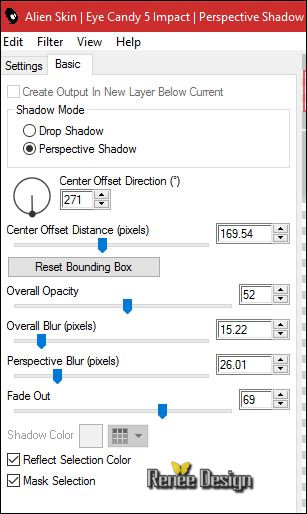
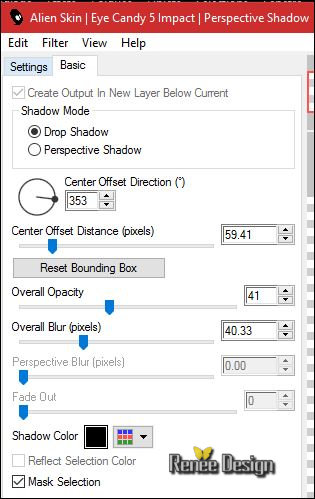
20.
Effects -Plugins – Eyecandy 5 -Impact – Perspective
shadow use settings below
21.
Open the tube” DECOS_ Remain of a dream .pspimage” (Do not close we need it later for the rest of the work)
22. Activate the layer "Raster 1'"of the tube
- Edit - Copy- Activate your work -Edit - Paste as a new layer
23. Effects- Image Effects- Offset with these settings: H = 0 and V = - 280 /
Transparent
24.
Effects – Plugins – Flaming Pear – Flood /Preset ‘’
Remain _Flood settings.q8r’’
click on the red arrow  and select my file-preset ‘’ Remain _Flood settings.q8r’’ can be used in any folder of your choice by clicking it. Or manual settings as shown in the example below and select my file-preset ‘’ Remain _Flood settings.q8r’’ can be used in any folder of your choice by clicking it. Or manual settings as shown in the example below
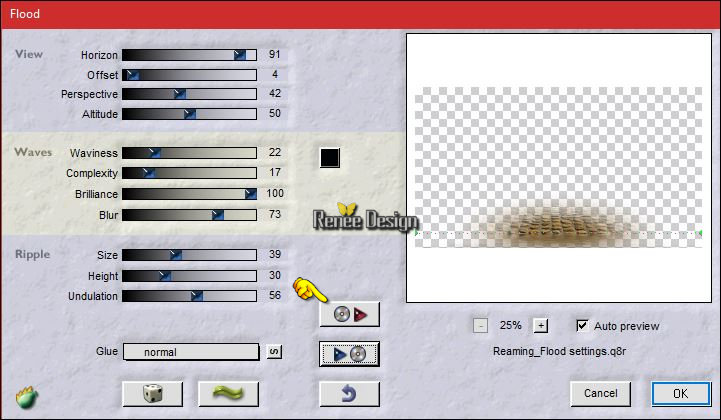
- Activate the bottom layer in the layer palette = Raster 1
25. Open the tube ‘’ Remain_Passage’’
- Edit - Copy- Activate your work -Edit - Paste as a new layer
26. Effects- Image Effects- Offset with these settings: H = 0 and V = - 173
27. Effects-Edge Effects- Enhance
- To replace the top of the layers palette
28. Back on
tube DECOS
- Activate the layer "raster 2 (terre en
feu) of the tube
- Edit - Copy- Activate your work -Edit - Paste as a new layer
- Place them in the top center to the edge.
29.
Layers-Properties-Set the Blend Mode to " Hard Light " -Set the Opacity of this layer to 55%
- Back on tube DECO
30. Activate the layer "raster 3" of the tube
- Edit - Copy- Activate your work -Edit - Paste as a new layer
- Place on paving stones( see finished image )
- Activate the bottom layer in the layer palette = Raster 1
DO NOT ADD A NEW LAYER
31.
Selections –load/save selection –load selection from disc and select my selection: ‘’Remain_2’’
32. Adjust- Blur-Gaussian Blur: Radius 20
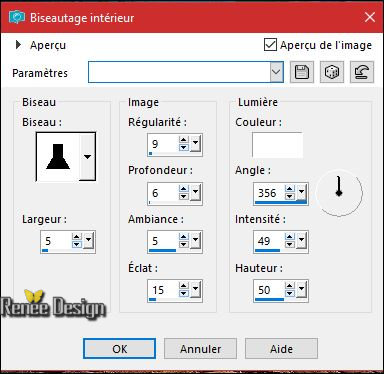
33. Effects- 3 D Effects-Inner Bevel use settings below
Selections - Select none.
- To replace the top of the layers palette
34.
Open the tube ‘’ Renee_tube_reamain
dream_Tube_BY_Artus.pspimage’’
- Image
Resize to 635 pixels Height
- Edit - Copy- Activate your work -Edit - Paste as a new layer
- Move to the bottom right side
35.
Layers-Properties-Set the Blend Mode to "Luminance-Legacy "
36. Back on tube
DECOS
- Activate the layer "raster 4"of the tube
- Edit - Copy- Activate your work -Edit - Paste as a new layer
- Place at the top of the tube
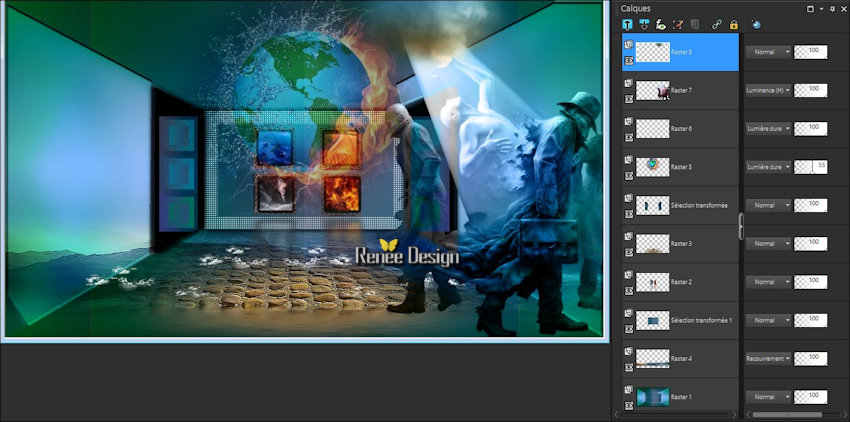
Your Layer palette look like this now-You should have this result
-
Color Palette- Set your foreground color to #3c3a47 - Set your background color to #cfbbb3
- Set your Foreground color to foreground-background "linear" gradient configured like this
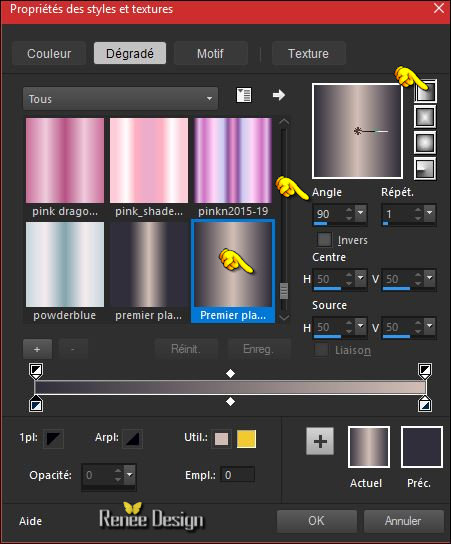
37. Layers- New Raster Layer
38.
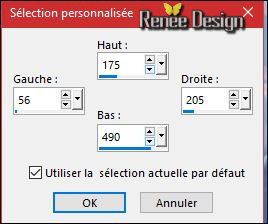
Activate Selection Tool -Custom Selection (S) -Rectangle with these settings
39. Activate Flood Fill Tool and fill the selection with the gradient
40.
Selections – Modify –Contract 5 pixels
Hit the DELETE
key of your keyboard
41.
Flood Fill Tool – Opacity of the color at 50%
- Fill the selection with the gradient
42.
Effects – Plugins – L & k ‘s – Djin a
48/18
43. Effects-Edge Effects-Enhance More
Selections - Select none.
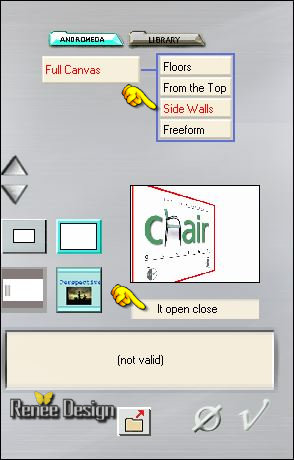
44. Effects
- Plugins - Andromeda – Perspective -Side Walls
–
45. Effects- Image Effects- Offset with these settings:

46. Layers- New Raster Layer
47.
Selections –load/save selection –load selection from disc and select my selection: ‘’ Remain_3’’
- Properties Foreground: Set your foreground color to #ffffff
48. Flood Fill Tool – Opacity of the color at 50% –Fill the selection with the foreground color #ffffff
Selections - Select none.
49. Back on tube DECOS
- Activate the layer
‘’lampe’ of the tube
- Edit - Copy- Activate your work -Edit - Paste as a new layer
Place them in the top center to the edge.
-Back on tube DECOS
50. Activate the layer "raster 5" of the tube
- Edit - Copy- Activate your work -Edit - Paste as a new layer
51. Effects- Image Effects- Offset with these settings H = - 420 and V = - 192
52.
Selections –load/save selection –load selection from disc and select my selection: ’’ Remain_4’’
- Color Palette- Set your foreground color to #f5d05f - Set your background color to #295ea9
53.
Set your Foregroundcolor to foreground-background "linear" gradient configured like this
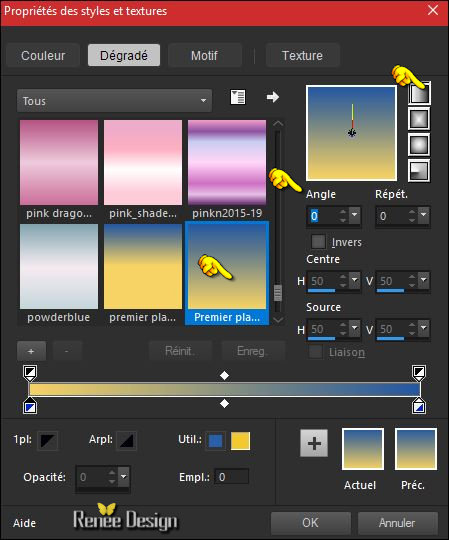
54. Layers- New Raster Layer
55. Flood Fill Tool – Opacity of the color at 100% - Fill the selection with the gradient
56. Effects
–Plugins – Xero – Porcelaine
57. Layers- New Raster Layer
58. Effects
– 3D Effects -Cutout use settings below / Color #ffffff
Selections - Select none.
59. Back on tube DECOS
- Activate the layer ‘’arbre"of the tube
- Edit - Copy- Activate your work -Edit - Paste as a new layer
- Place it on the bottom left side ( see finished image )
60. Effets
– Modules Externes – EyeCandy 5 Impact – Perspective
shadow
- Back on
tube DECOS
61. Activate the layer Raster 5"of the tube
- Image
Resize to 2 x 70%
- Edit - Copy- Activate your work -Edit - Paste as a new layer
- Place it on the bottom left side ( see finished image )
62. Layers- Duplicate – Image Resize to 70%
-
Place it on the bottom left ( see finished image )
63. Effects
–Plugins – Flaming Pear Flood /with the same settings
(
(The filter settings depends where the tube is placed)
)

64. Open the tube’’ Remain_texte’’
- Edit - Copy- Activate your work -Edit - Paste as a new layer
- Place it on the top left side
65. Open the tube ‘‘ruban rouge.pspimage’’
- Edit - Copy- Activate your work -Edit - Paste as a new layer
Move it the right place at the bottom of your image
66.
Set the Opacity of this layer to 48%
67. Image - Add borders-Symmetric checked: 1 pixels #3c3a47 (number 2)
68 .Image - Add borders-Symmetric checked: 15 pixels #cfbbb3 (number 1)
69. Image - Add borders-Symmetric checked: 1 pixels #ee8000 ( number 4)
70. Image - Add borders-Symmetric checked: 45 pixels #ffffff
71. Activate your Text Tool –Size 30 –foreground color of your choice -background color black
-Write the 2 texts with the 2 attached fonts (into the zipfile)
72. Apply a Drop Shadow to your taste
73. Layers- Merge- Merge All (flatten)
74. Image
Resize to 1005 pixels width
Save as JPG
So we are done .
I hope you had fun making this lesson
Renée
This lesson was written by Renée 25/11/2016
Edited and Update
2016
*
Any resemblance with an existing lesson is a coincidence
* Do not forget to thank the people who work with us and for us I have appointed the tubeurs and translators
Thanks Renée *
*
| 
 Translations


 If a plugin supplied appears with this icon it must necessarily be imported into Unlimited *

 All rights reserved