|
Let us begin with the lesson
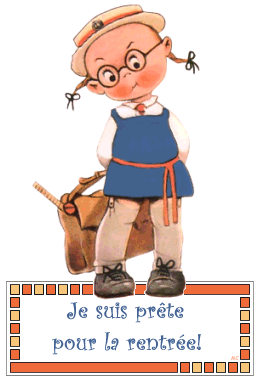
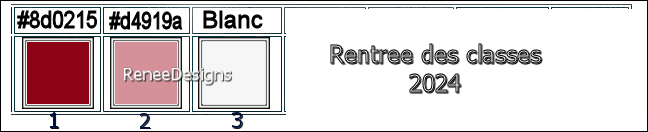
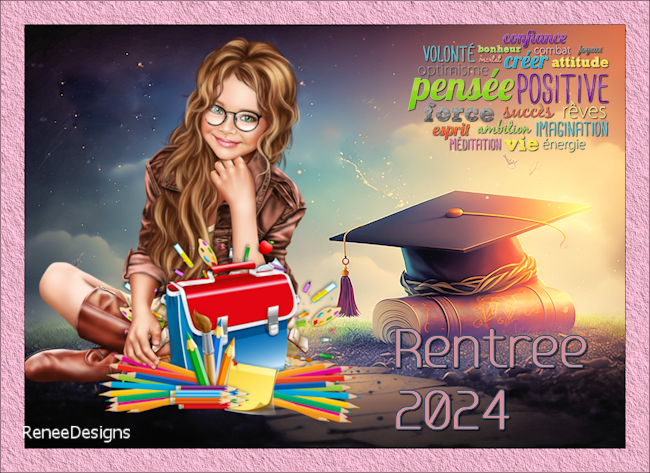
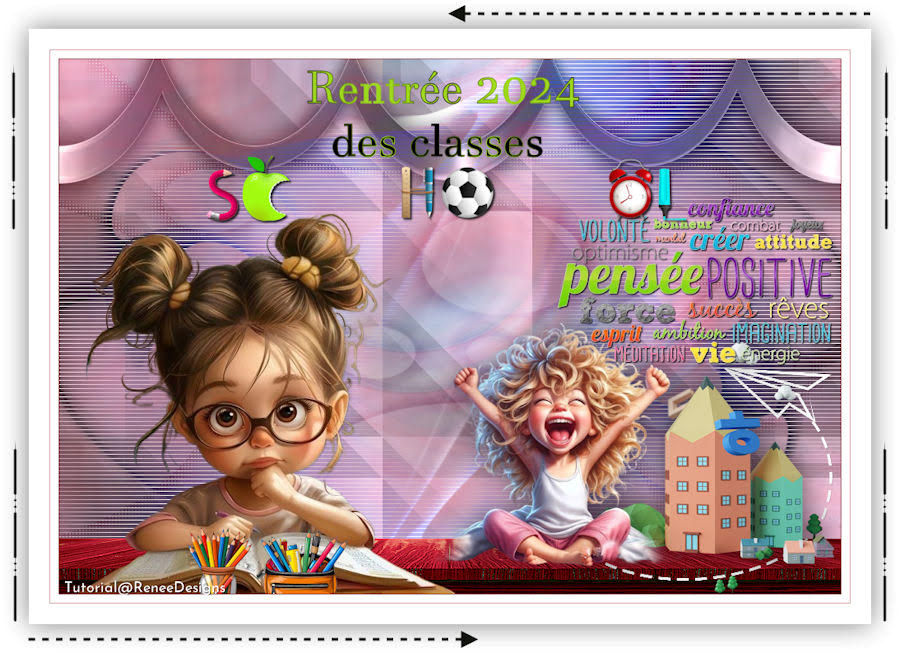
Rentrée des classes 2024
Back to school 2024
-Preparation
-Material Properties:Set the color of your foreground to color 1 -Set the color of your background to color 2
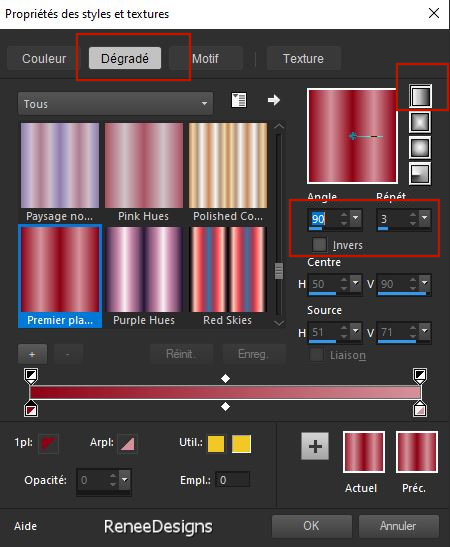
- Replace your Foreground color with a Foreground/Background Linear Gradient configured like this
1. File-Open a new transparent image in this size : 950
x 650 Pixels
2. Activate Flood Fill Tool
 –
Fill the layer with the Gradient –
Fill the layer with the Gradient
3. Selections-Select All
4.Open the tube ‘’Renee-TUBES-Rentree-Classes-2024- Image 1’’ -Edit - Copy - Activate your work - Edit - Paste into selection

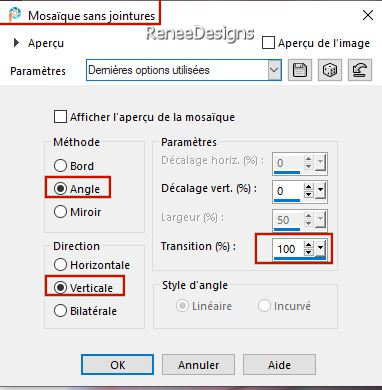
5. Effects- Image Effects- Seamless Tiling using the default settings
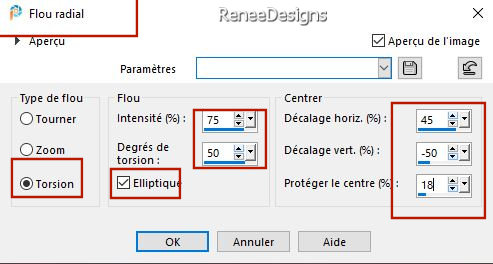
6. Adjust-Blur-Radial Blur use the settings below
7. Effects –Distorstion Effects– Twirl -Degrees 190°
8. Effects- Image Effects- Seamless Tiling using the default settings
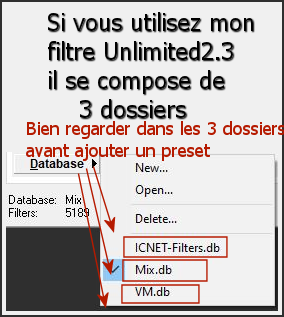
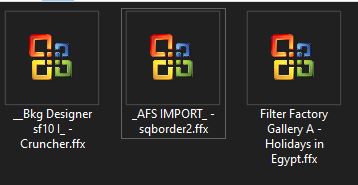
9. Effects - Plugins - Filters in Unlimited 2.0 - Filter Factory
Gallery A - Holidays in Egypt – Size : 130
10.Effects- Image Effects- Seamless Tiling use the settings below
11. Effects - Plugins - Filters in Unlimited 2.0 - &<Bkg Designer sf10
I> - Cruncher: 49 /20
12. Layers-New Raster Layer
13.Selections –load/save selection –load selection from disc and select my selection: ‘’ Rentree-classes-2024-1’’
14. Effects- 3D- Effects- Drop Shadow with these settings: 0/0/58/1 Color Black
15. Effects - Plugins - Filters in Unlimited 2.0 - [AFS IMPORT]
-sqborder2 using the default settings
16. Effects-Image Effects-Enhance (do it a second time)
17. Layers-Properties-Set the Blend Mode to "Overlay "
18.Open the tube ‘’ Renee-TUBES-Rentree-Classes-2024-
Image 2’’ --Edit - Copy- Activate your work -Edit - Paste as new layer
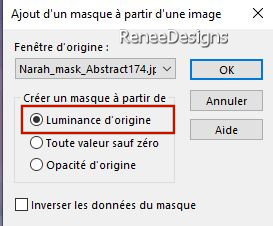
19.Layers-New mask layer-From image and choose mask :‘’
Narah_mask_Abstract174.jpg’’
- Layers-Merge-Merge Group
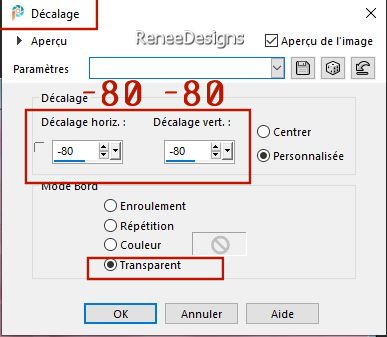
20. Effects-Image Effects-Offset use the settings below
21. Layers – Duplicate
22. Image - Mirror - Mirror Horizontal (Image - Mirror in older versions of PSP)
– Image - Mirror - Mirror vertical ( Image - Flip in older versions of PSP)
23. Layers-Merge-Merge Down
24. Effects -Plugins – AP [Blur]- Blur – Lightenup use the settings below
 
25. Effects -Plugins - AP[Lines] Lines – Silverlining use the settings below

26. Layers-Properties-Set the Blend Mode to " Hard Light "
27. Layers– Duplicate
- Layers-Merge-Merge Down
28. Layers-New Raster Layer
29.Selections –load/save selection –load selection from disc and select my selection: ‘’ Rentree-classes-2024-2’’
30. Activate Flood Fill Tool
–
Fill the selection with #ffffff ( white)
31. Effects - Plugins - Alien Skin EyeCandy 5 – Impact – Chrome-Tab-Settings/User Settings and and choose my preset ‘’rentree-classes-2024renee’’
32. Effects- 3D- Effects- Drop Shadow with these settings: 0/0/80/55 Color Black
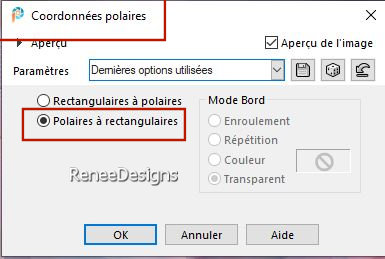
33. Effects-Distortion Effects-Polar Coordinates-Rectangular to Polar
34. Image - Mirror - Mirror vertical ( Image - Flip in older versions of PSP)
-
View Rulers checked
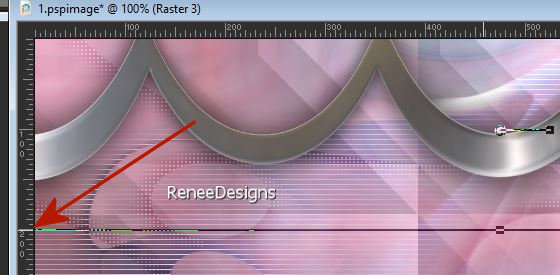
35. Activate Select tool (K)- Ruler mode - Move up like this (200)
36. Layers-Properties-Set the Blend Mode to " Luminance Legacy "
37. Open the tube ‘’Renee-TUBES-Rentree-Classes-2024-school’’ -Edit - Copy- Activate your work -Edit - Paste as new layer -
- Put the tube in the right place (see finished image)
38. Open the tube ‘’Renee-TUBES-Rentree-Classes-2024-sol’’ -Edit - Copy- Activate your work -Edit - Paste as new layer
33. Objects – Align -Bottom
34. Layers-New Raster Layer
35.Selections –load/save selection –load selection from disc and select my selection: ‘’ Rentree-classes-2024-3’’
36. Activate Flood Fill Tool
–
Fill the selection with #ffffff
37. Effects- 3D- Effects- Drop Shadow with these settings: 1/1/10/1 Color Black
38.Open the tube
‘’Renee-TUBES-Rentree-Classes-2024- Image 3’’ -Edit - Copy- Activate your work -Edit - Paste as new layer
Place at bottom right
39.Open the tube
‘’Renee-TUBES-Rentree-Classes-2024- textes’’ -Edit - Copy- Activate your work -Edit - Paste as new layer
Place on the right (see finished image)
40. Open the tube
‘’Renee-TUBES-Rentree-Classes-2024- Image 4’’ -Edit - Copy-Edit - Paste as new layer - Move to bottom left–Resize if necessary
41.Drop shadow of your choice
42. With the attached font you can write your own title in your own language.
43. Add the author's watermark to your work and your own watermark
44. Image - Add Borders-Symmetric checked: 1 Pixel -Color 1
Image - Add Borders-Symmetric checked: 10 -Color #ffffff
Image - Add Borders-Symmetric checked: 1 Pixel -Color 2
Image - Add Borders-Symmetric checked: 60 Pixels -Color #ffffff
45. Selections-Select All
46. Selections - Modify - Contract 35 Pixels
47. Effects –3D-Effects -Drop Shadow with these settings: 0/0/50/50 Color Black
Optional
-Add my frame/border decoration as a new layer or use the Pen tool (line style tool) to draw your own decoration.
48. Layers-Merge-Merge All (flatten)
49. Image – Resize to 900 pixels width- Resize all layers checked
Save as JPG
Thanks for your time and enjoyment of this lesson.
Renée
This lesson has been written by Renée 07/07/2024
Edited and Update
in 2024
*
*
Any resemblance to an existing lesson is purely coincidental.
*
Don't forget to thank the people who work with us and for us - the testers and translators
Thanks
|
 Translations