|
Let's start the lesson.
-
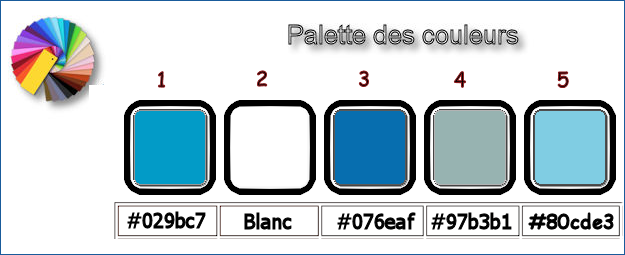
Preparation/ Material Properties: Set your foreground color to #029bc7= Nr1 - Set your background color to #ffffff = Nr 2
1. File: Open a New Transparent Image: 1050 x 695 Pixels
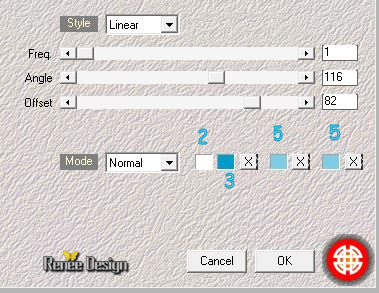
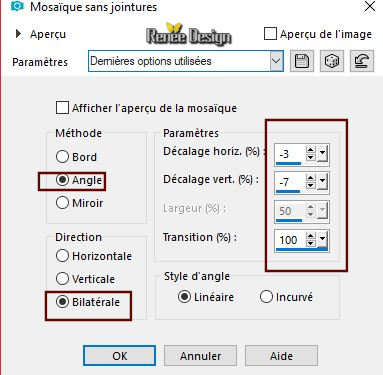
2. Effects –Plugins – Medhi- Wavy Lab 1.1 with these settings
3. Effects- Image Effects- Seamless Tiling using the default settings
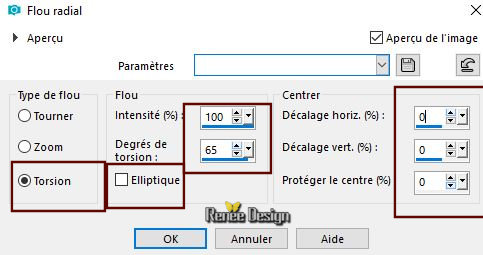
4. Adjust- Blur- Radial Blur use the settings below
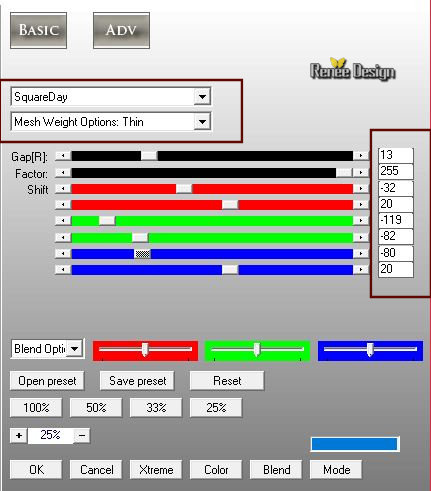
5. Effects – Plugins – AP Distort –ShiftMesh use the settings below
(older version AP 01
[Innovations] Distort –ShiftMesh)
6. Effects- Edge Effects- Enhance
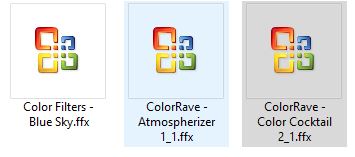
7. Effects –Plugins- Unlimited-ICNETFILTERS - Color Filters –
Blue sky: 215/128
8. Effects – Plugins – Fotomatic- Sky Grad use the settings below

9. Open the Image ‘’ Rouler_dans_eau_image_park.jpg’’
(if you change your image do not take a dark picture )
-
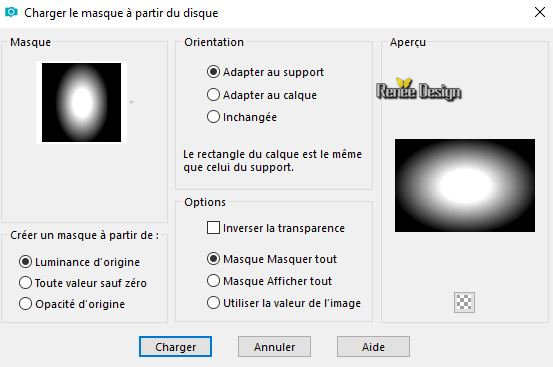
Layers- Load/Save mask-Load Mask from Disk and select:
20/20
-
Layers- Merge- Merge Group
10. Edit - Copy- Activate your work -Edit - Paste as a new layer
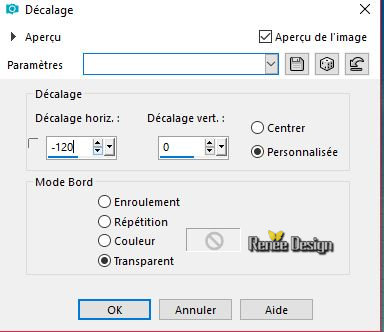
11. Effects- Image Effects- Offset with these settings: H = 0 and V =
125
12. Layers- New Raster Layer
13. Selections –load/save selection –load selection from disc and select my selection:‘’ Rouler_ds_eau.’’
14.
Activate Flood Fill Tool  – Flood Fill the selection with #ffffff ( 2 clicks) – Flood Fill the selection with #ffffff ( 2 clicks)
Selections- Deselect All
15. Layers- Duplicate
16. Activate Brush Tool (B) use the settings below

Glide or stamp in short lines with the foreground color # 029bc7
(only the white parts)
17. Layers-Properties-Set the Blend Mode to " Screen "
18. Effects- Image Effects- Offset with these settings:
19. Effects –Plugins – Color Rave – Atmospherizer using the default settings
-In the Layer Palette:Make Raster 2 active ( park image )
20.
Effects –Plugins – PhotoEffex- Background Blur: 21
- To replace the top of the layer-palette
21. Activate the tube ‘’ Renee_TUBES_Rouler_ds_eau_motocycliste’’
-
Image Resize to 60%
-
Edit - Copy- Activate your work -Edit - Paste as a new layer
22.
Effects- Image Effects- Offset with these settings: H = 53 and V = -71
23. Selection Tool (S) - Selection Type- Circle use the settings below

Draw 2 circles like this
24. Selections- Promote selection to Layer
25. Adjust- Blur- Motion Blur with these settings
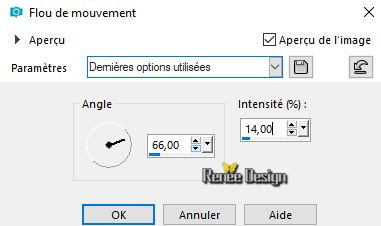
- Repeat: Adjust- Blur- Motion Blur with the same settings
Selections- Deselect All
26. Activate the tube ‘’ Renee_TUBES_Rouler_ds_eau_image_1.pspimage’’
-
Edit - Copy- Activate your work -Edit - Paste as a new layer
27. Objects – Align -Bottom
28 . Selections –load/save selection –load selection from disc and select my selection:‘’ Rouler_ds_eau_1.’’
DELETE
 2 times
Selections- Deselect All
29. Layers- Duplicate – Layers-Properties-Set the Blend Mode to " Multiplikation "- Lower the Opacity of the layer to 32%
-
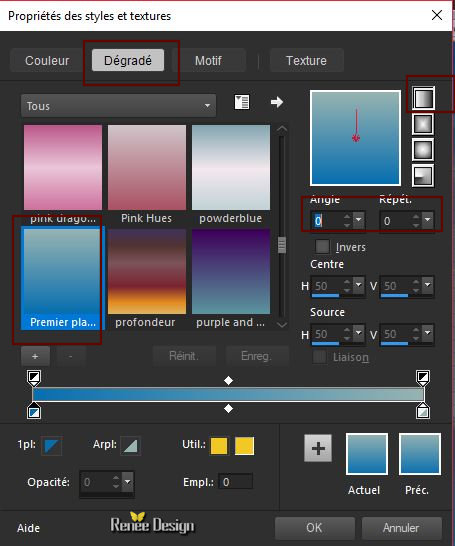
Color Palette: Set your foreground color to #076eaf = Nr.3- Set your background color to #80cde3 = Nr. 5
-Prepare a foreground/background linear gradient configured like this
30. Layers- New Raster Layer
31. Selections –load/save selection –load selection from disc and select my selection:‘’ Rouler_ds_eau_2.’’
32.
Activate Flood Fill Tool –Flood Fill the selection with the gradient (2 clicks)
33. Layers- Duplicate– Lower the Opacity of the layer to 59%
Selections- Deselect All
34. Activate the tubes ‘’ Rouler_ds_eau-_surface.png’’
-
Edit - Copy- Activate your work -Edit - Paste as a new layer
35. Effects- Image Effects- Offset with these settings : H = 0 and V =
-57
Attention Be careful
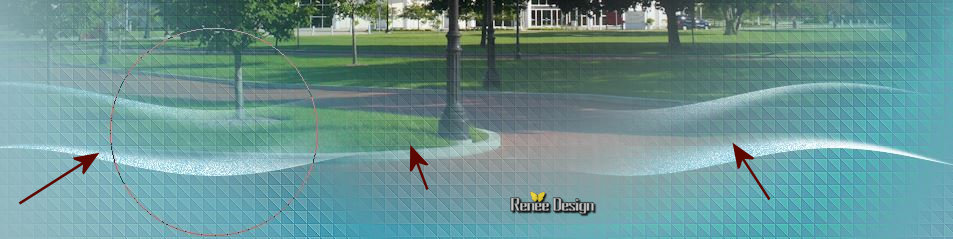
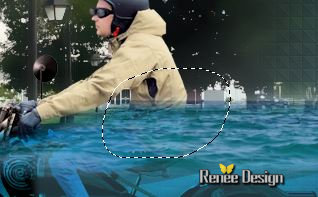
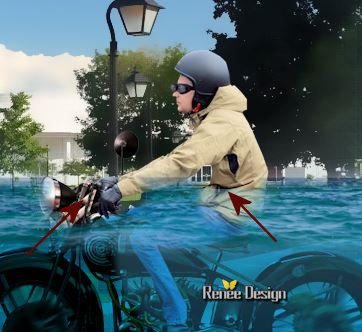
36. Activate Freehand Selection Tool use the settings below

-Draw a selection as shown in the example  reduced opacity for the moment (biker's hands and arms and the headlight) reduced opacity for the moment (biker's hands and arms and the headlight)
-
DELETE
2 x
-Layer Palette: Make Raster 5 active >DELETE
1 x
-Layer Palette: Make Copy of Raster 5 active >>DELETE
1 x
Selections- Deselect All
37.
Back to the layer of the motorcycle rider
38. Activate Freehand Selection Tool -Draw a selection as shown in the example
-
DELETE
2 x
- Layer Palette:Make Raster 5 active >DELETE
1 x
- Layer Palette: Make Copy of Raster 5 active >>DELETE
1 x
Selections- Deselect All
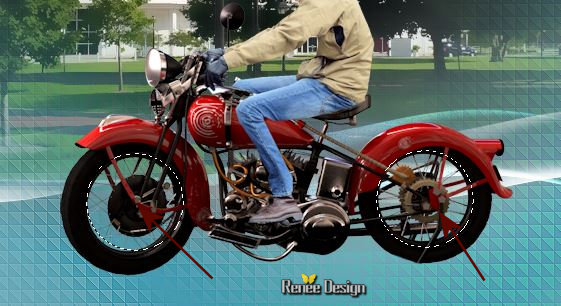
If necessary rectify slightly with the eraser ( It must be the illusion that these parts are out of the water due to the movement of the motorcycle. )
-
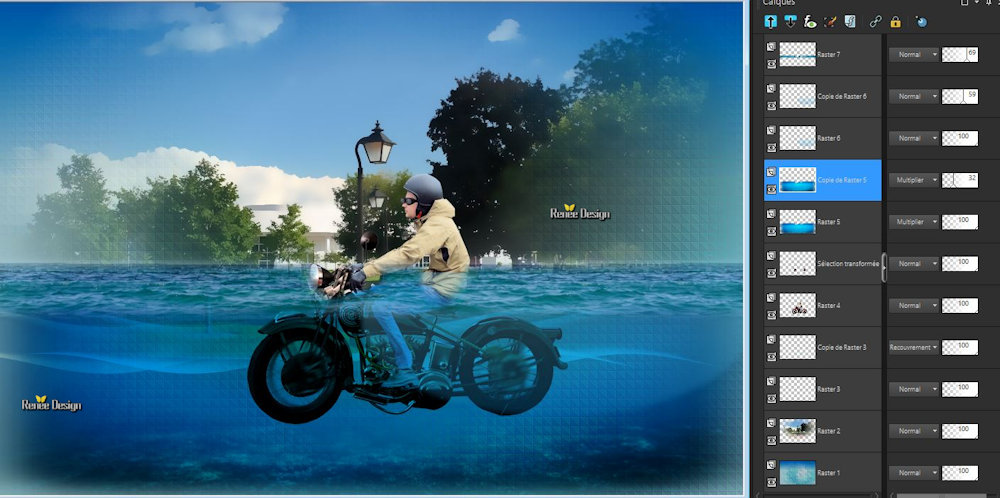
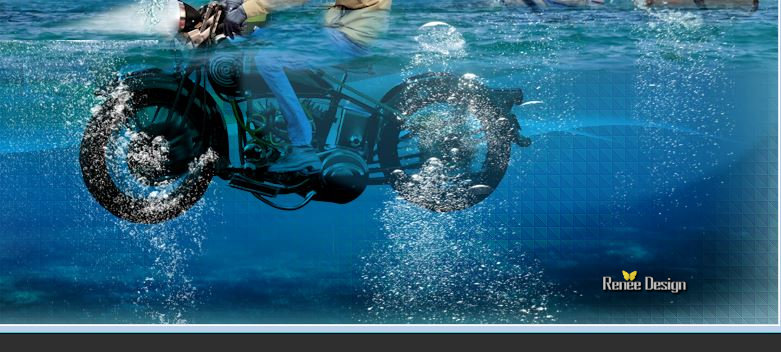
Your work and Layer Palette look like this now-You should have this result
- To replace the top of the layer-palette
39. Activate the tube ‘’ Rouler_ds_eau_Lumiere_phare’’
-
Edit - Copy- Activate your work -Edit - Paste as a new layer
- Place in front of the lighthouse of the motorcycle
- Layer Palette: Activate Copy of
Raster 3
40
. Activate the tube
‘’Renee_TUBES_Rouler_ds_eau_telephone.pspimage’’
-
Edit - Copy- Activate your work -Edit - Paste as a new layer
-Place and go slightly down in the water (see finished)
41.
Image - Free Rotate 30° to the left
42.
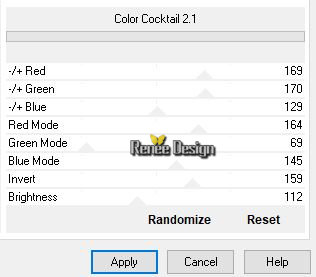
Effects –Plugins- Unlimited - Color rave - Color Cocktail
2.1
43. Activate the tube ‘’ image
vague.png’’
-
Edit - Copy- Activate your work -Edit - Paste as a new layer
-
Activate your Move Tool (M) move it in the right place (Go down slightly see finished image)
- Not required to do this
Activate your Clone Brush (C) use the settings below

A clone source is an area of the image you want to copy to cover up another area. To select the clone source, right-click with your mouse and a circle will appear around the area. ( she is circled black on capture )
- Next, click the part of the image you want to cover over.
(the result may be slightly different)
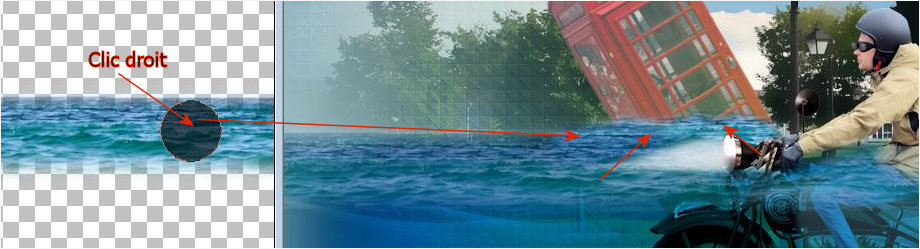
This to give an additional effect of sliding of the cabin in the water
- Layer Palette: Make Raster 4 active
44. Activate the tube ‘’ Renee_TUBES_Rouler_ds_eau_valise_livres.pspimage’’
-
Edit - Copy- Activate your work -Edit - Paste as a new layer
- Activate your Move Tool (M) place the tube at the right side
- To replace the top of the layer-palette
45. Activate the tube ‘’
Renee_TUBES_Rouler_ds_eau_v_livre_volant’’
-
Edit - Copy- Activate your work -Edit - Paste as a new layer
- Activate your Move Tool (M) place the tube at the top right side
46. Effects – Plugins – Graphic plus – Cross
shadow using the default settings
47. Layers- New Raster Layer
48. Selections –load/save selection –load selection from disc and select my selection:‘’ Rouler_ds_eau_3.’’
49.
Activate Flood Fill Tool –Flood Fill
the seletion with #ffffff
Selections- Deselect All
50.
Adjust- Blur- Gaussian Blur : Radius 6
51. Activate the tube ‘’ Renee_TUBES_Rouler_ds_eau_avion.pspimage’’
-
Edit - Copy- Activate your work -Edit - Paste as a new layer (- Place in front of the previous effect)
52. Activate the tube ‘’ Renee_TUBES_Rouler_ds_eau_arc-en_ciel.pspimage "
Edit - Copy- Activate your work -Edit - Paste as a new layer ’"Move at the top( see finished image )
Activate the tube ‘’ Renee_TUBES_Rouler_ds_eau_nuage.pspimage
-Edit - Copy- Activate your work -Edit - Paste as a new layer
-
Place at the top to( see finished image )
53. Activate the tube ‘’
Renee_TUBES_Rouler_ds_eau_colombes.pspimage
- Edit - Copy- Activate your work -Edit - Paste as a new layer
- Activate your Move Tool (M) place the tube at the top right side
54. Layers- New Raster Layer
55. Selections –load/save selection –load selection from disc and select my selection:‘’ Rouler_ds_eau_4’’
56.
Activate Flood Fill Tool
-Flood fill the selection with #ffffff
Selections- Deselect All
57. Effects- Image Effects- Seamless Tiling use the settings below
58. Repeat: Image- Seamless Tiling with the same settings
59. Activate the tube ‘’ Renee_TUBES_Rouler_ds_eau_petites_flaques.pspimage’’
-
Place these 3 tubes as a new layer and put them in place(to give the effect of movement in the water like this)
60.
Activate the tube ‘’ Rouler_ds_eau_Lumiere_mouvement_eau.pspimage’’
( Optional) I did not add it)
-
Edit - Copy- Activate your work -Edit - Paste as a new layer
- Place down below the motorcycle
- Open the masks in your psp
61.
Layers- New Raster Layer
62. Activate Flood Fill Tool –Flood Fill the Layer with #ffffff
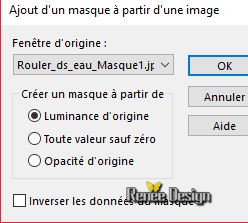
63. Layers- New Mask Layer from Image and select Mask: ‘’Rouler_ds_eau_Masque1.jpg’’
-
-Layers- Merge- Merge Group
64. Images – Resize to 45%
-Move Tool (M) move it in the right place (see finished image )
65. Layers- New Raster Layer
66. Activate Flood Fill Tool –Flood Fill the Layer with #ffffff
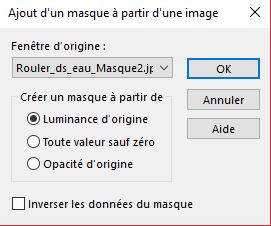
67. Layers- New Mask Layer from Image and select Mask: ‘’Rouler_ds_eau_Masque2.jpg’’
-Layers- Merge- Merge Group
68. Images-Resize to 50 %
- Move Tool (M) move it in the right place (see finished image )
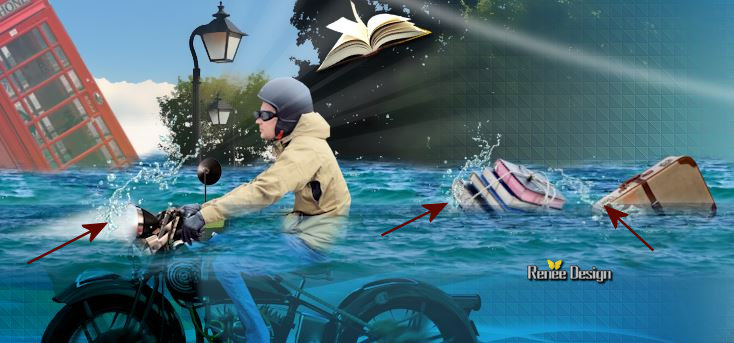
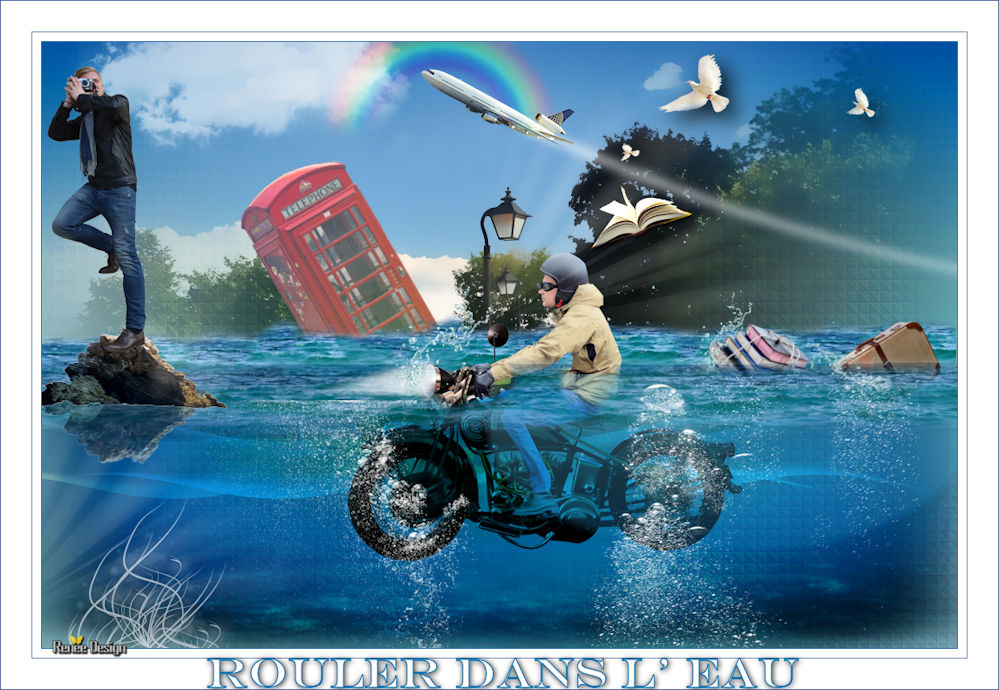
The Result
69.
Activate the tube
‘’Rouler_ds_eau_Photographe.pspimage’( Do not close )
-
Activate the Layer " rocher "(rock) of the tube
-
Edit - Copy- Activate your work -Edit - Paste as a new layer
70. Effects- Image Effects- Offset with these settings: H = - 421 and V =
- 29
71.
Layers- Duplicate
72. Image - Mirror - Mirror vertical ( Image - Flip in older versions of PSP)
73. Layers- Arrange- Move Down
74. Set the Opacity of this layer to 51%
- To replace the top of the layer-palette
75.
Activate the Layer " photographe" (on the same tube )
-
Edit - Copy- Activate your work -Edit - Paste as a new layer
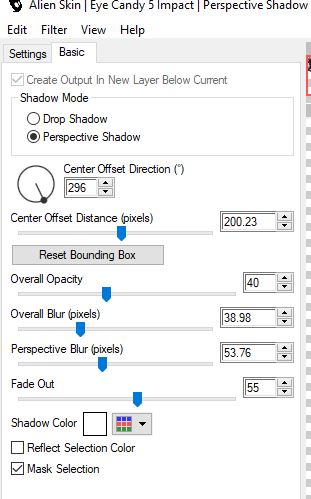
76. Effects – Plugins – Eyecandy 5 Impact –
Perpective Shadow use the settings below. Color #ffffff
77. Layers- New Raster Layer
78. FG-Color #ffffff -Activate Brush Tool and select my file in the list ''rouler_eau''- Stamp with the foreground color #ffffff color and repeat it twice on the same place

79. Layers-Properties-Set the Blend Mode to " Screen "
80. Image - Add borders-Symmetric checked 1 Pixel color # 076eaf =Nr. 3
81. Image - Add borders-Symmetric checked 10 Pixels color #ffffff
82. Image - Add borders-Symmetric checked 1 Pixel color # 076eaf =Nr. 3
83. Image - Add borders-Symmetric checked 35 Pixels color #ffffff
84. Activate the "titre"-Edit - Copy- Activate your work -Edit - Paste as a new layer and move
85.Layers- Merge- Merge All (flatten)
86. Image Resize to 999 pixels Width.
Save as JPG
I hope you enjoyed this lesson
Renée
This lesson was written by Renée 2018
Edited and Update
2018
*
Any resemblance with an existing lesson is a coincidence
*
Do not forget to thank the people who work with us and for us I have appointed the tubeurs and translators
Thanks
*
| 

 Translations


 If a plugin supplied appears with this icon it must necessarily be imported into Unlimited *