Let's begin
1. Open the gradient ''kk-halloween-04'' in the
foreground of the color palette and configured as linear
as shown below
2. Open a new image 950 x 650 pixels and fill with the
gradient
3. Layers - add a new raster layer
4. Selections - Select all and paste the tube
''surrealiste2'' into the selection
5. Selections - deselect.
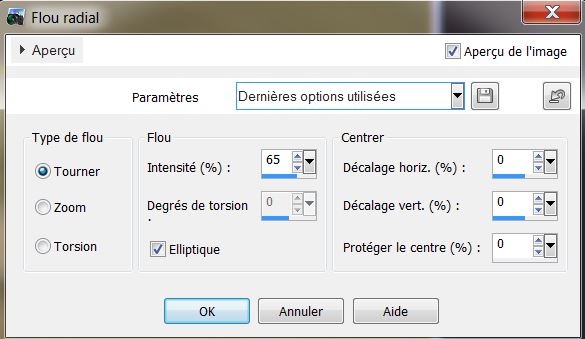
6. Adjust - blur - radial blur
7. Effects - Image effect - seamless tiling/ default.
8. Adjust - blur - Gaussian blur @ 52
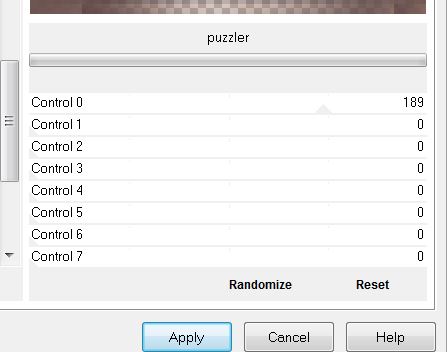
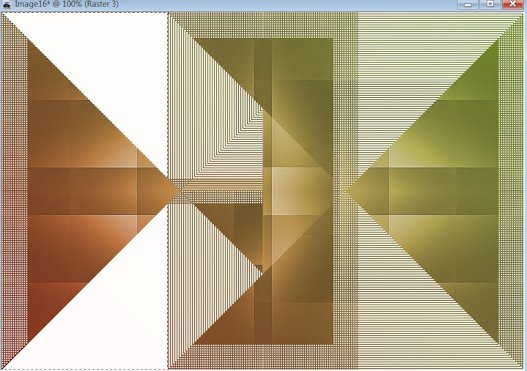
9. Effects - Filters Unlimited 2.0/ AFS Import/ Puzzler
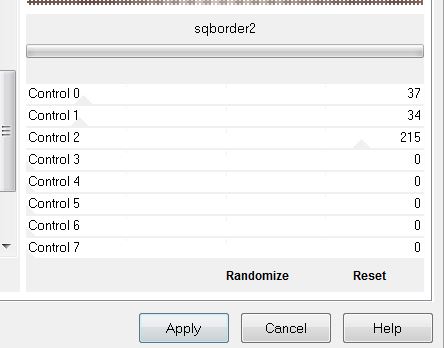
10. Effects - AFS Import/ square border 2
11. Effects - Simple Pizza Slice Mirror apply twice
Layers - Change Blend mode to luminance
12. With the magic wand - select the two white triangles
like this
13. Layers - add a new raster layer and fill with the
gradient
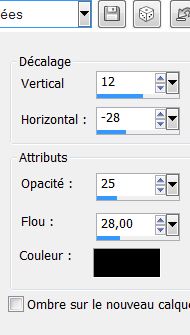
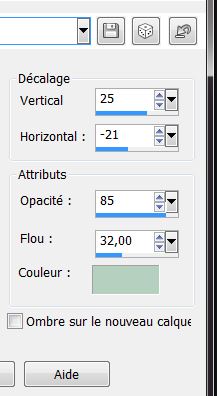
14. Effects - 3-D effect - Drop shadow
15. Selections - deselect
16. Layers - duplicate
17. Effects - Simple - Pizza Slice Mirror
18. Selections - load selection from disk ''sans_dessous_dessus"
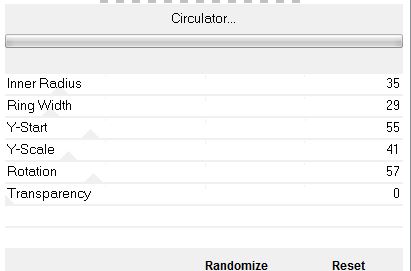
19. Effects - VM Distortion/ Circulator
20. Selections - Deselect
21. Effects - Flaming Pear - Flexify 2
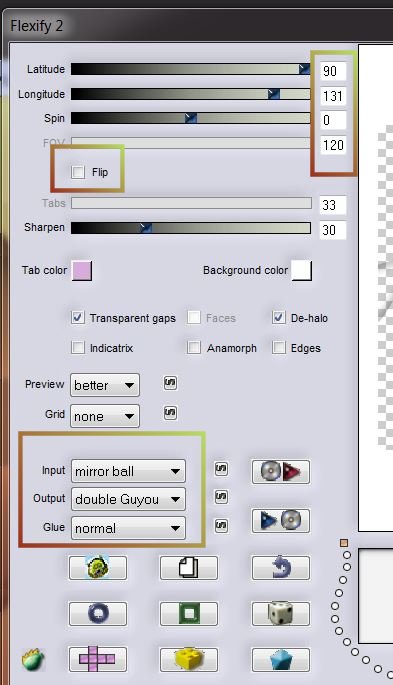
22. Effects - 3-D effect - Drop Shadow default
Change the layer mode to hard light
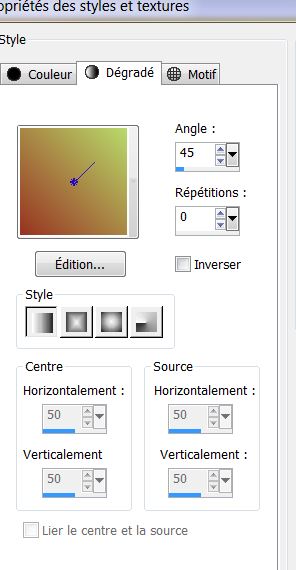
23. Open the tube ''10_ben_goossens_thumb''. Paste as a
new layer/ do not move (it is in the right place)
Change blend mode to Overlay
24. Effects - distortion effects - wind/ right /
intensity at 100

25. Repeat Distortion wind left/ intensity at 100
26. Edit - paste tube "10_ben_goossens_thum'' as new
layer. Remember Do Not Move
Change to Hard light mode
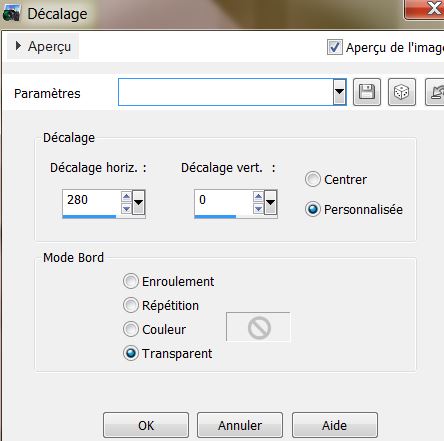
27. Effects - Image effects - Offset
28. Open the tube ''image_vague'' and paste as a new
layer/ move to the bottom of your work
Change mode to Luminance Legacy and opacity lowered to
83
29. Open the tube ''Chouchoucat's82s'' / Mirror Image /
Edit - edit copy and paste as a new layer
No need to move it is in the right place
30. Change the layer to soft light mode
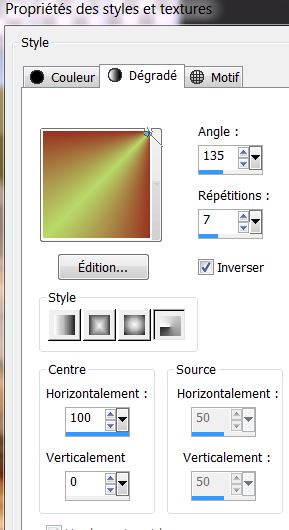
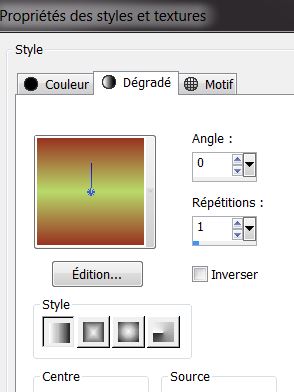
31. Color palette - foreground gradient ''kk-halloween-04''
radial settings as shown
32. Layers - Add a new raster layer / paint tool /
Opacity lowered to 35
33. Selections - load the selection
''sans_dessus_dessous_1" - fill selection
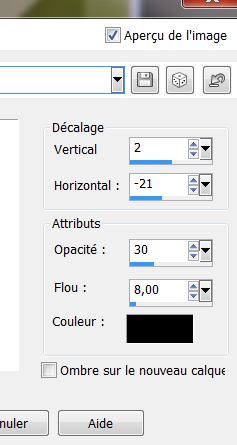
34. Effects - VM Toolbox - Fast shadow (Alpha Needs)
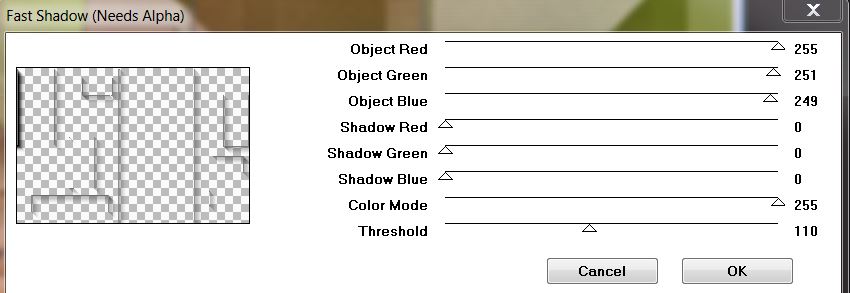
KEEP THE SELECTION
35. Effects - EyeCandy 5 Impact/ Glass - Preset
''sans_dessous_1''
36. Change the layer to Luminance mode and opacity to 67
/ Select none
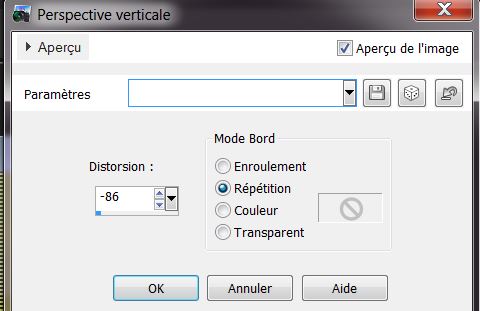
37. Effects - Geometric effect - Perspective Vertical
38. Open the tube ''6_baroque_animabelle" - activate
Copy (2) of Merged / Edit copy then edit paste as new
layer
Image - Mirror - move to a good place
39. Effects - Nik Software - Color effex Pro3.0 - Bi
Color Filters / Color set - Brown 1
40. Effects - 3D effects - Drop Shadow
41. Layers - Merge Visible
42. Layers - Duplicate
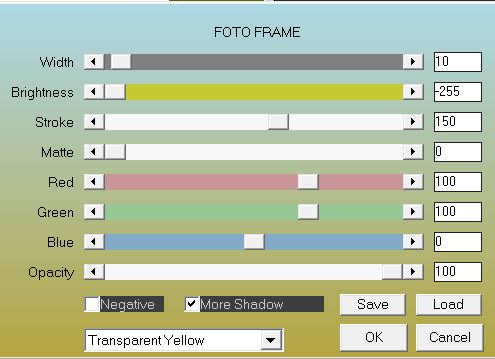
43. Effects - AAA Frame - Foto Frame
44. Image - Resize to 65%/ all layers unchecked
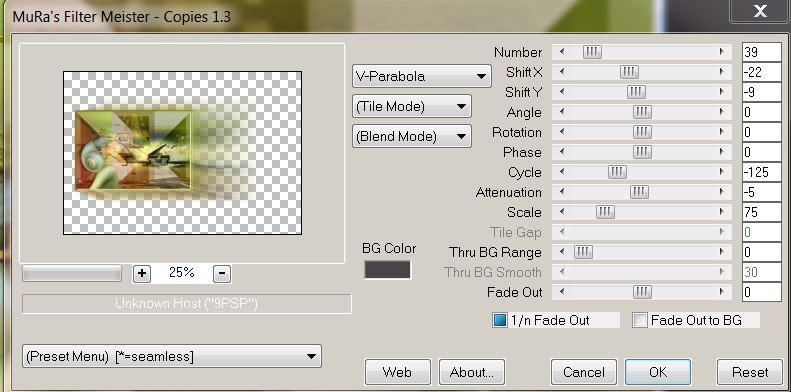
45. Effects - Mura's Meister / Copies
46. Effects - 3 D effects / Drop Shadow color #b6d0bf
47. Back on the layer below (Merged)
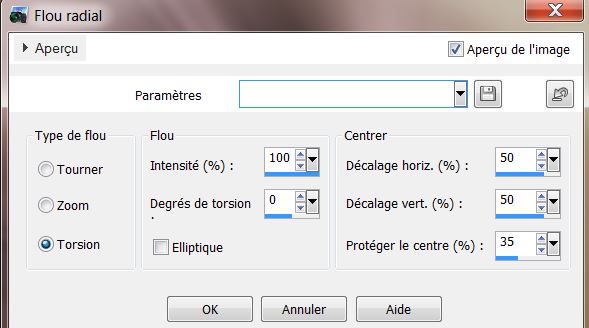
48. Adjust - blur - radial blur
49. Open the tube ''attache'' Paste as a new layer /
Duplicate / Image Flip - move as shown on the final
image
50. Layers - merge down
51. Get back on the bottom layer (merged)
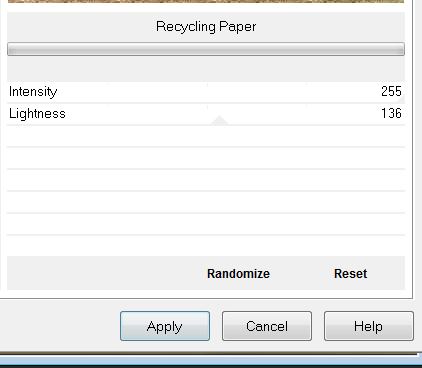
52. Effects - ICNet FILTERS - Filters Unlimited 2.0 /
Paper texture - Recyclin Paper
53. Color Palette - Change the gradient to linear like
this
Get
back on the top layer
54. Layers - Add a new raster layer
55. Selections - load the selection
''sans_dessous_dessus_2'' / Fill with the gradient / NB:
Paint opacity @ 100
57. Effects - Alien Skin - Snap Art/ oil paint/ preset
''sans_dessous_oil paint ''
58. Selections - deselect
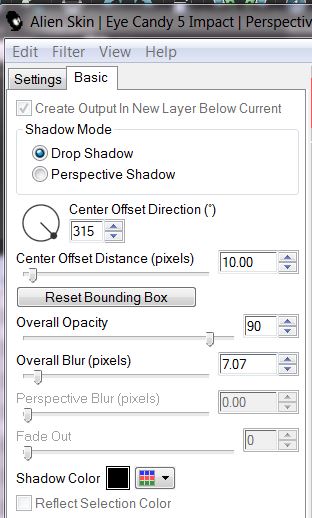
59. Effects - Eyecandy 5 Impact - Perspective Shadow -
Settings -
Preset - Drop shadow blurry / Basic: see table
60. Layers - add a new raster layer
61. Selections - load selection ''sans_dessous_dessus3''
Fill with the color #d0e1e4 - Paint tool set at Opacity
of 60
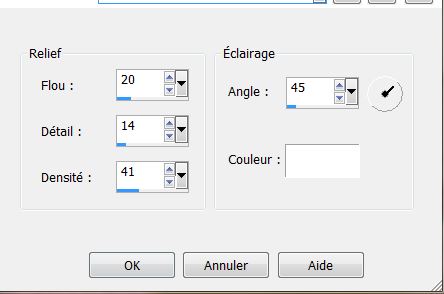
62. Effects - Texture effects - Soft plastic
63. Selections - Deselect
64. Effects - 3-D effect - Drop Shadow

65. Open tube ''4_baroque animabelle'' - resize to 80% /
edit copy - edit paste as new layer
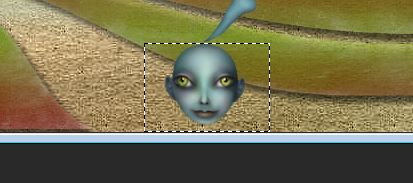
66. With select tool (k) select the head like this
67. Edit copy / edit paste
as a new layer
68. Layers - duplicate
Place to your taste and change to different modes. I
have chosen Luminance and Hard Light
69. Layers - merge visible
70. Image - add borders 2 pixels color #204b65
71. Image - add borders 20 pixels white
72. Image - add borders 2 pixels color #204b65
73. Image - add borders 50 pixels white
74. Image - add borders 2 pixels color #204b65
75. Image - add borders 10 pixels white
76. Open the tube ''renee_sansdessus_dessous_billes" and
paste as a new layer
77. Layers - Duplicate/ Image Mirror / Image Flip
78. Open the tube "Titre" Paste as the title or write
your own using the font Zinco
Lesson over
Thanks Sally
|