|
Let's start the lesson
-
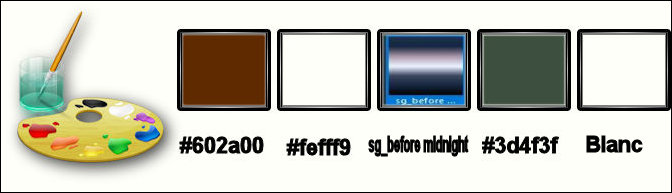
Attention: Take these colors, otherwise you will get a completely different effect
-
Color Palette- Set your foreground color to #602a00
- Set your background color to#ffffff
1.
File: Open a new white image 1005 x 685 pixels -Promote Background Layer = Raster 1

-
Set your Foregroundcolor to gradient and select
‘’sg_before midnight’’
Prepare a linear gradient configured like this.

2.
Layers- New Raster Layer
3.
Activate Flood Fill Tool and fill the layer with the gradient
4.
Effects – Distortion Effects -Twirl : Degrees
625
5.
Adjust-Blur- Gaussian Blur: Radius 55
6.
Effects –Plugins – Alpha Works- Vertical Fade Out
189
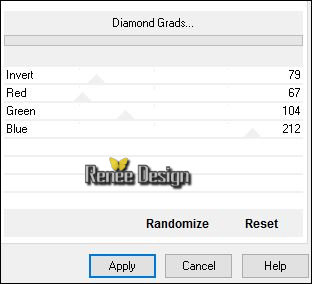
7.
Effects –Plugins - Unlimited - Alf's Power Grads- Diamond
Grads..use settings below.
8. Effects –
Plugins – Mock – Bevel 55
9. Effects – Image Effects- Seamless Tiling use settings below

10. Layers- Duplicate
11. Image
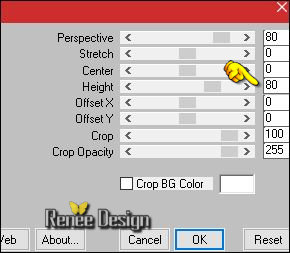
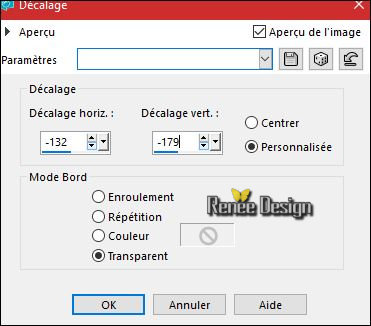
– Free Rotate 90° Right
11. Effects – Image Effects -Offset with these settings H = - 165 and V = 0/
transparent
12. Effects –Plugins- Unlimited -&<Bkg
Kaleidoscope>Cake Mix 222 / 169
13.
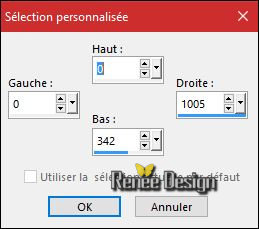
Activate Selection Tool -Custom Selection (S) -Rectangle with these settings
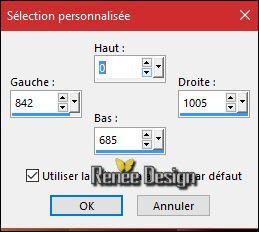
Hit the DELETE key on your keyboard
Keep Selected !!
14.
Layers- New Raster Layer
15. Activate Flood Fill Tool and fill the selection with the gradient
16. Effects
– Plugins - (not in Unlimited )– VM EXTRAVAGANZA- Color fusion 0/153/47
Selections- Deselect All
17. Layers-Properties-Set the Blend Mode to " Screen"
18.
Effects –Plugins– Simple - 4 Way
average
19.
Effects –Plugins – Simple - Zoom Out and
Flip
20.
Effects – Plugins– Mura’s Meister – perspective
Tilling
- Repeat the same filter again, using the same settings
21.
Activate Selection Tool -Custom Selection (S) -Rectangle with these settings
Hit the DELETE key on your keyboard
Selections- Deselect All
22.
Effects –Plugins – EyeCandy 5 Impact –
Extrude use the settings below
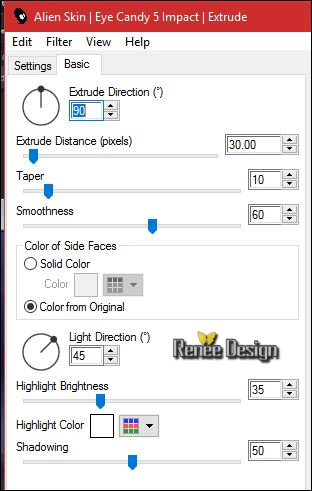
- Stay on this Layer =( Raster 3)
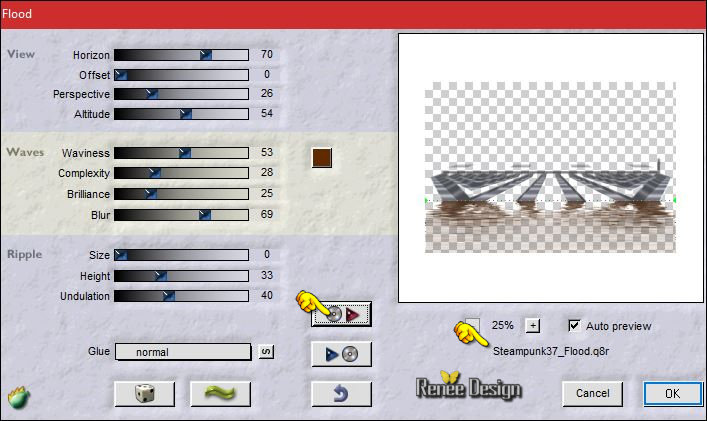
23.
Effects –Plugins - Flaming Pear Flood-select my file-Preset
‘’Steampunk37_Flood’’ / Color #602a00
24. Layers-Properties-Set the Blend Mode to " Hard Light "
25. Layers- New Raster Layer
26.
Selections –load/save selection –load selection from disc and select my selection: ‘’Steampunk_37_1’’
27. Activate the
image ‘’Steampunk37_image1’’
- Edit - Copy-Activate your working area, Edit - Paste into Selection
Selections- Deselect All
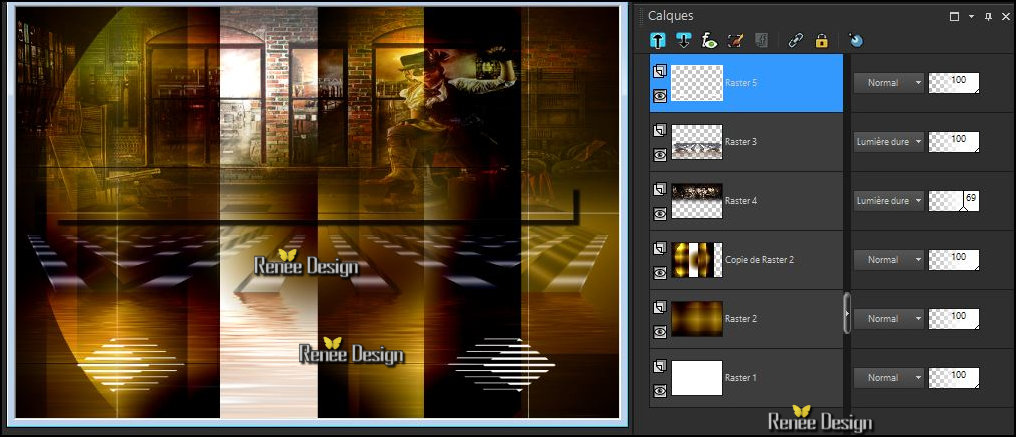
28. Layers- Arrange- Move Down
29. Layers-Properties-Set the Blend Mode to " Hard Light " -Set the layer opacity of this layer to 69%
-To replace the top of the layers palette
30. Open the tube ‘’ Steampunk_37_losanges.png’’
- Edit - Copy- Activate your working area, Edit - Paste as a new layer
- Move tool / place your tube on the bottom of your image
31. Image-
Negative-Image
-Your Layer palette look like this now-You should have this result
32. Open the tube ‘’ Steampunk_37_taches.png’’
- Edit - Copy- Activate your working area, Edit - Paste as a new layer
33. Effects – Image Effects -Offset with these settings
34. Layers-Properties-Set the Blend Mode to " Dissolve " -Set the layer opacity of this layer to 55%
35.
Effects –Plugins - Unlimited – Factory Gallery M – Loom 41/68/0
- Color Palette- Set your foreground color to #3d4f3f
36. Activate Pen Tool with these settings "Line Style "Dash Dot Dot "
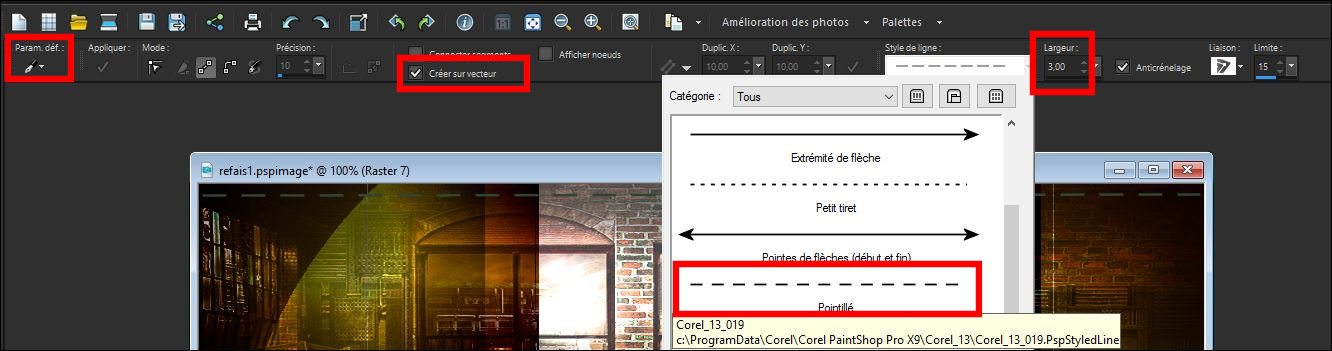
Draw a line at the top of the work with the foreground color - like this (
Press the Shift Key for a straight line )
-
Convert to Raster Layer
37. Effects
–Plugins- EyeCandy 5 – Impact – Extrude (using the same settings )ATTENTION: Image Flip !!
Activate Move Tool (M) move it the right place at the top of your image
38. Effects- Edge Effects- Enhance More
39. Layers-Properties-Set the Blend Mode to " Soft Light "
40. Open the tube ‘’ Steampunk_37_effet_bas.png’’
- Edit - Copy- Activate your working area, Edit - Paste as a new layer
41. Effects – Image Effects -Offset with these settings H = 31 and V = -
150/ transparent
42. Layers-Properties-Set the Blend Mode to " Hard Light "
- In the Layer Palette: Make Copy of Raster 2 active
43. Effects
–Plugins – Simple – 4 Way average
44. Layers-Properties-Set the Blend Mode to " Lighten"
- Stay on this Layer
45.
Activate Selection Tool -Custom Selection (S) -Rectangle with these settings

Hit the DELETE key on your keybord
Selections- Deselect All
- To replace the top of the layers palette
46. Open the tube ‘’DECOS _ Steampunk37’’(Do not close)
- Activate the layer "Raster 1"of the tube
- Edit - Copy- Activate your working area, Edit - Paste as a new layer
Move tool / place your tube on the left side of your image
47.Back on tube - Activate the layer "Raster 2"of the tube
- Edit - Copy- Activate your working area, Edit - Paste as a new layer
48 . Effects – Image Effects -Offset with these settings H = 0 and V = - 145
49.
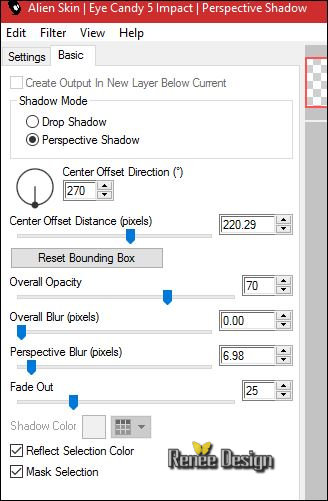
Effects –Plugins – EyeCandy 5 Impact – Perspective
Shadows -tab Settings/User settings choose my Preset ‘’ Steampunk_37_Shadows”
50. Back on tube -Activate the layer " Raster 3 "of the tube
- Edit - Copy- Activate your working area, Edit - Paste as a new layer
-
With the Move Tool, move it in the bottom right corner
51. Effects- Illumination Effects- Sunburst with these settings / Color #fefedc

52.
Open the tube ‘’
ajgv-Steampunk_Rooster_by_ursulav-13052013’’
- Edit - Copy- Activate your working area, Edit - Paste as a new layer
- Place on the edge of the watch
53. Layers- New Raster Layer
54.
Selections –load/save selection –load selection from disc and select my selection:
’’Steampunk_37_2 ‘’
55. Activate Flood Fill Tool and fill the selection with the background color #ffffff (2 clicks)
Selections- Deselect All
56. Layers-Properties--Set the layer opacity of this layer to 48%
57. Open the tube ‘’ Renee_tube_555’’
- Image Resize to 75%
- Edit - Copy- Activate your working area, Edit - Paste as a new layer
-With the move tool, move it in the right place
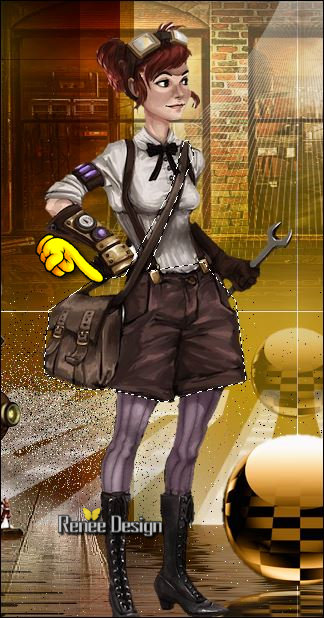
(see finished image)
58. Activate Freehand Selection Tool with these settings

-
Select this part as shown in the example below
59.
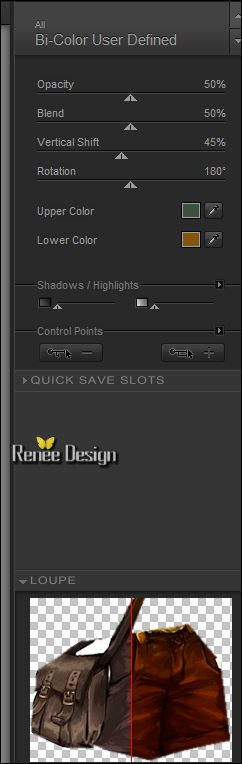
Effects – Plugins – Nick Color Effex pro3.0/ Bi Color
User defined
Select a color from your work to harmonize- I use this color #3d4f3f
Selections- Deselect All
60. Image - Add borders-Symmetric checked: 2 pixels #000000
- Edit-Copy!!!!
61.
Selections- Select All
62. Image - Add borders-Symmetric checked: 50 Pixels #ffffff
-
Selections -Invert
63. Edit -Paste into the selection
64.
Adjust-Blur- Gaussian Blur: Radius 40
65.
Selections- Promote selection to Layer
66.
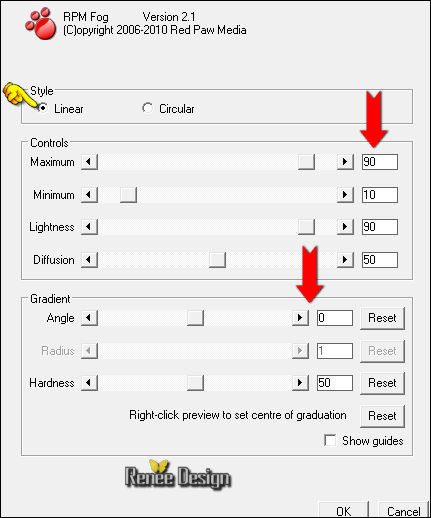
Effects –Plugins – Red Paw Media – RPM
Fog use settings below
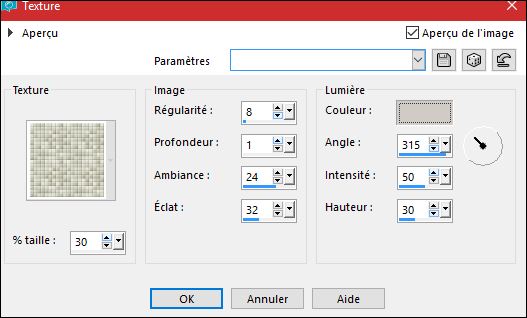
67. Effects
– Texture Effects -Texture 1217493541_textures-with these settings - color
#cec8c1
68. Effects-Edge Effects- Enhance More
69. Layers- Duplicate
70. Effects
–Plugins – Simple- Zoom out and flip
Selections- Deselect All
71. Image - Add borders-Symmetric checked: 1 pixel #602a00
72. Open the tube "Text" and open the tube ''GOFD_Kit_Susan_Elements (138)''Edit - Copy- Activate your working area, Edit - Paste as a new layer-With the move tool, move it in the right place( see finished image)
73. Layers- Merge- Merge All (flatten)
74. Image
Resize to 999 pixels widthe.
Save as JPG
I hope you enjoyed this lesson
Renée
This lesson was written by Renée 26/10/2016
Edited and Update
2016
*
Any resemblance with an existing lesson is a coincidence
*
Do not forget to thank the people who work with us and for us I have appointed the tubeurs and translators
Thanks Renée *
*
| 

 Translations


 If a plugin supplied appears with this icon it must necessarily be imported into Unlimited *

 All rights reserved
