|
Let's start the lesson.
Steampunk-51
-
Preparation
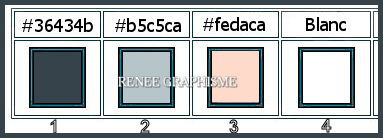
- Material Properties: Set your foreground color to color #36434b= 1 – Set your background color to color #b5c5ca=2
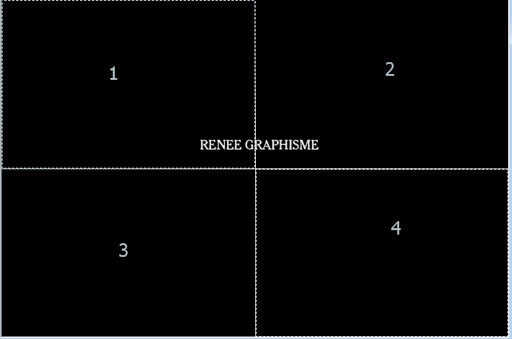
1. File- Open a new transparent Image of 1015 x 674 Pixels
2. Food Fill Tool
 –
Fill the layer with the Foreground color = 1 –
Fill the layer with the Foreground color = 1
3. Effects – Plugins – Medhi- Vibrations 1.1 use the settings below

4. Layers- Duplicate
5. Effects –Plugins -
Unlimited 2.0 – Mock – LaserSight
6. Activate the Magic Wand with these settings

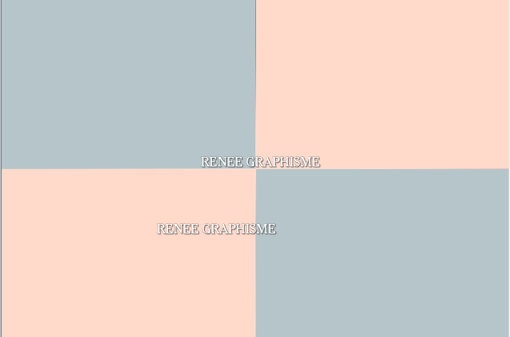
- Magic Wand select frames 1 and 4
7. Food Fill Tool
-
Fill the selection with the BG-Color = 2
Selections-Deselect All
8. Activate your Magic Wand - Select frames 2 and 3
9.-Set your Foreground color to color # fedaca=3
Food Fill Tool
-Fill the selection with the FG-Color = 3
Selections-Deselect All
- The result
10. Effects- Image Effects- Seamless Tiling use the settings below
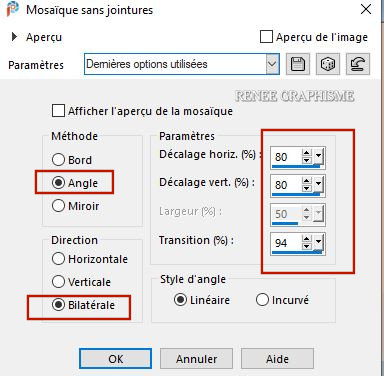
11. Effects- Image Effects- Seamless Tiling use the settings below

12. Effects – Edge Effects- Enhance
13. Effects –Plugins-
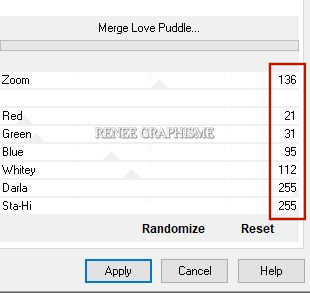
Unlimited 2.0 - Alf's Power Sines - Merge Love Puddle..use the settings below .
14. Layers-Properties-Change the Blend Mode to " Overlay " and Lower the Opacity to 36%
15. Open the tube ‘’STP51-Image 1’’ -Edit - Copy- Activate your work -Edit - Paste as a new layer . Do not move it is in the right place
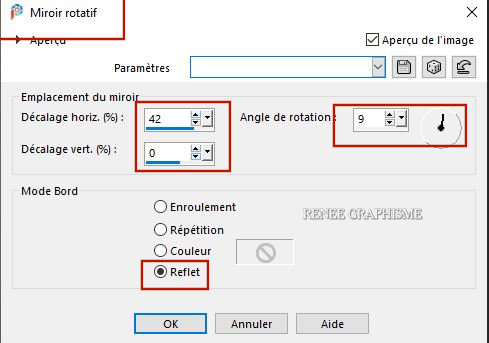
16. Effects – Reflection Effects - Rotating Mirror use the settings below
17. Effects– 3 D Effects- Drop Shadow with these settings: 18/ 3 /65/5 Color Black
18. Effects –Plugins-
Unlimited 2.0 - RCS Filter Pak 1.0 - RCS TripleExposure
: 255
19. Effects– 3 D Effects- Drop Shadow with the same settings
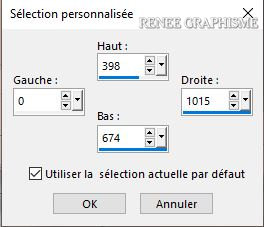
20. Activate Selection Tool -Custom Selection (S) -Rectangle with these settings

21. Edit – Cut !!
22. Layers- New Raster Layer
23. Edit - Paste into Selection
24. Adjust- Blur- Gaussian Blur-Radius 40.
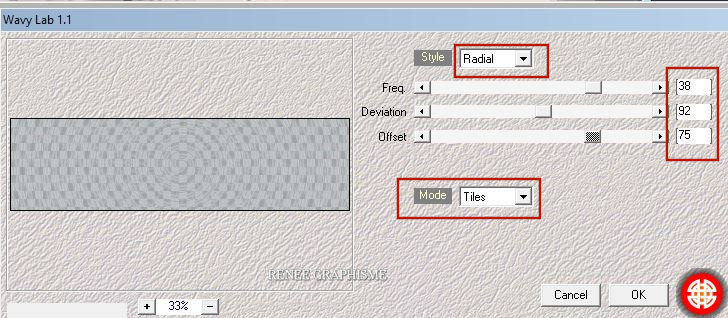
25. Effects – Plugins – Medhi – Wavy Lab 1.1 use the settings below
26. Effects – Plugins – Mura’s Meister – Perspective Tiling using the default settings
Selections- Deselect All
27. Magic Wand with these settings, click in the transparent part

Hit 10 times the Delete Key of your Keyboard 
Selections- Deselect All
28. Layers-Properties-Set the Blend Mode to " Multiply "
29. Layers- Duplicate
- Lower the Opacity of the layer to 79%
30.Layers- Merge- Merge Down
- Activate the bottom layer in the layer palette = Raster 1
31. Layers- Duplicate
32. Layers- Arrange- Bring to Top
33. Effects- Geometric Effects -Circle-Transparent
34. Effects –Plugins -
Unlimited 2.0- RCS Filter Pak 1.0 - RCS Digi-Lens - RCS
Digi-Lens - Window ShadesII
35. Effects –Plugins -
Unlimited 2.0 - Alf's Border FX –Border Fade III
160/103
36.
Image- Resize by 58% ( Resize all the layers NOT checked !)
37.Pick Tool: (K) on your keyboard -Enter these parameters for the X:564 and Y: 5 positions on the Toolbar
 564 / 5
- Press ( M ) to close the Pick Tool
38. Selections –load/save selection –load selection from disc and select my selection: ‘’
STP-51-1’’
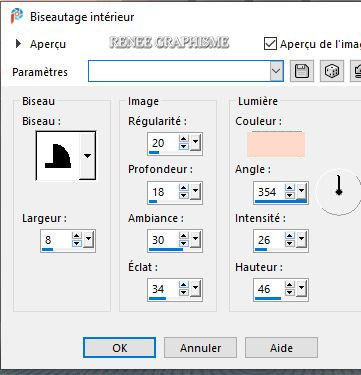
39. Effects – 3 D Effects – Inner Bevel use the settings below - Color # fedaca = 3
40. Selections –load/save selection –load selection from disc and select my selection: ‘’STP-51-2’’
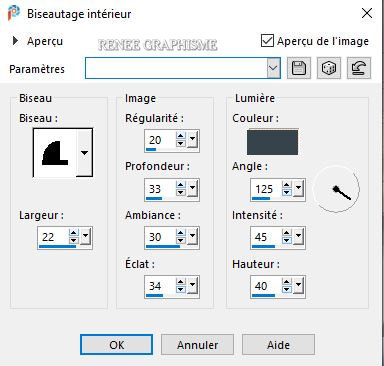
41.Effects – 3 D Effects – Inner Bevel use the settings below - Color # 36434b = 1
Selections- Deselect All
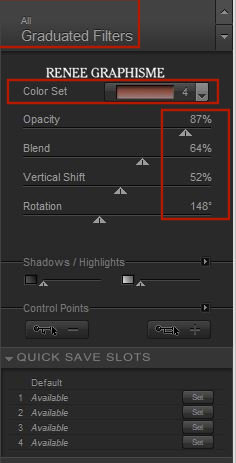
42. Effects – Plugins- Nick Sofware Color Effex
Pro 3-Gradueted Filters – Color set : Orange 4
43. Effects – Plugins – Flaming Pear – Flood -click on the red arrow>>select my file - Preset :
‘’STP-51-Flood-boule’’
Or manual settings as shown in the example below
44. Layers- New Raster Layer
45. Brush tool - Round shape –Reset the settings to the default settings
 -
now enter the settings -
now enter the settings

- Set your foreground color to color #36434b= 1
- Place the brush with the foreground color as shown in the example below
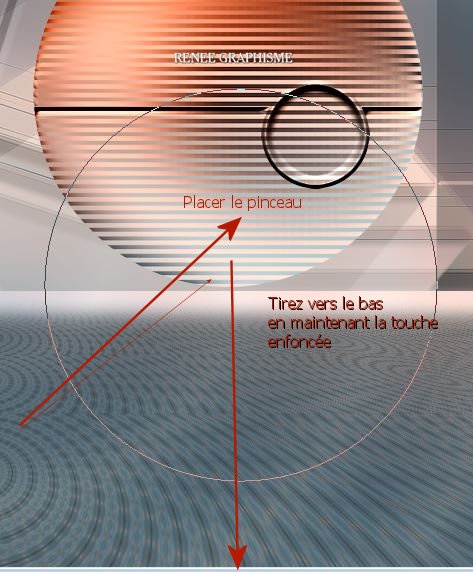
- Hold down the left mouse button and go down
- Repeat this process with the same settings
- Set the Foreground color to color #b5c5ca=2
-Hold down the left mouse button and go slightly to the left repeat the process
- Set the Foreground color to color #fedaca= 3
- Hold down the left mouse button and go slightly to the right repeat the process
The result will not be the same as Renée's, that's normal (If the above step does not work, then find an image in the folder. Paste this image into a new layer and move it to its place - Delete the brush layer from Step 45
46. Effects – Distortion Effects -Twirl 250
47. Layers-Properties-Change the Blend Mode to " Overlay "
- Layers- Duplicate
48. Layers- Merge- Merge Down
49. Open the tube ‘’
STP51 -Image2’’ - -Edit - Copy- Activate your work -Edit - Paste as a new layer
50. Pick Tool: (K) on your keyboard -Enter these parameters for the X:-178 and Y: -103 positions on the Toolbar
 -178/ -103
- Press ( M ) to close the Pick Tool
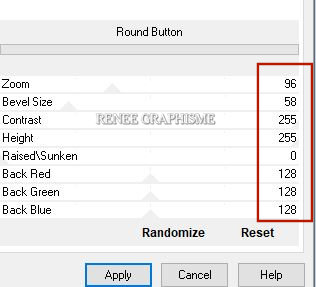
51. Effects –Plugins- Unlimited 2.0- Harry's Button Tools - Round
Button use the settings below
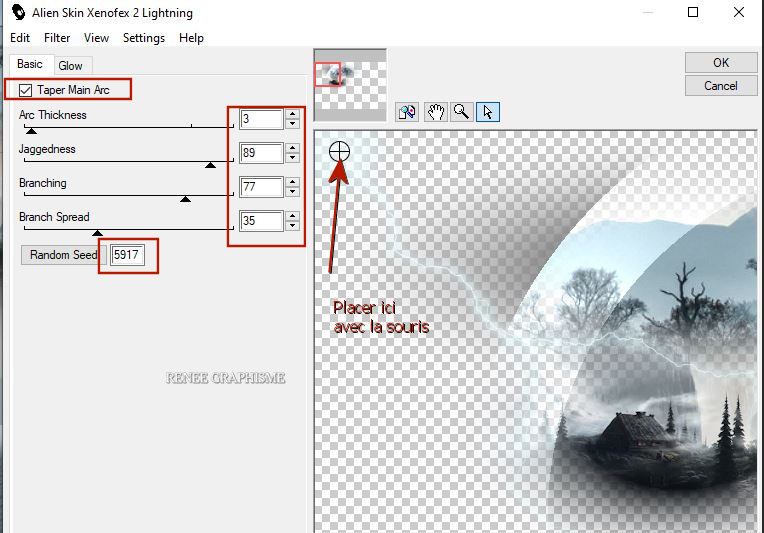
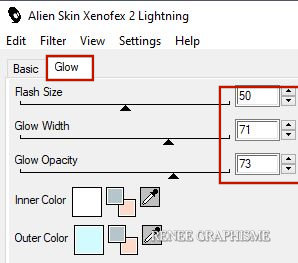
52. Effects – Plugins – Alien skin Xenofex 2 –
Lightning use the settings below
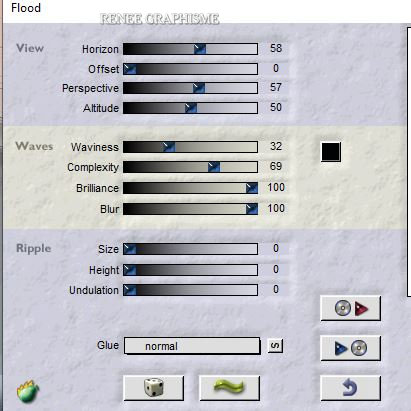
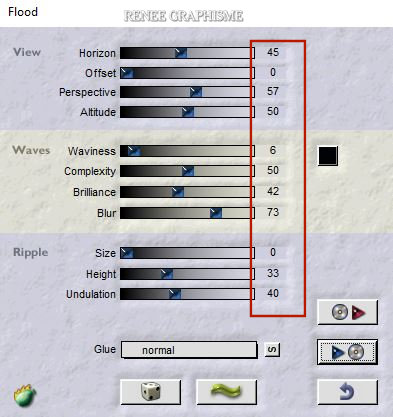
53. Effects – Plugins – Flaming Pear –
Flood-click on the red arrow>>select my file - Preset : STP-51-Flood’
Or manual settings as shown in the example below’
54. Layers- New Raster Layer
55. Selections –load/save selection –load selection from disc and select my selection: ‘’
STP-51-3’’
56.Set the Foreground color to color #ffffff=4
- Food Fill Tool
–
Fill the selection with color #ffffff
Selections- Deselect All
57. Layers-Properties-Change the Blend Mode to " Overlay " – and Lower the Opacity to
59%
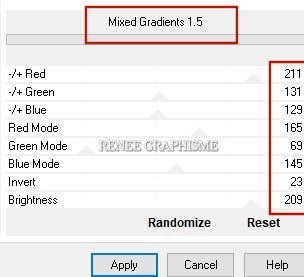
58. Effects –Plugins- Unlimited 2.0 -
Harry's Rave Grads - Mixed Gradients 1.5 use the settings below
59. Layers- Duplicate
60. Layers- Merge- Merge Down
- Layers-Properties-Change the Blend Mode to " Overlay " and Lower the Opacity to 81%
61. Layers- New Raster Layer
62. Selections –load/save selection –load selection from disc and select my selection: :’’STP-51-4’’
63. Food Fill Tool – Fill the Selection with color #ffffff=4 ( click 4 times into the selection)
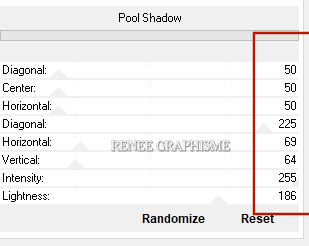
64. Effects –Plugins - Unlimited 2.0 - Greg's Factory Output Vol.
II - Pool Shadow use the settings below
Selections- Deselect All
65. Layers- New Raster Layer
66. Selections –load/save selection –load selection from disc and select my selection: :’’STP-51-5’’
67. Food Fill Tool – Fill the Selection with color #ffffff=4
68. Effects – Plugins – Alien skin Eyecandy 5
Impact – Glass use the settings below– Color #36434b = 1
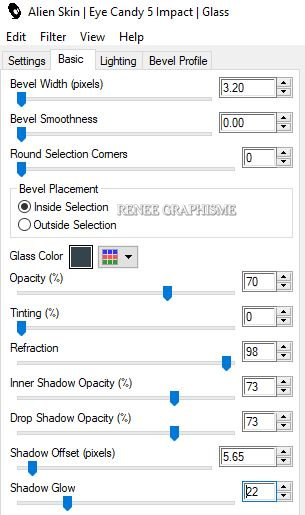
Selections- Deselect All
69. Open the tube ‘’
Steampunk_51’’ (5 layers )-Edit - Copy- Activate your work -Edit - Paste as a new layer– and place the decorative elements individually according to your taste
70. Open the tube "’Steampunk -Kardouane3D’’ -Edit - Copy- Activate your work -Edit - Paste as a new layer
- Place it in the bottom left ( see finished image)
71. Effects - Plugins- Alien Skin EyeCandy 5
Impact – Perspective Shadow –Tab-Settings-User Settings and select my file -Preset : ‘’STP51_Shadow’’
72. Layers- Duplicate
- Slightly move the tube down and to the right ( see finished image)
73. Effects - Plugins- Alien Skin EyeCandy 5
Impact – Perspective Shadow –Tab-Settings-User Settings and select my file -Preset : ‘’STP51_Shadow
2’’
-Is all in place ???
74.Layers- Merge- Merge- Visible
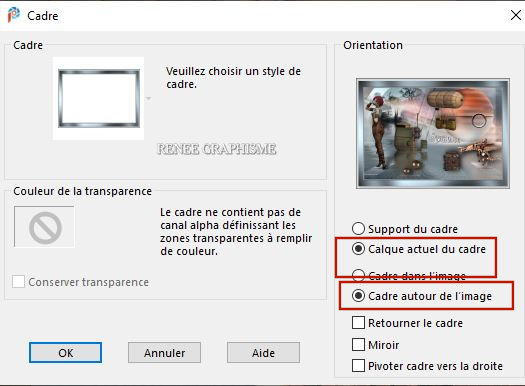
75. Image - Picture Frame– and select
‘Steampunk-51’’ use the settings below
76. Open the tube ‘’Deco and the text/titre (remove the watermark on the tube) Edit - Copy -Activate your work, Edit - Paste as new layer and move it in the right place. ( see finished image)
77. Layers- Merge- Merge All
78. Image -Resize to 1005 Pixels width.
Save as JPG file and you're done!
I hope you enjoyed this lesson
Renée
This lesson was written by Renée
29-06-2020
Edited and Update
2020
*
Any resemblance with an existing lesson is a coincidence
*
Do not forget to thank the people who work with us and for us I have appointed the tubeurs and translators
Thanks
*
|


 Translations


