|
Let us begin with the lesson
Steampunk-61
You can find more of the tubes used in this tutorial here

- Preparation
-Material Properties:Set the color of your foreground to color 1 -Set the color of your background to color 2

- Replace your foreground color with a linear foreground/background gradient configured as follows
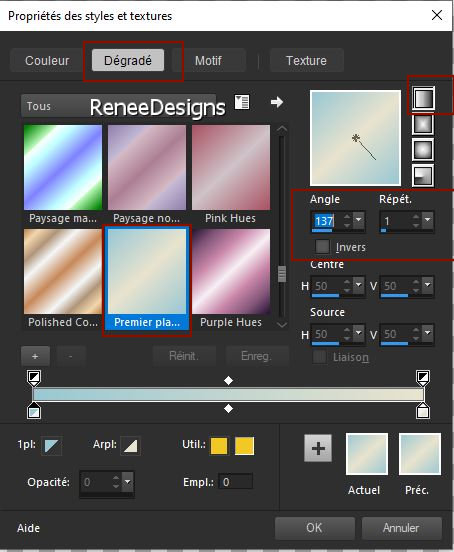
1. File - Open a new transparent image of this size: 1050
x 750 Pixels
2. Flood Fill Tool
 -Fill the layer with the gradient -Fill the layer with the gradient
3. Activate the tube ‘’ Renee-TUBES-Steampunk-61-torsion’’ -Edit - Copy- Activate your work -Edit - Paste as new layer
(It is best to take this tube and color it according to your colors.)
4. Effects- Image Effects- Seamless Tiling-using the default settings
5. Adjust- Blur- Radial Blur use the settings below
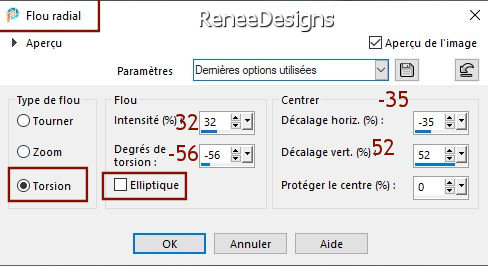
6. Effects – Plugins – FM Tile Tools – Saturation Emboss using the default settings
- Edit- Repeat- Saturation Emboss
7. Layers- Duplicate
8. Effects - Plugins - Filters in Unlimited 2.0 – Tramage - Panel
Stripes... 75/202/255
9. Layers-Properties-Set the Blend Mode to Multiply
10. Effects- Edge Effects- Enhance
11. Layers- Merge- Merge Down
12. Effects - Plugins – Simple- Top Bottom Wrap
13. Effects – Plugins - L & K's – Palmyre with these settings: 255/7
- On this layer
14.
Selections –load/save selection –load selection from disc and select my selection: ‘’STP-61-1’’
15. Effects- 3D-Effects- Cutout use the settings below
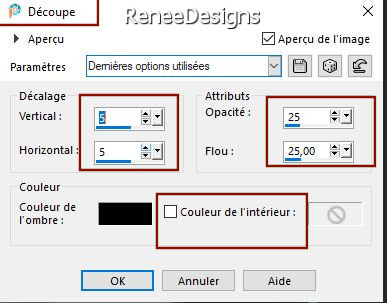
16. Effects- 3 D-Effects- Drop Shadow using the default settings

17. Effects – Plugins – Mura’s Meister – Perspective Tiling use the settings below
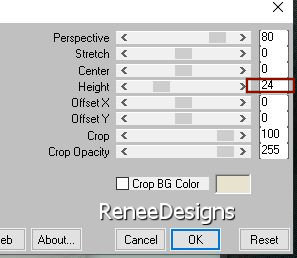
18.
Selections –load/save selection –load selection from disc and select my selection: ‘’STP-61-2’’
 2
times 2
times

- Material Properties:Set the color of your foreground to color 3 -Set the color of your background to color 2
Keep the same linear gradient
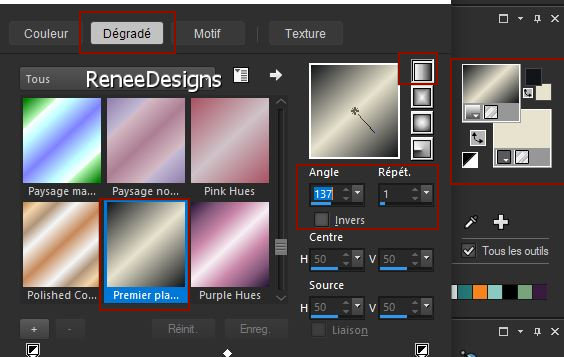
19. Layers- New Raster Layer
20. Flood Fill Tool
 -Fill the layer with the gradient -Fill the layer with the gradient
21. Effects – Plugins – Mura’s Meister – Pole Transform use the settings below
( 2 clicks on "Fill background" it will take the configuration)
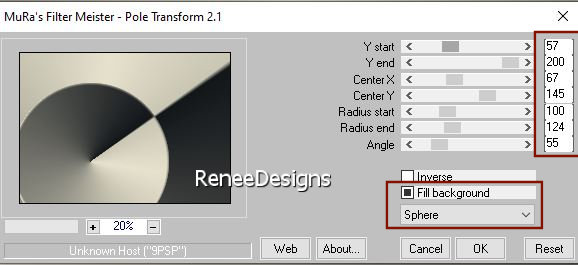
22. Effects - Image Effects- Seamless Tiling use the settings below
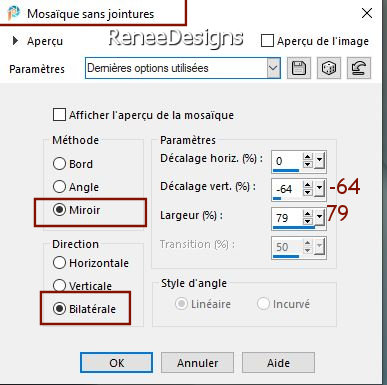
23. Layers-Properties-Set the Blend Mode to Difference –Reduce the opacity of this layer to 63%
Attention-Save the work for a while, the filter may close psp.
If this happens, go back to your work and run the filter again, the filter will work.
24. Effects – Plugins – Frischluft – Mosaic Plane with these settings
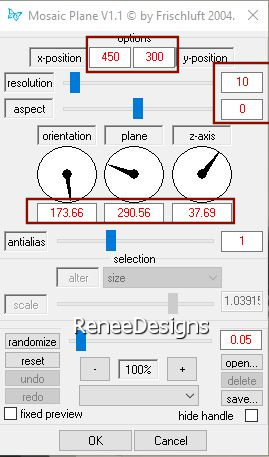
25. Layers- Arrange- Move Down
26.
Selections –load/save selection –load selection from disc and select my selection: ‘’STP-61-3’’


27. Effects- Edge Effects- Enhance
- Activate the top of the layer palette
- Preparation
-Material Properties:Set the color of your foreground to color 1 -Set the color of your background to color 2
28. Layers- New Raster Layer
29.
Selections –load/save selection –load selection from disc and select my selection: ‘’STP-61-4’’
30. Effects – Plugins – Mura’s Meister – Cloud use the settings below
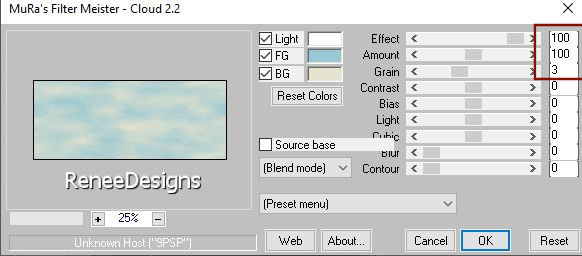

31. Effects –Distortion Effects- Wind- Wind direction From left-Wind strength 100
32. Layers- New Raster layer
33.
Selections –load/save selection –load selection from disc and select my selection: ‘’STP-61-5’’
34. Activate the tube ‘’Renee-TUBES-Steampunk-61-CARRES’’ -Edit - Copy - Activate your work - Edit - Paste into the selection
You can choose different colors for your squares
35. Activate the tube ‘’ Renee-TUBES-Steampunk-61-Image-Fond’’ - Edit - Copy- Activate your work -Edit - Paste as new layer
- Place this tube above the squares
36. Selections - Invert

37. Selections - Invert
38. Layer Properties - Select the Blend Mode you want to use (Renée selected Blend Mode Luminance and layer opacity 55.)
39. Effects - Plugins - Alien Skin EyeCandy 5 – Impact – Glass
use the settings below -Color number 1
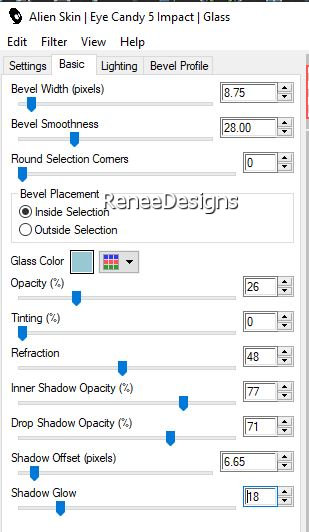

40. Activate the tube ‘’ Renee-TUBES-Steampunk-61-DECO’’ - Edit - Copy- Activate your work -Edit - Paste as new layer
41. Pick Tool: (K) on your keyboard -Enter these parameters on the toolbar
 379
/ 19 379
/ 19
Press the ( M ) button to close the tool.
- In the layer palette activate ‘’Raster 5 ‘’(colored edges)
42. Effects - Plugins – Flaming Pear – Flood –Click on the red arrow select my file - Preset ‘’
STP-61-Flood’’
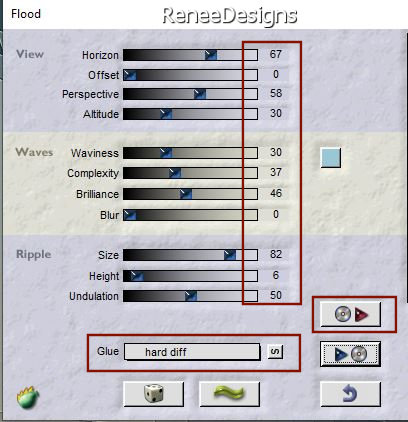
Your Layers palette will look like this - you should have the following result
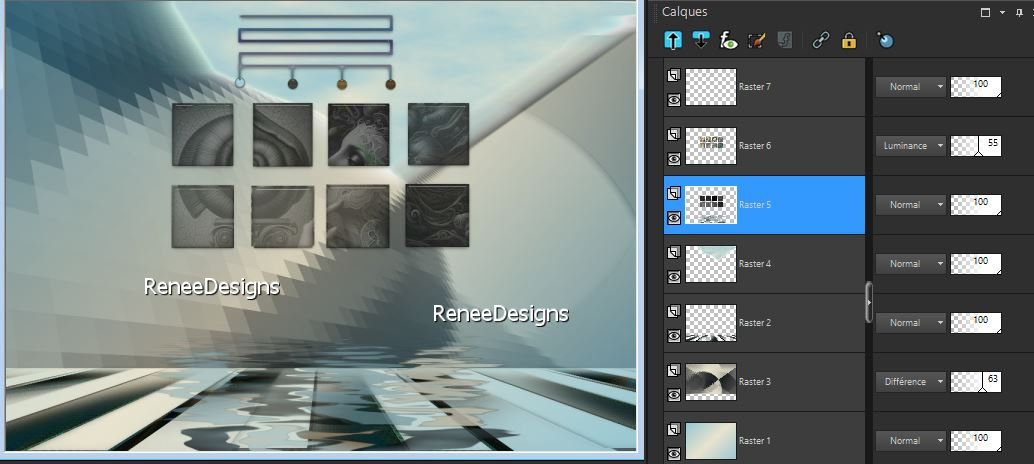
- Activate the top of the layer palette
43. Layers- New Raster Layer
44. Material Properties:Set the color of your foreground to color white
Flood Fill Tool
 -
Fill the layer with color white -
Fill the layer with color white
45. Layers- New Mask layer- From image and select ‘’
Masque-Bodem.jpg’’
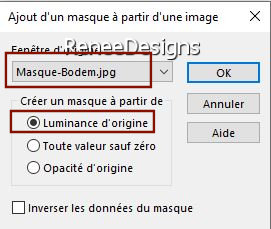
- Layers- Merge- Merge Group
46. Effects- Image Effects- Seamless Tiling use the settings below
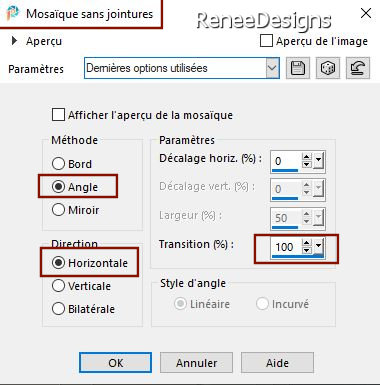
47. Effects- Edge Effects- Enhance
48. Image - Mirror - Mirror vertical ( Image -Flip in older versions of PSP)
49. Effects- 3 D-Effects- Drop Shadow with these settings: 1/1/100/2 Color white
50. Layers - Duplicate
51. Effects–Distortion Effects– Polar Coordinates- Rectangular to Polar -Transparent checked
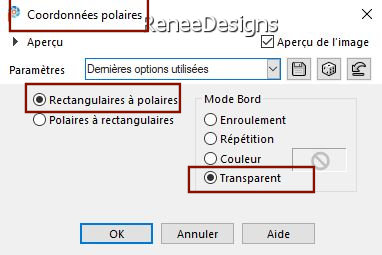
- Place in upper left corner ( see finished image)
52. Layers - Duplicate
53. Layers- Merge- Merge Down
54. Activate the tube
‘’Renee-TUBES-Steampunk-61-Image 1’’ - Edit - Copy- Activate your work -Edit - Paste as new layer
- Place in the upper right corner ( see finished image )(Renée has set the Blend Mode to Overlay) according to your tubes
55. Layers- New Raster Layer
56.
Selections –load/save selection –load selection from disc and select my selection: ‘’STP-61-6’’
57.Flood Fill Tool  – Fill the selection with the foreground color white

58. Effects - Plugins - Alien Skin EyeCandy 5 – Impact – Extrude use the settings below
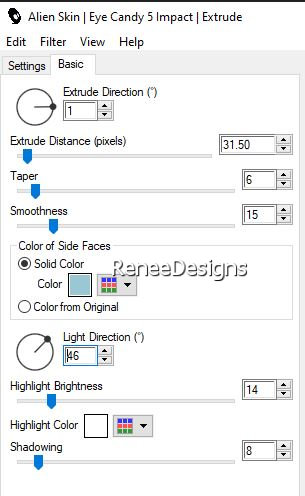
59. Activate the tube
‘’ Renee-TUBES-Steampunk-61-train’’ - Edit - Copy- Activate your work -Edit - Paste as new layer
60. Pick Tool: (K) on your keyboard -Enter these parameters on the toolbar
 731/
274 731/
274
-Press the ( M ) button to close the tool.

- Activate the layer above
61. Layers- Merge- Merge Down
62. Layers- Duplicate
63. Image- Resize by 75%, resize all layers not checked
64. Effects – Plugins – Andromeda- Perspective - It’s open
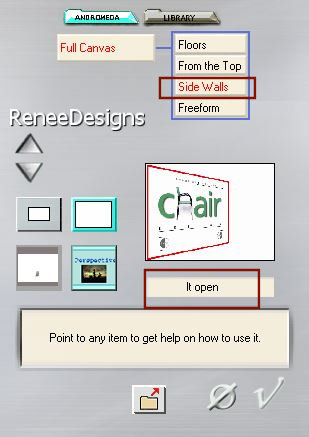
- Place to your liking –
Set the blend mode of this layer to Overlay
65. Layers- Duplicate
66. Image- Resize by 75%, resize all layers not checked
67. Layers-Properties-Set the Blend Mode to Overlay - Reduce the opacity of this layer to 61%
68. Activate any of the tubes
Renée chose these tubes ‘’Renee-TUBES-Steampunk61-iska’’
and this tube "Renee-TUBES-Steampunk61-Peintre pour tuto’’
Edit - Copy- Activate your work -Edit - Paste as new layer - Move the tube in the right place ( see finished image)
69. Image - Add Borders-Symmetric checked:1 Pixel – Color No. 1
Image - Add Borders-Symmetric checked:10 Pixels -Color white
70. Selections – Select All
Image - Add Borders-Symmetric checked:1 Pixels – Color No. 3
Image - Add Borders-Symmetric checked:40 Pixels - Color white
71. Effects- 3 D-Effects- Drop Shadow with these settings: 0/0/45/45/ Color black

72. Effects – Plugins – AAA Frame – Texture Frame use the settings below
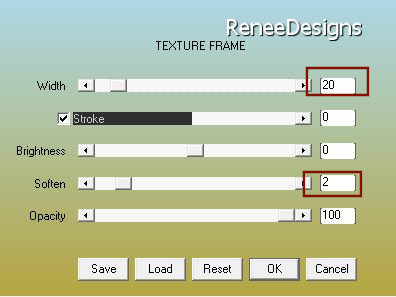
- Add the author's watermark to your work and your own watermark
73. Layers- Merge- Merge All ( flatten)
74. Image- Resize by 85%, resize all layers checked
75. Write the Title - Font (ARIDI 11) in the folder or choose one of your own.
Save as JPG.
Thanks for your time and enjoyment of this lesson.
Renée
This lesson was written by Renée
26/10/2024
Edited and Update
in 2024
*
*
Any resemblance to an existing lesson is purely coincidental.
* Don't forget to thank the people who work with us and for us - the testers and translators
Thanks
*
|


