|
Let's begin
1.
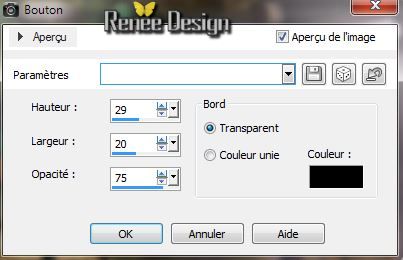
File: Open the image ''fond_steampunk_13''/ Promote Background Layer = raster 1
2.
Adjust-One Step Photo Fix
3.
Activate the Tube ''steampunk13_fleur'' /Edit/copy-Edit/paste as a new layer.
(do not move, it is the right place)
4.
Adjust-Blur-Radial Blur/Default
5.
Effects-User defined Filter/Default
6.
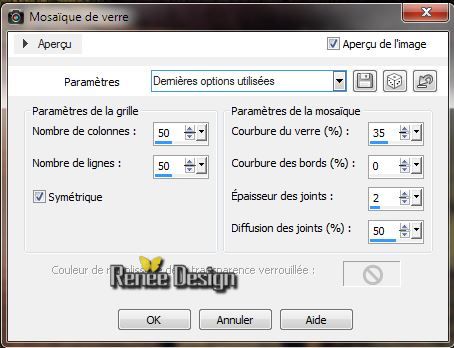
Effects-Texture Effects-Mosaic Glas
7.
Effects- PluginsUnlimited - Fiter Factory Gallery D / Ring
Tile / 75/25/0
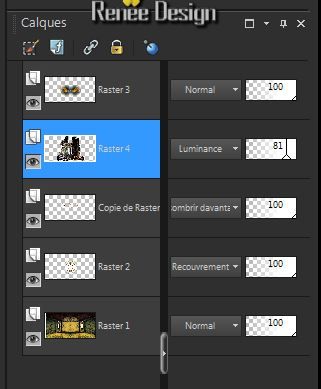
8. Layer Palette: Set the Blend mode to "Overlay"
9. Layers- Duplicate
10. Effects- Plugins
Unlimited - Filter Factory Gallery D/ Infini Tile / 17/12/0/0
11. Image Resize 55 % All layers not checked
12. Layers- Duplicate/Image Mirror / Layers- Merge- Merge Down
13. Layer Palette: Set the Blend mode to "Darken"
14. Activate the Tube '' KRYSMISTSURREALISME16.pspimage''/ Image Resize 55 %
Edit/copy-Edit/paste as a new Layer
15. Layers- Duplicate/Image Mirror
Place with your move tool as shown in screen below:
-
Layers- Merge- Merge Down
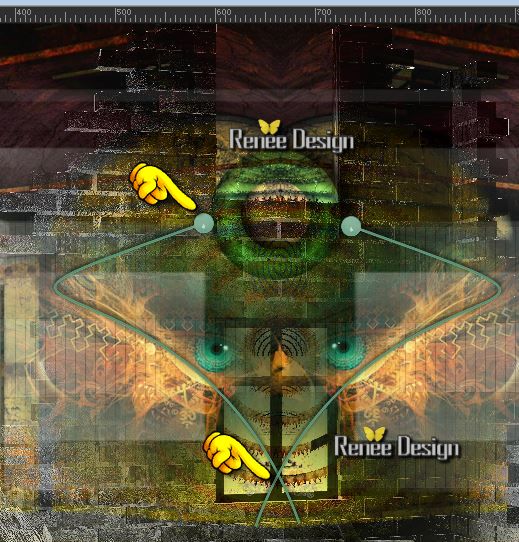
16. Activate the Tube ''element22_mur'' /Edit/copy-Edit/paste as a new layer. With your move tool place it in the right place
Layer Palette: Set the Blend mode to "Luminance Legacy". Opacity down to 83%
17. Layers-Arrange-Move Down
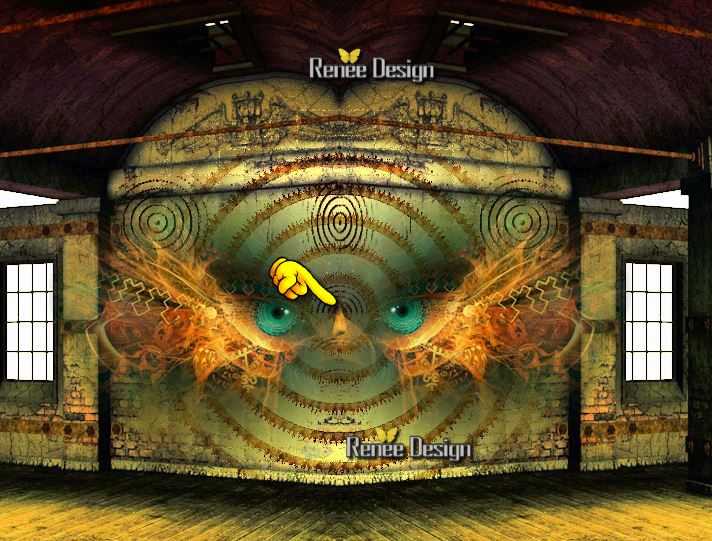
Your work look like this now
Aktivate the top of the Layers palette
18.
Layers-New raster layer
19. Flood Fill Tool: lower the opacity to 60% / Fill the Layer with color white
20.
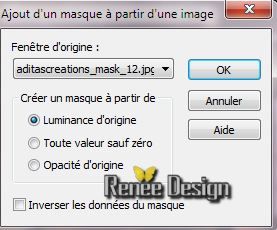
Layers- New Mask Layer From Image and choose Mask: ''aditascreations_mask_12.jpg''
21. Layers- Merge-Merge Group
22.
Selections - load/save selection- load selection from disk and select my file
''steampunk13_1''
23.
Selections- Promote Selection To Layer
24.
Selections - Deselect all
25.
Effects-Plugins- Toadies / What are
you / 18/37
26.
Effects-Edge Effects-Enhance More /Layer Palette: Set the Blend mode to "Screen" Opacity down to 67%
27.
Effects- Plugins- AP01 /Lines
Silverling
28.
Layers- Merge- Merge Down
29. Layer Palette: Set the Blend mode to "Normal " and the Opacity to 69%
30.
Selections - load/save selection- load selection from disk and select my file ''steampunk13_2''/
Delete
Keep Selections
31.
Effects-Plugins / EyeCandy 5 -Impact - Black
Light- tab Settings/User settings - choose my preset ''steampunk13_light''
-
Selections - Deselect all
32. Activate the Tube ''element_deco'' be placed on the raster 2 of the tube/Edit/copy-Edit/paste as a new Layer / With your move tool place it in the right place. Layer Palette: Set the Blend mode to "Hard Light"
33. Activate the Tube ''element_deco'' be placed on the raster 1 of the tube/Edit/copy-Edit/paste as a new Layer
34. Layers- Duplicate/Image Mirror
Place with your move tool as shown in screen below:
35. Layers- Merge- Merge Down and Repeat (3 deco,s one layer)
36. Layer Palette: Blend Mode "Hard Light"
37. Effects-3D Effects-Drop Shadow: 1/2/30/5 Black
38. Layers-New raster layer
39.
Selections - load/save selection- load selection from disk and select my file ''steampunk13_3'
40. Flood Fill Tool: lower the opacity to 60% /Fill the selections with this color #c29e48
41. Effects-3D Effects-Drop Shadow: 8/ -21/ 30 /7 Black
42.
Layers-New raster layer
43.
Selections - load/save selection- load selection from disk and select my file ''steampunk13_4''
44. Effects-
3D Effects-Buttonize
45. Layers-New raster layer
46. Activate the Tube '' KRYSSURREALISME-03-05-14-180.pspimage''/Edit/copy-Edit paste into selection
47.
Selections - Deselect all
48. Layers- Arrange-Move Down
49. Aktivate the top of the Layers palette /Layers- Merge- Merge Down
50. Activate the Tube '' KRYSSTEAMPUNK-18-O4-14-046.pspimage''/ Image Resize 58%
Edit/copy-Edit/paste as a new Layer /With your move tool place it on the right side
51.
Layers-New raster layer
52.
Selections - load/save selection- load selection from disk and select my file ''steampunk13_5''/ Flood Fill Tool: lower the opacity to 60%. Fill the selection with color white
53.
Selections - Deselect all
54.
Activate Eraser Tool/ Shape ''Round'' /eraser gently see example
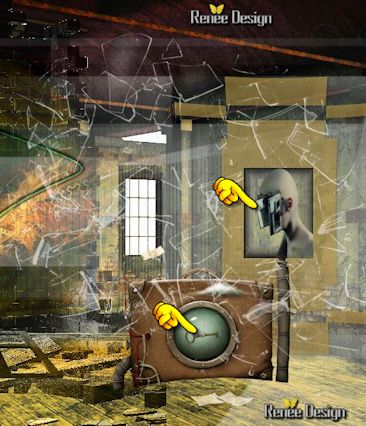
55. Activate the Tube '' KRYSSTEAMPUNK-25-O4-14-049.pspimage'' /Image Resize 50% / Edit/copy-Edit/paste as a new layer. With your move tool place it in the right place
56. Activate the Tube « Steampunk13_texte » / Edit/copy-Edit/paste as a new layer. With your move tool place it in the right place
Layer Palette: Blend Mode "Soft Light"
57. Activate the Tube'' bouteille_steampunk13'' /Edit/copy-Edit/paste as a new layer. With your move tool place it in the right place
58. Activate the Tube ''poupéesteampunk01.psp''/Edit/copy-Edit/paste as a new layer. With your move tool place it in the right place
59.Layer Palette: Set the Blend mode to "Luminance-Legacy"
60. Activate the Tube ''steampunk13_sang''/ Edit/copy-Edit/paste as a new layer. With your move tool place it in the right place
61.
Activate text tool with these settings:Font'' AL Age Old Love''/ Type the name HELP
/Foreground color RED and BG-Color White

62. Effects-Distortion effects- Twirl 150°
63. Layers- Merge- Merge Visible
64.
View - Toolbars - Script checked !! Activate toolbar Script, choose my file in the list ''steampunk_13 -Script'' / click the little blue arrow and let the script run and when it asks click OK

** C:\Users\YourName\Documents\Corel PaintShop Pro\16.0\ Scripts-trusted.
It is like this
Image - Add Borders - Symmetric
-
1Pixel en black/1Pixel white /1 Pixel black/20
Pixels white /1Pixel black/1Pixel white/1
Pixel black
Image Resize 1025 pixels Width
I hope you enjoyed this lesson
Renée
This lesson was written by Renée the
9/05/2014
Created the
05/2014
*
Any resemblance with an existing lesson is merely a coincidence
*
Don't forget to thank the people who work for us and with us. I named the tubeurs - Testers and the translators.
Thanks Renée
| 
 Translations


