|
Let's start the lesson
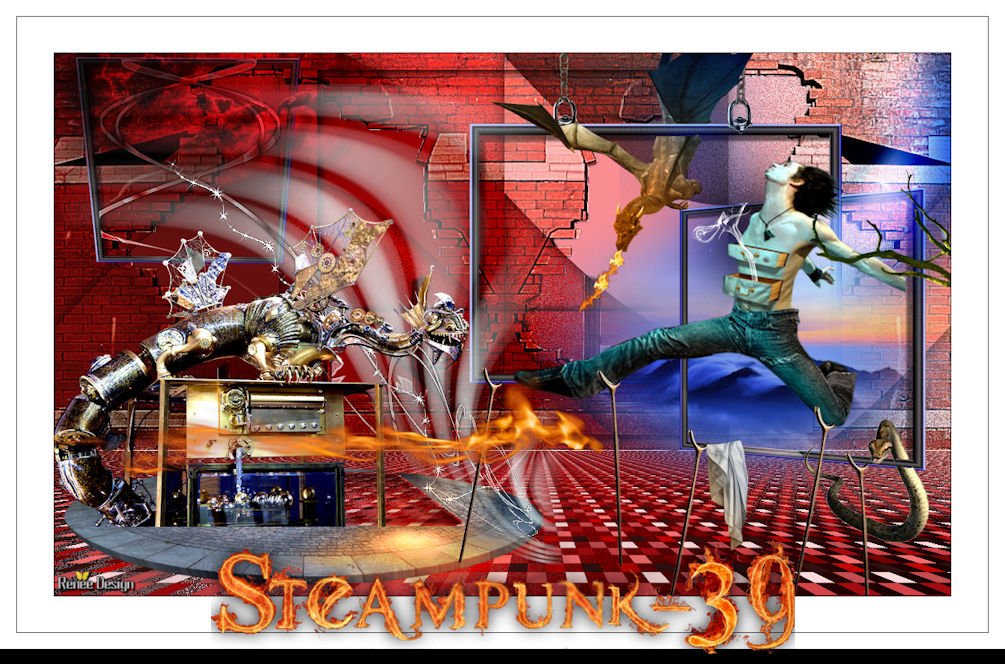
Steampunk_39
1.
Open Image ‘’Fond_steampunk_39’’- Window - Duplicate (or shift+D) - Close the original and proceed on the copy -Promote Background Layer = Raster 1
2.
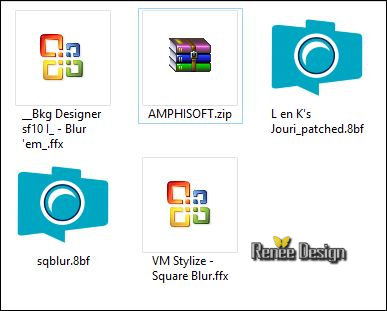
Effects- Plugins – Unlimited- &<Bkg Designer sf10 I>- Blur
'em!... 114/12
3. Layers- Duplicate
4. Effects –Plugins – L & K’s – Jouri 128/129/128 ( Patch Filter )
5.
Selections –load/save selection –load selection from disc and select my selection: ‘’
Steampunk_39_selection_1’’
6. Edit-Cut !!!! Edit -Paste as new Layer
Selections- Deselect All
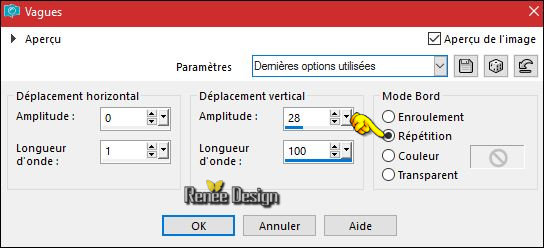
7. Effects- Distortion Effects-Wave use settings below
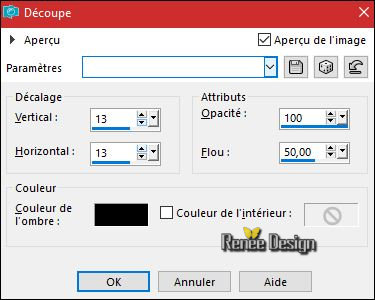
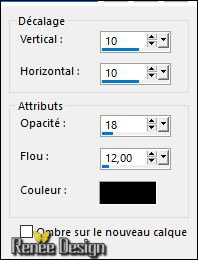
8. Effects –3D Effects – Drop Shadow with these settings: 1/1/50/25 black
- Repeat -Drop Shadow with the same settings
-Layer Palette - Click on the Second Layer from the bottom =Copy of Raster 1
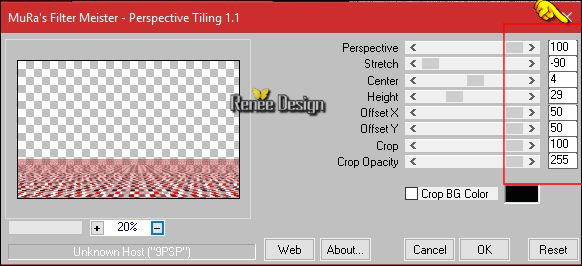
9. Effects –Plugins
- Mura’s Meister – Perspective
Tilling use settings below
- Activate the top layer in the layer palette = Raster 2
10.
Activate Selection Tool -Custom Selection (S) -Rectangle with these settings
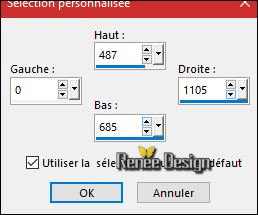
DELETE

Selections- Deselect All
11. Open the tube ‘’ Tube_Steampunk_39_Double_mur.png’’
- Edit - Copy- Activate your work -Edit - Paste as a new layer
-Activate Move Tool (M) move it the right place at the top of your image.
Leave the small white line at the bottom of the tube
12.
Layers-Properties-Set the Blend Mode to " Hard Light "
13. Layers- Duplicate
14.
Layers-Properties-Set the Blend Mode to " Screen " -Set the Opacity of this layer to 63%
15. Layers- Merge- Merge Down
16. Layers- New Raster Layer
17.
Selections –load/save selection –load selection from disc and select my selection: ‘’Steampunk_39_selection_2’’
18. Effects- 3 D Effects- Cutout with these settings
- Repeat- Effects- 3 D Effects- Cutout with the same settings
Selections- Deselect All
- Open the
tube ‘’Steampunk_39_tubes_DECOS’’
( Do not close we need it later for the rest of the work (some are hidden layers to lighten the weight of the tube simply open)
19. Activate the layer ‘’cadre’’of the tube
- Edit - Copy- Activate your work -Edit - Paste as a new layer
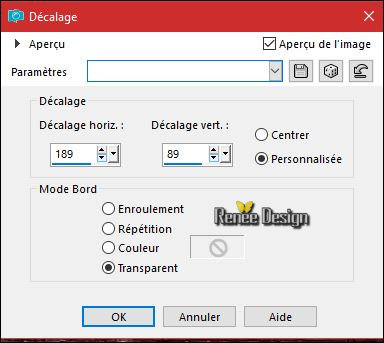
20. Effects- Image Effects- Offset with these settings:
21. Activate the layer ‘’cadre’’of the tube
- Edit - Copy- Activate your work -Edit - Paste as a new layer
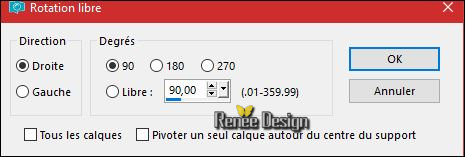
22. Image -Free Rotate 90° right
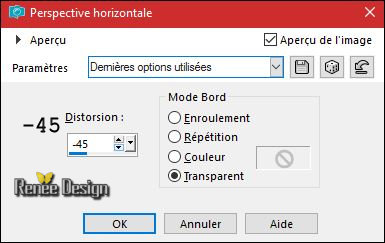
23. Effects
– Geometric Effects– Perspective Horizontal
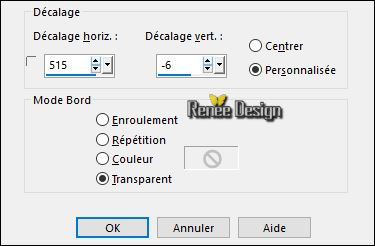
24. Effects- Image Effects- Offset with these settings: H = 515 and V = - 6
25.Back on tube Decos- Activate the layer ‘’cadre ‘’of the tube
- Edit - Copy- Activate your work -Edit - Paste as a new layer
26. Image -Free Rotate 90° right
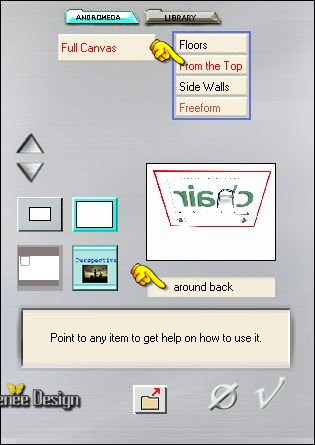
27.
Effects – Plugins – Andromeda/ Perspective - From the
top – Around back
Move to the lower left corner - Your Layer Palette look like this now-You should have this result
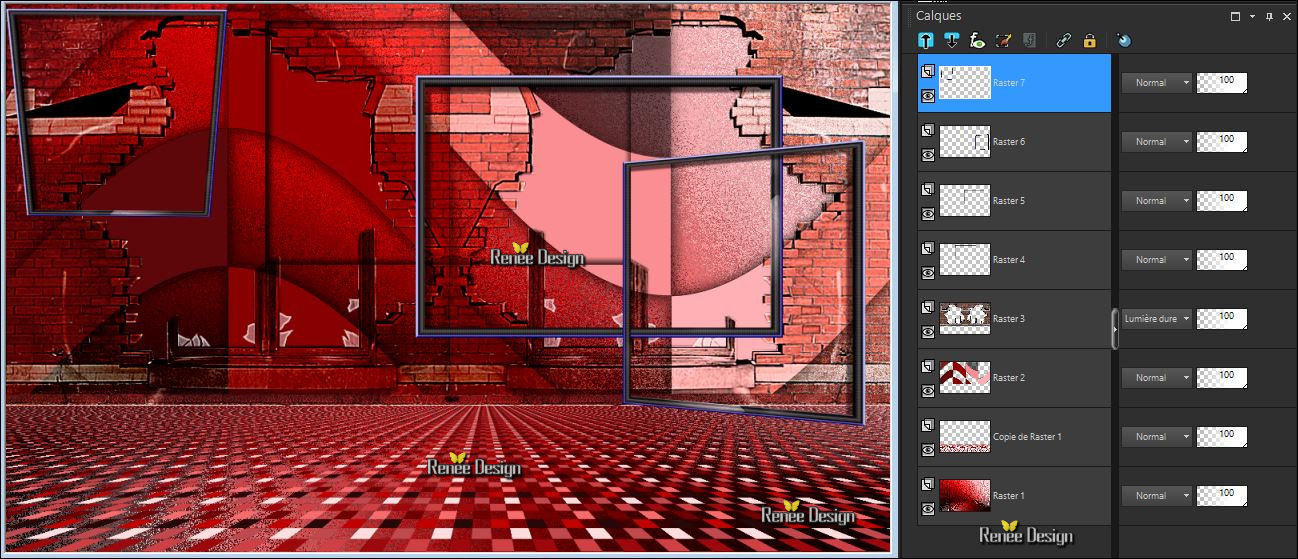
- Layer-Palette: activate the Layer underneath = (Raster 6)
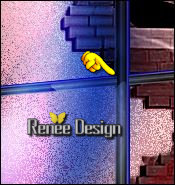
28.Eraser Tool: erase away what is on the frame (see screen)
- To replace the top of the layers palette
Back on the tube ''DECOS''
29. Activate the layer ‘’Attaches ‘’of the tube
- Edit - Copy- Activate your work -Edit - Paste as a new layer //place at the top of the frame
30. Adjust- Sharpness- Sharpen More
31. Open the tube ‘’ Steampunk_39_image1.png’’
- Edit - Copy- Activate your work -Edit - Paste as a new layer
-
Move the tube to the top right corner
32.
Layers-Properties-Set the Blend Mode to " Hard Light "
-
Layer palette – Make Raster 5 active
33. Open the tube ‘’ Steampunk_39_paysage’’
- Edit - Copy- Activate your work -Edit - Paste as a new layer
34.
Activate your Pick Tool /-Deformation tool (K) Mode Scale -place it in the right place as shown in the example below
- To replace the top of the layers palette
35. Open the tube ‘’ Steampunk_39_pavement’’
- Edit - Copy- Activate your work -Edit - Paste as a new layer
- Move the tube to the lower left corner ( see completed)
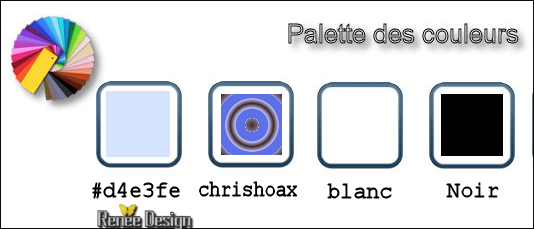
-Color Palette- Set your foreground color to
#d4e3fe
36. Layers- New Raster Layer
37.
Selections –load/save selection –load selection from disc and select my selection: ‘’Steampunk_39_selection_3’’
38. Activate Flood Fill Tool and fill the selection with the foreground color #d4e3fe  (2
clicks) (2
clicks)
Selections- Deselect All
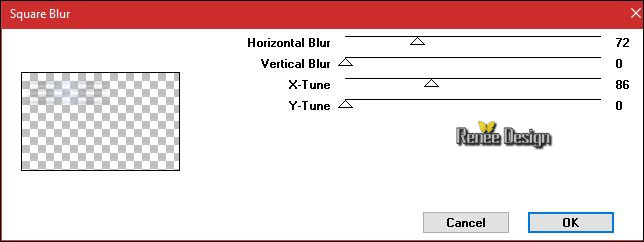
39. Effects
–Plugins (of Unlimited) VM -VM Stylize – Square
Blur
40. Effects- Edge Effects- Enhance More
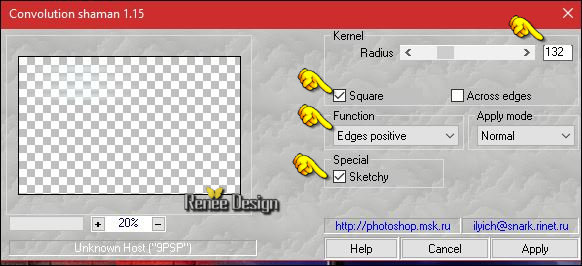
41. Effects
–Plugins – Amphisoft- Convulsionshaman 1.5 (attention =Patch -Filter -Included in the zipfile )
42. Effects- Distortion Effect- Warp with these settings
43. Effects –3D Effects – Drop Shadow with these settings:
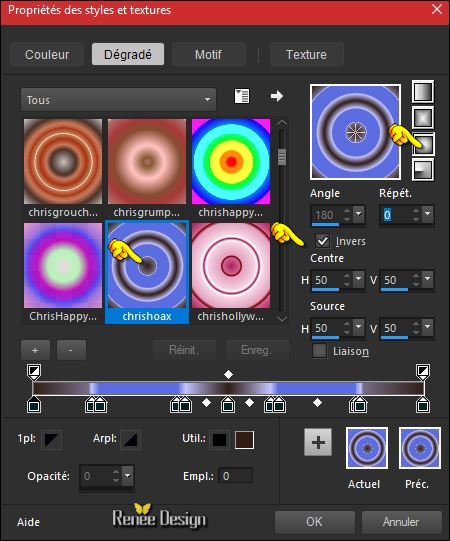
- Properties foreground: Change foreground material into gradient and select ‘’ chrishoax.jgd’’ – Put your foreground on the sunburst gradient with settings below
44. Layers- New Raster Layer
45.
Selections –load/save selection –load selection from disc and select my selection: ‘’Steampunk_39_selection_4’’
46. Activate Flood Fill Tool and fill the selection with the gradient
Selections- Deselect All
Move Tool- place in the middle of the frame
-Activate the top layer in the layer palette
47. Effects- Distortion Effect- Warp with these settings
48. Effects- Edge Effects- Enhance More
49.
Layers-Properties-Set the Blend Mode to " Luminance " -Set the Opacity of this layer to 83%
- Back on tube ''DECOS''
50. Activate the layer
‘’nuage rouge ‘of the tube
- Edit - Copy- Activate your work -Edit - Paste as a new layer
- Move the tube to the lower left corner
51. Layers-Properties-Set the Blend Mode to " Hard Light " -Set the Opacity of this layer to 81%
52. Open the ‘’ Steampunk_39_guirlande.png’’
- Edit - Copy- Activate your work -Edit - Paste as a new layer
- Activate your Move Tool (M) place it in the right place
53. Open the tube’’ Steampunk_39_tache_rouge.png’’
- Edit - Copy- Activate your work -Edit - Paste as a new layer
- Place against the edge of the pavement
54. Layers-Properties-Set the Blend Mode to " Hard Light "
55. Open the tube ‘’ Renee_tube_dragon_seampunk_Tube par
artus.pspimage’’
- Image-
Resize to 60%
- Edit - Copy- Activate your work -Edit - Paste as a new layer and move to the left
56. Back on tube '' DECOS''
- Activate the layer ’’canne ‘’ of the tube / -
Edit - Copy- Activate your work -Edit - Paste as a new layer
-Make first one tube on the right size
-
Duplicate to create the following effects
- Arrange them and give them the desired rotation
-
you can rotate the tube or erase a little
57 . Back on tube ''DECOS ''
- Activate the layer ''serpent ''of the tube
- Image-
Resize to 60%
– Edit - Copy- Activate your work -Edit - Paste as a new layer and move (erase away what is on the frame
(This snake is behind the window )
58. Back on tube Decos -Activate the layer ‘’dragon ‘’of the tube
- Image
-Resize to 60%
– Edit - Copy- Activate your work -Edit - Paste as a new layer
59. Activate Eraser Tool: erase away what is on the frame
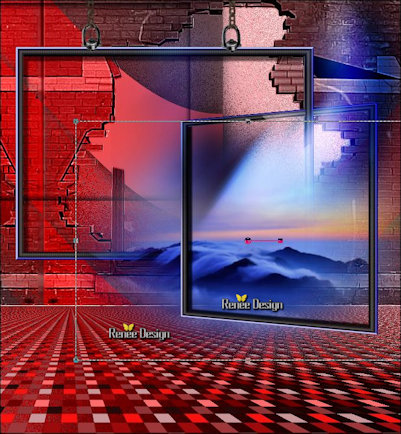
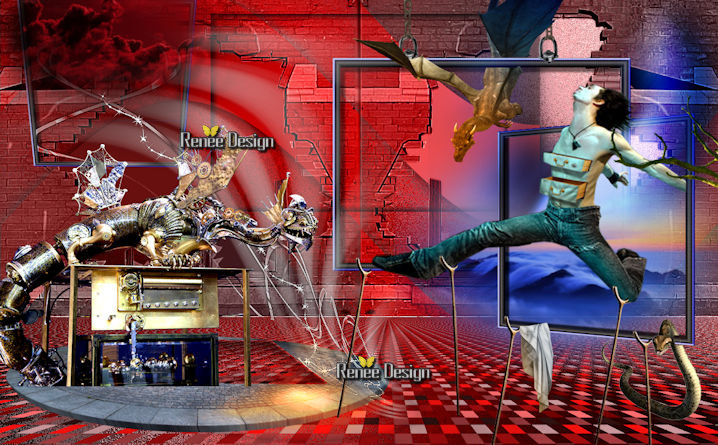
You should have this result
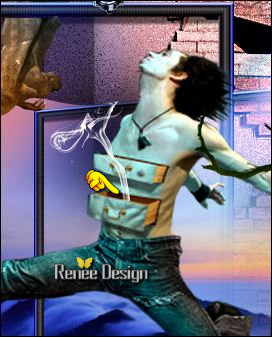
60. Open the tube ‘’ Steampunk_39_personnage.png’’
- Edit - Copy- Activate your work -Edit - Paste as a new layer
- Move to the right
61.Back on tube Decos-
Activate the layer ‘’canne’’ of the tube
- Edit - Copy- Activate your work -Edit - Paste as a new layer
- Dupliate and move (To hold the character )
-
If necessary reposition the brackets as shown in the example below
62. Back on tube Decos-Activate the layer ’’ drap ‘’of the tube
- Edit - Copy- Activate your work -Edit - Paste as a new layer
- Move Tool: place the tube as shown in the example below
You should have this result
- Then you are sure that it is in the right place?
63.
Layers- Merge- Merge Visible
64. Back on tube
''DECOS''
- Activate the layer ’’flamme_dragon’’ of the tube
–Edit - Copy- Activate your work -Edit - Paste as a new layer
- and move to the right place (see finished image)
65. Back on tube Decos -Activate the layer ’’flamme’’
- Edit - Copy- Activate your work -Edit - Paste as a new layer
- and move to the right place (see finished image)
- Color Palette- Set your foreground color to #ffffff
66. Layers- New Raster Layer
67.
Selections –load/save selection –load selection from disc and select my selection: ‘’Steampunk_39_selection_5’’
68. Activate Flood Fill Tool and fill the selection with the foreground color #ffffff (2 clicks)
Selections- Deselect All
With the Move tool, move as shown in the example above .
69. Image - Add borders-Symmetric checked: 1 pixel black
70. Image - Add borders-Symmetric checked: 45 Pixels #ffffff
71. Image - Add borders-Symmetric checked: 1 pixel black
72. Image - Add borders-Symmetric checked: 20 pixels #ffffff
73. Open the tube ‘’titre’’ /Image -Resize to 80%
- Edit - Copy- Activate your work -Edit - Paste as a new Layer- Or write your own text
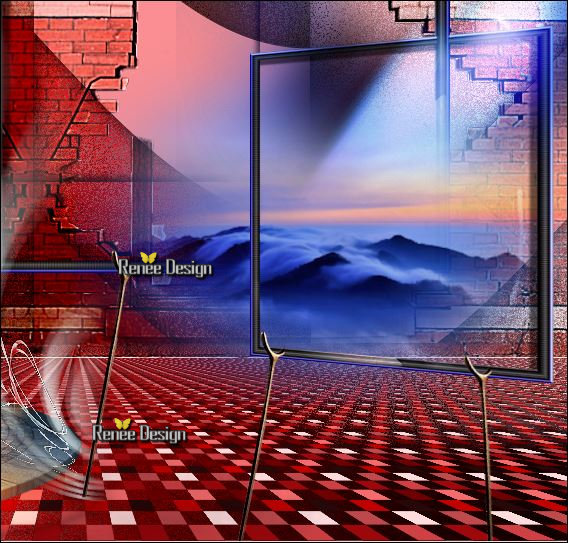
74. Layers- Merge- Merge All (flatten)
Image-
Resize to 1005 pixels width
Save as JPG
22/01/2017
I hope you enjoyed this lesson
Renée
This lesson was written by Renée 20/01/2017
Edited and Update
2017
*
Any resemblance with an existing lesson is a coincidence
* Do not forget to thank the people who work with us and for us I have appointed the tubeurs and translators
Thanks Renée *
*
| 
 Translations


 If a plugin supplied appears with this icon it must necessarily be imported into Unlimited *

 All rights reserved