|
Let's start the lesson.
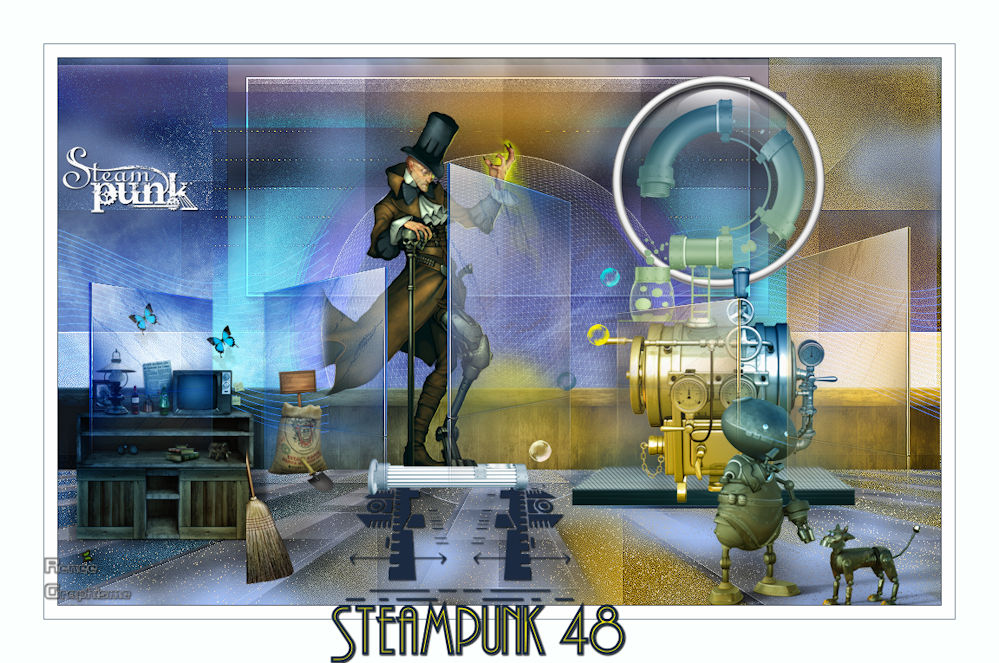
Steampunk 48
- Preparation
- Color Palette: Set your Foreground color to color #6c5b47=1 – Set your Background color to color #5b698b=2

1. Open the Image : Fond_steampunk_48 – Window - Duplicate (or shift+D) - Close the original and proceed on the copy -Promote Background Layer =Raster 1
2. Effects- Image Effects- Seamless Tiling using the default settings
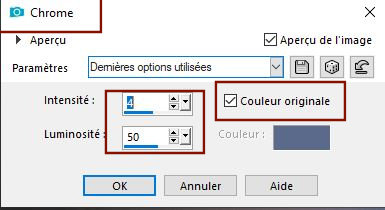
3. Effects– Artistic Effects – Chrome
4. Effects –Plugins- Unlimited 2.0
– Toadies - Band supressing noise : 117
5. Adjust- Sharpness-Sharpen More
6. Effects –Plugins- Unlimited 2.0
– Toadies -*Sucking Toad* Bevel II.2... using the default settings
7. Effects – Plugins - Simple – Quick Tile
8. Effects – Edge Effects
– Enhance
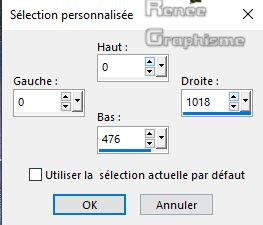
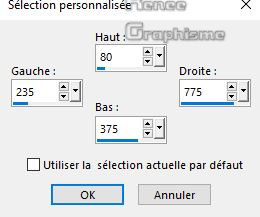
9. Activate Selection Tool -Custom Selection (S) -Rectangle with these setting

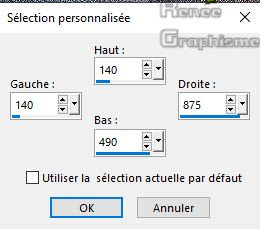
10. Selections- Promote Selection to Layer
11. Effects –Plugins- Unlimited 2.0
- Filter Factory Gallery G – Panel stripes 65/51/140
12. Effects – Plugins– AAA Frame - FotoFrame with these settings
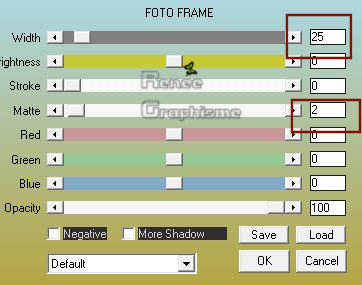
Selections- Select None
13. Image - Resize to 85% - Resize All Layers - not checked
14. Layers- Duplicate
15. Image - Free Rotate
90° to the Right
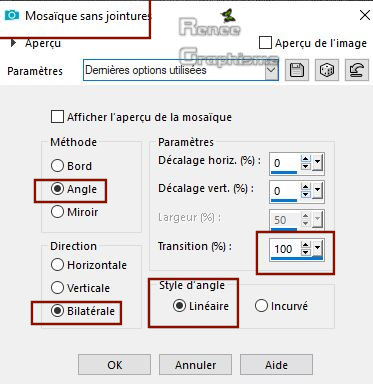
16. Effects- Image Effects- Seamless Tiling use the settings below
17.
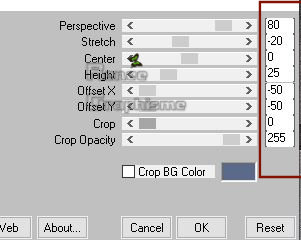
Effects - Plugins – Mura’s Meister – Perspective
Tilling use the settings below
18. Effects –3D- Effects – Drop Shadow with these settings : 10/10/65/18 Color black
- In the Layer-Palette-Activate the Layer underneath ( Promoted selection)
19. Objects – Align- Top
- To replace the top of the layer-palette(Copy of promoted selection)
20.
Layers- New Raster Layer
- Material Properties: Set your foreground color to color #5b698b =2 – Set your background color to color #a8c6fe= 4
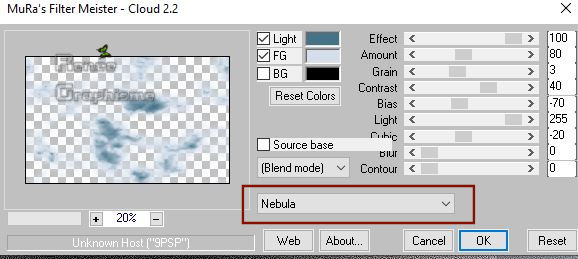
21. Effects –Plugins – Mura’s Meister – Clouds use the settings below
To apply this filter
1.
In the menu select "Nebula"
2.
Change the colors to
#447287 and #a8c6fe
3.
OK
22. Selections –load/save selection –load selection from disc and select my selection: ‘’ STPUNK-38_1’’
DELETE

Selections- Select None
23. Adjust-Blur-Gaussian Blur : Radius 10
24. Layers- New Raster Layer
25. Selections –load/save selection –load selection from disc and select my selection: ‘’ STPUNK-38_1’’
26. Activate the tube ‘’
STP_48_Image 1’’
- Edit - Copy- Activate your work -Edit - Paste into Selection
Selections- Select None
27. Layers-Properties-Set the Blend Mode to " Screen "
28. Adjust- Sharpness-Sharpen More
29. Activate the tube ‘’
STP_48_Image 2’’
- Edit - Copy- Activate your work -Edit - Paste as a new layer
- Do not move, it is in the right place
30.
Effects – Edge Effects- Enhance
31.
Layers- Duplicate
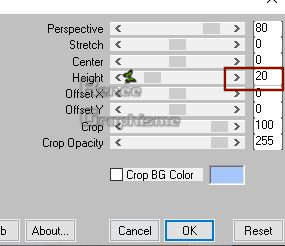
32. Effects – Plugins- Mura’s Meister – Perspective Tiling use the settings below
33. Layers-Properties-Set the Blend Mode to " Dissolve " and lower the Opacity to 38
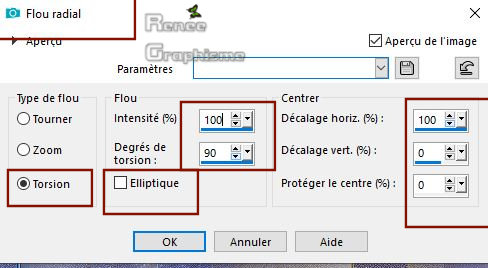
34. Adjust-Blur-Radial Blur use the settings below
35. Activate Selection Tool -Custom Selection (S) -Rectangle with these setting
DELETE
Selections- Select None
- Activate the bottom of the Layer-Palette = Raster 1
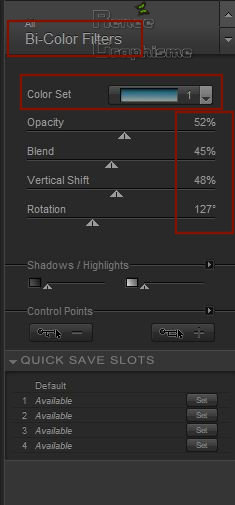
36. Effects – Plugins – Nick color effex Pro 3.- Bi- color Filters -
color set – Cool warm 1
- Layer palette – Make Raster 3 active
37. Activate the tube ‘’
STP_48_Image 3’’
- Edit - Copy- Activate your work -Edit - Paste as a new layer
38. Effects- Image Effects- Offset with these settings: H = 0 and V = - 112
39. Lower the Opacity of this Layer to 91%
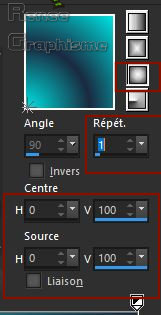
Material Properties: Set your foreground color to color #00e4e4 =5 – Set your background color to color #1a2a40=6
-Prepare a foreground/background sunburst gradient configured like this
- In the Layer-Palette-activate the second layer from the bottom(promoted selection)
40.
Layers- New Raster Layer
41. Activate Flood Fill Tool -Flood fill the Layer with the gradient -Flood fill the Layer with the gradient
42. Effects – Plugins – Graphic plus - Cross Shadow - Using the default settings
43. Effects Plugins- Unlimited
2.0- Andrew's Filters 1 – Boxed with these settings: 236/232/255/55
44. Image -Resize to
65 % - Resize All Layers - not checked
45.
Effects – Image Effects– Offste with these settings: H = 0 and V = 72
46. Activate Selection Tool -Custom Selection (S) -Rectangle with these setting
47. Effects - Plugins- L& K’s – Zitah- Using the default settings

48. Effects - Edge Effects - Enhance More
49. Effects –3D- Effects – Drop Shadow with these settings : -13/25/50/30 with the Foreground color #00e4e4 =5
Selections- Select None
50. Effects –Plugins- Unlimited 2.0
- Andrew's Filters 1 - Circular Tremors... using the default settings
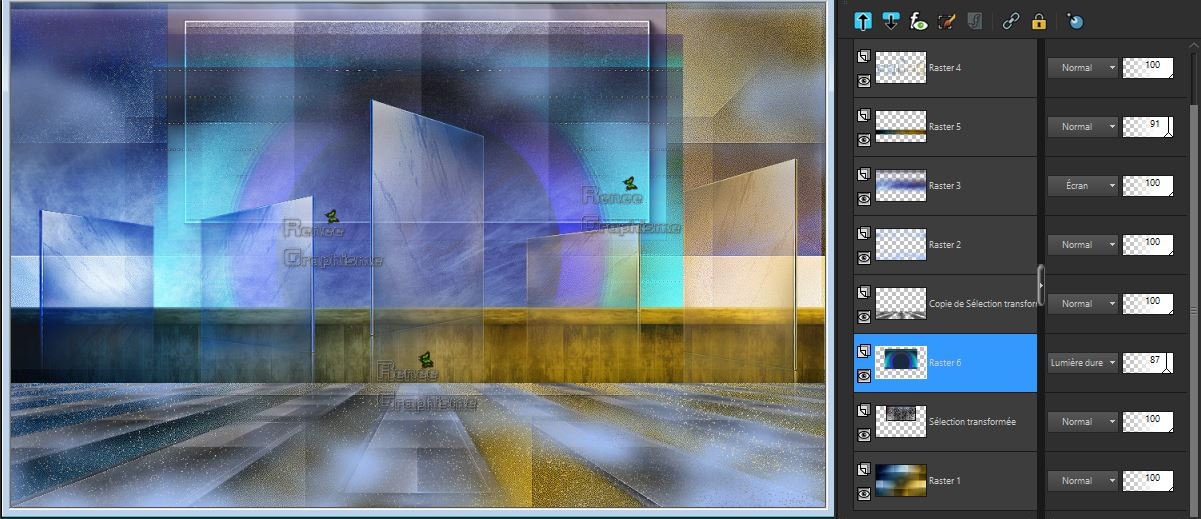
Layers-Properties-Set the Blend Mode to " Hard Light " – Lower the Opacity of the layer to 87%
Your work and Layer Palette look like this now-You should have this result
51. Activate the tube ‘’
STP_48_Image4.pspimage’’
-Edit - Copy- Activate your work -Edit - Paste as a new layer
- Do not move, it is in the right place
- To replace the top of the layer-palette
52. Layers- New Raster Layer
- Open the Brush Image
‘’ pinceau_Steampunk_48’’ in your PSP
- File- Export Custom Brush
Give it a name "Steampunk_48"
53.Color Palette: Set your Foreground color to color #ffffff
-Activate the Brush Tool and select my file ‘’Steampunk_48 ‘’‘’- Size 236
–Stamp in the top left corner by using your foreground color #ffffff
54.
Effects- 3D Effects- Drop Shadow with these settings: 1/1/100/2 Color black
55. Activate the tube ‘’
STP_48_Image 5.pspimage’’
- Edit - Copy- Activate your work -Edit - Paste as a new layer
- Do not move, it is in the right place
56.
Layers-Properties-Set the Blend Mode to" Screen "
57.
Layers- New Raster Layer
58. Selections –load/save selection –load selection from disc and select my selection: ‘’ STPUNK-38_2’’
59. Color Palette: Set your Foreground color to color #fca600=7
Activate Flood Fill Tool -
Flood fill the selections with the Foreground color = 7 ( 2 clicks)
Selections- Select None
60. Adjust-Blur- Gaussian Blur: Radius 28
61.Layers- New Raster Layer
62. Selections –load/save selection –load selection from disc and select my selection: ‘’ STPUNK-38_3’’
63.Color Palette: Set your Foreground color to color #fff600=8
Activate Flood Fill Tool - Flood fill the selections with the Foreground color = 8 ( 3 clicks)
Selections- Select None
- Activate the tube ‘’
Steampunk_48_Renee_TUBES_Divers.pspimage’’
Do not close , we need it soon
64. Activate the layer ‘’base’’ of the tube
- Edit - Copy- Activate your work -Edit - Paste as a new layer
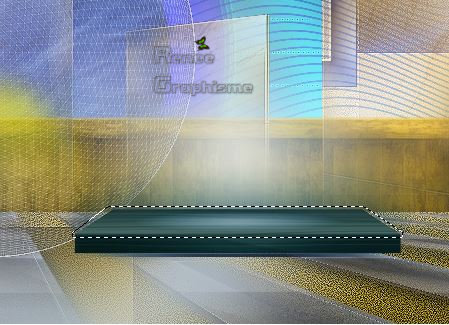
65. Effects- Image Effects- Offset with these settings: H = 245 and V = - 68
66. Activate your Freehand Selection -Point to Point -Mode-Add (shift)
-Select this part as shown in the example below
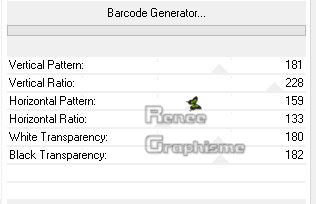
67. Effects –Plugins- Unlimited 2.0
- &<Bkg Designer sf10 I> - Barcode Generator..with these settings.
68. Effects – Plugins – Carolaine and Sensibility – CS-DLines : 40/5
69. Effects – Edge Effects–Enhance
Selections- Select None
70. On the same tube -select the layer
–Activer ‘’machine ‘’of the tube
- Edit - Copy- Activate your work -Edit - Paste as a new layer
–Activate your Move Tool (M) place it in the right place ( see finished image )
71. Effects – Plugins – EyeCandy 5 Impact perspective Shadow use the settings below

72. On the same tube-Activate the layer
‘’meuble ‘of the tube
- Edit - Copy- Activate your work -Edit - Paste as a new layer
–Activate your Move Tool (M) place it in the right place ( see finished image )
73. Layers- New Raster Layer
74. Selections –load/save selection –load selection from disc and select my selection: ‘’ STPUNK-38_4’’
75. Activate Flood Fill Tool -
Flood fill the selection with the Background color =6
Selections- Select None
76. Effects –3D- Effects – Drop Shadow with the same settings
- On the same tube
77. Activate the layer ‘’tube ‘’and
Bulles ‘’of the tube
-Edit - Copy- Activate your work -Edit - Paste as a new layer and move
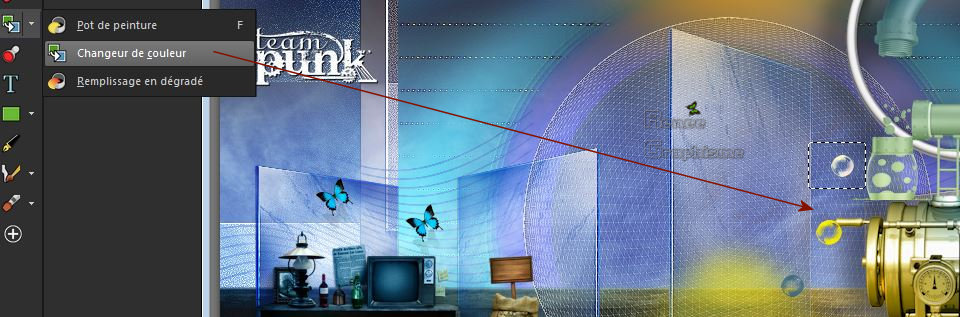
77.On the bubble layer- Activate Selection Tool-Rectangle and select the bubbles one by one
Using the Color Changer Tool
- You can colorize to your own taste
78. Activate the tube
‘’personnage or personnage 2 ‘’
-Edit - Copy- Activate your work -Edit - Paste as a new layer and move it in the right place (see finished image)
79. Activate the tube’’
Renee_TUBES_Robot.pspimage’’
80. Image Resize to
65 %
- Edit - Copy- Activate your work -Edit - Paste as a new layer
- You can colorize this tube or use it with- Adjust / Hue and Saturation -Hue Map, since it contains several colors
-Layer palette – Make Raster 4 active
81. Layers- Arrange- Bring to Top
Make sure everything is in the right place
82. Layers- Merge- Merge All
83.
Image - Add borders-Symmetric checked 1 pixel Color #1a2a40=6
84. Image - Add borders-Symmetric checked 15 pixels Color #ffffff
85. Image - Add borders-Symmetric checked 1 pixel Color#447287= 3
86. Image - Add borders-Symmetric checked 50 pixels Color #ffffff
87. Activate Text Tool - Renée choose font "Andes" (is into the zip), Size and Colors to your taste
Write the title ''Steampunk 48 -Activate your Move Tool (M) move it in the right place (see finished image )
88. Layers- Merge- Merge All (flatten)
89. Image -
Resize to 999 Pixels width
Save as JPG
I hope you enjoyed this lesson
Renée
This lesson was written by Renée 16 - 06 -2019
Edited and Update
in 2019
*
Any resemblance with an existing lesson is a coincidence
* Do not forget to thank the people who work with us and for us
I have appointed the tubeurs and translators
Thanks
|
 Translations


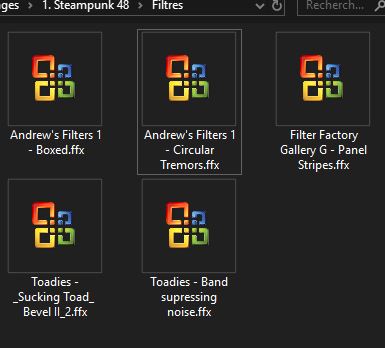


 If a plugin supplied appears with this icon it must necessarily be imported into Unlimited *