|
Let's start the lesson.
-
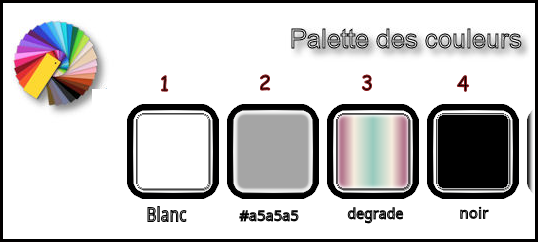
Preparation/ Material Properties: Set your foreground color to #ffffff - Set your background color to #a5a5a5
1. Open the Image ‘’ Fond_ville_desastre.jpg’’
–Window - Duplicate (or shift+D) - Close the original and proceed on the copy -Promote Background Layer =Raster 1
2. Layers- Duplicate
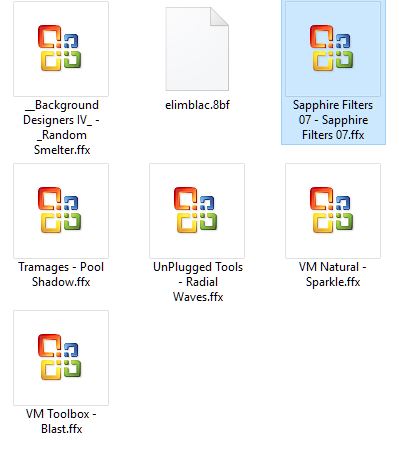
3. Effects –Plugins -Unlimited - &<Background Designers IV>
-@Random Smelter
4. Effects –Plugins – Transparency – eliminate
Black
5. Activate the Pick Tool- (K) Mode Scale -Pull the Top Node up to 300 pixels
6. Effects- Edge Effects- Enhance
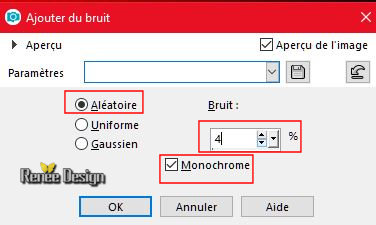
7. Adjust-Add/Remove Noise-Add Noise use te settings below (Random 4 )
8. Layers-Properties-Set the Blend Mode to " Screen "
9. Activate the tube ‘’ ville_desastre_image
1’’ – Edit - Copy- Activate your work -Edit - Paste as a new layer .Do not move, it is in the right place
10. Layers-Properties-Set the Blend Mode to " Overlay " -Set the opacity of this layer to
59%
11. Activate Warp Brush Tool 
-
Click:Deformation map

-
Select preset Tiled Monitors =‘’Corel_03_008
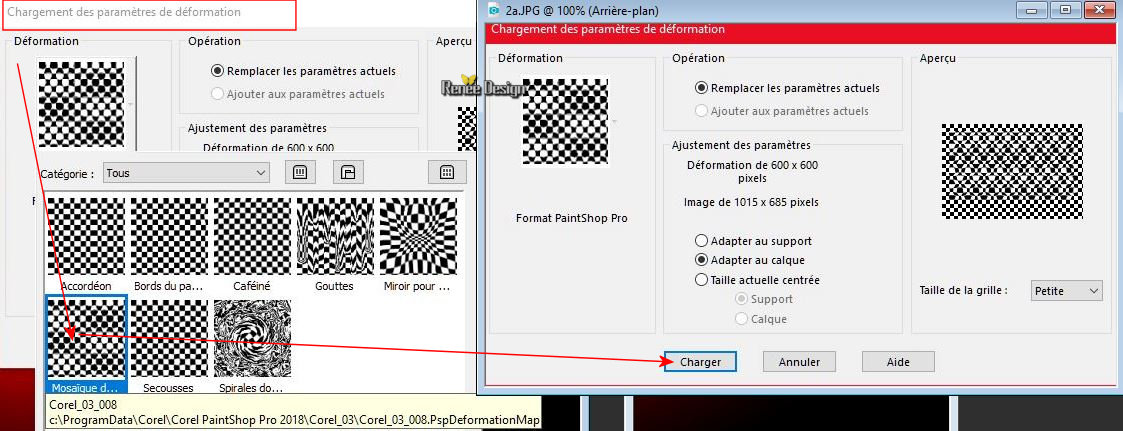
- Click Load
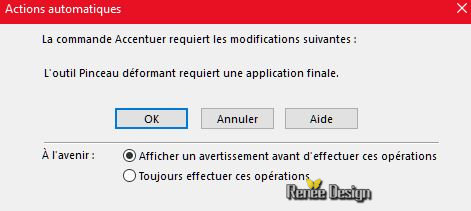
-If he asks : The followings changes are needed to proceed with your New Raster Layer action.
The Warping Brush Tool must do a final apply. Click OK
12. Effects- Edge Effects- Enhance
13. Effects – Plugins – Flaming Pear –
Ghost
14. Layers- Duplicate
15.
Image - Mirror - Mirror vertical ( Image - Flip in older versions of PSP)
16. Effects- Image Effects- Offset with these settings : H = 0 and V = -105
/Transparent
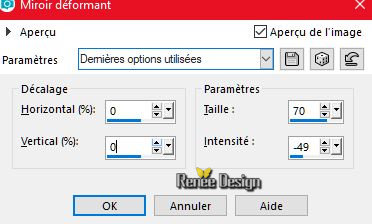
17. Effects- Distortion Effects-Warp use the settings below
-
Repeat: Effects- Distortion Effects-Warp with the same settings
18. Layers-Properties-Set the Blend Mode to " Hard Light " -Set the opacity of this layer to 100%
19. Layers- New Raster Layer
20. Selections –load/save selection –load selection from disc and select my selection: ‘’ Ville_
Désastre 1’’
21.
Activate Flood Fill Tool and fill the selection with the foreground color #ffffff
Selections- Deselect All
22. Layers-Properties-Set the Blend Mode to " Screen " -Set the opacity of this layer to 53%
23. Activate the tube ‘’ ville_desastre_image
2.png’’
-
Edit - Copy- Activate your work -Edit - Paste as a new layer
- Activate your Move Tool (M) move it in the right place as shown in the example below
24. Layers- New Raster Layer
25. Activate Flood Fill Tool and fill the layer with the foreground color #ffffff
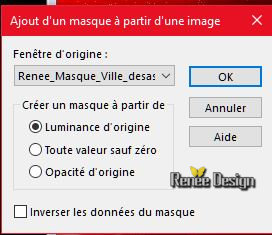
26. Layers-New Maske Layer- From Image and select Mask: ‘’ Renee_Masque_Ville_desastre.jpg’’
- Layers- Merge-Merge Group
27. Image Resize to 50 % -Resize all Layers not checked
28.
Image - Mirror - Mirror vertical ( Image - Flip in older versions of PSP)
29. Selections –load/save selection –load selection from disc and select my selection: ‘’ Ville_
Désastre 2’’
DELETE
2 times
Selections- Deselect All
30. Layers-Properties-Set the Blend Mode to " Screen " -Set the opacity of this layer to 55%
31. Activate the tube ‘’ ville_desastre_image
3.png’’
-
Edit - Copy- Activate your work -Edit - Paste as a new layer
-
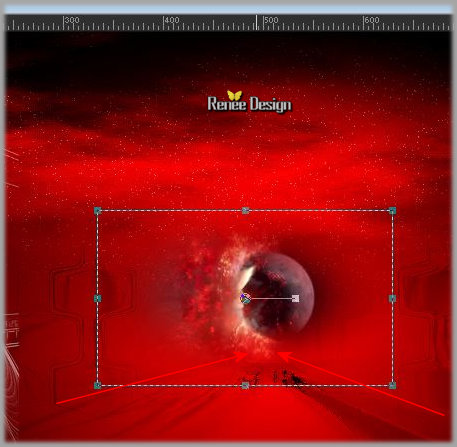
Activate your Move Tool (M) move it in the right place (see finished image )
-. Activate the bottom of the Layer-Palette= Raster 1
32. Selections –load/save selection –load selection from disc and select my selection: ‘’ Ville_
Désastre3
33. Effects – Plugins-Unlimited – VM Natural – Sparkle use the settings below

Selections- Deselect All
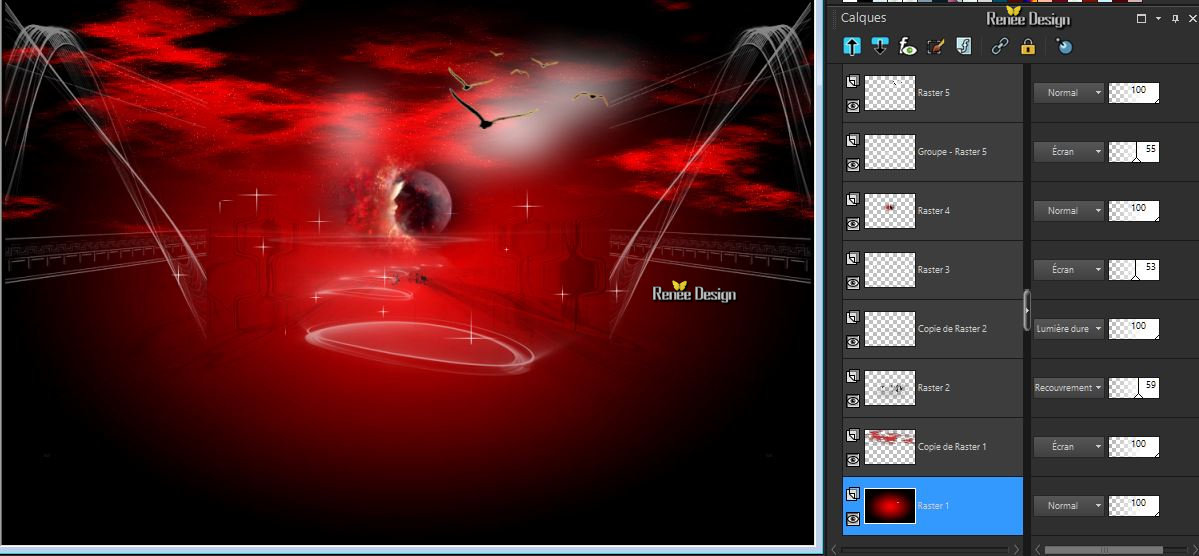
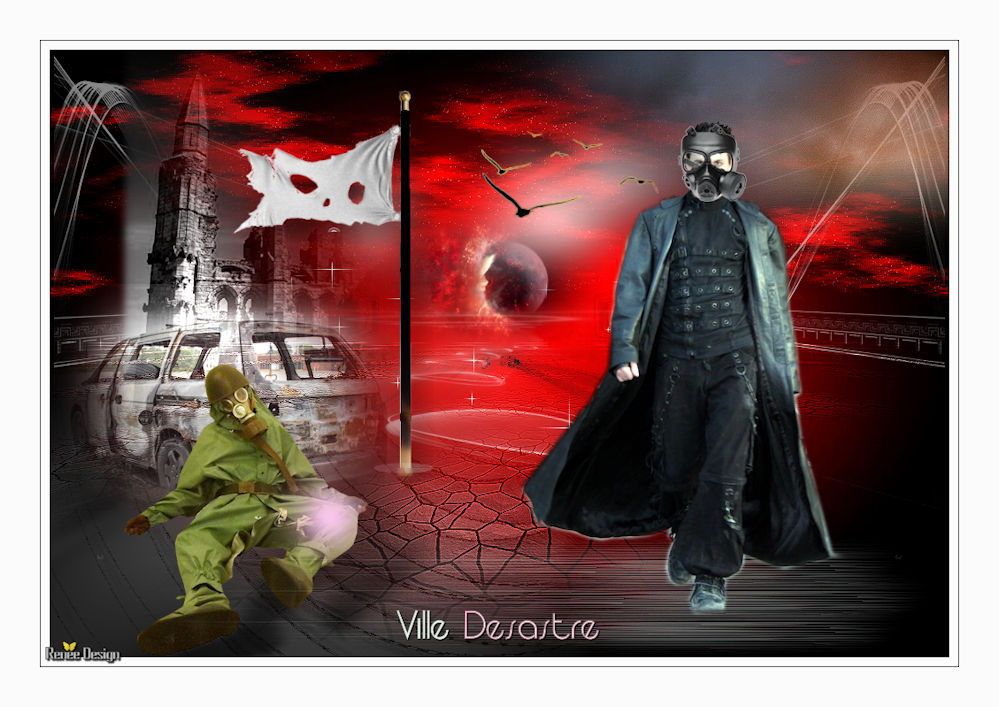
Your work and Layer Palette look like this now-You should have this result
- To replace the top of the layer-palette
34. Activate the tube ‘’ ville_desastre_image
4.png’’
-
Edit - Copy- Activate your work -Edit - Paste as a new layer
35. Effects –Image Effects- Offset with these settings: H = - 315 and V =
- 60
36. Activate the tube ‘’ ville_desastre_image
5.png’’
-
Edit - Copy- Activate your work -Edit - Paste as a new layer
-
Activate your Move Tool (M) move behind the car (see finished image )
37. Layers- Arrange- Move Down
- To replace the top of the layer-palette
38. Layers- Merge- Merge Down
-
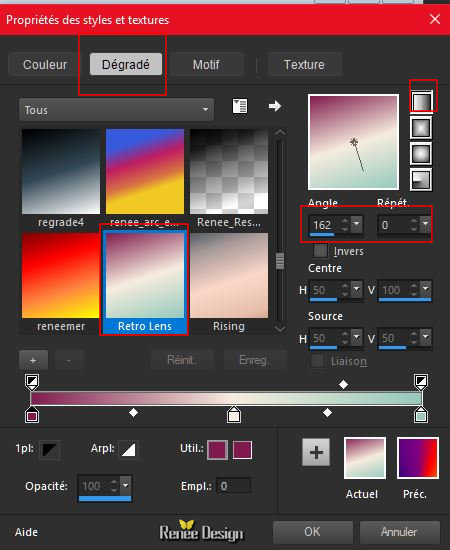
Material Properties: Set your foreground to gradient and select ‘’
Retro Lens.PspGradient’’ -Prepare a linear gradient configured like this.
39. Layers- New Raster Layer
40. Selections –load/save selection –load selection from disc and select my selection: ‘’ Ville_
Désastre4’’
41.
Activate Flood Fill Tool- Opacity 65 %- Flood fill the selection with the gradient
Selections- Deselect All
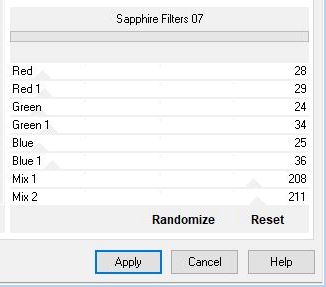
42. Effects –Plugins- Unlimited - Sapphire Filters 07 -
Sapphire
Filters 07 using the default settings
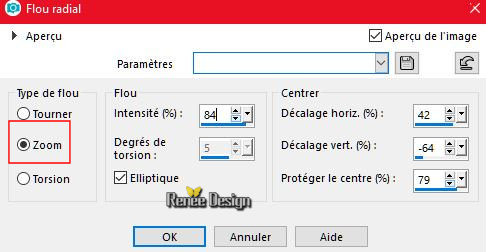
43.Adjust- Blur- Radial Blur use the settings below
44. Effects –Plugins- Unlimited - UnPlugged Tools - Radial
Waves... 200/10/0 ‘ (Pay attention: the color effect will depend on your background color )
45. Effects- Edge Effects- Find Horizontal
46. Lower the Opacity of the layer to 46%
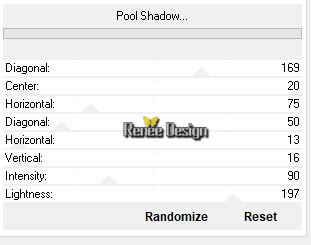
47. Effects –Plugins- Unlimited – tramage – Pool Shadow use the settings below
48. Activate the tube ‘’ Renee_Tubes_Gazman.png’’
-
Image Resize to 75%
-
Edit - Copy- Activate your work -Edit - Paste as a new layer
- Activate your Move Tool (M) move against the car (see finished image )
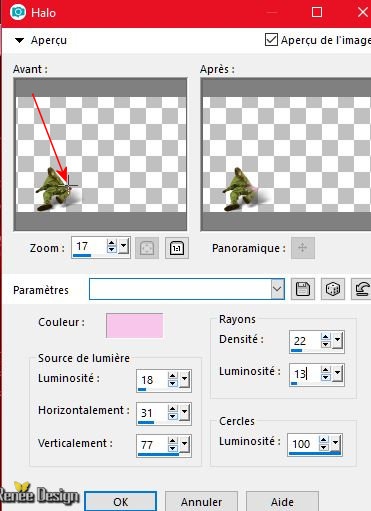
49. Effects- Illumination Effects-Sunburst -use the settings below- Color
#f8c6eb
The filter settings depends where the tube is placed (Move the cross that I did.)
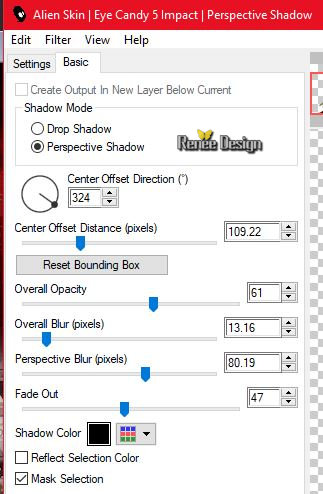
50 . Effects - Plugins - EyeCandy 5 Impact
-Perspective shadow use the settings below
51.
Layers- New Raster Layer
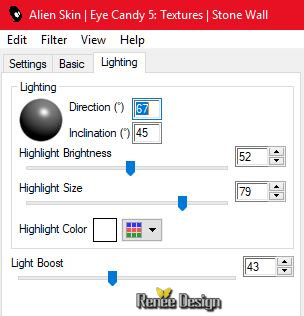
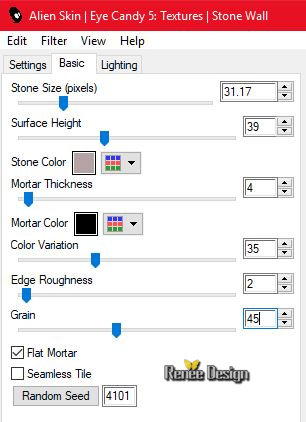
51a. Effects –Plugins – Alien Skin EyeCandy 5-
Textures – Stones Walls -Tab- Settings- User Settings and choose my Preset ‘’textures _stone’’
Or manual settings as shown in the example below
Stained Glass –Red /Colors
#b6a4a4 and Black
52.
Layers-Load/Save Mask-Load Mask from Disk and select Mask ‘’ 1217491303_masques.jpg’’
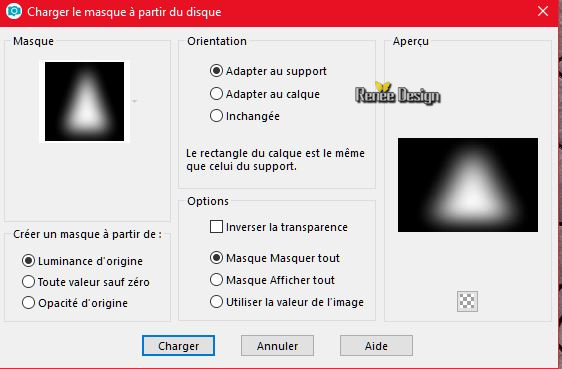
-
Layers- Merge- Merge Group
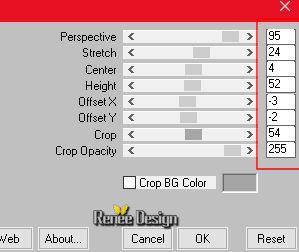
53. Effects –Plugins – Mura’s Meister –
Perspective Tiling use the settings below
54. Layers-Properties-Set the Blend Mode to " Overlay " -Lower the opacity of this layer to
79%
55. Layers- Arrange- Move Down
56. Effects- Edge Effects- Enhance
- To replace the top of the layer-palette
57. Activate the tube ‘’ ville_desastre_image
_drapeau.png’’
-
Edit - Copy- Activate your work -Edit - Paste as a new layer
-
Activate your Move Tool (M) move it in the right place (see finished image )
58. Activate the tube ‘’ ville_desastre_image
_nuages.png’’
-
Edit - Copy- Activate your work -Edit - Paste as a new layer
- Activate your Move Tool (M) place it in the top right corner
59. Layers- New Raster Layer
60. Selections –load/save selection –load selection from disc and select my selection: ‘’ Ville_
Désastre 5’’
61
Activate Flood Fill Tool- Opacity 65 %- Flood fill the selection with the gradient
Selections- Deselect All
62 Effects – Plugins -Unlimited – VM Toolbox – Blast 191
63. Effects- Edge Effects- Enhance More
64. Layers- Duplicate
65. Effects –Image Effects- Offset with these settings: H = 31 and V = 35
66. Layers- Duplicate
67.Effects –Image Effects- Offset with these settings: H = - 31 and V =
35
68. Layers- Merge- Merge 2x Down
69.Effects –Image Effects- Offset with these settings: H = 0 and V = -
65
70. Activate the tube ‘’ Renee_TUBES_Ville
- Désastre_Men_Gaz’’( or Alice's your choice)
- Image Resize to 70%
-
Edit - Copy- Activate your work -Edit - Paste as a new layer
- With the Move Tool (M) move it to the bottom right side
71. Layers- Merge- Merge Visible
72. Layers- New Raster Layer
73. Activate Flood Fill Tool- Opacity 100 %- Flood fill the Layer with #ffffff
74. Layers- New Maske Layer- From Image and select Mask: ‘’ aditascreations_mask_16.jpg’’
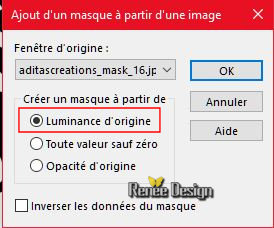
-
Layers- Merge-Merge Group
75. Adjust- Blur- Gausian Blur : Radius 25
76. Layers-Properties-Set the Blend Mode to " Dodge "
77. Image - Add borders-Symmetric checked 1 Pixel color black
78. Image - Add borders-Symmetric checked 10 Pixels #ffffff
79. Image - Add borders-Symmetric checked 1 Pixel color black
80. Image - Add borders-Symmetric checked 45 Pixels #ffffff
81. Activate the tube ‘’titre’
- Edit - Copy- Activate your work -Edit - Paste as a new layer
- Activate your Move Tool (M) place it in the right place/Ore write your own text
82. Layers- Merge- Merge All (flatten)
83. Image Resize to 999 Pixels width. Save as JPG
29 March 2018
I hope you enjoyed this lesson
Renée
This lesson was written by Renée 29 March 2018
Edited and Update
2018
*
Any resemblance with an existing lesson is a coincidence
* Do not forget to thank the people who work with us and for us I have appointed the tubeurs and translators
Thanks
*
| 
 Translations


 If a plugin supplied appears with this icon it must necessarily be imported into Unlimited *