|
Let's start the lesson.
Used Colors 
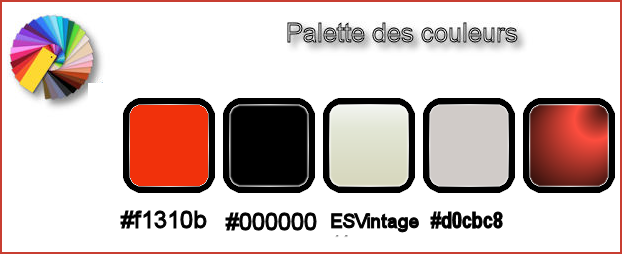
-
Preparation - Color Palette: Set your foreground color to #f1310b
-Set your background color to #000000
-
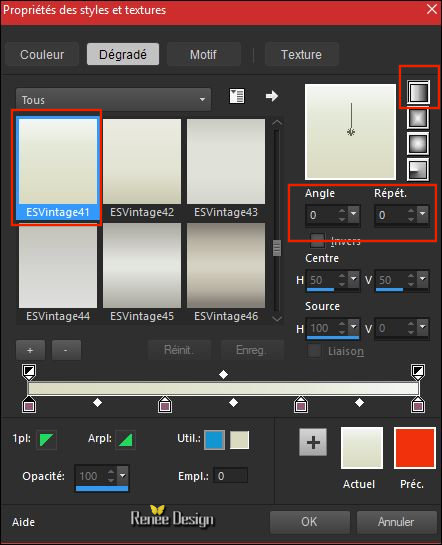
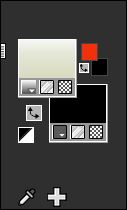
Properties Foreground - Set your foreground material into gradient and select ‘’ ESVintage41.PspGradient’’
/Prepare a linear gradient configured like this
-We start the lesson with this material palette
1.
Open Image ''fond waow''- Window - Duplicate (or shift+D) - Close the original and proceed on the copy -Promote Background Layer = Raster 1
2. Layers- Duplicate
3. Adjust-Blur- Gaussian Blur: Radius : 85%
4. Effects –Plugins - Unlimited
- It@lian Editors Effect- Effetto Tv with these settings
8/158/255/255
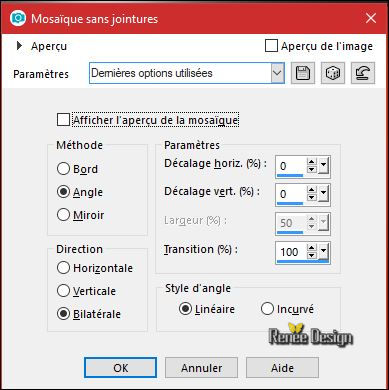
5.
Effects- Image Effects- Seamless tiling use the settings below
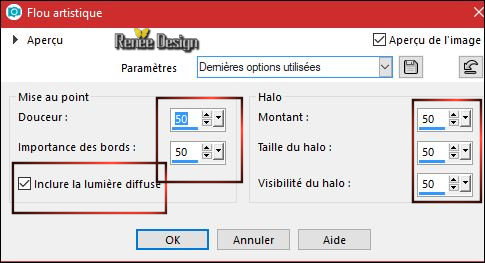
6. Adjust -Softness-Soft Focus use the settings below
7. Image
- Free Rotate 90° to the left (nothing checked )
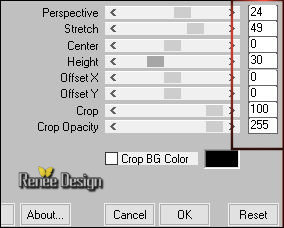
8. Effects –Plugins
- Mura’s Meister – Perspective Tilling use the settings below
9.
Layers-Properties-Set the Blend Mode to " Overlay "
10. Effects- Edge Effects- Enhance More
11. Effects – 3D Effects –Drop Shadow with these settings /5/5/32/8 black
12.
Layers- New Raster Layer
13.
Activate Flood Fill Tool  fill the layer with the gradient fill the layer with the gradient
14.
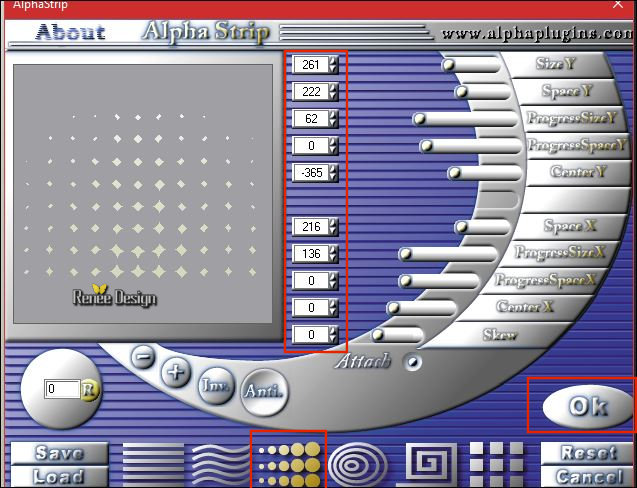
Effects – Plugins – Panopticum – AlphaStrip - select
" Circle" with these settings as shown in the example below
15.
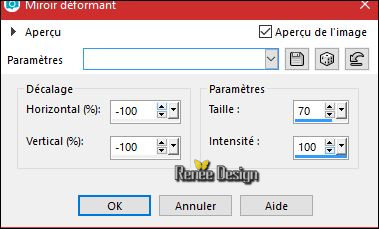
Effects- Distortion Effects- Warp with these settings
16.
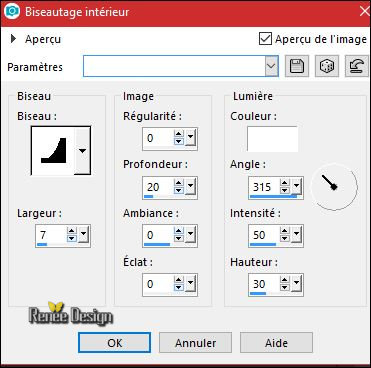
Effects- 3 D Effects-Inner Bevel use the settings below
17.
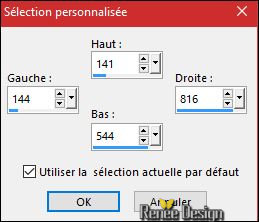
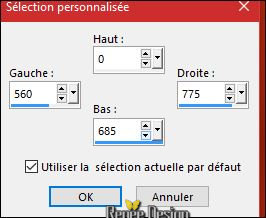
Activate Selection Tool -Custom Selection (S) -Rectangle with these settings
DELETE

Selections- Deselect All
18.
Layers- New Raster Layer
19.
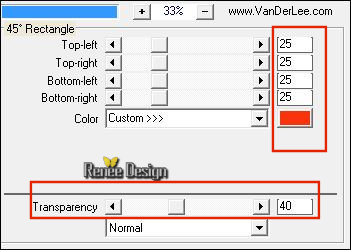
Effects – Plugins - Vanderlee – Unplugged X
-45°Rectangle/ color #f9330b
20.
Effects – 3D Effects –Drop Shadow with these settings 1/1/100/1 color
#f1310b
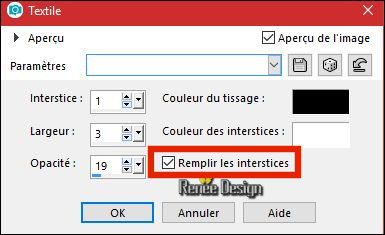
21.
Effects- Texture Effects- Weave / black and white
22.
Effects- Edge Effects- Enhance
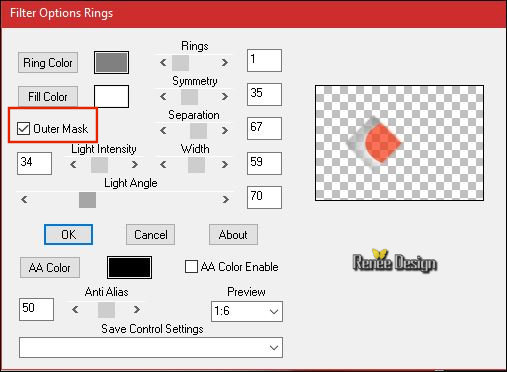
23. Effects
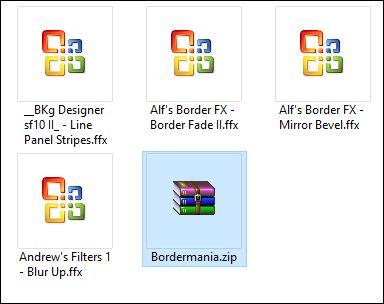
– Plugins – Bordermania – Rings (if you receive an error message
click OK and the filter opens
)
( If the bordermania filter removes the weaving effect on the left gray field, create the points 24 and 25 again)
24.
Selections –load/save selection –load selection from disc and select my selection: ‘Waow-2’’
25. Repeat:
Effects- Texture Effects- Weave / black and white with the same settings
Selections- Deselect All
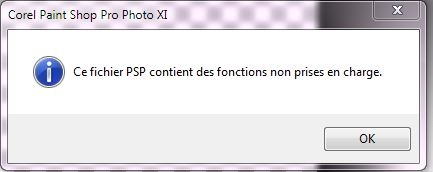
If you do not have this filter effect, paste the png which is in the download folder
-
Activate in the layer palette Raster 1
26.
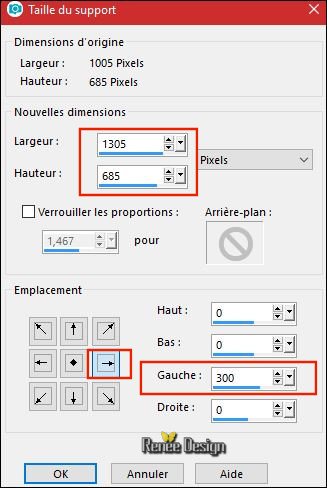
Activate Selection Tool -Custom Selection (S) -Rectangle with these settings 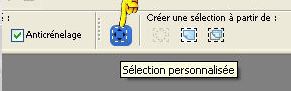
27.
Selections- Promote selection to layer
28. Layers- Arrange- Bring to Top ( you don't see anything now )
Selections- Deselect All
29. Effects –Plugins -Unlimited –
Andrew’s Filter 1 / Blur up with these settings 255/255
30.
Effects –Plugins - unlimited - &<BKg Designer sf10 II> -Line
Panel Stripes use the settings below
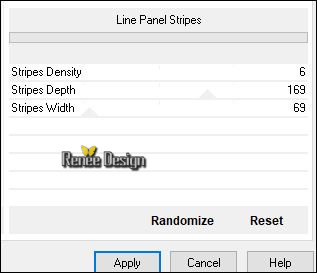
31.
Effects –Plugins - Unlimited - Alf's Border FX- Mirror Bevel with these settings
193/64
32.
Activate your Magic Wand with these settings

- Select the black part
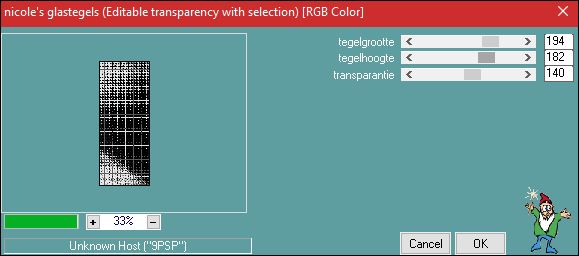
33. Effects -Plugins – Pspforum – nicole’s glastegels
Selections- Deselect All
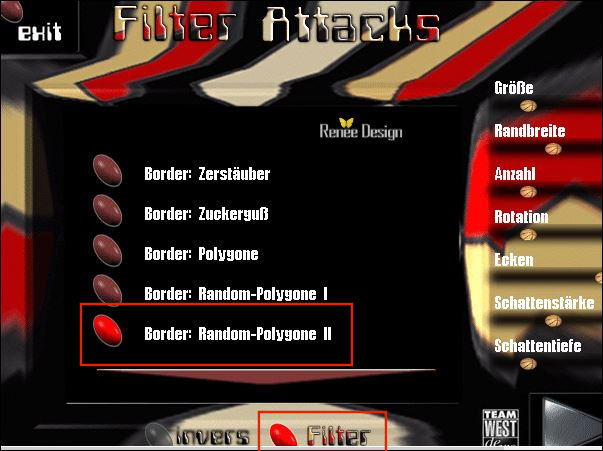
34. Effects –
Plugins – Filter Attack ( if you do not have this filter effect, paste the png which is in the download folder )
1. Click "Filter"--you get into the menu and choose >>>Border :Random -Polygone
II
2. Put the settings on the right positions. Play with the settings for a correct picture ( if it is slightly different, it doesn't matter )
 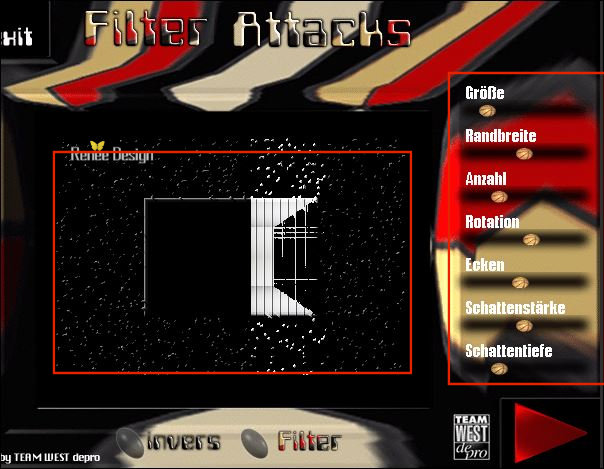
35. Layers-Properties-Set the Blend Mode to " Multiply " -Set the opacity of this layer to 71%
36. Open the
tube ‘’Waow_lune’’
- Edit - Copy- Activate your work -Edit - Paste as a new layer.
- Move Tool (M) move the tube on the top right corner
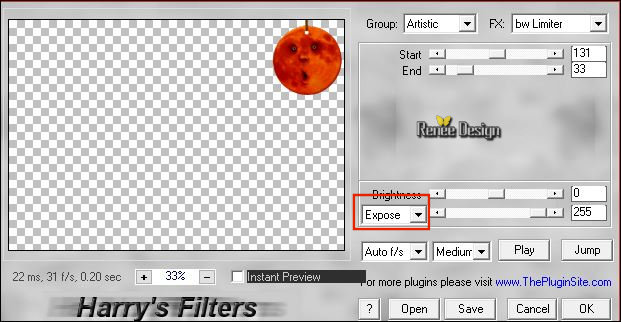
37.
Effects –Plugins – The plugin site - Harry’s Filters
3
38. Open the
tube ‘’ Texte_logo_waow’’
- Edit - Copy- Activate your work -Edit - Paste as a new layer. Move tool / place your tube on the top of your image
39. Layers-Properties-Set the Blend Mode to " Soft Light "
40. Open the tube ‘’ Waow_Image1’’
- Edit - Copy- Activate your work -Edit - Paste as a new layer.
41. Effects- Image Effects- Offset with these settings: H = - 47 and V = 8
42. Layers-New Raster Layer
43.
Selections –load/save selection –load selection from disc and select my selection: ‘Waow’’
44. Activate Flood Fill Tool and fill the selection with black (2 clicks)
Selections- Deselect All
- Activate in the layer palette Raster 1
45.
Selections –load/save selection –load selection from disc and select my selection: ‘Waow_1’’
46. Selections- Promote selection to layer
Selections- Deselect All
47.
Effects –Plugins - Unlimited - Photo Aging Kit – Film Grain 107
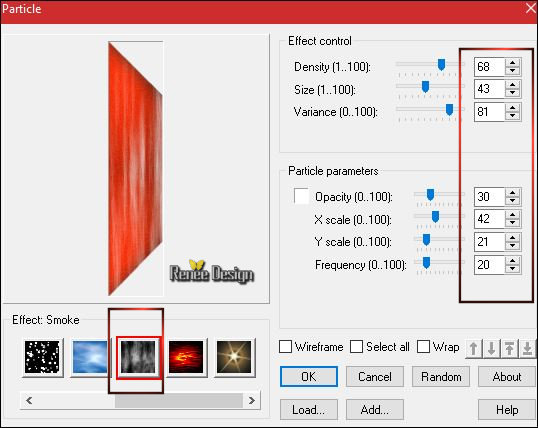
48.
Effects –Plugins – Ulead Effects Particle /
Smoke
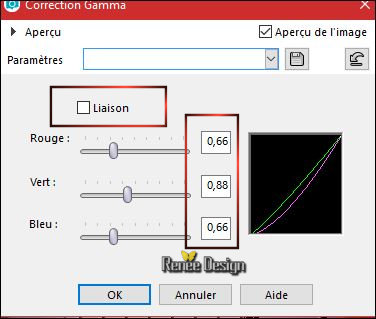
49. Gamma Correction (Shift + G)
50. Adjust- Blur- Gaussian Blur: Radius : 5%
51. Layers- Duplicate
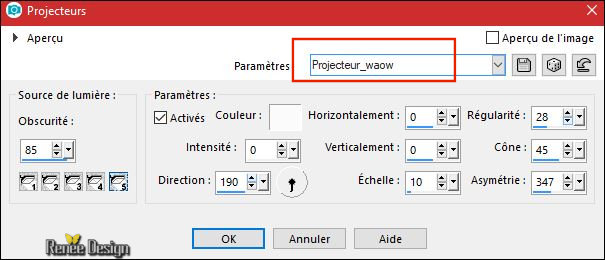
52. Effects- Illumination Effects- Lights and select my Preset
‘’Projecteur_waow’’
53.
Layers-Properties-Set the Blend Mode to " Overlay " -Set the Opacity of this layer to 83%
54. Layers- Duplicate
55. Effects
–Plugins- Unlimited - Alf's Border FX - Border Fade II
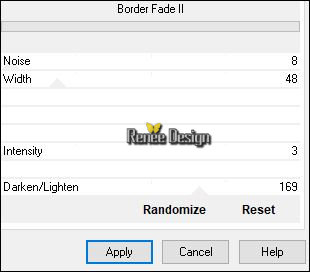
56. Layers-Properties-Set the Blend Mode to " Overlay "
57. Layers- Merge- Merge Down
58. Layers-Properties-Set the Blend Mode to " Multiply " -Set the Opacity of this layer to 57%
59.Open the tube ‘’Renee_waow_coquelicots’’
- Edit - Copy- Activate your work -Edit - Paste as a new layer.
- Move Tool (M) move the tube on the left
60. Layers- Merge- Merge Visible
61. Layers- New Raster Layer
62. Activate Flood Fill Tool and fill the layer with #ffffff
63. Layers- New Mask layer from image and select mask ‘’
Narah_mask_0715.jpg’’
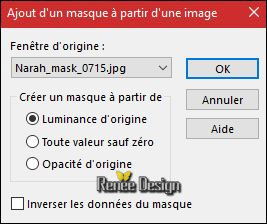
- Layers- Merge- Merge Group
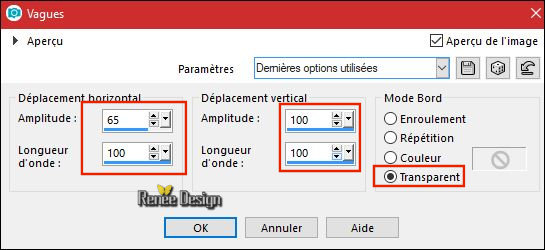
64. Effects- Distortion Effects- Wave use the settings below
65.Activate Selection Tool -Custom Selection (S) -Rectangle with these settings
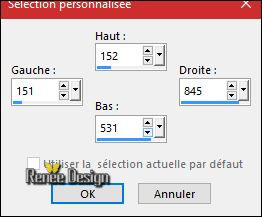
DELETE
Selections- Deselect All
66.Effects – 3D Effects –Drop Shadow with these settings 1/1/100/1 black
67. Open the
tube ‘’lune de guismo’’
- Edit - Copy- Activate your work -Edit - Paste as a new layer.
- Move Tool (M) move the tube on the left (see finished image )
68. Layers- Merge- Merge Visible
69. Image- Canvas Size use the settings below
70. With the Magic Wand select the left transparent part
71. Layers- New Raster Layer
72. Selections
- Modify – Expand 2 pixels
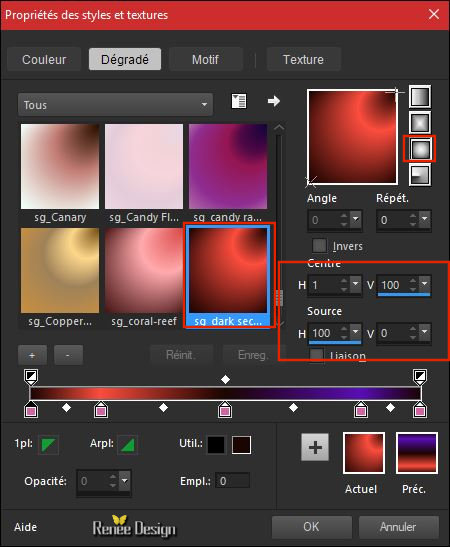
- Properties Foreground - Set your foreground material into gradient and select ‘’ sg_dark
secrets’’
73. Prepare a sunburst gradient configured like this.
74. Activate Flood Fill Tool fill the selection with the gradient
Selections- Deselect All
75. Open the tube ‘’Waow_mongolfieres''
– Edit - Copy- Activate your work -Edit - Paste as a new layer.
- Move Tool (M) move the tube on the top left corner(see finished image )
76. Layers-Properties-Set the Blend Mode to " Hard Light " -Set the Opacity of this layer to 85%
77. Open the
tube ‘’ Renee_Tubes_WAOW’’
- Edit - Copy- Activate your work -Edit - Paste as a new layer.
- Move Tool (M) move the tube on the bottom left
78. Image - Add borders-Symmetric checked 2 Pixels #d0cbc8
79. Image - Add borders-Symmetric checked 20 Pixels #ffffff
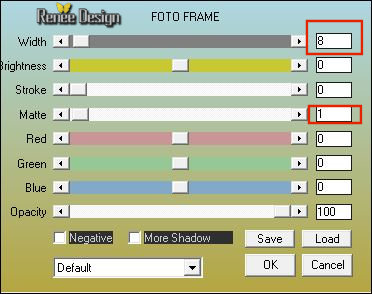
80. Effects –
Plugins – AAA Frame – Foto frame
81. Image
Resize to 1005 Pixels width.
Save as JPG
I hope you enjoyed this lesson
Renée
This lesson was written by Renée
22/08/2017
Edited and Update
2017
*
Any resemblance with an existing lesson is a coincidence
* Do not forget to thank the people who work with us and for us I have appointed the tubeurs and translators
Thanks
Renée
*
| 

 Translations


 If a plugin supplied appears with this icon it must necessarily be imported into Unlimited *