|
Let's start the lesson
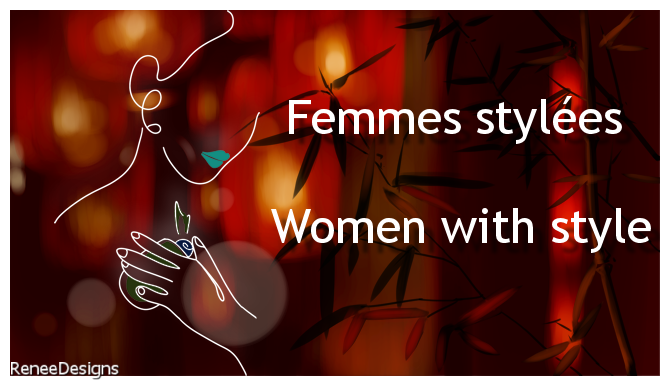
Femmes stylées -
Women with Style
- Preparation
-Material Properties: Set your Foreground color to color #101c2d = 1- Set your Background color to color # 959caf=2

- Prepare a Foreground/Background-Radial Gradient configured like this

1. File: Open a new transparent image in this size: 1100 x 750 Pixels
2. Activate Flood Fill Tool
 – Fille the layer with the gradient – Fille the layer with the gradient
3. Layers- New Raster Layer
4. Selections –load/save selection –load selection from disc and select my selection: ‘’Femmes stylees 1’’
- Color Palette – Inverting the colors
(If you click on the arrow in front of the gradient, you will reverse the gradient
Set your Foreground color to color #959caf=2-Set your Background color to color #101c2d =1
You have this now

5. Activate Flood Fill Tool
 –
Fill the selection with the Gradient –
Fill the selection with the Gradient

6. Effects – Plugins– L& K’s- Trouble use the settings below

7. Effects – Reflection Effects – Feedback/Stagger lower right and OK

8. Repeat: Effects – Reflection Effects – Feedback/Stagger lower left and OK
9. Layer Properties- Change the Blend Mode to " Overlay"
10. Effects – Edge Effects- Enhance
11. Layers- Duplicate
12. Effects-Distortion Effects- Wave use the settings below

12a Effects-Distortion Effects- Wave with the same settings
13. Layer Properties- Change the Blend Mode to " Overlay"- Lower the Opacity to 38%
- Color Palette - Set your Foregroundcolor to color #aa0512 = 3
-Prepare a Foreground/Background-Sunburst Gradient configured like this

- In the Layer Palette -Activate
Raster 1
14. Layers- New Raster Layer
15. Selections –load/save selection –load selection from disc and select my selection: ‘’Femmes stylees 2’’
16. Activate Flood Fill Tool
 –Fill the selection with the Gradient –Fill the selection with the Gradient

17. Effects –Plugins- Filter-
Unlimited 2.0–ICNET-Filters- Color Filters- Color
Temperature : 232
18. Effects –Plugins- Filter-
Unlimited 2.0- Willy- Draw Curtain with these settings: 120/130 /36
(attention here it is the Background color that gives effect)
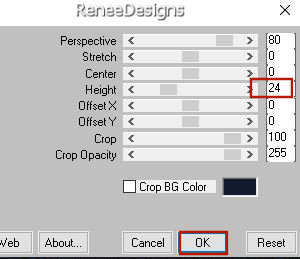
19. Effects - Plugins – Mura’s Meister- Perspective Tiling use the settings below

20.Activate Magic Wand – Tolerance 0 – Feather 20
Click in the upper empty area
21. Effects - Distortion Effects– Wave use the settings below

22. Effects– 3D-Effects – Drop Shadow with these settings: 3/4/85/25 Color black

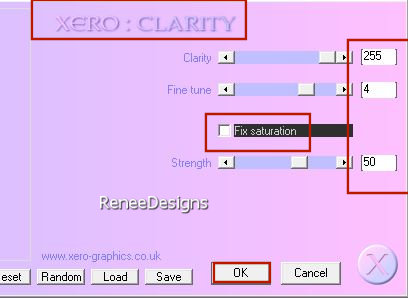
23. Effects – Plugins – Xero - Clarity use the settings below

24. Repeat – Activate Magic Wand with the same settings
- Click in the upper empty area
25. Effects-3D-Effects – Boutonnize use the settings below / Color white


- In the Layer Palette -Activate
Raster 1
26. Effects –Plugins- Filter-
Unlimited 2.0- Toadies – Weaver using the default settings: 59/48/222
27. Effects –Plugins-Filter-
Unlimited 2.0- ICNET-Filters - Tile & Mirror -Mirrored &
Scaled
28. Effects – Plugins– Xero – Clarity use the settings below

- Activate the top of the layer palette
( Do you have problems with the following operation (Balls and Bubbles) Then there is an image in the folder, paste it as a new layer and do not move.
29. Layers-New Raster Layer
30. Effects – Artistic Effects –Balls and Bubbles use the settings below

31. Layers-Properties-Change the Blend Mode to " Soft Light "
32. Layers- Duplicate
33. Layers- Merge- Merge Down
34. Layers-New Raster Layer
35. Selections –load/save selection –load selection from disc and select my selection: ‘’Femmes stylees 3’’
36. Color Palette- set the Foreground color to color black
Activate Flood Fill Tool
 –
Fill the selection with black –
Fill the selection with black
(This shape was drawn with the Pen Tool, you can draw one to your liking if desired)
37. Layers-New Raster Layer
38. Selections –load/save selection –load selection from disc and select my selection: ‘’Femmes stylees 4’’
39. Activate Flood Fill Tool
 –
Fill the selection in a color of your choice (Renée chose color 4 ) –
Fill the selection in a color of your choice (Renée chose color 4 )

- Material Properties: Set your Foreground color to color #aa0512 =3- Set your Background color to color # 959caf=2
40. Layers-New Raster Layer
41. Activate Selection Tool -Custom Selection (S) -Rectangle with these settings


42. Activate Flood Fill Tool
 –Fill the selection with the Foreground color=3 –Fill the selection with the Foreground color=3
43. Effects –Plugins- Filter-
Unlimited 2.0- Graphic Plus – Cross Shadow using the default settings
44. Effects – Plugins – Xero – Fritillary use the settings below

45. Effects – Edge Effects– Enhance
46. Effects – Plugins- AAA Frame – Foto Frame use the settings below


47.
Open the Tube’’ Femmes stylees
-Deco 1’’ -Edit - Copy- Activate your work -Edit - Paste as a new layer
- Move in the right place( see finished image)
48. Layers- Merge- Merge Down
49. Effects-3D-Effects – Drop Shadow -use the settings below-Color white -Shadow on new layer checked!!

- Stay on the Shadow Layer
50. Effects – Texture Effects- Blinds use the settings below / Color black

51. Layers- Duplicate
52. Image - Mirror - Mirror Horizontal (Image - Mirror in older versions of PSP)
-In the layer palette-activate the layer above =Raster 7
53. Layers- Duplicate
54. Image - Mirror - Mirror Horizontal (Image - Mirror in older versions of PSP)e
55. Layers- Merge- Merge Down and repeat 3 times
56. Layers-Properties-Change the Blend Mode of this layer to "Normal"
57. Effects - Plugins- Alien Skin EyeCandy 5 - Impact - Perspective
Shadow use the settings below/ Color= 2

Your work and Layer Palette look like this now-You should have this result

58. Layers- New Raster Layer
59. Selections –load/save selection –load selection from disc and select my selection: ‘’Femmes stylees 5’’
60. Color Palette-Set your Foreground color to color #ffffff=6 ( white)
Activate Flood Fill Tool
 –
Fill the selection with #ffffff –
Fill the selection with #ffffff

61.
Open the Tube ‘’Femmes
stylees -Deco 2’’-Edit - Copy- Activate your work -Edit - Paste as a new layer
62. Pick Tool: (K) on your keyboard -Enter these parameters on the toolbar
 183/ 242
Press ( M ) to close the Pick Tool
63. Layers- New Raster Layer
64. Activate Brush Tool - Select the file- ‘’Phenomenal –Woman’’

- Stamp the Brush with a color to your liking–Place to your liking
65. Layers- New Raster Layer
66. Selections –load/save selection –load selection from disc and select my selection: ‘’Femmes stylees 6’’
67. Color Palette- Set the Foreground color to color black
Activate Flood Fill Tool
 –
Fill the selection with color black –
Fill the selection with color black
68. Effects - Plugins- Alien Skin EyeCandy 5 - Impact - Glass –-Tab-Settings-User Settings and select my file-
Preset : ’’Femmes stylees-Glass’’

69. Effects -3D Effects-Drop Shadow with these settings: -16 /-2 /45 /32 Color black
Repeat: Effects -3D Effects-Drop Shadow with the same settings- Color white
70. Layers- New Raster Layer
71. Selections –load/save selection –load selection from disc and select my selection: ‘’Femmes stylees 7’’
72. Color Palette- Set the Foreground color to color #ffffff (white)
Activate Flood Fill Tool
 –
Fill the selection with color #ffffff –
Fill the selection with color #ffffff

- In the layer palette- Activate Copy of Raster 2
73. Open the Tube ‘’Renee-Tubes-Femme
en Rose’’ -Edit - Copy- Activate your work -Edit - Paste as a new layer
74. Objects –
Align- Right
75. Layers-Properties-Change the Blend Mode of this layer to "Hard Light- Lower the Opacity to 20%
- Activate the top of the layer palette
76. Open the Tube ‘’texte –Femme png’’ -Edit - Copy- Activate your work -Edit - Paste as a new layer/Or write your own title
- Move at your choice
77. Open a tube of your own choice (Renée has different models) and paste as a new layer on your work- Image - Resize if necessary- Move at your choice
78. Effects - 3D Effects - Drop Shadow at your choice.(Renée chose-Filter Alien Skin Eye Candy Impact 5 - Drop Shadow Blurry default settings)
79. Layers- Merge- Merge- Visible
80. Edit - Copy !!
81. Open the tube ‘’Cadre’’ in your Psp
82. Select the inside with the Magic Wand
83. Edit - Paste Into Selection (Image is still in your PSP memory)

84. Paste the author's watermark on your work and your own watermark
85.Layers- Merge- Merge All
86. Image - Resize with 90 %-Resize all layers checked.
Save as JPG
That's it - Thank you / I hope you enjoyed this lesson
Renée
This lesson was written by Renée
10/02/2022
Edited and Update
2022
*
*
Any resemblance with an existing lesson is a coincidence
* Do not forget to thank the people who work with us and for us -I have appointed the tubeurs and translators
Thanks
|


 Translations


