|
Let's start the lesson.
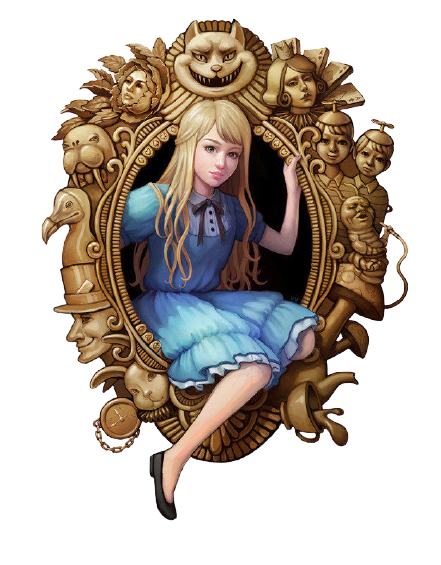
Alice in Wonderland
- Preparation
- Material Properties: Set your foreground color to color #ffffff =1 – Set your background color to color #0b1a09=2
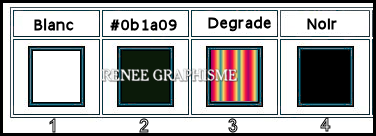
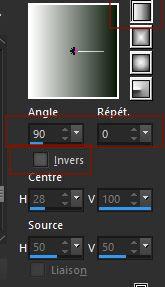
- Set your Foregroundcolor to foreground-background Linear gradient configured like this
1. File: Open a new transparent Image of 1005 x 685 Pixels
2. Activate Flood Fill Tool
 -
Fill the layer with the gradient -
Fill the layer with the gradient
3. Effects –
Unlimited 2.0 – Render- Clouds (fore-/background color)
65/128
4. Effects –Plugins-
ICNET-Filters – Distorsion Filters – Smelter 2 Setting to 65
5. Adjust- Blur- Gaussian Blur: Radius 32.
6. Effects –Plugins-
ICNET-Filters – Distorsion Filters- Warp (vertical) with these settings:
30/84/77
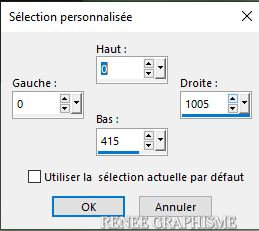
7. Activate Selection Tool -Custom Selection (S) -Rectangle with these settings

8. Selections- Promote selection to Layer
Selections- Deselect All
9. Effects –Plugins-
Unlimited 2.0 -Two Moon – Cut Glass 1/33
10. Layers- Duplicate
11. Image - Mirror - Mirror Horizontal (Image - Mirror in older versions of PSP)
12. Layers-Properties-Change the Blend Mode to " Overlay "
13. Layers- Merge- Merge Down
14. Effects –Plugins-
Unlimited 2.0-Two Moon – Cut Glass 2/33
15. Layers- Duplicate
16. Image - Mirror - Mirror Horizontal (Image - Mirror in older versions of PSP)
17. Layers-Properties-Change the Blend Mode to " Overlay "
18. Layers- Merge- Merge Down
19. Effects –Plugins-
Unlimited 2. 0 – Simple – Blintz
20. Layers- Duplicate
21. Image - Mirror - Mirror Horizontal (Image - Mirror in older versions of PSP)
22. Layers-Properties-Lower the Opacity to 50%
23. Layers- Merge- Merge Down
24. Effects – 3 D Effects – Drop Shadow with these settings: 0/0/82/57 Color Black
25. Layers- New Raster Layer
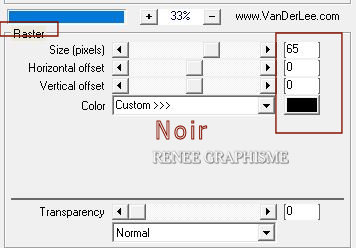
26. Effects - Plugins- Vanderlee Unplugged X – Raster use the settings below/ Color Black
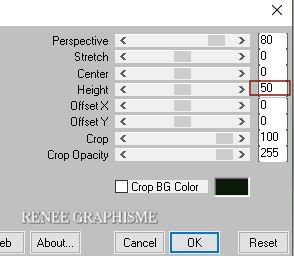
27. Effects – Plugins – Mura’s Meister – Perspective Tiling use the settings below
28.Layers- Arrange- Move Down
29. Layers- Duplicate
30. Effects – Plugins – EyeCandy 4000- Motion Trail use the settings below

31. Objects – Align
– Top
32. Layers- Arrange- Bring to Top
33. Layers-Properties-Change the Blend Mode to " Hard Light" and Lower the Opacity to 69%
34.
Selections –load/save selection –load selection from disc and select my selection: ‘’Wonderland-1’’
DELETE

Selections- Deselect All
35.
Open the tube ‘’Renee_Wonderland-Alice-Image1’’ -Edit - Copy- Activate your work -Edit - Paste as a new layer
36. Objects – Align
– Top
37. Layers-Properties-Change the Blend Mode to " Hard Light " and Lower the Opacity to 69%
Layer-Palette- Activate the promoted selection layer
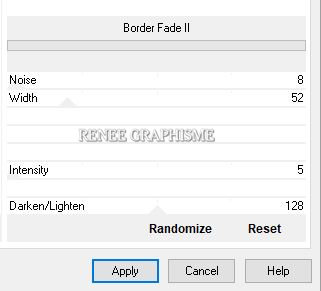
38. Effects –Plugins-
Unlimited 2.0 -Alf's Border FX- Border fade II use the settings below
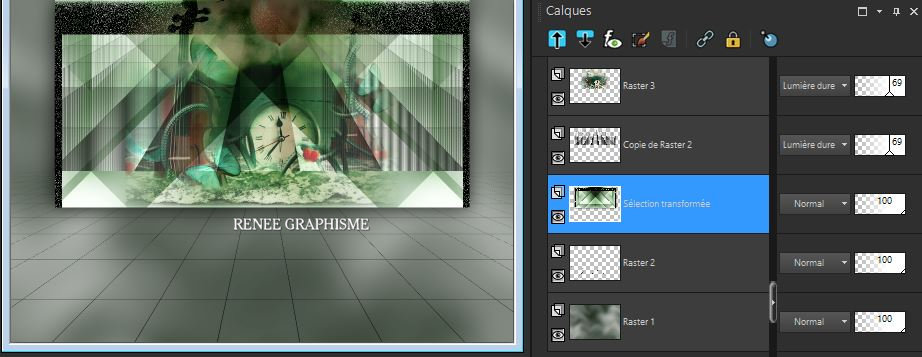
- Your work and Layer Palette look like this now-You should have this result
- Activate the second layer from the bottom
=Raster 2
39. Layers- New Raster Layer
40. Selections –load/save selection –load selection from disc and select my selection:
‘’Wonderland-2’’
41. Activate Flood Fill Tool
–
Fill the selection with the gradient
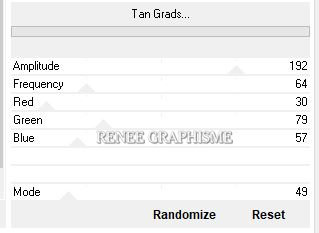
42. Effects -Plugins-
Unlimited 2.0 - Alf's Power Sines – Tan Grads use the settings below
Selections- Deselect All
43. Effects – 3 D Effects – Drop Shadow with these settings : 13/ 2 /94/ 68 Color Black
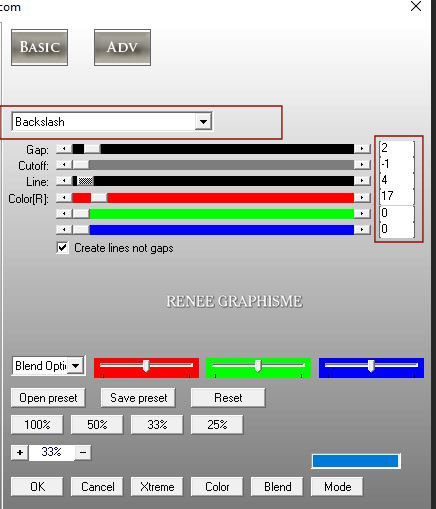
44. Effects – Plugins - AP[Lines] –
Lines Silverling use the settings below
- Activate the top of the layer palette
45. Layers- New Raster Layer
46.Selections –load/save selection –load selection from disc and select my selection: ‘’Wonderland-3’’
- Open the tube
‘’Renee_Wonderland-Alice-Image2’’ in your Psp
47. Edit - Copy- Activate your work -Edit - Paste into Selection
Selections- Deselect All
48. Effects – 3 D Effects – Drop Shadow with these settings : 1/2/100/0 Color Black
49. Open the tube ‘’
’Renee_Wonderland-Alice-Image 3’’ -Edit - Copy- Activate your work -Edit - Paste as a new layer
50. Pick Tool (K) Enter these parameters for the X: and Y: positions on the Toolbar
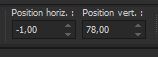 -
1 / 78 -
1 / 78
-Press ( M ) to close the Pick Tool
51. Layers- Arrange- Move Down
52.
Open the tube ‘’ ’Renee_Wonderland-Alice-Image 4’’ -Edit - Copy- Activate your work -Edit - Paste as a new layer
(Or choose your own tube)
- Pick Tool (K) Enter these parameters for the X: and Y: positions on the Toolbar
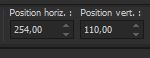 254/110 254/110
53. Layers- New Raster Layer
54.Selections –load/save selection –load selection from disc and select my selection: ‘’Wonderland-4’’
55. Color Palette- Set your Foreground color to color #ffffff=
Activate Flood Fill Tool
–
Fill the selection with #ffffff=1
Selections- Deselect All
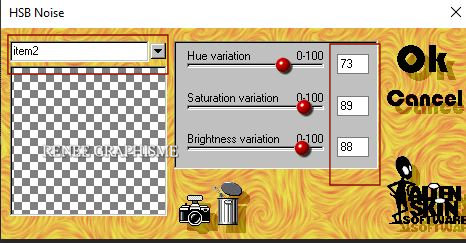
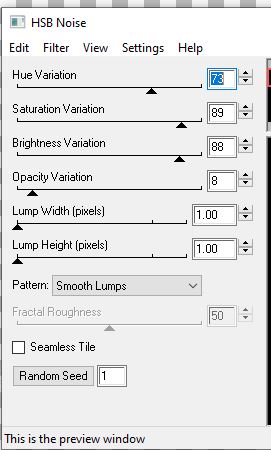
55. Effects- Plugins – Alien skin – HSB Noise use the settings below Or-Effects- Plugins EyeCandy 4000-HSB Noise with these settings
56. Layers-Properties-Change the Blend Mode to " Hard Light "
-
To replace the top of the layer-palette
57. Open the tube ‘’ Texte-Alice’’ -Edit - Copy- Activate your work -Edit - Paste as a new layer
Move Tool-Place the text in a nice place
58. Edit- Copy Special-Copy Merged - Paste as a new Layer
59. Effects –Plugins- ICNETFilters - Image Enhancement- Histogram
Stretching with these settings: 150/202/133
60. Layers- New Raster Layer
61. Activate Flood Fill Tool
–
Fill the layer with the Background color = 2
62. Effects -Plugins- Unlimited 2.0 - Tramage- Cyber Mosh with these settings:
150/45/176/11
63.Selections –load/save selection –load selection from disc and select my selection: ‘’Wonderland-5’’
DELETE
SELECTIONS- INVERT
64. Effects –Plugins- Unlimited 2.0 -Filter Factory Gallery C -
Border Noisy Fade III with these settings: 124/130/0
65. Effects –Plugins - Alien skin Eyecandy5
Impact /Glass -Tab Settings/User settings select my – Preset : Renee_Wonderland-Glass
Selections- Deselect All
66. Layers- Merge- Merge Down
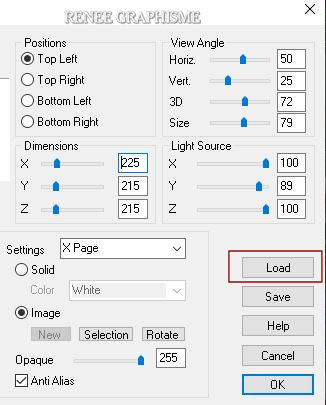
67. Effects – Plugins – Vizros – Box –Preset :
Renee_wonderland- Vizros
Click " Load " and select my Preset ’’
Renee_wonderland- Vizros’’ in your file (the settings will install )
Or manual settings as shown in the example below
68. Activate the Magic Wand with these settings

-
Select the white part
-
Selections – Modify – Expand with 2 pixels
DELETE
Selections- Deselect All
69. Image - Resize- 78 % - Resize all layers NOT checked.
-
Move Tool - place the tube on the bottom right side of your image (see finished image)
70. Open the tube ‘’ Renee_Wonderland-Alice-Image5’’ or Image 6 at your choise - Edit - Copy- Activate your work -Edit - Paste as a new layer
Move Tool-
Place the tube on the cube ( see finished Image )
-
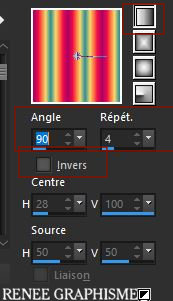
Color Palette-Set your foreground to gradient and select ‘’akgradient13’’ –
Set your Foreground to "Linear" gradient configured like this
71. Layers- New Raster Layer
72.Selections –load/save selection –load selection from disc and select my selection: ‘’Wonderland-6’’
73. Activate Flood Fill Tool
–
Opacity 50% – Fill selection with the gradient
Selections- Deselect All
74. Effects – 3 D Effects – Drop Shadow with these settings: 2/2/100/2 Color Black
75. Layers- New Raster Layer
76. Color-Palette-Set the foreground back to color #ffffff=1
Activate Flood Fill Tool – Opacity
100% – Fill the layer with the Foreground color =1
77. Effects –Plugins Unlimited 2.0- Toadies - 3 D Checkers with these settings:
5/129/103
78. Image - Resize 58 % - Resize all layers NOT checked.
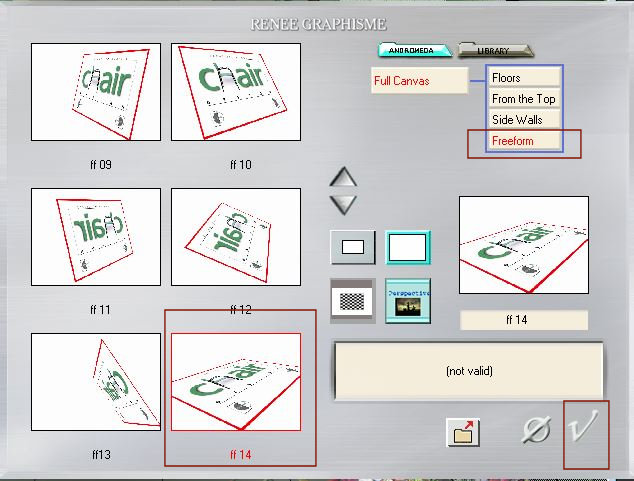
79. Effects – Plugins - Andromeda – Perspective
- Freeform / ff14
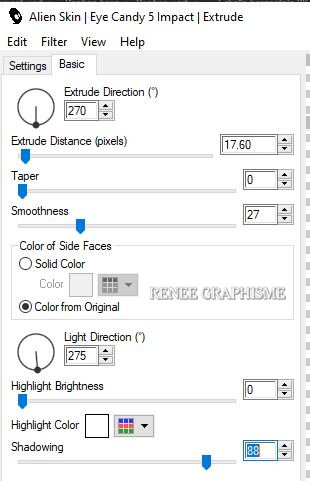
80. Effects – Plugins - Alien skin EyeCandy 5
Impact - Extrude use the settings below
81. Activate Pick Tool (K)
Default settings and select my file
‘’ Preset_Pick_Wonderland-alice perspective’’
-Click on the preset and OK
-Press ( M ) to close the Pick Tool
82.We are going to decorate
Open the tube ‘’
Renee_Wonderland-Alice-Image final ‘’or others to your liking
I have a folder with tubes, you can use (some tube levels to be closed by the weight)
Edit- Copy-Edit Paste as a new layer and move at your own choice
83. Image - Add borders-Symmetric checked- 1 Pixel Color Black
84.Edit- Copy !!
85. Open the tube " cadre " in your PSP
86. Edit - Paste as a new layer (Image is still in your PSP memory)
Activate Text Tool -With a font of your choice write your title
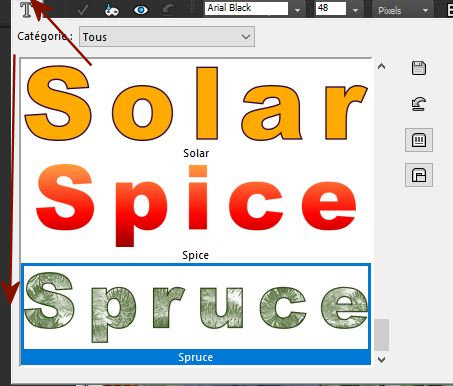
Or click the arrow of the text tool (preset) to open the menu and choose a writing effect ( Renée choose
SPRUCE)
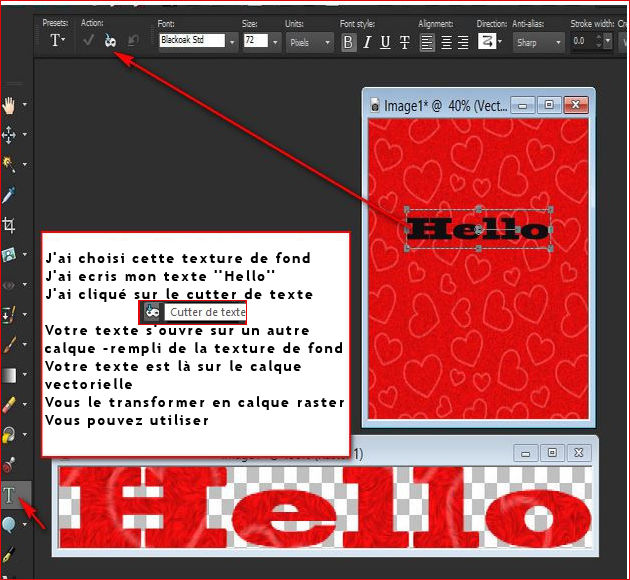
If you don't have this in PSP
Then do the following:
Take a new transparent image
Choose a nice pattern and open it in your PSP
Fill the layer with this pattern
Take your Text Tool
Choose a nice font and write your text
Now click on Text Cutter (as shown in the example below)
The text with the pattern is now in your PSP
Then copy and paste it as a new layer on you working area
Finished
87. Open the my copyright- Edit-Copy-Edit - Paste as a new layer and move
Layers- Merge- Merge All( flatten)
88. Image - Resize - 90%-Resize all layers checked.
-
Save as JPG
I hope you enjoyed this lesson
Renée
This lesson was written by Renée
11/11/2020
Edited and Update
2020
*
Any resemblance with an existing lesson is a coincidence *
Do not forget to thank the people who work with us and for us
I have appointed the tubeurs and translators
Thanks
*
|

 Translations