|
Let's begin .
1. Activate this file: image ''fond_macabre_medusa."Promote Background layer"
2.Layers-Duplicate
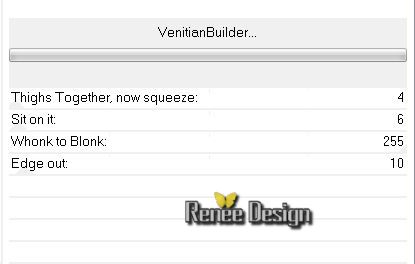
3. Effects -Plugins Unlimited Two Moon /VenitianBuilder
4.
Effects-Plugins Simple -Blintz
5.
Effects-Plugins Simple -Pizza Slice Mirror
6.
Selections - load/save selection - load selection from disk and choose ''macabre_medusa_1"
7.
Selections-Promote selection to Layer
8.
Selections - Deselect all
9. Effects -Plugins Simple - Top left Mirror
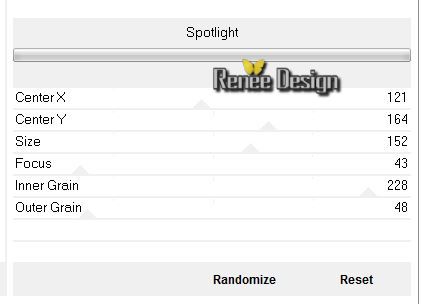
10.Effects -Plugins Unlimited Factory Gallery A - Spotlight
11.Effects- Edge Effects- Enhance More
Layer Palette: Set the Blend mode to"Dodge"
12.
Layer-Palette: Activate the layer underneath (Copie de Raster
1)
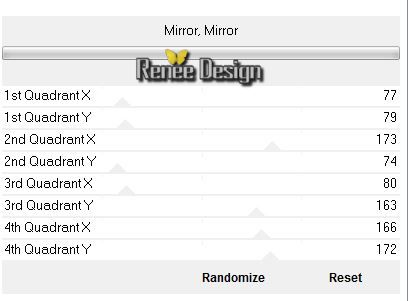
13. Effects -Plugins Unlimited Factory Gallery A / Mirror Mirror
14. Effects -Plugins Unlimited Factory Gallery A / Marble Madness
One default 26/0/0/0
15.
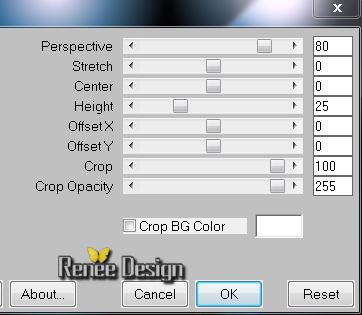
Effects -Plugins Mura's Meister - Perpespective tilling
17.
Effects- Geometrie Effects -Perspective- Horizontal
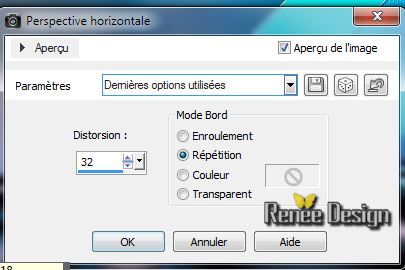
Layer Palette: Be placed on the bottom layer= raster 1
18.
Edit- Copy Special /Copy Merged
Aktivate the top of the Layers palette
Layers-New raster Layer
19.Selections-Custom Selection with these settings
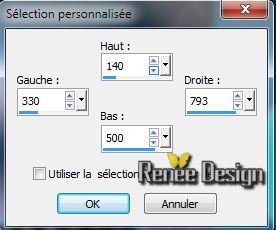
20.Edit/paste- Into Selection
21.
Selections - Deselect all
22.
Effects -Plugins Unlimited Toadies - weaver 193/43/0
23.
Effects -Distortion Effects -Warp
24.
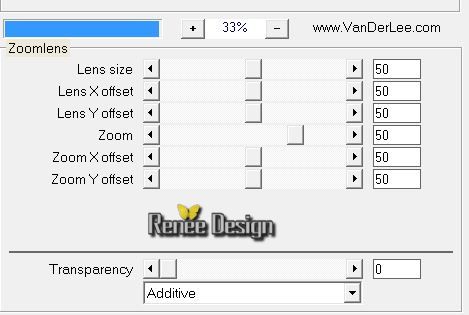
Effects-Plugins Vanderlee -Unppluged X/ Zoomlens
25.
Activate the tube ''medusa_2'' - Edit/copy-Edit paste as a new layer (do not move!!!))
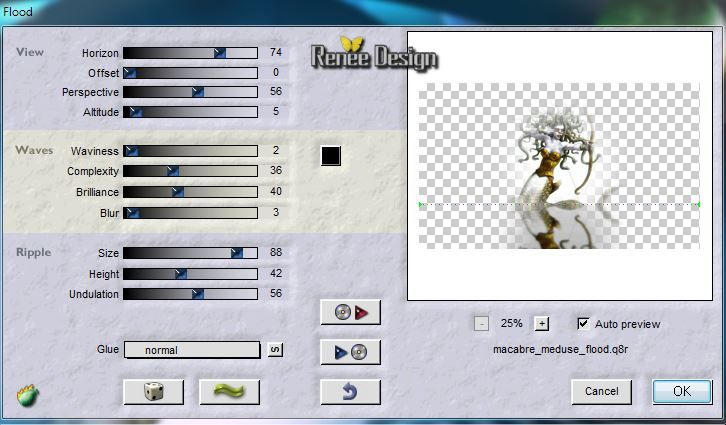
26. Effects -Plugins Flaming Pear Flood/ preset
"macabre_medusa_flood''
27.
Activate the tube'' medusa_lune'' /Edit/copy-Edit paste as a new layer
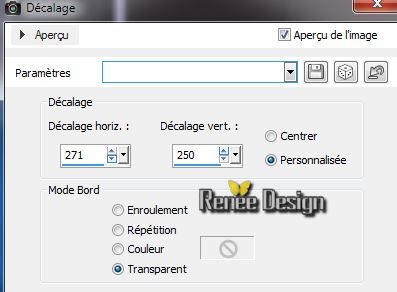
28.
Effects - Image Effects - Offset
Layer Palette: Set the Blend mode to "Hard Light"
29.
Layers-New raster Layer
30.Selections-Custom Selection with these settings

31.
Flood fill tool: Set the opacity of the colors at 70 and with the foreground color: #203b42
Flood Fill Tool: fill selection with the Foreground color
32.
Layers-New raster Layer
33.
Activate the tube'' 2251_TRP-12''/ Edit/copy-Edit paste Into selection. Lower the opacity 81%
34.
Layers-Merge -Merge Down
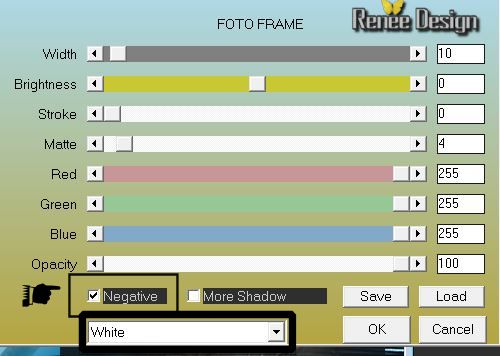
35.
Effects- Plugins AAA -FRame Foto Frame
36.
Selections - Deselect all
37. Effects -Plugins EyeCandy 5 Impact - Glass/ Preset
''macabre_medusa_glass''
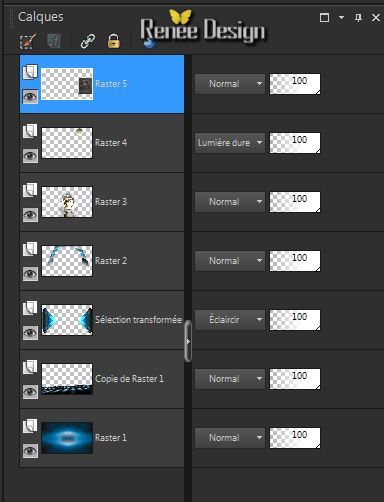
Your Layer Palette looks like this now
38.
Layer Palette: Be placed on the layer (copie de Raster 1)
39.
Layers-New raster Layer
40.
Material Properties: Foreground color to color white -
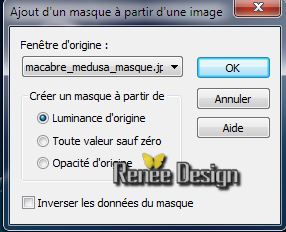
Flood fill tool: Set the opacity of the colors at 70% - Fill the layer with the FG-Color
41.Layers- New Maske Layer from Image and choose mask:''macabre_meisa_masque''
42.
Layers- Merge- Merge Group
Aktivate the top of the Layers palette
43.
Activate the tube "medusa_nuages'' /Edit/copy-Edit paste as a new layer
Aktivate
the Pick Tool (K)place like this
44.
Layer Palette: Set the Blend mode to"Hard Light "Lower the Opacity 65 %
45.
Layers-New raster Layer
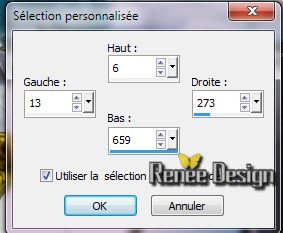
46.Selections-Custom Selection with these settings
47.
Effects - 3D Effects - Drop Shadow 1/1/100/38 black
48.
Selections-Select none
49
. Layers-Duplicate
50.
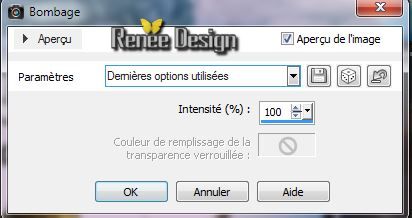
Effects -Distortion Effects - Pinch
51.
Layers-Duplicate-Refaire Effects- Distortion Effects - Pinch
(the same setting)
52.Layers-Merge-Merge Down and repeat( 3 layers edges together)
53.
Activate the tube ''medusa_texte_incliné'' - Edit/copy-Edit paste as a new layer and move to the left -
Layer Palette: Set the Blend mode to"Overlay"
54.
Aktivate the Preset Shape Tool: Draw two arrows.These two arrows :
Effects-Plugins EyeCandy 5 Impact - Glass/ Preset
''macabre_medusa_glass''
Or take them out of the folder and open.''medusa_fleches'' / Edit/copy-Edit paste as a new layer and move
(
White is in Normal Mode -Blue is in Hard light Mode)
55.
Layers-New raster Layer
56.
Selections - load/save selection - load selection from disk and choose
''macabre-medusa_2''
Material Properties: Foreground to gradient and choose: dégradé
''fairkiss_gardient.jgd'' with these settings
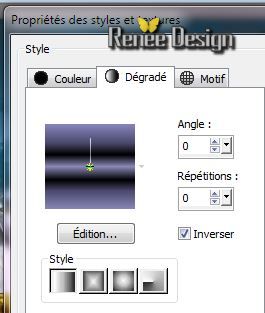 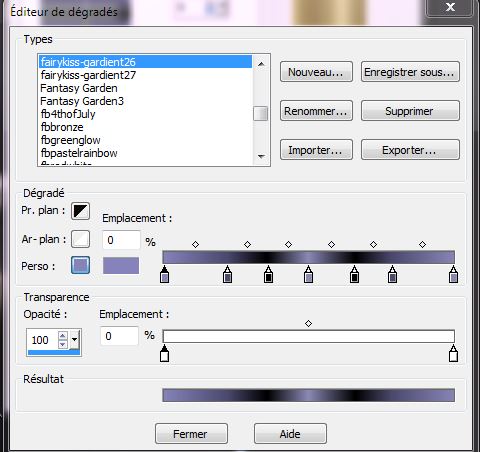
Flood Fill Tool: fill the selection with this linear gradient- click 2 times in the selection
57.
Selections - Deselect all
58
. Layers-Duplicate
59.
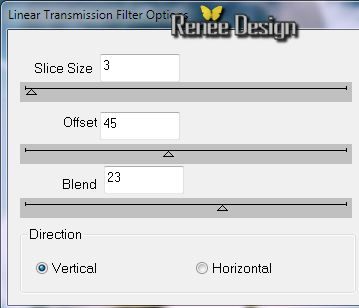
Effects -Plugins DBS Flux - Linear Transmision
60.
Effects - Edge Effects- Enhance
61.
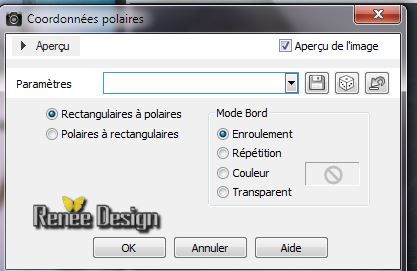
Effects - Distortion Effects - Polar Coordinates-Rectangular to Polar-Wrap
62.
Effects - 3D Effects-Drop Shadow: 1/1/10/40 black
63.
Effects-Plugins Graphic Plus - Horizontal Mirror
128/255
64.
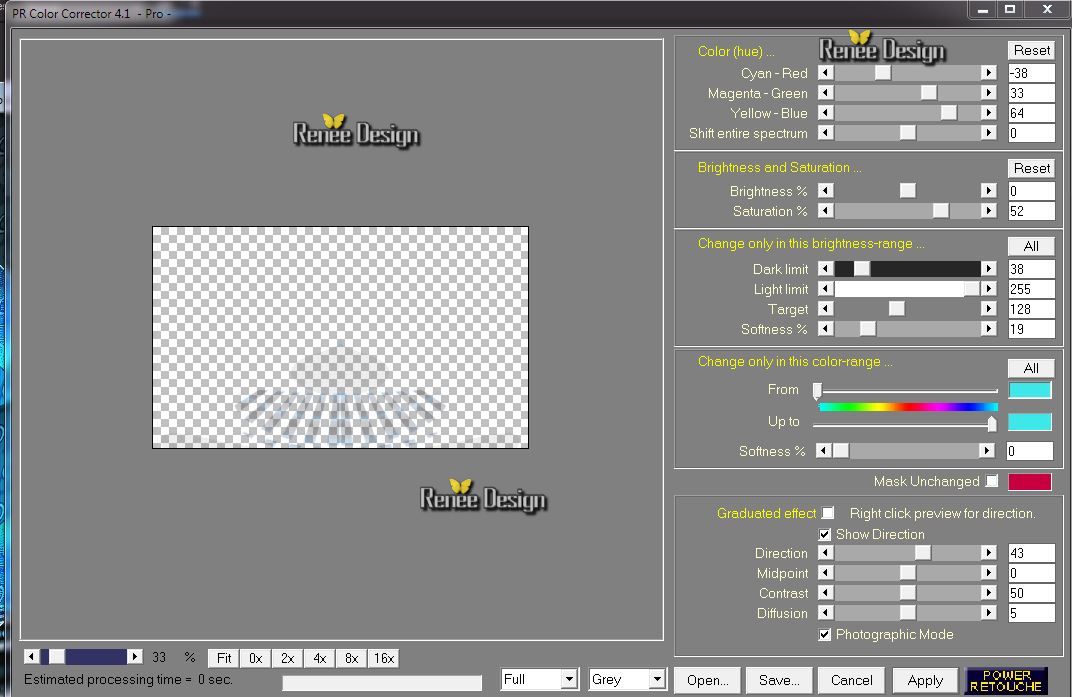
Effects-Plugins Power retouche /PR Color Corrector 4.1
You can also work with :Effects-Plugins Final Impact
Hotshot for the same effect
65.
Layers- Merge - Merge Visible
66.
Edit-Copy!!
67.
Image - Add Borders - Symmetric 1 pixels black
68.
Image - Add Borders -asymmetric white
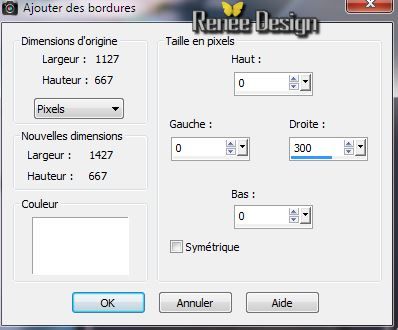
69.
Activate your Magic wand:Select the white border with 300 pixels
70.
Layers-New raster Layer
71.
Edit paste into selection (the image in memory)
72.
Adjust-Blur-Gaussian Blur: Radius: 65
73.
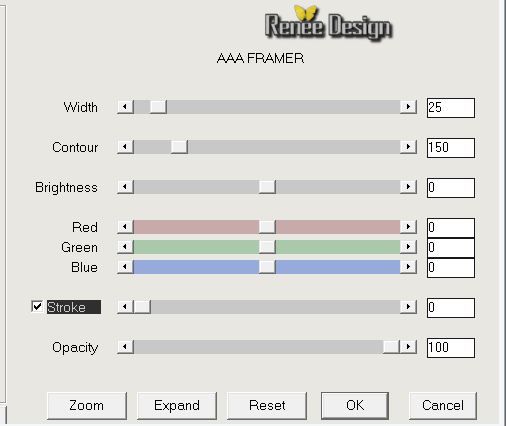
Effects-Plugins AAA Filters - AAA Framer
Selections-Select none
74.Layers- Merge-Merge Down
75.
With the magic wand select the white border
76. Effects -Plugins Eyecandy 5 Impact - Bevel / Preset
''medusa_bevel_1''
77. Selections-Select none
78. Layers-New raster Layer
79.
Selections - load/save selection - load selection from disk and choose
''macabre_medusa_3'' /Flood Fill Tool: fill the selection with the gradient
80.
Effects -Plugins Eyecandy 5 Impact - Bevel (the same setting
)
Selections-Select none
81.
Effects - Geometric Effects-Perspective -Horizontal
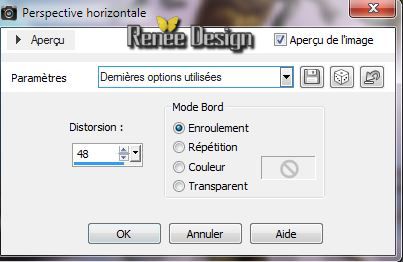
Layer Palette: Set the Blend Mode to : "Difference"
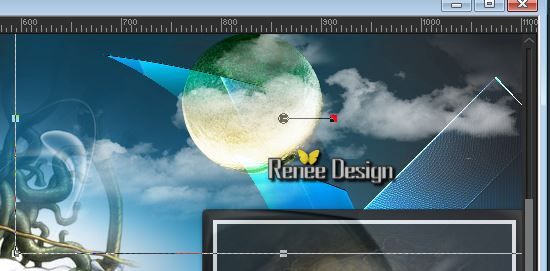
82.
Activate the tube ''LIz-Medusa3 voor Renee'' (Activate the selected part)/ Edit/copy- Edit paste as new Image !!
/Image
Resize 65 % /Image Mirror / Edit/copy-Edit paste as a new layer on your working area
Move to the Right
(see Example)
83.
Layers-Arrange-Move Down
84.
Layers- Merge - Merge Visible
85.
Image - Add Borders - Symmetric 2 pixels #0f181d
86.
Image Resize 1025 pixels Width
87.
Selections-Select All
87.
Image - Add Borders - Symmetric 35 pixels white
88.
Effects- 3D Effects -Drop Shadow: 1/1/100/35 black
89.
Selections- Invert
90.
Material Properties: Foreground color to color : white Background color to color : #0f181d
Prepare a linear gradient 0/1 invert unchecked
91.
Layers-New raster Layer /Flood Fill Tool: Fill the selection with the gradient
92.
Selections-Select none
93. Effects-Plugins Penta com /Color Dot 90/2/255/255/255
94. Effects-Plugins Toadies What are you 13/0
95.
Effects-Edge Effects- Enhance More
96.
Effet - 3D Effects-Drop Shadow: 7/5/34/0 en noir
97.
Effects -Plugins Graphic Plus -Horizontal Mirror 134/0
98.
Image - Add Borders - Symmetric 2 pixels BG-Color
99.
Image - Add Borders - Symmetric 25 pixels White
100.
Image - Add Borders - Symmetric 2 pixels BG-Color
101.
Activate the tube ''medusa_texte_2'' Edit/copy-Edit paste as a new layer
Layer Palette: Set the Blend Mode to "
Luminance" and the opacity to 63%
102.
Layers - Merge - Merge all layers (flatten)
I hope you enjoyed this lesson
Renée
This lesson was written by Renée the 7/03/0214
Created 16/03/2014
*
Any resemblance with an existing lesson is merely a coincidence
*
Don't forget to thank the people who work for us and with us. I named the tubeurs - Testers and the translators.
Thanks Renée | 


 Translations


