|
New
Translations here
Call me..... Please
*
Let's start the lesson. 1. Open the image fond ''renee_call_me_fond1'' 2. Layers- Duplicate 3. Image Resize 85% (Resize all the layers not checked) 4.Effects- 3D Effects- Drop Shadow with these settings
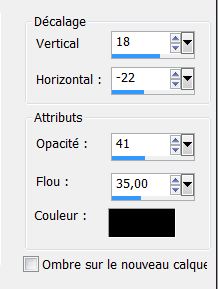
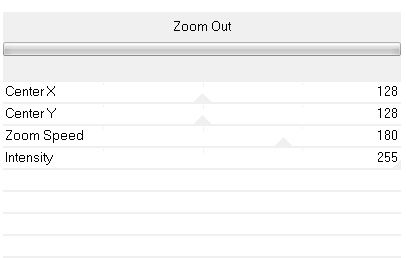
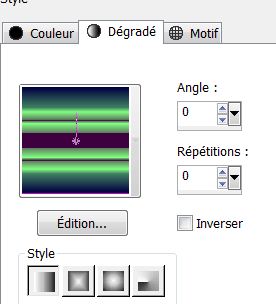
5.Repeat : Effects- 3D Effects- Drop Shadow H= -18 and V= 22 6. Material of the foreground:foregroundcolor to color: #aade90 7. Effects-Plugins -Unlimited- Factory Gallery A – Zoom out
8. Effects- Edge Effects-Enhance 9. Layers- Duplicate 10. Effects-Plugins-Filter -Unlimited - Factory Gallery A/ Marble Madness One 26/0/0/0 11. Effects-Plugins – Simple – Diamonds - In the Layerpalette, set Blend Mode to Exclusion 12. Layers- Arrange- Move Down - Layer Palette look like this now:
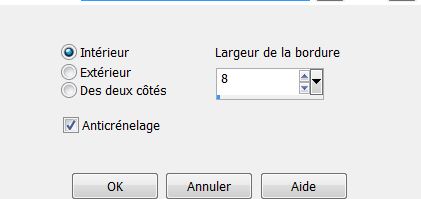
- Activate the top of the Layer-Palette 13. Layers - New raster layer 14. Selections - load/save selection - load selection from disk and choose my selection: ''renee-call-me-selection1'' 15. Activate Flood Fill Tool and fill the selection with this color #aade90 16. Selections -Select All -Selection Modify -Select-Selection Borders with these settings /Inside
17. Activate Flood Fill Tool and fill the selection with this color #555729 18. Effects- Plugins -EyeCandy5 -Impact –Glass -Tab- Settings/User Settings and choose my preset ''renee-call-me-glass1'' 19. Selections-Deselect All - Layer Palette: activate layer(-Copy 2 Merged layer) 20. Selection Tool ( S ) Custom selection use settings below
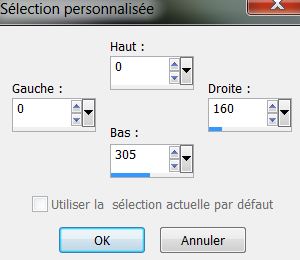
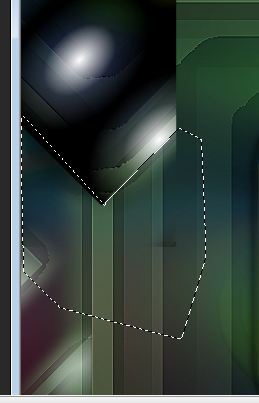
21. Selections- Promote selection to layer 22. Selections-Deselect All 23. Layers- Arrange-Bring to Top 24. Freehand Selection-Point to Point -select this part see excample / Hit the Delete Key of your Keyboard
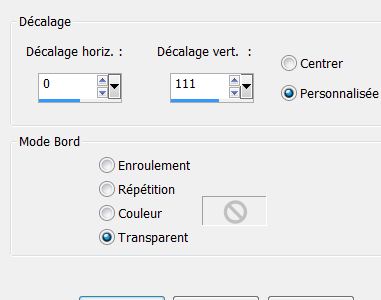
25. Selections-Deselect All 26. Effects- Geometric Effects - Circle – Repeats checked 27. Effects - Images Effects - Offset with these settings
28. Layers- Duplicate - Image Mirror 29. Layers- Merge- Merge Down - In the Layerpalette, set Blend Mode to Dodge 30. Layers- New Raster layer 31. Selections - load/save selection - load selection from disk and choose ''renee-call-me-selection2'' 32. Material of the foreground: foreground to Gradient and choose: ''chriscircumstance'' Put your foreground into a linear gradient with settings below.
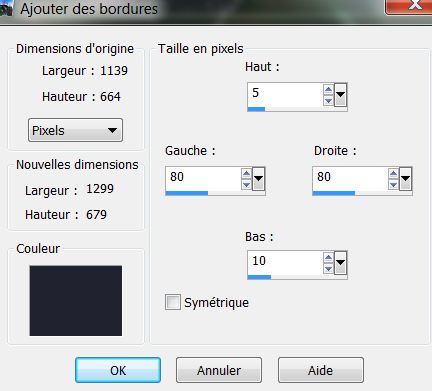
33. Activate Flood Fill Tool and fill the selection with the gradient 34. Effects- Plugins - EyeCandy 5-Impact -Tab-Settings/User Settings and choose my preset ''renee-call-me-glass1'' 35. Open the tube ''1293006820_femmes_nikita'' Edit/copy-Edit paste as a new layer.(do not move it is in the right place) 36. Open the tube ''renee-call-me-effet2'' Edit/copy-Edit paste as a new layer.(do not move it is in the right place) 37. Layer Palette - Double click on this layer and set the Blendmode to "Dissolve " and set the layer opacity of this layer to 12% 38. Layers- Merge Merge Visible 39. Image - Add borders-Symmetric checked: 2 pixels color white 40. Image - Add borders-Asymmetric with these settings-Color #212331
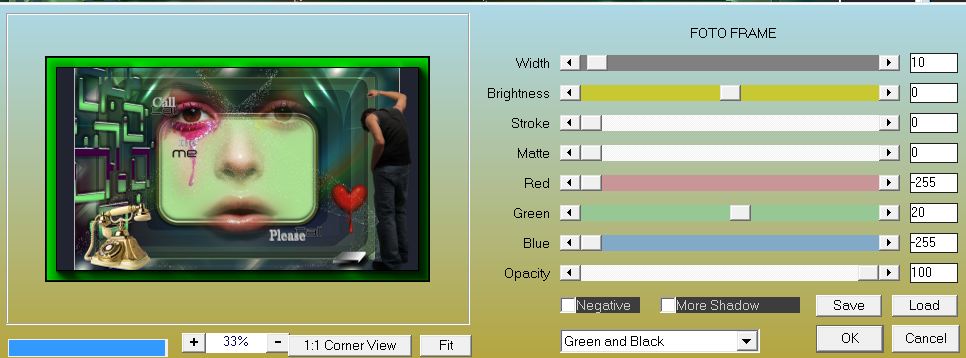
41. Promote Background layer =Raster 1 42. Open the tube ''phone_009'' / Image Resize 80% Edit/copy-Edit paste as a new layer. Move to the left corner 43. Effects- Plugins - EyeCandy5- Impact -Perspective shadow -Tab -Settings -Preset ''reflect in front short'' 44. Open the tube ''texte call me renee'' Edit/copy-Edit paste as a new layer.(do not move it is in the right place) 45. Open the tube ''pspcybertubes-blogspot-com-homens'' / Image Resize 80 % Edit / Copy -Edit - Paste as new layer on your working area.With your move tool move to the right side 46. Open the tube ''coeur'' Copy -Edit - Paste as new layer on your working area . In the Layerpalette, set Blend Mode to Hard Light and set the layer opacity of this layer to 65% 47. Open the tube ''renee-call-me-livret" Edit/Copy -Edit - Paste as new layer on your working aera 48. Image - Add borders-Symmetric checked: 5 pixels color white 49. Effects- Plugins -AAA Frame - Foto Frame use settings below
*
I am part of Tutorial Writers Inc. My tutorials are regularly recorded. ReneeGraphisme_All rights reserved
*
|

 Translations