|
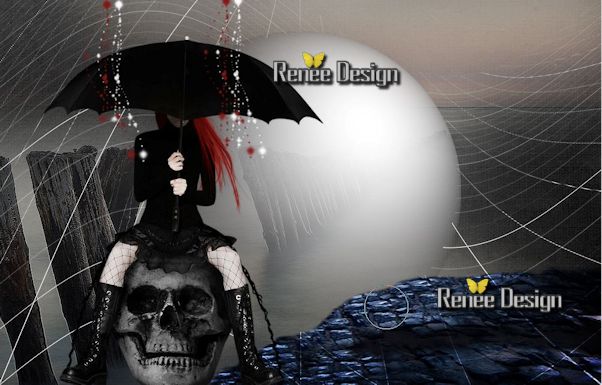
Let's start the lesson.
1. Open the Background image:_gothique_4''/Promote Background to Layer= Raster1
2. Layers- New Raster layer / - Activate Flood fill tool and fill the layer with color black
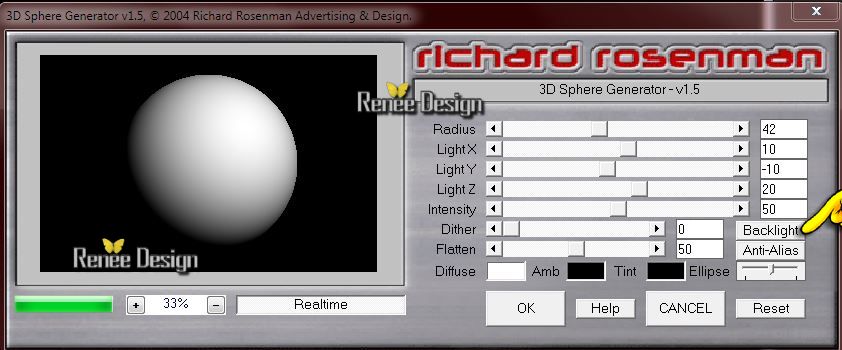
3. Effects- Plugins - Richard Rosenman -3D -Sphere Generator -v1.5
- Use the settings below
-
Then click Blacklight
4. Effects- Plugins - Transparency - Eliminate Black
5. Layers- New Raster layer - - Activate Flood fill tool and fill the layer with color black
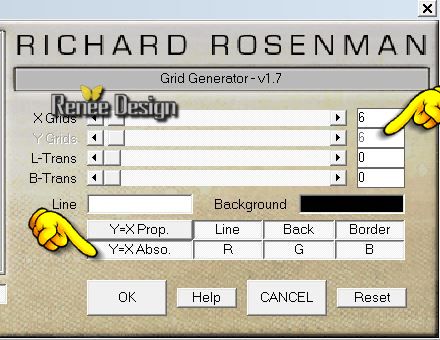
6. Effects- Plugins - Richard Rosenman- Grid Generator
7. Effects- Plugins Transparency - Eliminate Black
8. Effects- Plugins - Muras'Meister -Perpspective Tilling default settings
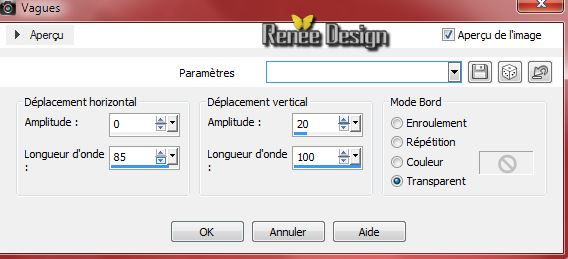
9. Effects- Distortion Effects-Wave use settings below
10.Selections - load/save selection - load selection from disk and choose my selection 4 = the round selection!!! : ''gothique_4''/ Press the delete button on your key board
Selections- Deselect All
11. Activate the tube ''Alies
301-halloween-26082010'' Edit - Copy -Edit - Paste as new layer on your working area and move to the left
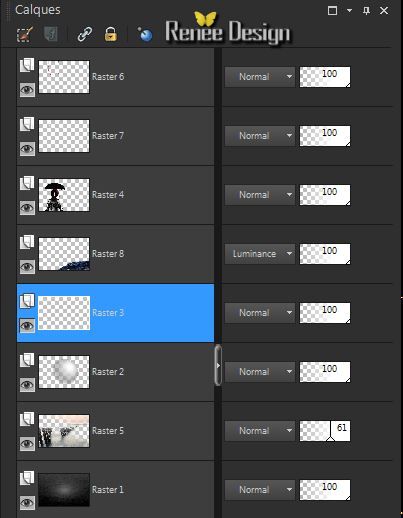
12. Activate the bottom of the Layer-Palette ( Raster 1 )
- Activate the tube "chemin
vers la lune_colorel"/ Edit - Copy -Edit - Paste as new layer on your working area and do not move!!!!
13. Effects- Edge Effects- Enhance
- Reduce the opacity of this layer to 61%
Activate the top of the Layer-Palette
14. Layers- New Raster layer
15.Selections - load/save selection - load selection from disk and choose my selection 1: ''gothique_4_1'' Activate Flood fill tool and fill the selection with color white
16. Layers- New Raster layer -Activate Flood fill tool and fill the selection with this color: #841815
Selections- Deselect All
17. Effects- Image Effects-Offset with these settings H = -20 and V = 0 Transparent
18. Layer-Palette : activate
raster 3
- Activate the tube
''Silence Corry DeLaan_colorel.pspimage''
- Freehandselection- /point to point /
Select a part of the blue paving stones
- -Edit - Copy -Edit - Paste as new layer on your working area
- With the clone brush (C)/Make your shape using this tool
How do we proceed:
Open the tool – size not larger than 55
.Place the brush on the spot you want to create (see print screen) and push on your right mouse button
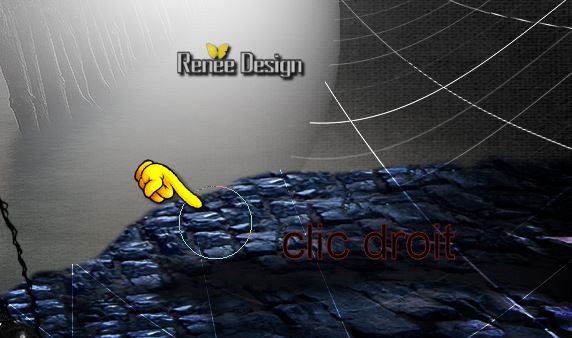
3.Go to the spot where you want to apply your shape and push your left mouse button to apply
Your example has to be simular on mine
19. Layer Palette -double click on this Layer and set the Blend Mode to "Luminance "(what you like )
The result
Activate the top of the layer-Palette
20. Layers- New Raster layer
21.Selections - load/save selection - load selection from disk and choose my selection 3: ''gothique_4_3'' - Activate Flood fill tool and fill the selection with color black
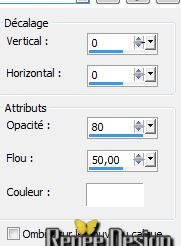
- Effects - 3D Effects - Drop shadow with these settings :2/2/10/9 color black
22. Layers- New Raster layer - Activate Flood fill tool and fill the selection with this color:
#841815
Selections- Deselect All
23. Activate the tube ''BLOODEYES
MDZ MIST.pspimage''/Image Resize 60% /
Edit - Copy -Edit - Paste as new layer on your working area and move a little
24. Layers- New Raster layer
25.Selections - load/save selection - load selection from disk and choose my selection 2: ''gothique_4_2'' /Flood fill tool opacity 35%/
Activate Flood fill tool and fill the selection with color white
Selections- Deselect All
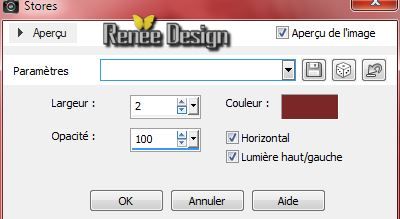
26. Effects- Texture Effects-Blinds use settings below
- Layers-Arange- Move Down under Raster 4
- Activate the top of the layer-Palette
27. Activate the tube
''araignée '' -
Edit - Copy -Edit - Paste as new layer on your working area
- Layers- Duplicate twice -
Move to a nice place
-Layers- Merge- Merge Down and Repeat( one layer with the spiders)
28. Effects - 3D Effects - Drop shadow with these settings color white :
29. Layer-Palette: activate Raster 8 (stone )
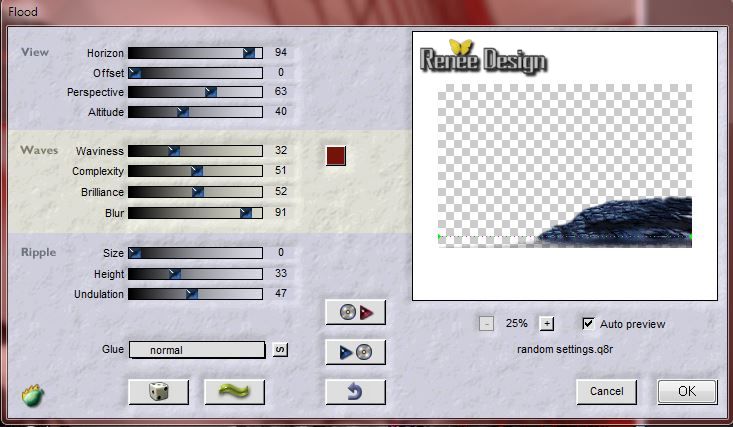
30. Effects- Plugins Flaming Pear - Flood use settings below
31. Layers- Merge- Merge Visible
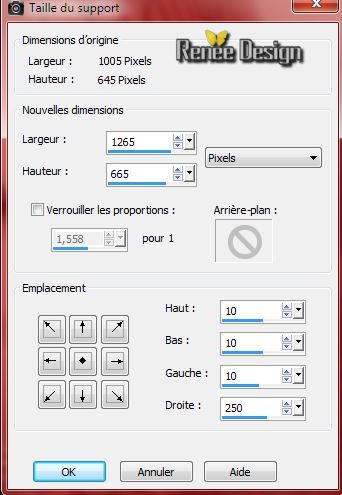
32.Image- Canvas Size use settings below
33. Layers- New Raster layer /Flood fill tool opacity 100%
- Activate Flood fill tool and fill the layer with color black
- Layers- Arrange- Move Down
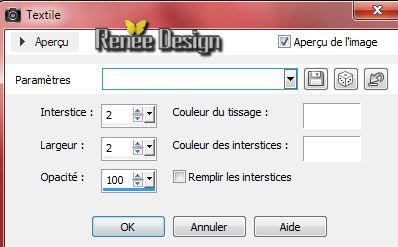
34. Effects- Texture Effects- Weave use settings below-color white
35. Activate the tube ''DroGocWnQonTEFShU''/
Edit - Copy -Edit - Paste as new layer on your working area and move to the bottom right side
36. Layers- New Raster layer - Layers- Arrange- Move Down
37.Selections - load/save selection - load selection from disk and choose my selection 4: ''''gothique_4_4''- Activate Flood fill tool and fill the selection with color black
38. Layers- New Raster layer /Activate Flood fill tool and fill the selection with this color:
#841815
Effects - 3D Effects - Drop shadow with the same settings
Selections- Deselect All
39. Image - Add borders-Symmetric checked: 22 pixels color white
40. Image - Add borders-Symmetric checked: 1 pixel color black
41. Activate the tube ''
Staple 2-GI_Dr.Evil''/ Image Resize 60%
- Edit - Copy -Edit - Paste as new layer on your working area
- Image- Rotate 90°
to the Right
- With your move tool move to the left side
42. Layers- Duplicate- Image Flip
- Layers- Merge- Merge Down
43. Layers- Duplicate -
Image Mirror
44. Layers- Merge- Merge All
45. Image Resize
1005 pixels Width
If you want to write a text- font is included into the zip file
Save as JPG
I hope you enjoyed this lesson
Renée
This lesson was written by Renée 17/08/2014
Created the
09/2014
*
Any resemblance with an existing lesson is merely a coincidence
* Don't forget to thank the people who work for us and with us. I named the tubeurs - Testers and the translators.
Thanks Renée. |

 Translations


 All rights reserved