|
Let's begin
-
Material Properties: Foreground color to color:#c9c9b2
.Background color to color: #5b5e2c
1.
File: Open a transparent image of1035 x 700 pixels
2.
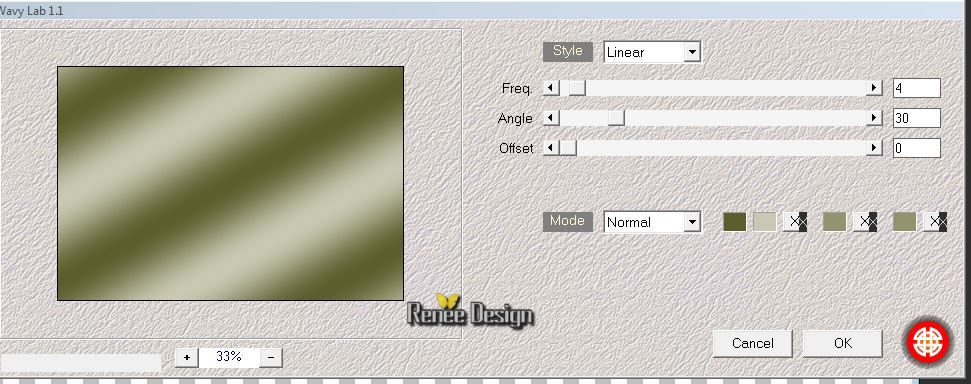
Effects- Plugins- Medhi - Vary Lab
1.1
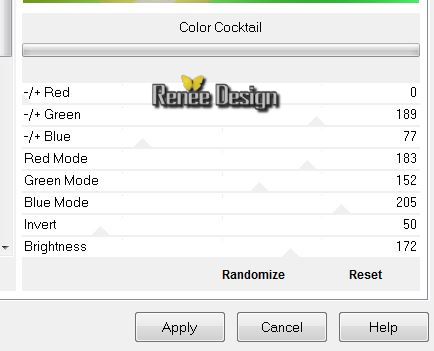
3.Effects- Plugins Unlimited &<Sandflower Specials°V° > /Color
Cocktail
4.Effects- Plugins Module Externes - Simple - 4 Way
Average
5.Effects- Plugins Edge Effects- Enhance More
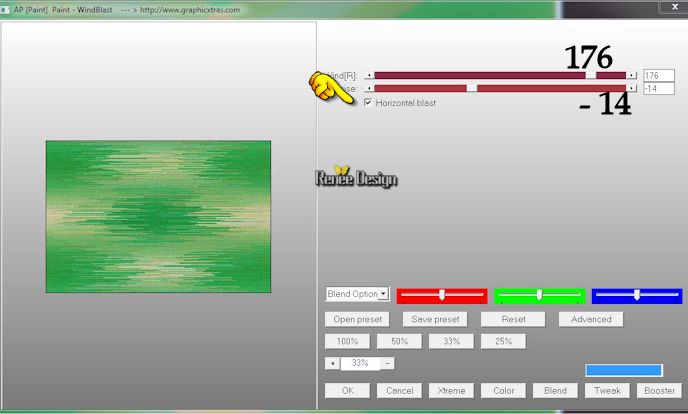
6.Effects- Plugins Modules externes AP [Paint] -Windblast
(the filter is (in the file) AP GX14)
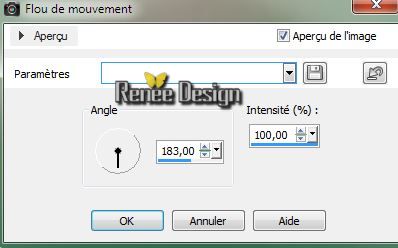
7. Adjust-Blur-Mortion Blur
8. Layers-New Raster layer/Flood Fill Tool:fill the layer with color white
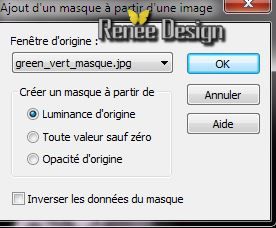
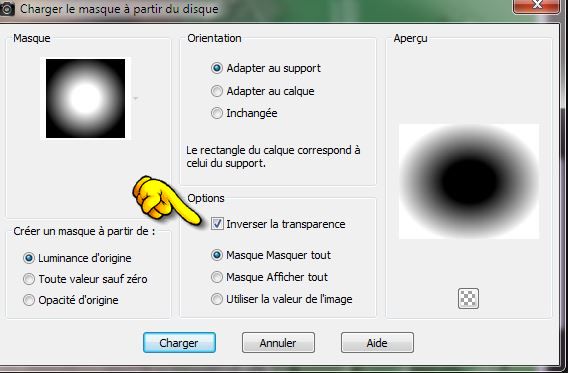
9. Layers-New Mask Layer From Image and choose Mask:''green_vert_masque''
10. Effects -
Edge Effects- Enhance More
11.
Layers- Merge- Merge Group
12. Effects -3 D Effects - Drop Shadow 1/1/100/0 black
13. Layers-New Raster layer
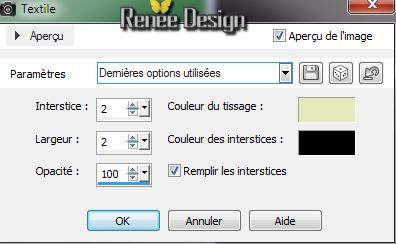
14.Material Properties: Foreground color to color:#e4eabc
15.
Selections - load/save selection - load selection from disk and select ''green_vert_1''
/Flood Fill Tool:fill the selection with the FG-Color
16.
Selections- Deselect All
17. Effet -
Modules Externes - Medhi - Weaver
18. Effects
-Plugins Simple Top left mirror
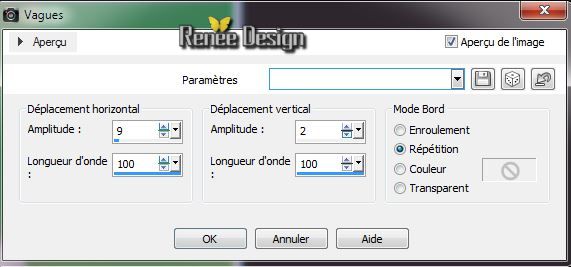
19. Effects -
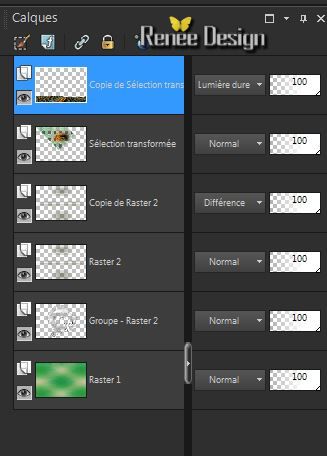
3 D Effects -Drop Shadow - with the same settings
20.
Effects - Plugins Toadies What
are you / 20/20
21. Effects -
Edge Effects- Enhance More
22. Layers- Duplicate- Layer-Palette: Change the Blend Mode to "Difference"
23. Aktivate the bottom of the Layers palette = raster 1
24.
Selections - load/save selection - load selection from disk and choose: ''green_vert_2''
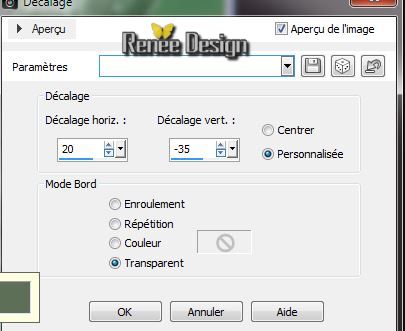
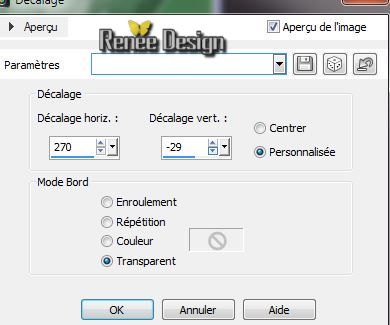
25.
Selections- Promote selection to layer
26. Effects
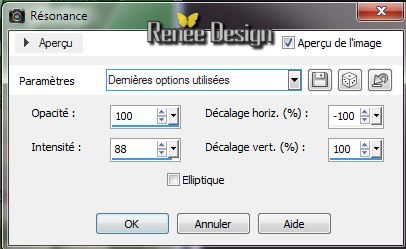
-Texture Effects-Weave ( with your FG-Color and Black )
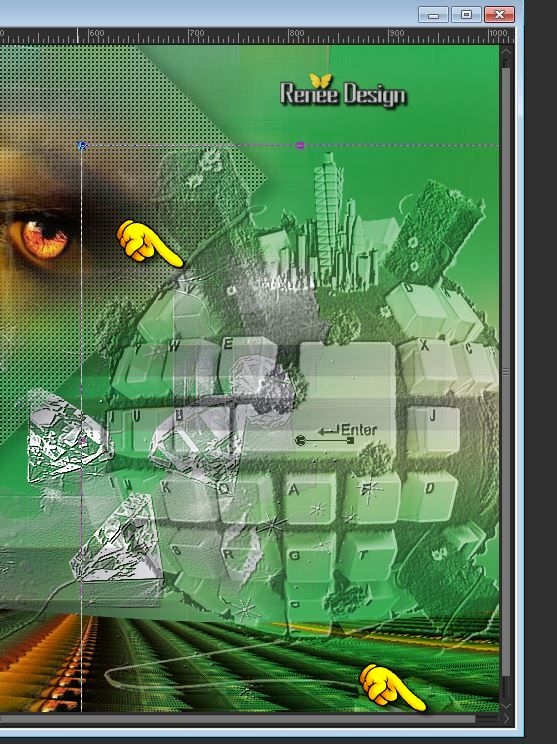
27. Layers-Arrange-Bring To Top
-
Selections- Deselect All
28. Layer-Palette: Change the Blend Mode to "Screen" Opacity of the layer down to 57%
29. Activate the tube''watching'' /Edit/copy-Edit paste as a new layer. (do not move it is in the right place)
30. Layers- Merge- Merge Down/ Layer-Palette: Change the Blend Mode to "Normal"
31. Effects-
3D Effects - Drop Shadow 4/12/38/22,38 black
32.
Layers- Duplicate
33. Effects-
Plugins - Mura's Meister - Copies

34. Image
Flip
35. Effects -Plugins
- Mura's Meister - Perspective
Tilling

36. Effects -
Distortion Effects- Wave
37. Layer-Palette: Change the Blend Mode to "Hard Light"
Layer Palette look like this now
38. Activate the tube''terre_895_bbc.pspimage'' /Edit/copy-Edit paste as a new layer. With your move tool place it in the right place
39.
Effects - User Defined Filter / Emboss 3 /
default
- Layer-Palette: Change the Blend Mode to "Luminance-Legacy".Opacity of the layer down to 46%
40.
Layers-New Raster layer
41.
Selections - load/save selection - load selection from disk and select ''green_vert_3''
/ Pot of paint opacity 65 %. Flood Fill Tool: fill the selection with color white
42.
Selections- Deselect All
43. Material Properties: Foreground color to color:white -Backgroundcolor to color :
#5b5e2c
44.
Effects -Plugins Unlimited -Penta Com / Drag / 30
45.
Effects -Plugins Unlimited -Penta Com/ Dot & Cross
72/10/2
46. Activate the tube '' tube BBR_ poignee_de_main .pspimage''/Edit/copy-Edit paste as a new layer
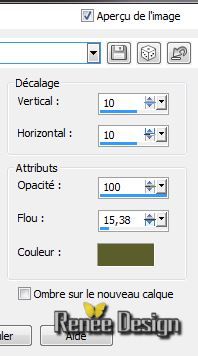
47. Effects - Image Effects-Offset
48. Activate the tube '' enter_Green_VertRenee/activate enter_1" Edit/copy-Edit paste as a new layer.
49. Effects -
Image Effects-Offset
Layer-Palette: Change the Blend Mode to "Hard Light"
50. Effects -
Reflection Effects - Feedback
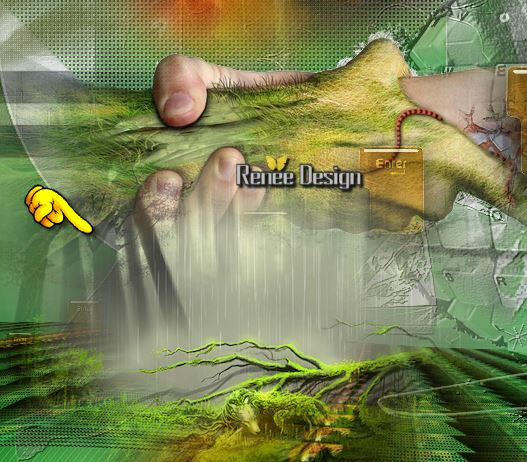
51. Activate the tube '' 1228506071_feerie''/ Edit/copy-Edit paste as a new layer.
With your move tool place it in the right place like this
52.
Layers- Load/save maske-Load mask from disk ''masque 20/20''
53.
Layers- Merge- Merge - Group
54. Effects - Edge Effects - Enhance
55. Activate the tube ''12283242414_divers''/Edit/copy-Edit paste as a new layer. With your move tool place it in the right place
56. Layers- Duplicate-Layers- Merge-Merge Down
57. Activate the tube '' calguismistgrace18052012'' /Edit/copy-Edit paste as a new layer. With your move tool place it in the right place
(well placed under effect of the previous layer)
58. Activate the tube '' enter_Green_VertRenee/activate enter_2" Edit/copy-Edit paste as a new layer. With your move tool place it in the right place
Layer Palette: Set the Blend mode to "Luminance Legacy"
59. Activate the tube ''13186826029_feerique_nikita'' /Edit/copy-Edit paste as a new layer. With your move tool place it in the right place
60. Activate Freehand Selection: select a piece of the chain. Edit/copy-Edit!!!.Back
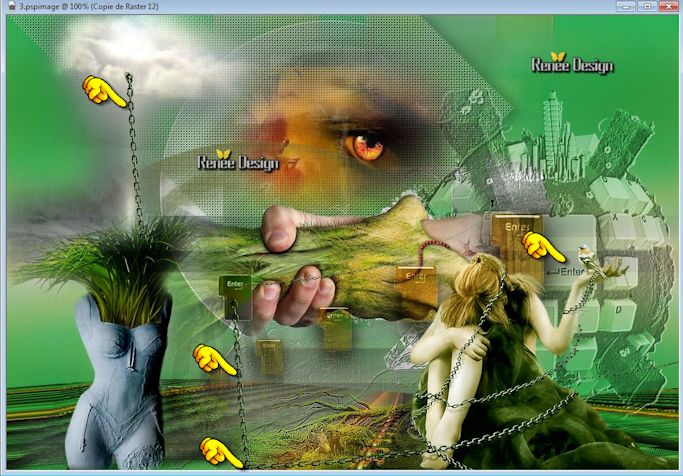
on your work image: Selections-Deselect All!! and paste as a new layer.Image Free Rotate-90 to the right .Layers-Duplicate and place with your move tool as shown in screen below:
61.Layers- Merge- Merge Visible
62.
Layers-New Raster layer
63.
Selections - load/save selection - load selection from disk and select '' green_vert_4''/
Flood Fill Tool: fill the selection with color white (click 2 or 3 times )
64.
Selections- Deselect All
65. Layers- Duplicate- Image Mirror
66. Effects-
Plugins DBS Flux- Linear Transmission
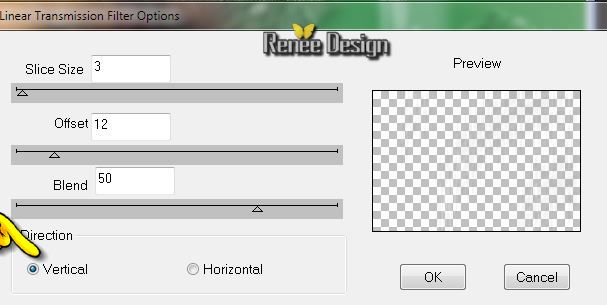
67. Layer-Palette: Change the Blend Mode to "Soft Light"
68.
Effects - 3 D Effects - Drop Shadow -BG-Color
69. Layers- Merge- Merge Visible
70. Image - Add Borders - Symmetric checked 1 pixels black
71. Image - Add Borders - Asymmetric color #8297a7
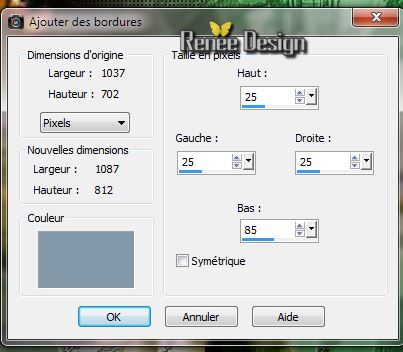
72. Image - Add Borders - Symmetric checked 1 pixels black
73.
With the magic wand select Asymmetric border
74. Adjust-Blur-Radial Blur
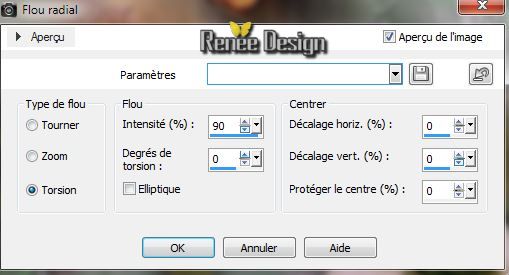
76. Adjust-Blur-Gaussian Blur: Radius: 45
76.Effects -
3D Effects - Cutout

77.
Selections- Deselect All
78. Activate the tube: ''green_vert_texteR'' Edit/copy Edit paste as a new layer and place .Or write your own text
79. Effects-Plugins -Xero XL Improver default
80.
Activate your Paint Brush: "Green verte" / File: Export-Custom Brush enter a name./Opacity Brush 50% .Activate Brush Tool and select my file: "Green Vert Brush "Layer-New raster layer.Stamp to the top left corner (with a color that you like)
I hope you enjoyed this lesson
Renée
This lesson was written by Renée the 4/05/2014
Created the 05/2014
*
Any resemblance with an existing lesson is merely a coincidence
*
Don't forget to thank the people who work for us and with us. I named the tubeurs - Testers and the translators.
Thanks Renée. | 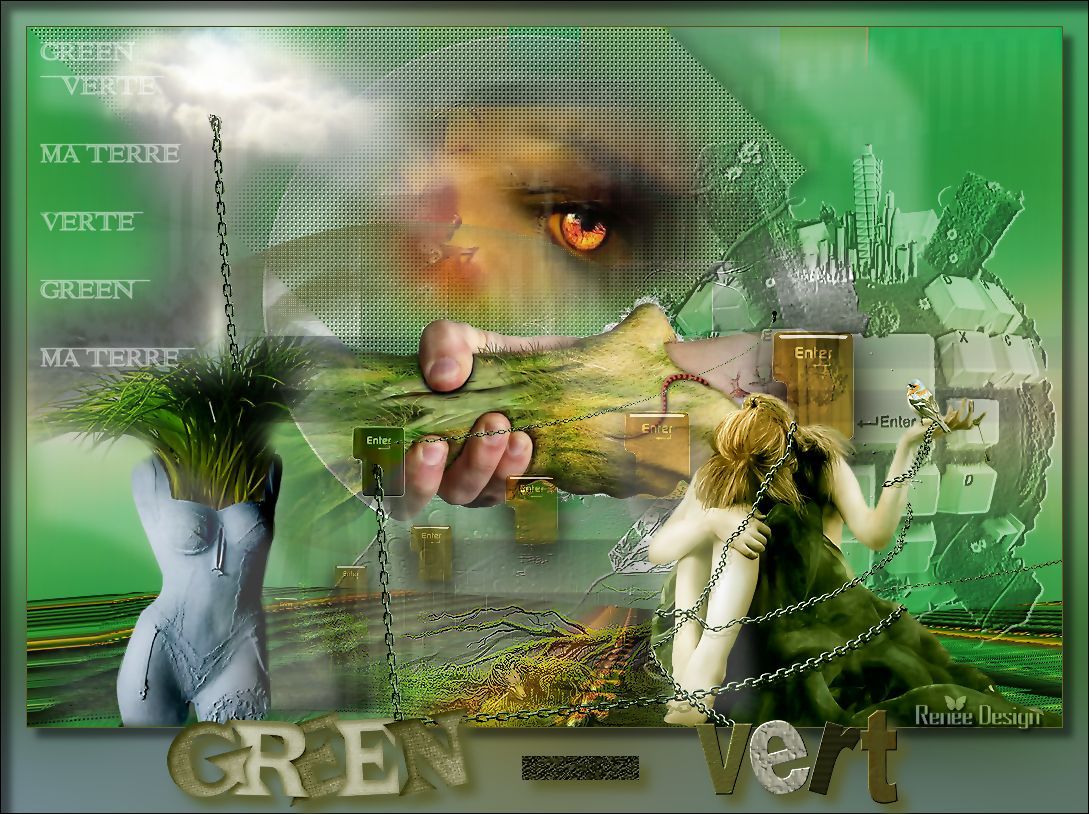
 Translations