|
Let's begin .
1.
File: Open a New transparent image of 995 x 625 pixels
2.
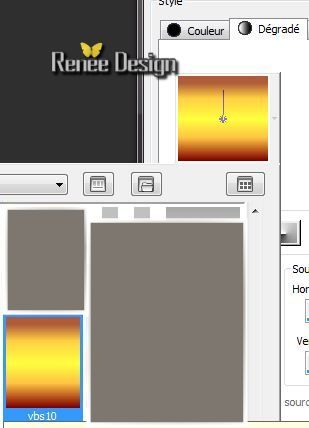
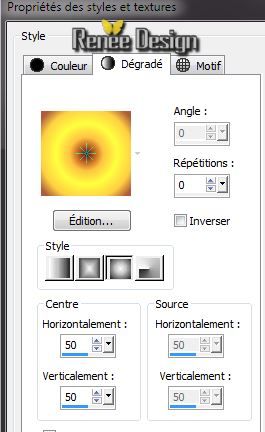
Materials-Properties: Foreground color to gradient and choose" vbs10/
Prepare Foreground sunburst gradient configured like this: = 0 (Invert not checked)
3.
Flood Fill Tool: Fill the Layer with this gradient
4.
Effects -Plugins AFS Import
/Sqborder2
5.
Effects -Plugins -Simple Blintz
6.
Layers-Duplicate/ Image Mirror - Lower the opacity down to
50%
Layers- Merge- Merge Down
7.
Effects- Plugins - Vanderlee -Unpplugged
X/Defocus
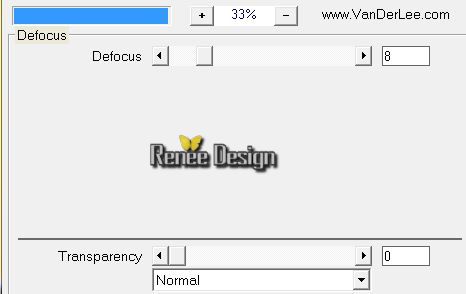
8.
Layers-Duplicate
9.
Effects -Plugins Unlimited- Fiter Factory Gallery E / Transparent
Pizza a 48
10.
Effects- 3D Effects-Drop Shadow: 0/0/10/45 black
11.
Layer -Palette: Set the Blend Mode to "Color Legacy"
12.
Effects - Edge Effects-Enhance
13.
Layers - New raster Layer
14.
Materials-Properties: Foreground color to color : #451a0a
Prepare a Fading Foreground linear gradient configured like this: = 0 (Invert checked)
15.
Flood Fill Tool:Fill the layer with this gradient
16.
Effects- Plugins - AAA Framer

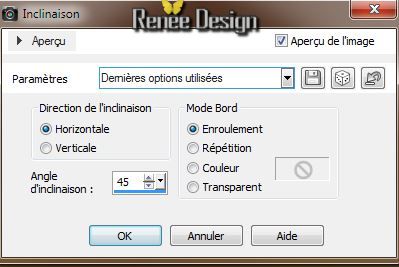
17.
Effects - Geometric Effects - Skew
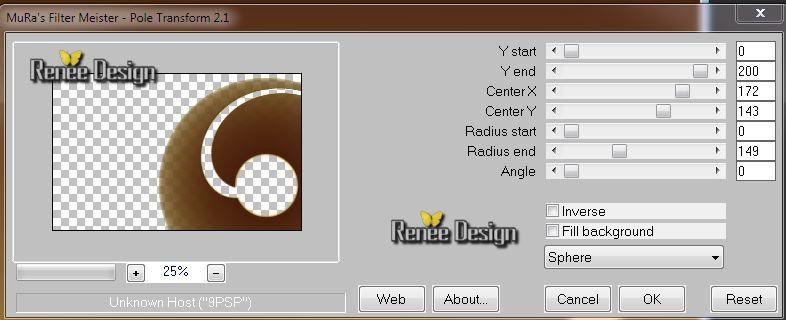
18. Effects-Plugins
Mura's Meister/Pole Transformation
19.
Layer -Palette: Set the Blend Mode to "Overlay"
20.
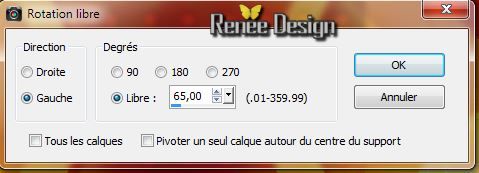
Layers-Duplicate /Image Mirror -Layers- Merge- Merge Down
21.
Selections - load/save selection- load selection from disk and select my file " jardin_reve_1.PspSelection" /
Promote selection to Layer
22
. Materials-Palette: Foreground color to gradient and choose: "vbs10'' Prepare a linear gradient 0/0 /Invert checked
23.
Flood Fill Tool: Fill the selection with this gradient
24.
Effects - Plugins - Penta Com Color Dot - default
90/0/255/255/255
25.
Layers- Arrange- Move down
Layer -Palette: change the Blend Mode to "Soft Light"
26.
Effects - 3D Effects-Drop Shadow/default
27.
Layers-Duplicate
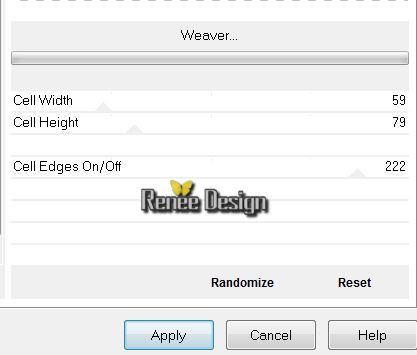
28.
Effects -Plugins Unlimited - Toadies Weaver (colors can be different with this filter. Is not serious )
29.Layer Palette-
Set the Blend Mode to "Multiply"
30.
Image Mirror
31.
Layer Palette: Activate the layer underneath =Raster 3
32.
Effects - 3D Effects-Drop Shadow: default
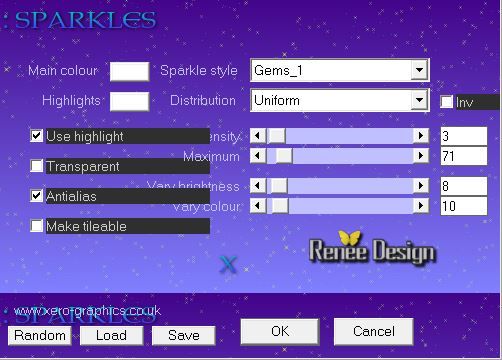
Your work look like this now
33.
Layers - New raster Layer
34.Open Paint Brush/ Shape Round 25/ Size
41

35.
Foreground linear gradient / Apply like this

36.
Effects- Plugins - EyeCandy 5 -Impact Glass /Preset
"clear''
37.
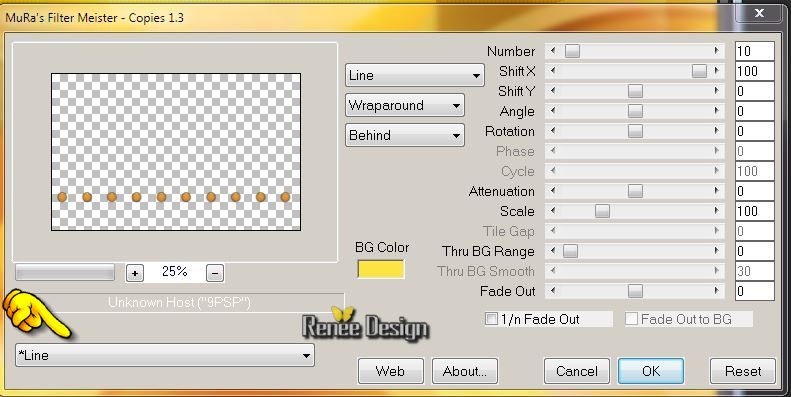
Effects - Plugins - Mura's Meister Copies
38.
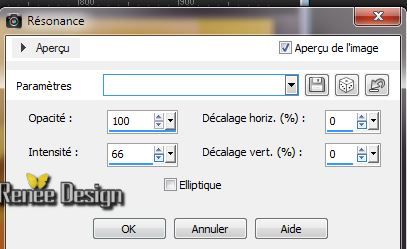
Effects -Reflection Effects-Feedback
39.
Layer palette: Set the Blend Mode to "Overlay"
40. Layers- Duplicate /Image Flip
41. Layers-Merge- Merge Visible
42. Layers- New raster layer
43.
Selections - load/save selection- load selection from disk and select my file '' jardin_reve_.PspSelection''
/Flood Fill Tool: Fill the selection with this color: #451a0a
44.
Selections-Select none
45. Effects
-Plugins Unlimited -Toadies - 3 D Checker 5/27/16
46.
Layer Palette: Set the Blend Mode to "Overlay"
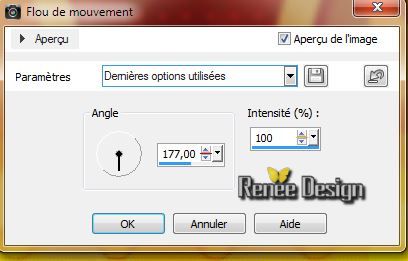
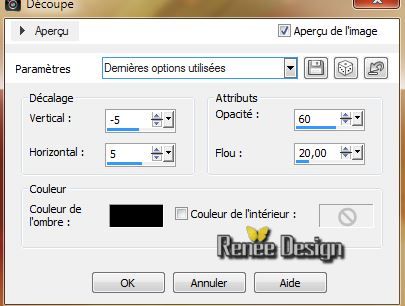
47. Adjust- Blur- Motion Blur
48. Image -Free Rotate left
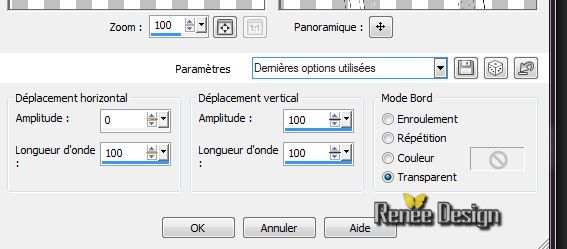
49. Effects- Distortion Effects-
Wave
50. Open tube ''branches_haut''/ Edit/copy -Edit/paste as a new Layer and move to the right
Layer Palette: Set the Blend Mode to "Luminance Legacy"
51.
Layers- New raster layer
52. Materials-Properties: Foreground: #d8d143 Lower the opacity of your colors at 65%
53.
Selections - load/save selection- load selection from disk and select my file '' jardin_reve_2.PspSelection''
Flood Fill Tool: Fill the selection with the foreground color
54. Effects -
3D Effects - Cutout
55.
Selections-Select none
56. Open tube''jardin_reves_doublecircle'' /Edit/copy -Edit/paste as a new Layer
57. Effects
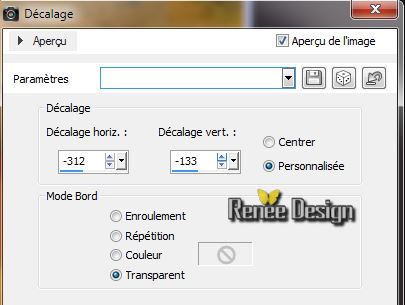
-Image Effects - Offset
58.
Layer - Palette : Set the Blend Mode to "Overlay"
Layers- Duplicate-Layers- Merge-Merge Down
59. Open tube ''jardin_reves_multilignes'' /Edit/copy -Edit/paste as a new Layer and move
60. Effects
-Plugins -Final Impact -Hot shot
(When working with your own colors, play with the Blend Mode and or Opacity at your own discretion .Or change the settings of this filter ")
61.
Layer Palette: Set the Blend Mode to "Multiply"
62. Open tube ''jardin_reves_effet1.pspimage'' / Edit/copy -Edit/paste as a new Layer and move
63.
Layer Palette: Set the Blend Mode to "Screen". Opacity 75%
64. Layers-Duplicate -Image Mirror /Layer Palette: Set the Blend Mode to "Overlay"
65. Open tube ''nicole-portrait1-2013.pspimage''/Image
Resize 600 Pixels Height /Edit/copy -Edit/paste as a new Layer and move
66. Layers- Arrange-Move 2x Down
67. Effects
-Plugins - Eye Candy 5 Impact -Perspective
shadow and choose my preset ""jardin_reves_persp_1"
68
Selections - load/save selection- load selection from disk and select my file
''jardin_reves_selection_3''
69. Adjust-Blur-Gaussian Blur: Radius: 15
70.
Selections - Deselect all
Activate the top of the layers palette
71. Open tube''jardin_reves_pot_abeilles '' /Be placed on the raster 2 of the tube- Edit/copy -Edit/paste as a new Layer and move
-Be placed on the raster 3 of the tube /Edit/copy -Edit/paste as a new Layer and move
72.Open tube ''1 Patries_BL108- Papaver-oranjegeel-24-1-11.psp''
erase the stem / Image Resize 60%-Edit/copy -Edit/paste as a new Layer and move
73.
Layer Palette: Set the Blend Mode to Luminance Legacy"
74. Layers-Merge- Merge Visible
75.
Selections - load/save selection- load selection from disk and select my file
''jardin_reves_selection_4''
76. Effects -
Plugins -Xero- Sparkles
77. Selections - Deselect all
78 .Image - Add Borders - Symmetric checked 2 pixels black
79.
Selections- Select All
80. Image - Add Borders - Symmetric checked 50 pixels white
Keep selections
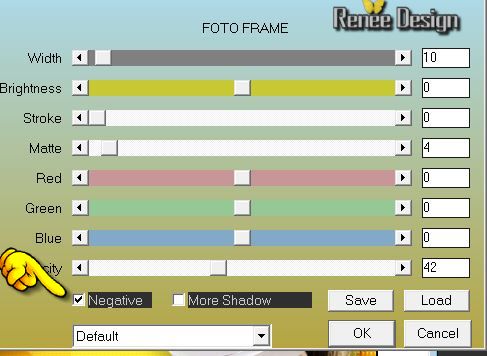
81. Effects - Plugins - AAA Frame - Foto
Frame
79.
Selections- Invert
80.
Selections - Modify - Contract 20 pixels
81.
Flood Fill Tool: Fill the selections with this color : #fbe669
82. Effects-
Plugins Icnet Filters - Buttons & Frames / Glass Frame 2 to a
34/128
83. Effects -
3D Effects- Drop Shadow default
84.
Selections - Deselect all
85. Open tube ''jardin_reves_bouton /Edit/copy -Edit/paste as a new Layer and move to the left (Blend Mode "Normal")
85. Effects
-Plugins -Simple - Top left Mirrror
86.
Layers-Merge- Merge Visible
87. Open tube ''titre '' Edit/copy -Edit/paste as a new Layer and move
88. Layers-Merge- Merge All (flatten)

I hope you enjoyed this lesson
Renée
This lesson was written by Renée
the 1/04/2014
Created
/04/2014
*
Any resemblance with an existing lesson is merely a coincidence
*
Don't forget to thank the people who work for us and with us. I named the tubeurs - Testers and the translators.
Thanks Renée. | 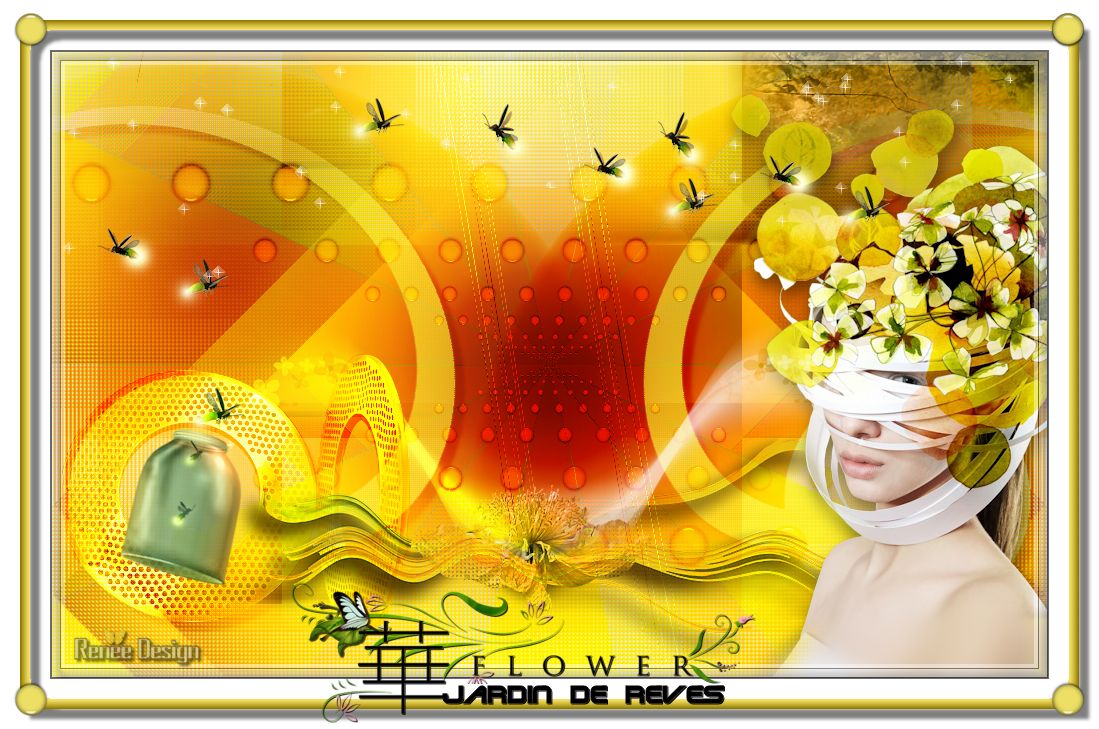
 Translations