|
Let's begin
Material Properties: Foreground color to color:#ffffff Background color to color: #798476
1.
File - New - New Image 1125 x 705 pixels transparent
2.
Effects -Plugins -Mura's Meister - Clouds
3.
Layers-New Raster layer / Flood Fill Tool:Fill the layer with black
4.
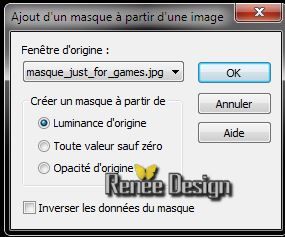
Layers- New Mask Layer From Image open''masque_just_for_games''
5.
Layers-Merge- Merge Group
6. Activate your Pick Tool(K) and select my file :''Preset_Pick_just_games''/ok
7.
Selections - Load/save selection - load selection from disk and select:''just_for_games_1''/ Delete
7. Effects -
3D Effects-Drop Shadow/black
-
Selections-Deselect all
8. Layers-New Raster layer
9.
Selections - Load/save selection - load selection from disk and select: /
''just_for_games_2''
10. Flood Fill Tool: Fill the selection with this color: #798476
11.
Selections-Deselect all
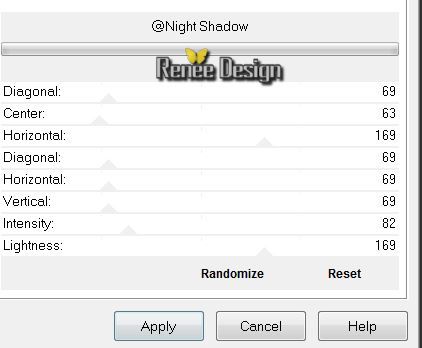
12. Effects -
Plugins Unlimited - &<Background Designer IV> @Night
shadow
13.Layers-New Raster layer
14.
Selections - Load/save selection - load selection from disk and select:''just_for_games_3''
15. Activate
image ''just_for_games_image3'' /Edit/copy-Edit paste into selection
16.
Selections-Deselect all
17. Effects -
3D Effects-Drop Shadow 0/0/65/2 black
18. Layers-New Raster layer
19.
Selections - Load/save selection - load selection from disk and select: / ''just_for_games_4''
20. Material Properties :Foreground color to color: #808080
21. Pot of Paint: Opacity down to 55% / Flood Fill Tool: Fill the selection with the FG-Color
22.
Selections-Deselect all
23. Effects -Plugins
ICNET Filter - Paper Textures- Canvas Coarse with this settings:
105/87
24. Effet -
3D Effects-Drop Shadow 22/31/50/30 black
25. Layers-New Raster layer
26.
Selections - Load/save selection - load selection from disk and select: '' ''just_for_games_5''
27. Pot of Paint: Opacity 100% Material Properties :Foreground color to color:Black /Flood Fill Tool: Fill the selection with the FG-Color
28.
Selections-Deselect all
29.
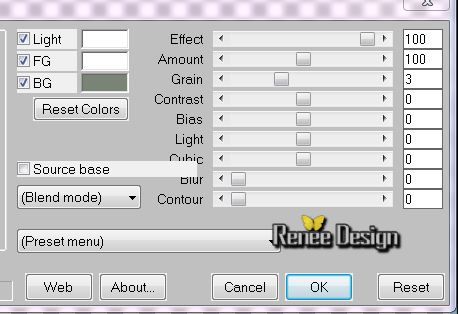
Effects -Plugins -EyeCandy 5 Impact - Bevel and choose my preset"
just_for_games_bevel''
30. Layers- Merge- Merge Down
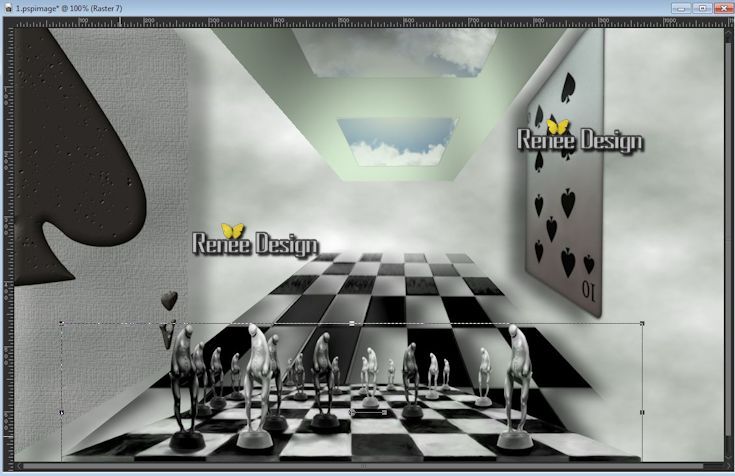
31. Activate tube ''just_for_games_image_10pique'' Edit/copy- Edit - paste as a new layer
Move to the right
32.Activate tube "kryssurealisme-02-12-13.pspimage---echiquer"/ activate layer "échiquier" /Image Resize 90%/-Edit/copy- Edit - paste as a new layer
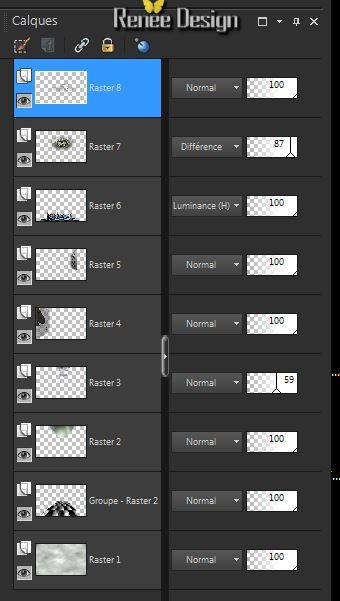
33. Activate the Pick Tool (K) and place like this
34. Layer Palette: Blend mode "Luminance" (do not take L legacy)
35. Activate tube ''just_for_games_horloge '' Edit/copy- Edit - paste as a new layer
36. Layer Palette: Blend mode "Difference" Opacity: 87%
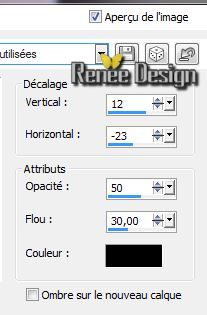
37. Effects -
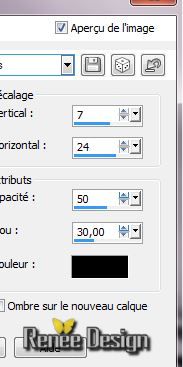
Image Effects - Offset: H= 12 and V = 100 /
transparent
38. Activate
tube ''just_for_games_image1''/ Edit/copy- Edit - paste as a new layer (do not move it is in the right place)
39.Adjust-Sharpness-High Pass Sharpen/Hard Light

Layer Palette look like this now
40. Activate
tube '' just_for_games_as_coeur''/ Edit/copy- Edit - paste as a new layer and move
41. Layer Palette:Blend mode "Hard Light" Opacity: 55%
42.Layer Palette: Activate the second layer from the bottom of the layer palette =Group _Raster 2
43. Activate
tube ''just_for_games_pion_rouge''/ Edit/copy- Edit - paste as a new layer
and place like this
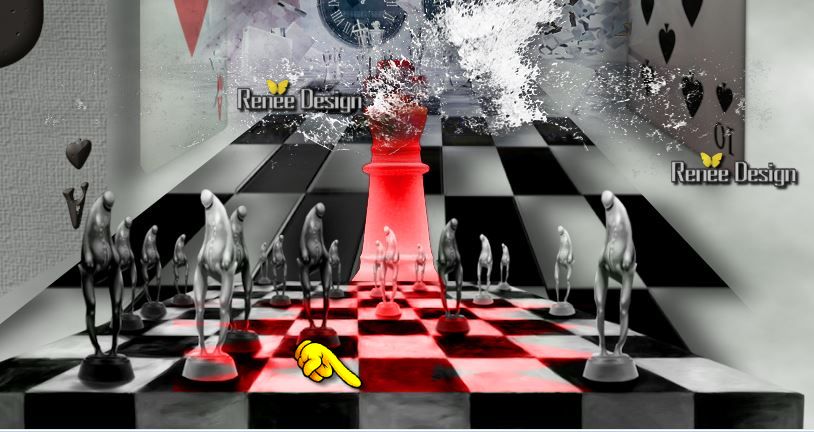
44. Aktivate the top of the Layers palette
45. Activate tube '' Alies 1VR653-woman-03092013.pspimage''/ Edit/copy- Edit - paste as a new layer and move to the right
46. Effet -
3D Effects-Drop Shadow/black
47. Activate tube '' kryssurealisme-02-12-13.pspimage-mains.pspimage'' /
(right hand) -Image Resize 55% -Image
Mirror -Edit/copy- Edit - paste as a new layer and move to the left
48.
Opacity: 55 %
49.Layers Merge-Merge- Visible
50. Activate tube ''just_for_games_effet-bleu" Edit/copy- Edit/ paste as new layer
(do not move it is in the right place)
Layer palette: Blend mode:"Color-Legacy" Opacity 42%
51. Image - Add Borders - Symmetric 2 pixels black
52. Image - Add Borders - Symmetric 35 pixels white
53 .Image - Add Borders - Symmetric 1 pixel black
54. Image - Add Borders - Symmetric 55 pixels white
55. Image - Add Borders - Symmetric 1 pixel black
56.
With your magic wand select the border of 35
pixels
57 . Effects-
Plugins -AAA Frame- AAA Framer
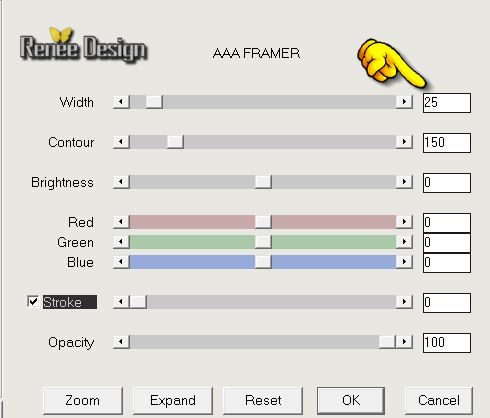
KEEP SELECTION!!!
58. Effects-
Plugins - L and K's - Pia to 15
59.
Selections-Deselect all
60. Activate the Text: Edit/copy- Edit - paste as a new layer.Layers-Duplicate-Image Flip and move to the right place .Or write your own text
61. Layers - Merge - Merge all layers (flatten)
62. Image
Resize 1025 pixels Width
I hope you enjoyed this lesson
Renée
This lesson was written by Renée 17/04/2014
Created the
04/2014
*
Any resemblance with an existing lesson is merely a coincidence
*
Don't forget to thank the people who work for us and with us. I named the tubeurs - Testers and the translators.
Thanks Renée. | 
 Translations