|
New
Translations here
La Solitaire Plugins
You can find my filters :http://www.reneegraphisme.fr/filtres/Mes%20filtres.html
Let's start the lesson.
2. Material Properties:Set your foreground color to: #99971d -Put the background color to this color #7b1200 3. Set your foreground to gradient 'Foreground-background' - Linear - Angle = 60 -Repeats 0 - Invert not checked. -Flood Fill Tool :fill the layer with the gradient 4. Open the tube « vase1 » Edit/copy- Edit/ paste as new layer on your working image (do not move it is in the right place) 5. Layers- Duplicate 6. Effects-Image Effects-Seamless Tiling with these settings
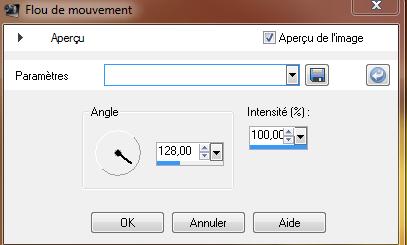
7. Adjust-Blur-Motion Blur with these settings
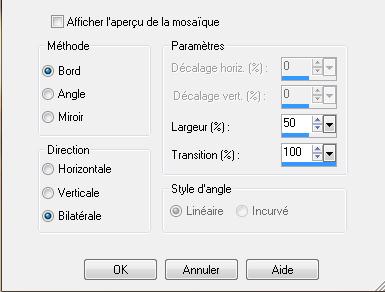
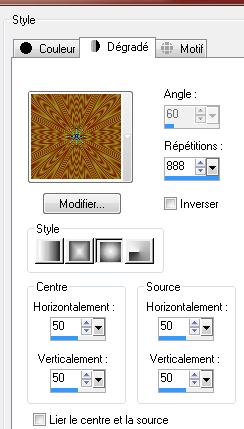
8. Effects- Plugins -Pixelate / Sector mosaïque - 25/52 9. Layers-New Raster layer 10. Selections –load/save selection –load selection from disc and choose: « renee fragilite » 11. Material Properties: Put your Foreground/background sunburst gradient with settings below
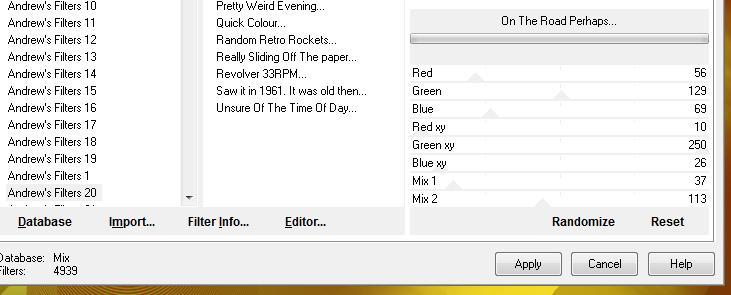
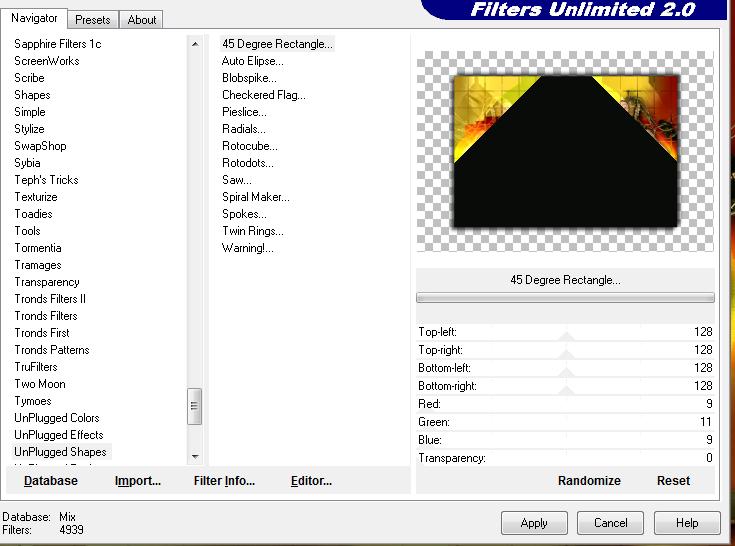
12. Activate Flood Fill Tool and fill the selection with the gradient 13. Selections- Deselect All 14. Effects- Plugins- Unlimited 2.0 - Andrew's Filters 20/On the roads perhaps with these settings
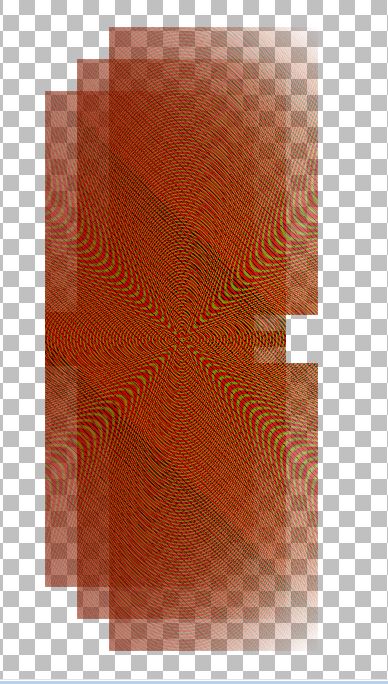
15. Effects- Plugins - Simple /Quick Tile Your work look like this now:
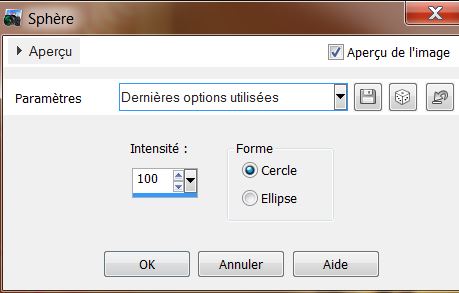
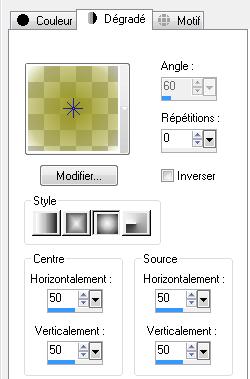
16. Effects- Geometric Effects- Spherize with these settings
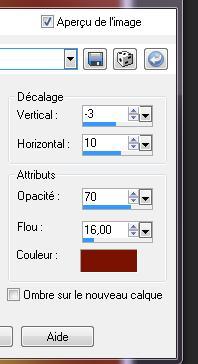
17. Effects- Plugins -Simple /Top left mirror 18. Effects- 3D Effects-Drop Shadow with these settings /backgroundcolor
- Double click on this Layer and set the Blend Mode to "Hard Light" 19. Image Resize with 60% resize all layers not checked Activate your Pick Tool (K) stretch on the both sides as shown in the example below
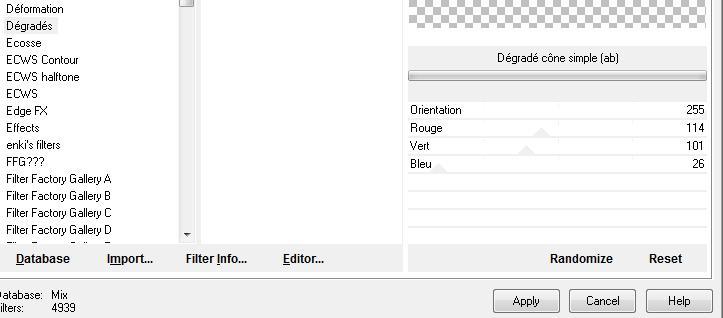
20. Effects-Plugins -Dégradés / Dégradé cône simple(ab) with these settings
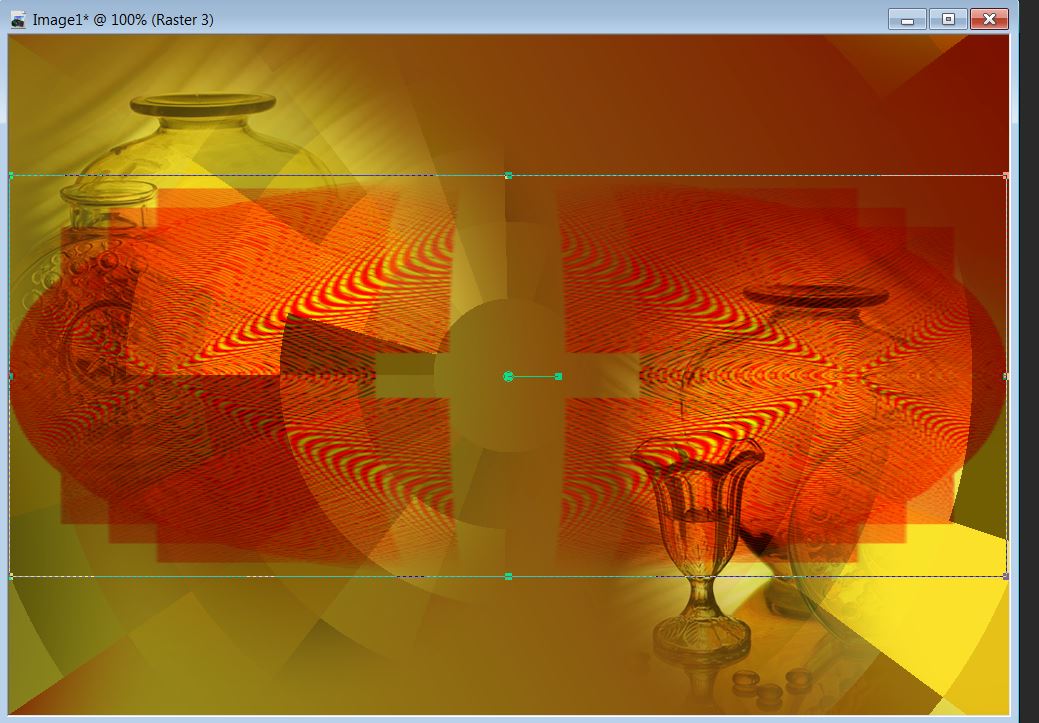
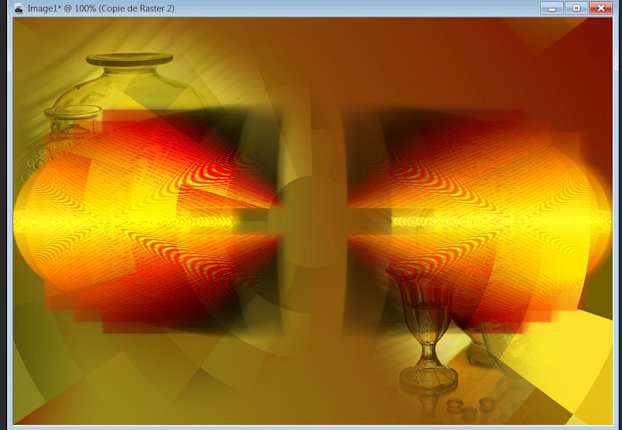
21. Layers- Duplicate-Layers-Merge- Merge Down Your work look like this now
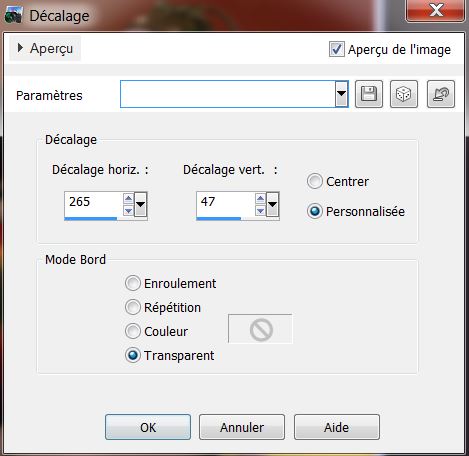
22. Open the tube '' nicole-etrange-2011 ''Edit/ paste as new layer on your working image 23. Effects- Image Effects- Offset with these settings
24. Layers- Duplicate-Image Mirror 25. Layer-Palette: Make copy layer 4 active - Double click on this Layer and set the Blend Mode to "Luminance Legacy "Set the layer opacity of this layer to 78% 26. Open the tube » nicole etrange 1-by-KunstlerDgenocide »/Image Resize 60% - Edit/copy- Edit/ paste as new layer on your working image (do not move it is in the right place) 27. Layers- Arrange-Move Down 28. Selection Tool - Rectangle - Select the part that exceeds the bottom /Press the delete button on your key board/ Selections- Deselect All
You are there in your work
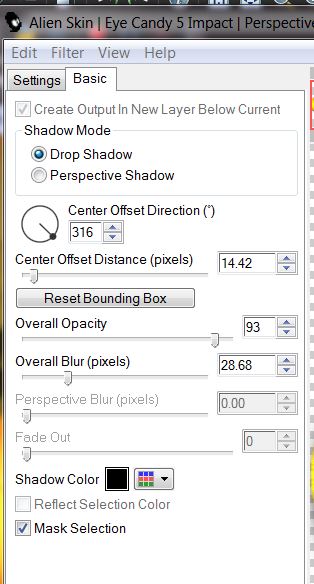
29. Layer-Palette: Make raster 3 active 30. Effects- Plugins -Eye candy5 Impact /perspective shadow / Preset / Drop blurry with these settings
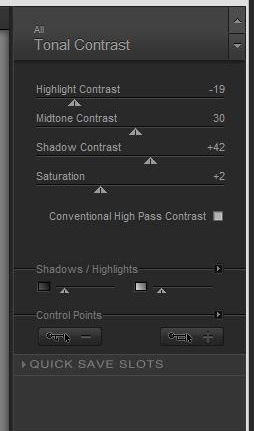
31. Effects- Filter- Nick Color effex Pro .3/ Tonal Contrast
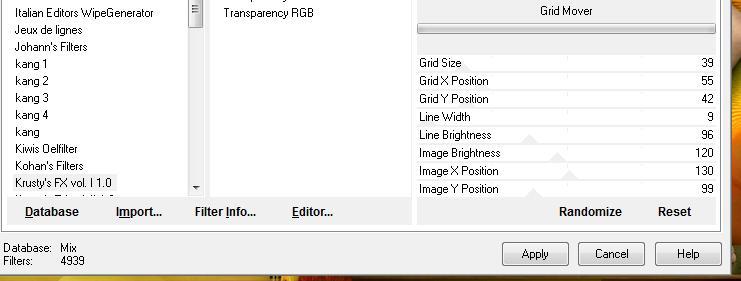
32. Layers- Merge- Merge- Visible 33. Layers-Duplicate 34. Effects- Plugins - Unlimited 2.0 - Kruxty's FX vol. I 1.10 /Grid Mover
35. Image Resize with 75% resize all layers not checked 36. Effects - 3D-Effects -Drop shadow with these settings
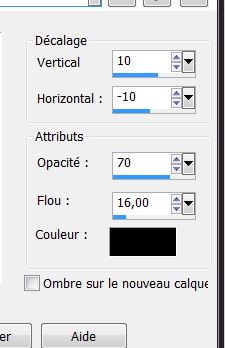
Repeat Drop Shadow with these settings:H= +10 andV= -10 38. Layers- Duplicate 39. Effects- Plugins-Unlimited 2.0 - Unplugged Shapes/45 degree Rectangle
40. Effects- Plugins -Transparency /Eliminate black Your work look like this now
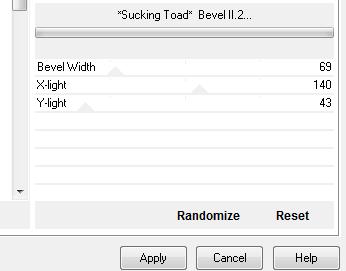
41. Activate the bottom layer in the Layer-Palette 43. Adjust-Blur-Gaussian Blur: Radius: 50 44. Effects- Plugins -Unlimited 2.0 - Toadies / Sucking Toad Bevel II.2
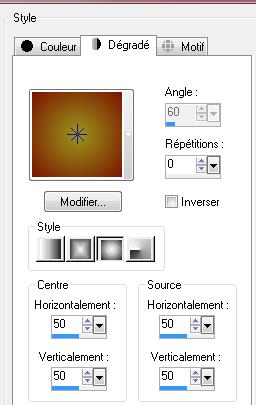
45. Layers- New Raster layer 46. Material Properties: Change your foreground/background into a "sunburst gradient" with settings below
Change Foreground material into a "fading foreground" sunburst gradient with these settings
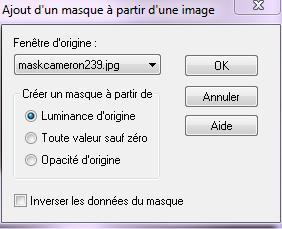
47. Activate Flood Fill Tool and fill the layer with the gradient 48. Open your mask in PSP -Layers- New Mask layer from Image and choose Mask: ''maskcameron239.jpg''
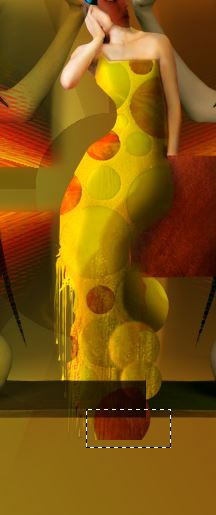
49. Layers- Merge- Merge- Group 50. Layers-Duplicate You are there in your work
51. Activate the top of the Layer-Palette 52. Open the ''nicole -etrange1-by-KunstlerDGenocide " Image Resize with 80 % -Edit/ paste as new layer on your working image 53. Image Mirror 54. Effects- Image Effects- Offset with these settings H= - 400 and V= 0 55. Effects - 3D-Effects -Drop shadow with these settings
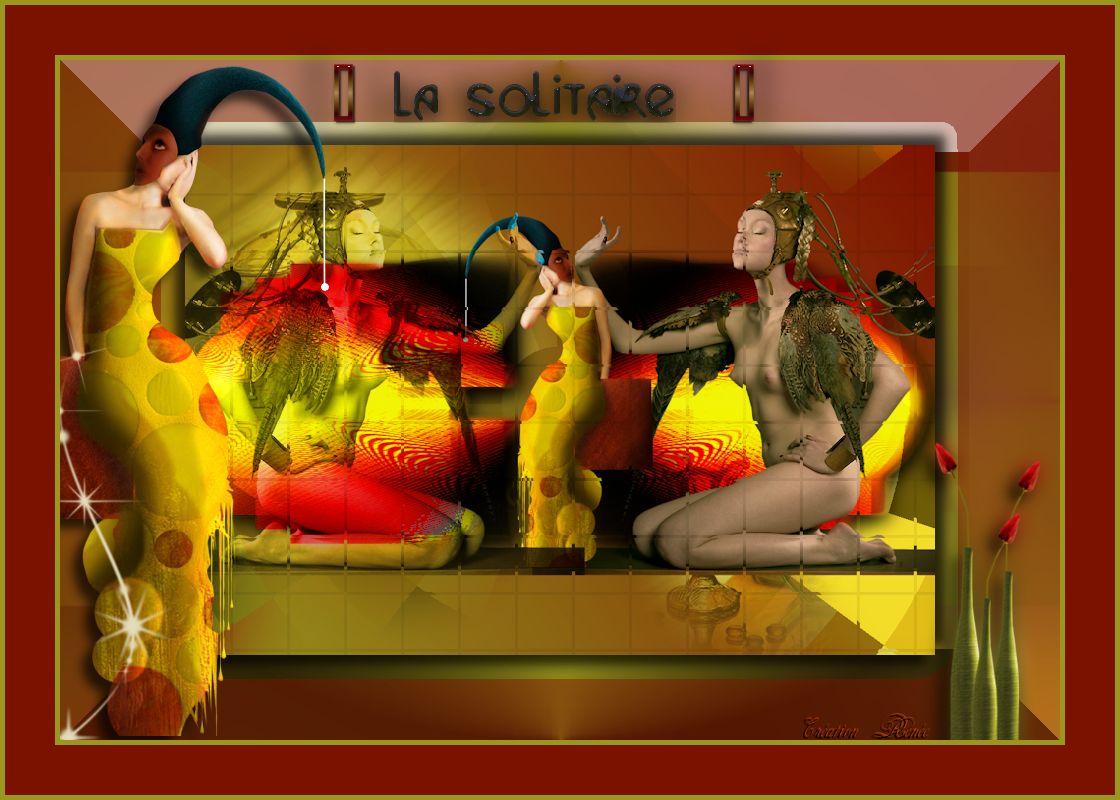
55. Open the tube "pinceau étoile " Edit/ paste as new layer on your working image and move to the left bottom 56. Open the tube ''@ ann_060411_vaseFlowers_hannah_tdstudio''/ Edit/ paste as new layer on your working image and move to the right bottom Repeat Effects - 3D-Effects -Drop shadow with the same settings 57. Image - Add borders-Symmetric checked: 5pixels foregroundcolor 58. Image - Add borders-Symmetric checked: 50 pixels backgroundcolor 59. Image - Add borders-Symmetric checked: 5 pixels foregroundcolor 60. Open the tube text "la solitaire " Edit/ paste as new layer on your working image and move 62. Layers- Merge- Merge- All. Save as JPG
* I hope you enjoyed this tutorial . Renée This lesson was written by Renée edited and update 2009 * Any resemblance with an existing lesson is merely a coincidence *
* Don't forget to thank the people who work for us and with us. I named the tubeurs - Testers and the translators. Thanks Renée.
I am part of Tutorial Writers Inc. My tutorials are regularly recordedt ReneeGraphisme_All rights reserved
|
 Translations