|
New
Translated here
Le Monde de la Théière
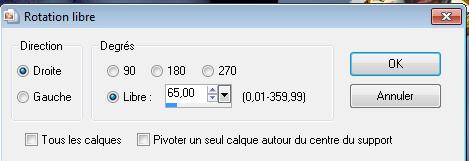
- Set your foreground to gradient 'Foreground-background' - Radial with these settings
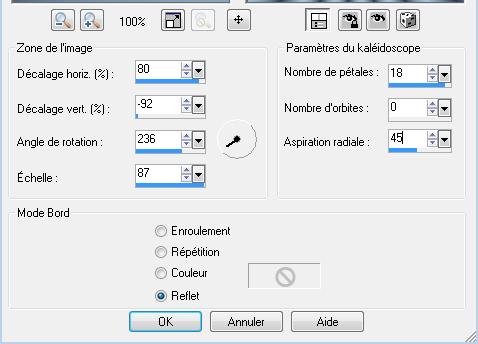
2. Open a transparent image of 1025 x 655 pixels - Activate Flood Fill Tool and fill the layer with the gradient 3. Effects -Reflecion Effects /Kaleidoscope with these settings
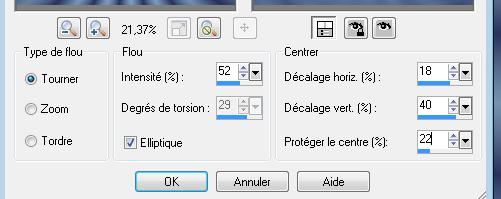
4. Adjust-Blur-Radial Blur with these settings
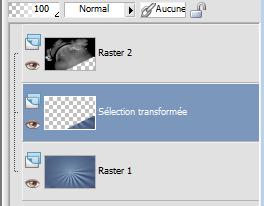
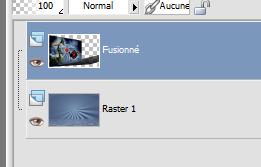
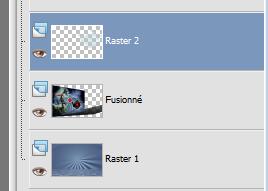
5. Effects-Edge Effects-Enhance More 6. Layers- New raster layer 7. Selections-Select All 8. Open the tube ''renee-monde-de-la-theiere'' - Edit/copy- Edit/ paste into selection /Selections-Deselect All - Layer Palette -Double click on this layer and set the Blendmode to "Overlay " and set the layer opacity of this layer to 97% 9. Selections - load/save selection - load selection from disk and select my file : @renee-le-monde-de-la-theire'' 10. Press the Delete button on your key board - Layer Palette-Make raster 1 active (bottom layer) 11. Selections- Promote selection to layer /Selections-Deselect All. Your layer palette looks like this:
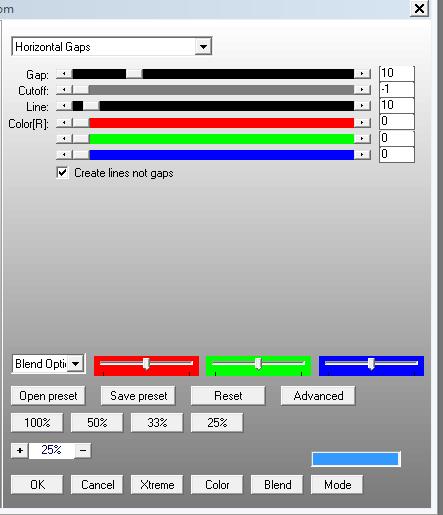
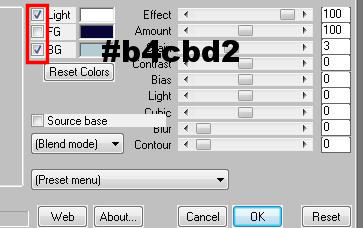
Layer palette: activate the second layer of the top 12. Effects-Plugins - EyeCandy5 Impact - perspective shadow tab Settings/User settings choose my preset: ''renee-monde-de-la-theiere-shadow'' 13. Effects-Plugins - AP01 Innovation - Lines silverling with these settings
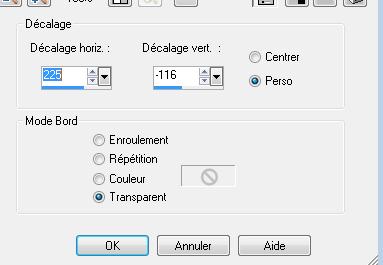
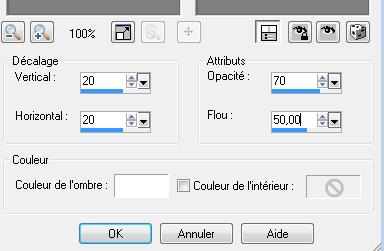
14. Open the tube ''renee-monde-de-la-theiere-ma théière noire'' /Edit/copy- Edit/ paste as new layer on your working area 15. Effects-Image Effects-Offset with these settings
16. Open the tube ''angeldesign_fantaisy28.png'' Image Resize with 85% / Edit/copy- Edit/ paste as new layer on your working area /With your move tool place it to the left side 17. Open the tube ''renee-monde-de-la-theiere-rouge'' / Edit/copy- Edit/ paste as new layer on your working area /With your move tool place it as shown below
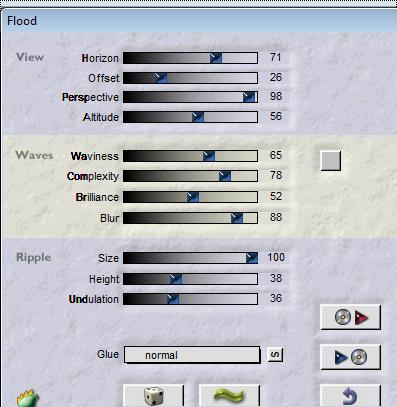
18.Open the tube ''renee-monde-de-la-theiere-barres horizontale '' /Edit/ Copy-Edit - Paste as new layer on your working area -Do not move it is in the right place 19. Layer Palette -Double click on this layer and set the Blendmode to "Hard Light " and set the layer opacity of this layer to 65% 20. Layers-Arrange-Move Down 21. - Activate the bottom of the layer-Palette 22. Layers-Duplicate /Close the bottom layer 23. Activate the top of the layer palette/Layers- Merge- Merge Visible 24. Effects-Plugins- Andromeda perspective /Preset - It open 25. Effects-Plugins - Eyecandy 5Impact - perpsective shadow Tab-Settings- Preset - long perspective shadow in back 26. Open eye of the layer - Stay on this layer 27. Effects-Plugins - Flaming pear /flood with these settings
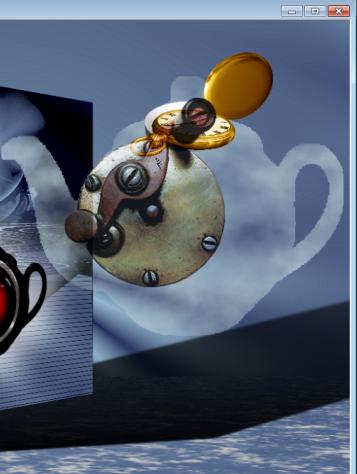
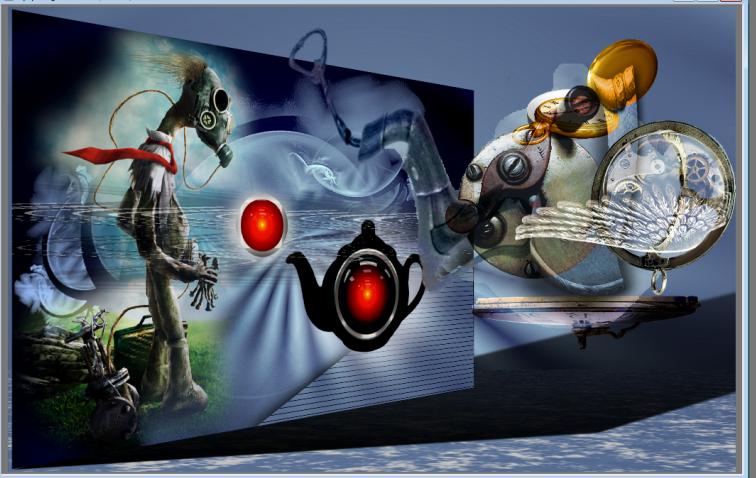
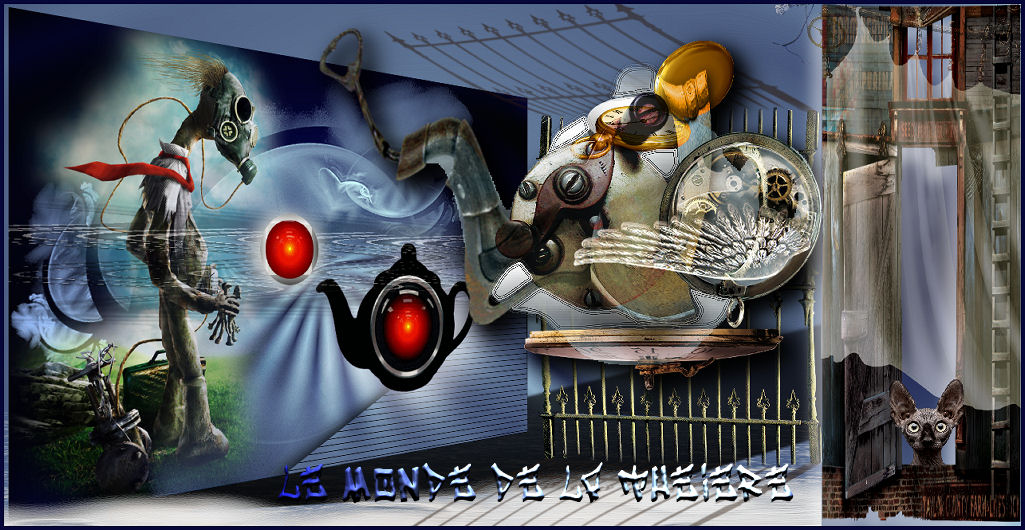
- You have this result
28. Activate the top of the layer palette 29. Layers- New rasterlayer 30. Selections - load/save selection - load selection from disk and select my file :''@_renee-monde-de-la-theiere-2'' 31. Effects-Plugins - Mura's Meister / Clouds **attention for the colors **
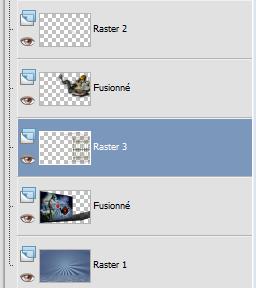
32. Selections-Deselect All - Layer palette look like this now
33. Layer palette-Make raster 2 aktive 34.Selections - load/save selection - load selection from disk and select my file : @ renee-monde-de-la-theiere3'' 35. Effects-3D Effects-Cutout with these settings
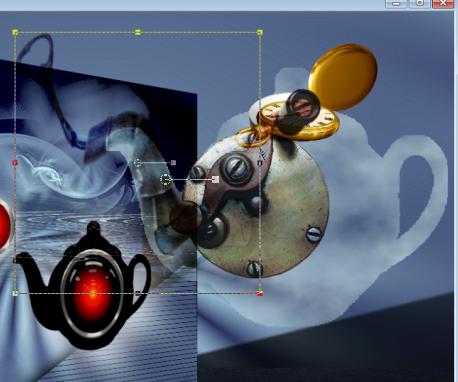
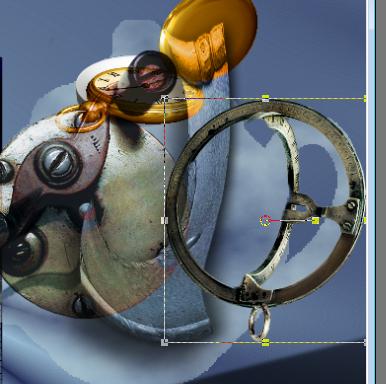
36. Effects-Plugins -Eyecandy5- Extrude -tab Settings/User settings choose my preset: ''renee-monde-de-la-theiere-extrude'' 37. Selections-Deselect All *We will dress up our teapot I gave you a map with the tubes I used. By using these tubes you won’t have same the result as I had You can use the Pick tool - mode perspective - the Mesh warp tool etc to obtain a result simular to mine. My print screens will help you. - Open the tube ''élément 1 /Edit/copy- Edit/ paste as new layer on your working area and move /Layer Palette -Double click on this layer and set the Blendmode to "Hard Light " and set the layer opacity of this layer to 83% - Open the tube Elément 2 '' Edit/copy- Edit/ paste as new layer on your working area and move/ Set the Blendmode to Normal normal - Layers-Arrange-Move Down./ The result - Open the tube'' element 3" / Edit/copy- Edit/ paste as new layer on your working area and move **If you have difficulties with this item feel free to use the pspimage in the map ** - Image Free Rotate as shown below
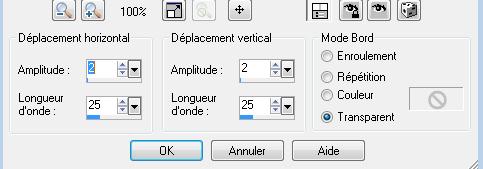
- Effects-Distortion Effects-Wave with these settings/ Repeat twice
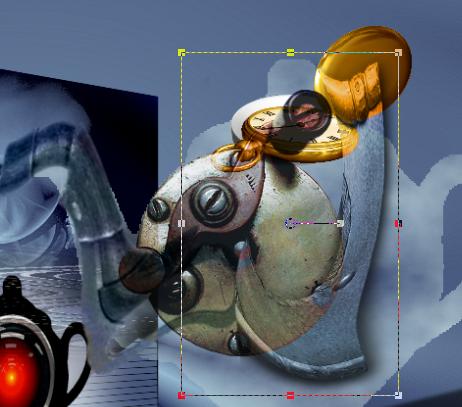
- Image Mirror /Image Flip - Pick Tool (K) place it in the right place as shown in the example below/ Layer Palette -Double click on this layer and set the Blendmode to "Luminance Legacy "
- Layers Duplicate-Layers-Merge-Merge-Down - Open the tube ''élément 4" /Edit/copy- Edit/ paste as new layer on your working area and move - Effects-Distortion Effects-Twirl with these settings -180 Degress - Double click on this layer and set the Blendmode to Luminance /Set the layer opacity of this layer to 85% - Pick Tool (K) place it in the right place as shown in the example below
- Effects-3D Effects-Drop Shadow with these settings 18/ -14/45/25 black - Open the tube ''élément 5 '' /Edit/copy- Edit/ paste as new layer on your working area and move like this
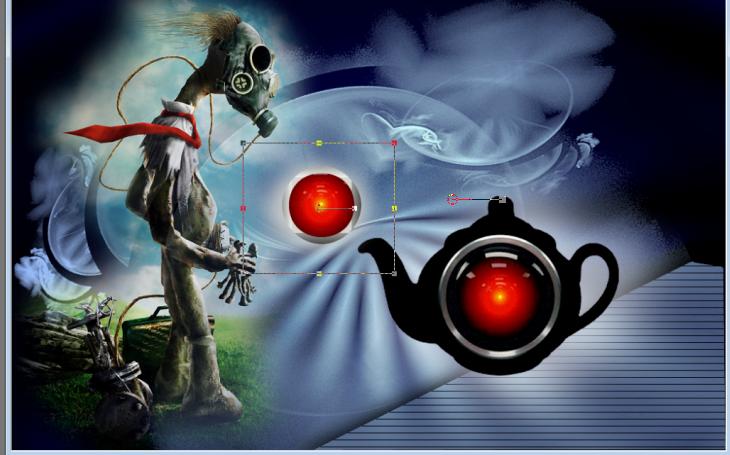
- Open the tube ''élément 6 '' /Edit/copy- Edit/ paste as new layer on your working area and move at the center of your work /Double click on this layer and set the Blendmode to Screen - Open the tube ''élément 7'' /Edit/copy- Edit/ paste as new layer on your working area and move'' Double click on this layer and set the Blendmode to Overlay - Your final result depends from how you placed all the tube elements you used to dress up your teapot
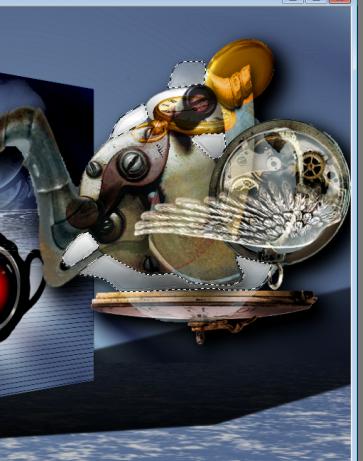
38. Layer Palette: Close the 2 bottom layers-Layers- Merge- Merge Visible (Layers with the teapot are merged ) 39. Effects-Plugins - EyeCandy 5Impact - perspective shadow Tab-Settings -Preset -drop shadow blury and repeat this filter again 40. Activate the Free Hand Selection-Lasso-Select this parts as shown below
41. Layers-New raster layer 42. Color palette: Change foreground material into a Fading White gradient-Linear 0/3 -Flood Fill Tool-fill the selection with the fading white gradient 43. Effects-Plugins -EyeCandy 5/ Gradient glow 44. Effects- Edge Effects- Enhance More 45. Selections- Deselect All 46. Open the tube ''renee-monde-de-la-theiere-double barrière '' -/Edit/copy- Edit/ paste as new layer on your working area and move - Your layer palette looks like this:
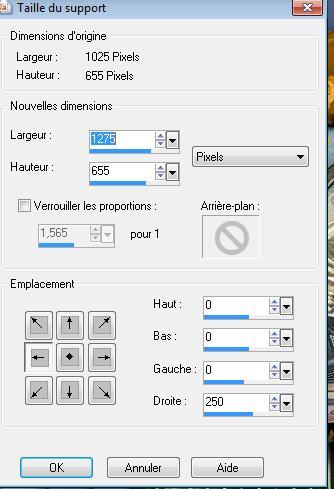
47. Open the tube ''renee-monde-de-la-theiere-brouillard'' -/Edit/copy- Edit/ paste as new layer on your working area and move -Layers-Arrange-Move Down underneath raster 3 48. Layers- Merge-Merge Visible 49. Image -Canvas Size with these settings
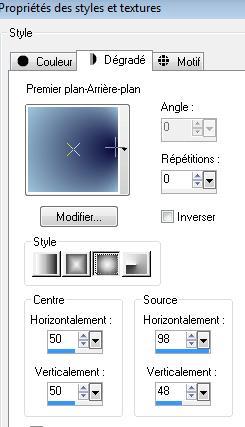
50 With the magic wand select the right part 51. Material Properties:Set the foreground color to #060738- Set the background color to #a0c6dc /Set your foreground to gradient 'Foreground-background' - sunburst with these settings
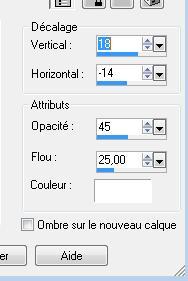
53. Activate Flood Fill Tool and fill the selection with the gradient 54. Layers- New raster layer 55. Open the tube ''renee-monde-de-la-theiere-porte ouverte'' - Edit/copy- Edit/ paste into selection 56. Selections- Deselect All 57. Effects- 3D Effects-Drop Shadow with these settings
58. Open the tube ''chien-nu-tubed by thafs '' Image Resize with 125 pixels /Edit/copy- Edit/ paste as new layer on your working area and move 59. Open de tube ''renee-monde-de-la-theiere-rideaux'' /Edit/copy- Edit/ paste as new layer on your working area and move Layer Palette -Double click on this layer and set the Blendmode to "Hard Light " and set the layer opacity of this layer to 48 60. Layers-Arrange-Move Down 61. Layers- Merge-Merge Visible 62. Image - Add borders-Symmetric checked: 5 pixels foreground color 63. Open the tube '' texte '' /Edit - Copy -Edit - Paste as new layer on your working area and move.Ore write your own text. (Font is into the zipfile) Save as JPG I hope you enjoyed this tutorial . Renée This lesson was written by Renée
Placing 2012 *
Any resemblance with an existing lesson is merely a coincidence *
* Don't forget to thank the people who work for us and with us.
I named the tubeurs - Testers and the translators. Thanks Renée.
I am part of Tutorial Writers Inc.
My tutorials are regularly recordedt
ReneeGraphisme_All rights reserved *
*
|
 Translations


 Let's start the lesson.