|
New
Translations here
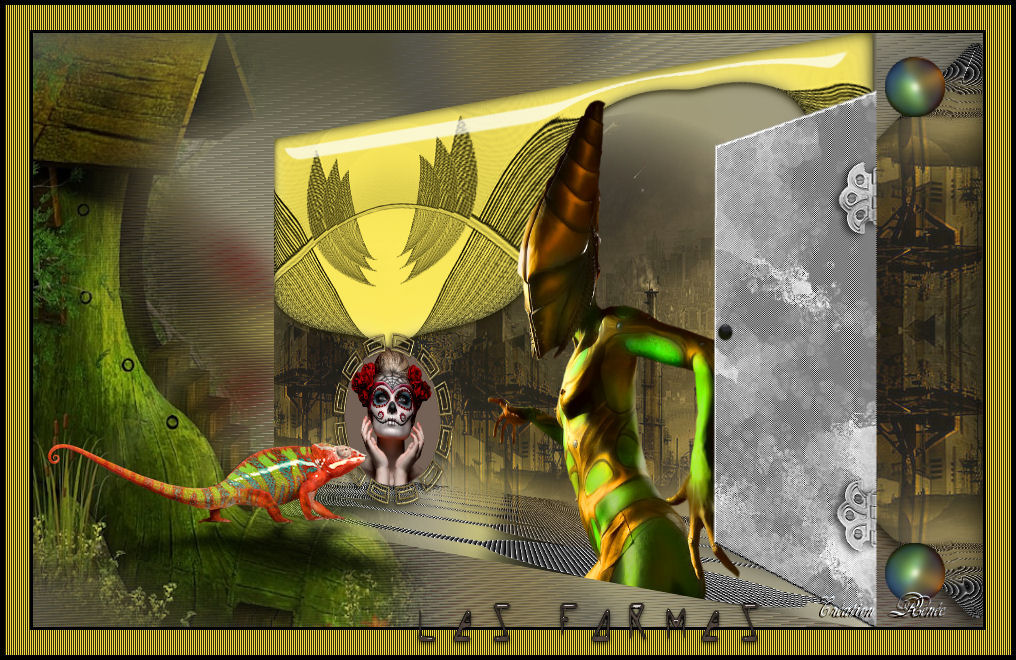
Les Formes
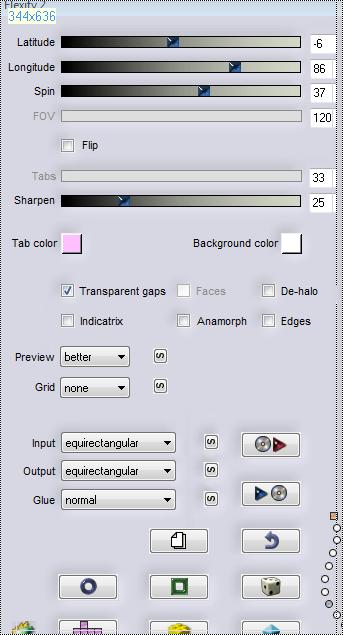
Let's start the lesson. 1. Open the image "fond1" Window - Duplicate (or shift+D) - Close the original and proceed on the copy 2. Open the tube ''renee 3 balles '' Edit/copy- Edit/ paste as new layer on your working image (do not move it is in the right place) 3. Effects-Plugins -Flaming pear Demitone 50 4. Effects-Plugins - Flaming pear /flexify2 with these settings
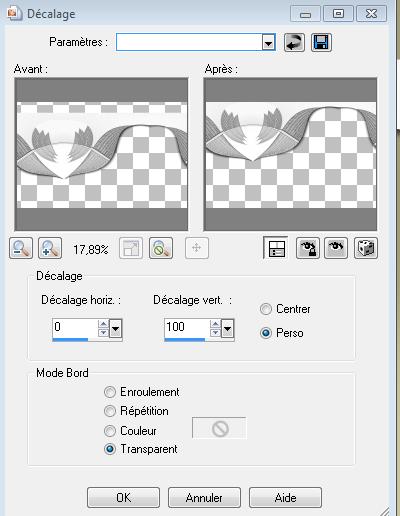
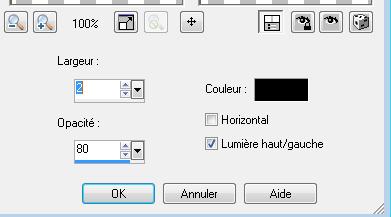
5. Effects - Images Effects - Offset use settings below
6.
Effects-Plugins - EyeCandy5 Impact - Glass /
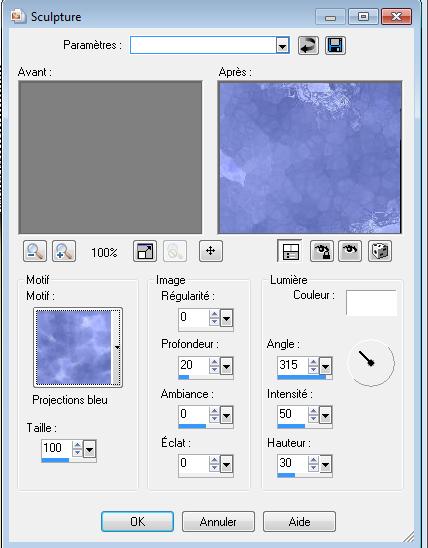
7. Effects-Plugins -Adjust Variation 1x click Original and click 3x Darker 8. Layers- New raster layer 9. Selections –load/save selection –load selection from disc and choose: ''renee formes '' Preparation:Set your foreground color to #808080-Activate Flood Fill Tool and fill the selection with the foreground color #808080 10. Effects-Texture Effects-Sculpture ''projection bleue'' with these settings (C:\Users\YourName\Documents\My PSP-files\Textures Textures
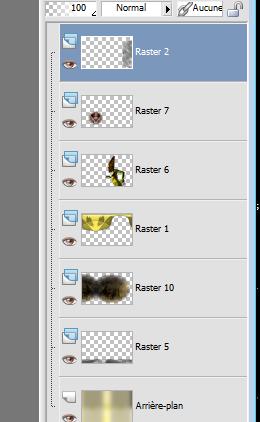
11. Selections-Deselect All 12. Effects-Plugins - Flaming pear / Demitone 50 13. Open the tube ''renee formes attaches "Edit/copy- Edit/ paste as new layer on your working image and move 14. Open the tube ''renee forme poignee'' Edit/copy- Edit/ paste as new layer on your working image and move - Activate the bottom of the Layer-Palette 15. Layers-New raster layer 16. Selections –load/save selection –load selection from disc and choose: ''renee -formes2'' Preparation: Set your foreground color to #808080 -Activate Flood Fill Tool: fill the selection with the foreground color #808080 17. Effects-Texture Effects-Blinds with these settings color #404040
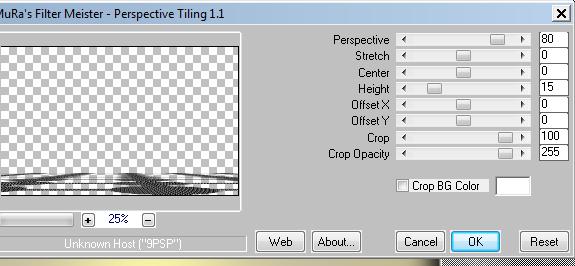
18. Selections-Deselect All 19. Effects -Plugins - Mura's Meister /persective tiling with these settings
20. Effects-Edge Effects- Enhance 21. Effects-Plugins - EyeCandy 5 Impact /
Perspective shadow 22. Open the tube ''Cityscape"" Edit/copy- Edit/ paste as new layer on your working image 23. Effects - Images Effects - Offset with these settings: H= -200 and V= 0 transparent 24. Open the tube ''1293007550 '' Edit/copy- Edit/ paste as new layer on your working image /Layers-Arrange Move Down ( above raster 1 )(Place against the edge of the door ) 25. Open the tube ''renee -cadre-forme '' Edit/copy- Edit/ paste as new layer on your working image and move - Your work look like this now
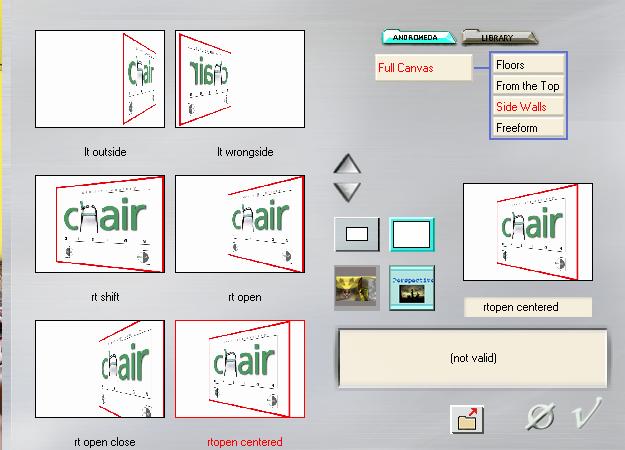
26. Layers- Merge- Merge-Visible 27. Layers-Duplicate 28. Effects-Plugins - Andromeda /Perspective /Side walls/ Preset - rtopen centered!!!
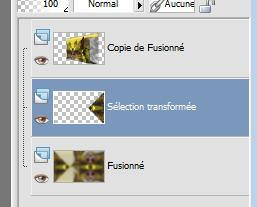
- Activate the layer underneath ( the merged layer) 29. Effects-Plugins - Simple /pizza slice mirror 30. Selections –load/save selection –load selection from disc and choose: ''renee-formes3'' 31. Selections-Promote selection to layer /Selections-Deselect All - Activate the layer underneath ( the merged layer) 32. Adjust-Blur-Gaussian Blur Radius: 15 - Activate the layer above (promoted selection) 33. Effects-Plugins -EyeCandy5 Imapct -Glass Tab-Settings- Preset / clear 34. Image Mirror - you should have this result
- Activate the layer underneath ( the merged layer) 35. Effects-Plugins - L and K's / Elvida a 18 - Activate the top of the layer palette 36. Open the tube ''133-feerie-nikita'' - Edit/copy- Edit/ paste as new layer on your working image and move to the left side 37. Activate the Pick Tool(K)mode scale -pull the tube up (see finished image ) 38. Adjust-Sharpness-Sharpen 39. Open the tube ''renee-billes -formes '' Edit/copy- Edit/ paste as new layer and move to the right side 40. Layers-Duplicate-Image Flip 41. Open the tube ''guismo-cameleon 150211 » Image Resize 25% - Edit/copy- Edit/ paste as new layer on your working image and move to the left 42. Effects-Plugins - EyeCandy5
Impact /Perpective shadow 43. Layers-Merge- Merge All . 44. Image - Add borders-Symmetric checked: 3 pixels black 45. Image - Add borders-Symmetric checked: de 25 pixels #f3dc43 46. Image - Add borders-Symmetric checked: de 5 pixels black 47. With the magic wand select the border of 25 pixels 48. Effects-Texture Effects-Blinds-Black
49. Open the tube ''titre ''–Edit/copy-Edit paste as a new layer on your working image and move Ore write your own text Save as JPG
I am part of Tutorial Writers Inc. My tutorials are regularly recordedt ReneeGraphisme_All rights reserved
*
|
 Translations