|
New
Translations here
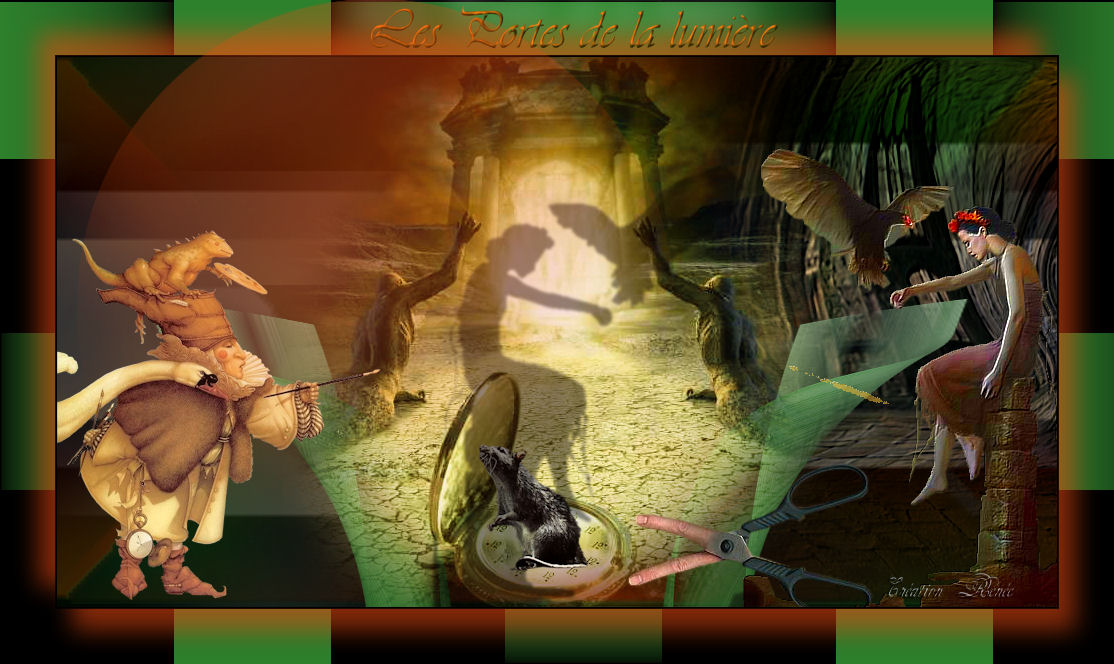
Les Portes de la lumière
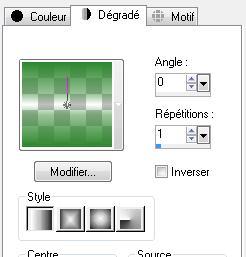
- Let's start the lesson. 1. Open a transparent image of 1000 x550 pixels 2. Material Properties:Set your foreground color to: #ef4b10 - Set your background color to: #30872f 3. Properties Foreground: Set your foreground to gradient 'Foreground-background' - Linear - Angle 45 - Repeats 3- Invert not checked. -Activate Flood Fill Tool and fill the selection with the gradient 4. Adjust-Blur- Gaussian Blur: Radius: 40 5. Layers- New Raster Layer 6. Selections- Select All 7. Open the tube »calguisBeautyColored25082011 »Edit/copy- Edit/ paste into selection 8. Selections- Deselect All 9. Effects- Image Effects- Seamless Tiling using the default settings 10. Layers- Merge- Merge Down Adjust-Blur- Gaussian Blur: Radius: 40 11. Layers- Duplicate 12. Effects- Plugins - VM Extravanga with these settings
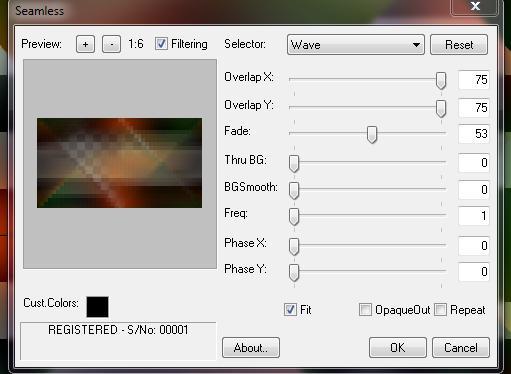
13. Selections - Load/save selections - Load selection from disk and select my file:« @renee-gnomes » 14. Selections-Promote selections to Layer 15. Selections- Deselect All 16. Effects- Plugins- Unlimited <& Bkg kaleidoscope / mirrored and scalled 17. With the magic wand select the white parts- Hit the Delete Key of your Keyboard 18. Layers- Duplicate / Effects- Plugins- Unlimited <& Bkg Kaleidoscope Qflip Zbottom R/ 19. Layers- Merge- Merge Down 20. Effects- Plugins - Mura's Pro -Seamless/with these settings
21. Layers- New Raster Layer 22. Selections - Load/save selections - Load selection from disk and select my file:'' renee gnomes2'' Change background material into a "fading background" linear gradient with these settings -Activate Flood Fill Tool and fill the selection with the gradient
Selections Deselect All 23. Effects- Plugins - Vm Stilyze / Motion Trail Wild with these settings
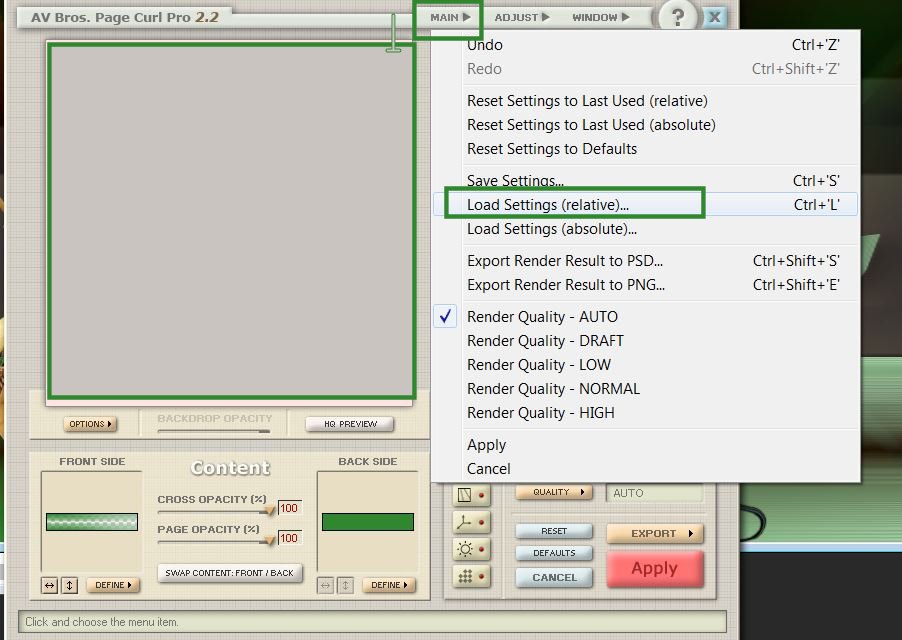
24. Effects- Plugins - Avs bros page curl 2.2 /Click main/ Load Dettings(relative) and select my file preset « avs gnomes '' and OK
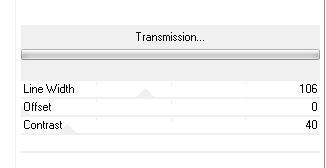
25. Effects- Distortions Effects- Pinch to 100 26. Layers- Duplicate /Image Mirror 27. Layers- Merge- Merge Down 28. Open the tube « cal-guis-stopimage-21102008 »Edit/copy- Edit/ paste as new layer on your working image (do not move it is in the right place) 29. Open the tube « calguismichael1619 »Image Resize a 55% Edit/copy- Edit/ paste as new layer on your working image /Move tool (M) : place your tube on the left side of your image 30. Open the tube « calguirat181010 » Image Resize to 55 % /Image Mirror /Edit/copy- Edit/ paste as new layer on your working image and move 31.Open the tube »calguissurrealsite goossens 2112011 »Edit/copy- Edit/ paste as new layer on your working image 32. Open the tube « calguis-mistchat-231--86c7aa » Activate Mesh Warp Tool -You can use the grid to help you. Attention: there is an image in the folder :Edit/copy- Edit/ paste as new layer on your working image and move as shown in the example below-Layer Palette look like this now-You should have this result
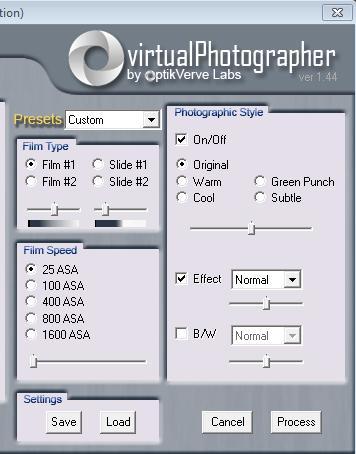
33. Effects-User Defined Filter: Emboss 3/using the default settings -Layer Palette -Double click on this layer and set the Blendmode to "Overlay " 34. Layers- Merge - Merge Visible 35. Effects- Plugins- Optik verlaps Virtual Photographer with these settings
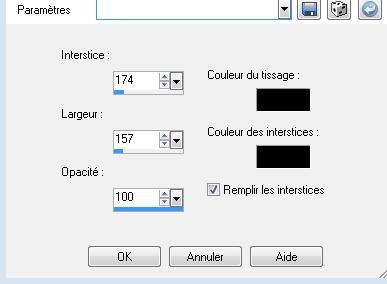
36. Open the tube « Linda Bergkvit%Calimity of touch » activate raster 1 of the tube »Edit/copy- Edit/ paste as new layer on your working image/Image Mirror and move 37. Effects- Plugins -FM Tile tools /saturation emboss /using the default settings and repeat this filter -activate the tube again activate « raster 1 shadow /Edit/copy- Edit/ paste as new Layer and move /Set the layer opacity of this layer to 68% 38. Layers- Merge- Merge All 39. Image - Add borders-Symmetric checked: 2 pixels black 40. Image - Add borders-Symmetric checked: 55 pixels background color 41. Activate Magic Wand and click in the border of 55 pixels 42. Effects- Texture Effects- Weave with these settings
43. Selections- Invert 44. Effects- 3 D Effects- Drop Shadow with these settings-use the forground color
-Repeat: Effects- 3 D Effects- Drop Shadow -negative 45. Selections- Deselect All 46. Open the tube " titre" Edit/copy- Edit/ paste as new layer on your working image and move 47. Layers- New Raster Layer 48. Selections - load/save selection - load selection from disk and choose my selection:" renee -gnomes 3" Activate Flood Fill Tool and fill the selection with the foreground color /Set the layer opacity of this layer to 34% 49. Selections- Deselect All Layers- Merge- Merge All Save as JPG
I hope you enjoyed this lesson This lesson was written by Renée 2009 * Any resemblance with an existing lesson is merely a coincidence * * Don't forget to thank the people who work for us and with us. I named the tubeurs - Testers and the translators. Thanks Renée. I am part of Tutorial Writers Inc. My tutorials are regularly recordedt ReneeGraphisme_All rights reserved
*
|
 Translations