|
New
Translations here
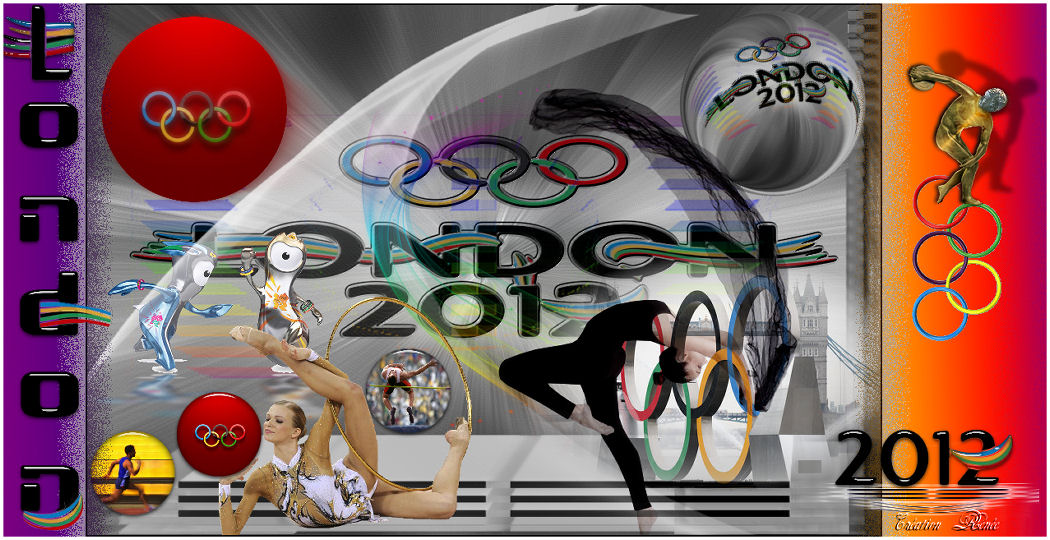
LONDON 2012 Jeux Olympiques
1. Open the backgroundimage ''fond olympique '' Window Duplicate -Promote Background Layer =Raster 1'' 2. Effects- Image Effects-Seamless Tiling with these settings
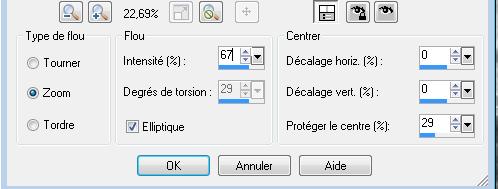
3. Adjust-Blur-Radial Blur with these settings
4. Layers-New raster layer 5. Selections - load/save selection - load selection from disk and choose my selection: ''renee-olympique 1 '' 6. Open the tube ''renee-olympique-logo '' Edit/copy-Edit paste into selection 7. Selections-Deselect All 8.
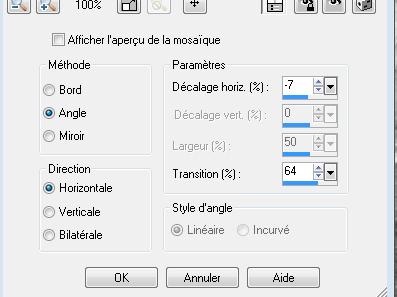
Effects-Plugins -EyeCandy 5 Impact / glass - 9. Layers-New raster layer 10. Selection Tool-(S) Custom Selection with these settings
11.
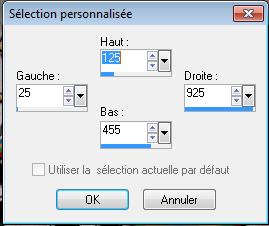
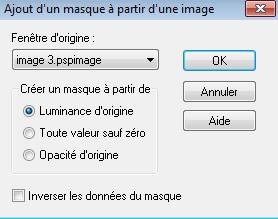
Properties foreground: 'arc en ciel'' - Activate Flood Fill Tool and fill the selection with the gradient 12. Layers- New Mask layer from Image and select Mask ''image3''
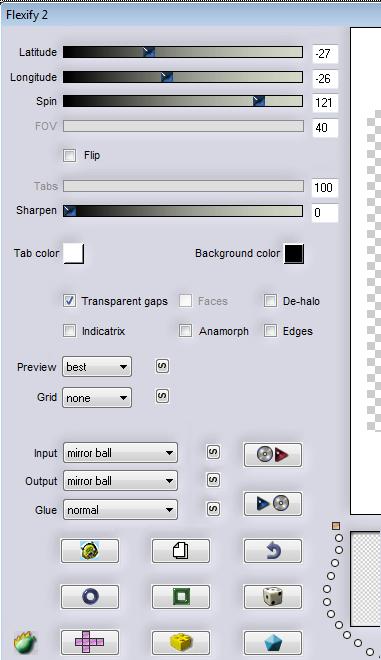
13. Layers- Merge- Merge- Group 14.Selections-Deselect All 15. Effects-User Defined Filter - Emboss3 using the default settings 16. Layers- Merge-Merge Visible 17. Layers- Duplicate - Stay on this layer 18. Effects- Plugins - Flaming pear /flexify 2 with these settings
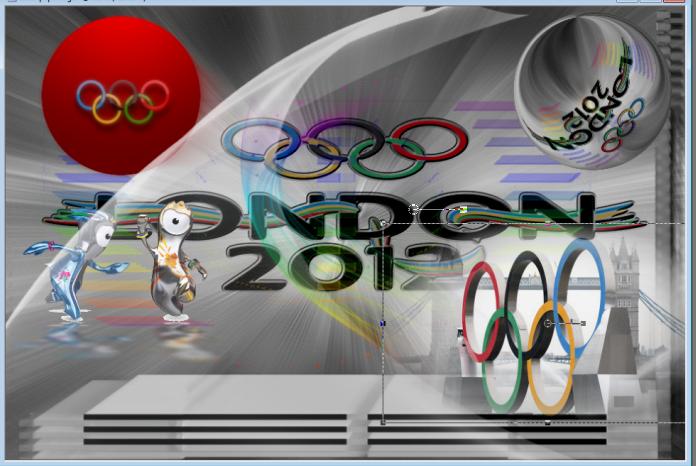
19. Image Resize with 35% (Resize all the layers not checked) - Activate your Pick Tool (K) Mode Scale place it in the right place as shown below
20. Layers- New raster layer 21. Selections - load/save selection - load selection from disk and choose my selection: ''renee-olympique2'' 22. Open the tube ''renee-olympique-image rouge'' Edit/copy-Edit paste into selection 23. Selections-Deselect All 24.
Effects- Plugins - Eyecandy5 Impact /Motion trail - Activate the bottom of the layer-Palette 25. Open the tube ''renee-olympique-podium '' Edit - Copy -Edit - Paste as new layer on your working area. - Activate the top of the layer-Palette 26. Open the tube " renee-olympique-mascottes ''/ Image Resize with 40% --Edit - Copy -Edit - Paste as new layer on your working area. With your move tool move to the left 27. Effects-Plugins - Eyecandy 5 Impact /perspective -Tab-Settings-preset - "reflect in front" 28. Open the tube ''renee sinedot" //Edit/copy-Edit paste as a new layer on your working area .(do not move it is in the right place) Layer Palette -Double click on this layer and set the Blendmode to Hard Light and set the layer opacity of this layer to 69% 29. Open the tube ''renee-effet couleur '' --//Edit/copy-Edit paste as a new layer on your working area .(do not move it is in the right place) !! 30. Open the image ''londres olympique '' Layers- Load/Save mask-Load Mask from Disk and select: masque 20-20 using the default settings -Layers- Merge- Merge Group - Layers- Duplicate -Layers- Merge- Merge Down - Image Mirror 31. Edit/copy-Edit paste as a new layer on your working area / and move as shown in the example below
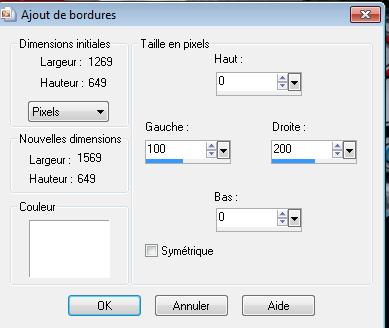
32. Open the tube ''Mtm_lady_140_21-aug 2006 33. Edit/copy-Edit paste as a new layer on your working area and move - Layer Palette -Double click on this layer and set the Blendmode to Multiply 34. Open the tube ''Rythmique-Gymanastique '' Image Resize with 65 % / Edit/copy-Edit paste as a new layer on your working area 35. Layers- New raster layer 36. Selections - load/save selection - load selection from disk and choose my selection:''renee-olympique3''- Open an image of your choice ( I put in the folder) / Edit/copy-Edit paste into selection 37. Selections-Deselect All 38. Effects-Plugins - Eyecandy5Impact /glass Tab-Settings-User/settings and select -preset ''renee -olympique '' 39. Layers- New raster layer Selections - load/save selection - load selection from disk and choose my selection:''renee-olympique3'' Open an image of your choice Edit/copy-Edit paste into selection - Repeat- Effects - Eyecandy5Impact /glass /with the same setting-//Selections-Deselect All -Repeat this with the another image 40. Image - Add borders-Symmetric checked: 2 pixels black 41. Image - Add Borders NO SYMMETRIC-Color white
42. With the Magic Wand select the white Borders 43.Layers- New raster layer //Properties foreground: Same gradient, ' 'arc en ciel'' but now with settings below: -Activate Flood Fill Tool and fill the selection with the gradient
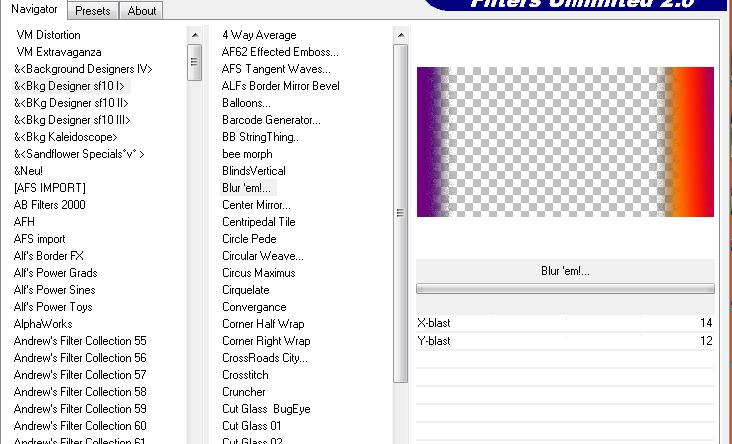
44. Effects-Plugins -Unlimited -&<Bkg designers /sf 10I>/ Blur'em
45. Open the tube ''athlete1 de roserika'' Edit /Copy -Edit - Paste as new layer on your working area and move 46. Open the tube ''renee-olympique-anneau '' Edit /Copy -Edit - Paste as new layer on your working area and move 47. Open the Textes 2012 and London// Edit/copy-Edit paste as a new layer on your working area .Ore write your own text 48. Image Resize with 1050 pixels Width Save as JPG I hope you enjoyed this lesson Renée This lesson was written by Renée Placing 26
July 2012 * Any resemblance with an existing lesson is merely a coincidence * * Don't forget to thank the people who work for us and with us. I named the tubeurs - Testers and the translators. Thanks Renée.
I am part of Tutorial Writers Inc. My tutorials are regularly recorded ReneeGraphisme_All rights reserved
|
 Translations


 On the road to London