|

Translated by Sally
*
Translator Here
Mysterious light
*
Material Here
Filters
*
VM Instant Art /vernissage
VM Extravanga /shoutin
Mura's Meister /pole transformation
***
here
http://www.reneegraphisme.fr/filtres/Mes
filtres.html
*
TUBES
*
CLAUDIA VIZA - TREAGEN
These tubes were
received from tubeurs sharing groups
Or found by me
searching on the net
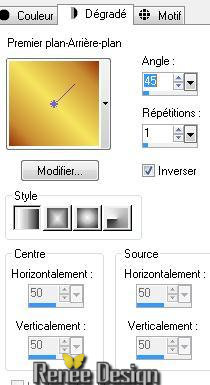
I am grateful to have
been given permission these beautiful tubes so
please use any
copyright information as needed
If one of these tubes
is yours,
Contact me
so I can make a link
to your site
or remove it
Thank you Renee
|
Before you start
*
Open PSP
Open / tubes duplicate and close originals
Open then Minimize the mask in PSP
Put filters in their proper folders
Brushes and other tools in their respective folders
To import presets / Double-click the file it will
automatically install
|
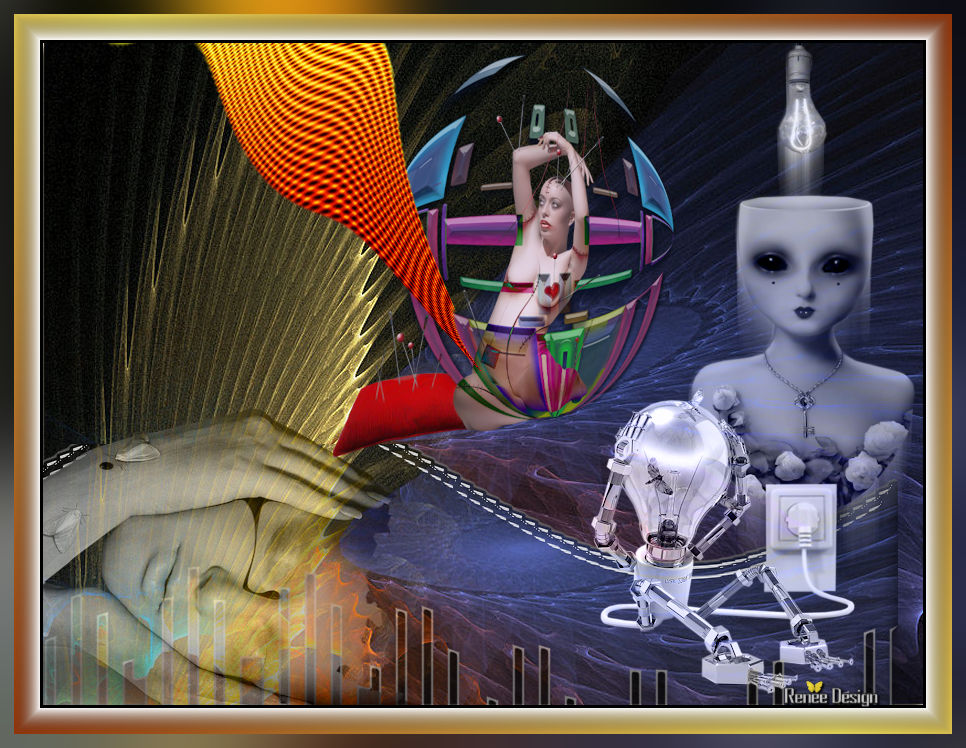
Let's begin
1. Open tube "fractals 32" - Window duplicate - close original (we
will work on the copy)
(We always work on copies of the tubes so duplicate and close
original window)
2. Layers - duplicate
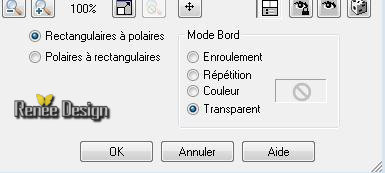
3. Effects - distortion effects / polar coordinates
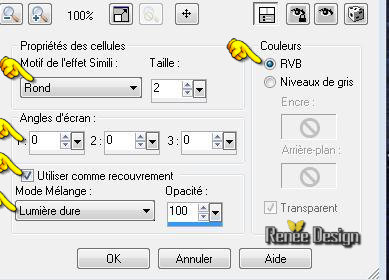
4: filter – vm instant art – vernissage

5. Transparency / Eliminate white.
6. Effects - Eyecandy5 - Impact / Glass / preset "renne_mystere_1"
7. Effects - Geometric effects / circle / transparent
8. Layers - Duplicate /Image mirror / Layers - merge down
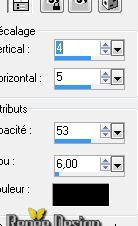
9. Effects - 3D effects - Drop shadow/ as follows
10. Set the layer mode to difference
11. Open tube "claudia Viza 1202" - paste as a new layer / no need
to move, it is in the right place
12. Layers - Arrange down
13. Close the background layer / click on another layer and merge
visible
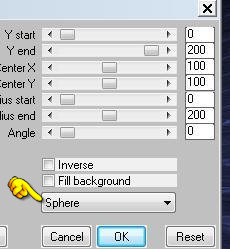
14. Effects - Andromeda Perspective / side walls / It open centered
15. Image resize to 70% and paste on your work as a new layer
16. Open your tube "languette" Promote to raster layer
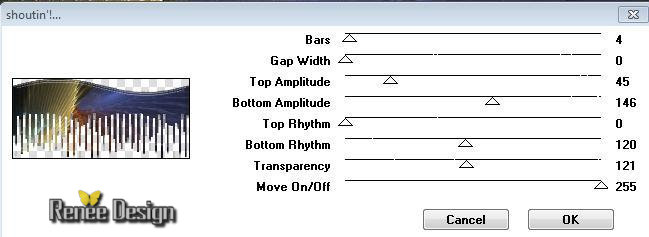
17. Effects - Plugins - VM Extravanga / shoutin
18. Effects - Eye Candy5 Impact - Glass / "preset renee_futurisme_1"
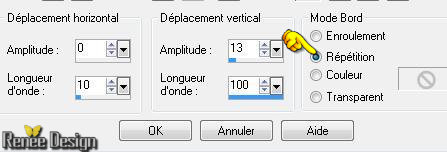
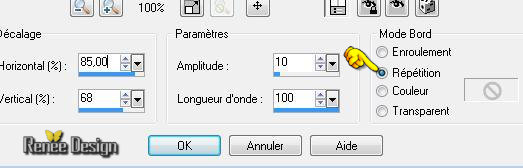
19. Effects - Distortion effects / wave
20. Edit - Copy and paste as new layer
21. Layers - Arrange/ move down. Move layer down as shown on the
finished image
.
smudge tool - touch up the image using these settings

22. Change the blend mode of this layer to hard light
23. Layers - add a new layer / load selection
"renee_futurisme_selection2"
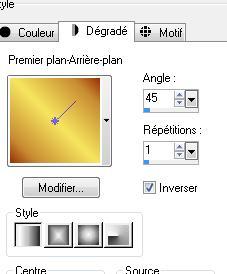
24. Create a linear gradient with the colors foreground #f6e55e and
background #9a3107
25. Fill the selection -Selections - select none
26. Effects - Artistic effects - halftone/ blend mode - hard light
27. Effects - Distortion effects - ripple
28. Plugins - Mura's meister - pole transform
Niets
verschuiven – hij is op de goede plaats
- Do not move the effect is in the right place
** Make sure the layer with the woman in the sphere is in a good
place. See end result
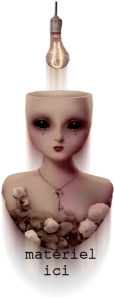
- Open the tube "fille ampoule" Paste as a new layer
* Move to a good place and set the layer mode to luminance legacy
29. Open tube "ampoule20% 20730" - Place well/ Set the mode to
Luminance - Image mirror
30. Open tube "t reagen_2427" - resize 55%, all layers unchecked -
paste as a new layer
31. Layers palette - Luminance mode and opacity to 75%
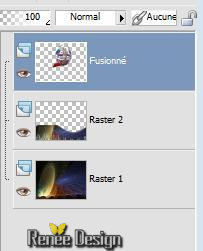
32. Merge all layers
33. Edit - copy
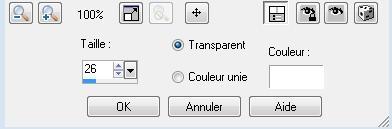
34. Image - add borders 3 pixels black
35. Image - add borders 40 pixels white
36. Select the white border using the magic wand / edit - paste into
selection with the image in memory
37. Adjust - blur / gaussian blur at 45
38. Transform the selection to layer
39. Selections - Invert selection
40. Effects - 3D effects / Chisel
41. Layers / add a new layer
42. Selections - Invert
43. Fill with the linear gradient / colors same as before
44. Layers - Arrange - Move down.
Selections - select none
All
Finished
Thanks Sally
*
I am part of Tutorial Writers Inc.
My tutorials are regularly recorded


|
Pour voir vos réalisations c'est ici
 |
|