|
New
Translations here Regarde moi
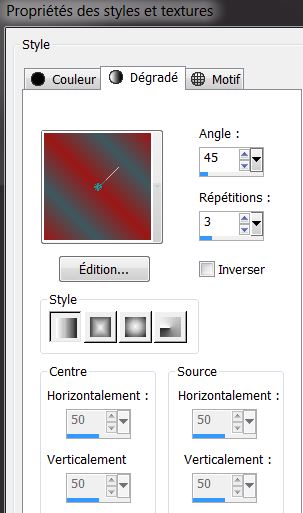
Let's start the lesson. 1. File - New - Open a new transparent image 950 x 650 pixels 2. Color-palette:Set your foreground color to #9b1716- Set your background color to #3d595f 3. Properties Foreground: Foreground/background linear gradient with settings below
4. Activate Flood Fill Tool and fill the layer with the layer with the gradient 5. Layers- New Raster Layer 6. Selections- Select All 7. Open the tube "maxyran 17-03-10-woman217 "- Edit/ Copy-Edit - Paste into selection-Selections- Deselect All 8. Effects- Image Effects- Seamless Tiling using the default settings
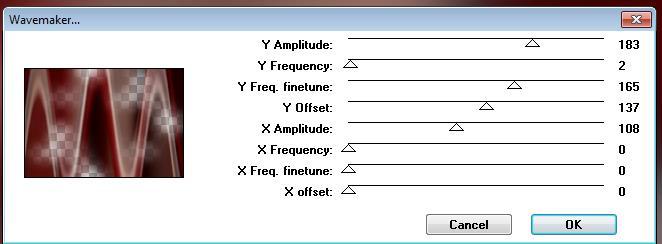
9. Adjust- Blur- Gaussian Blur: Radius: 42 10. Layers- Duplicate 11. Effects- Plugins-Unplugged Tools/lomo 151/242 12. Effects- Plugins- Unplugged Tools / Wavemaker use settings below
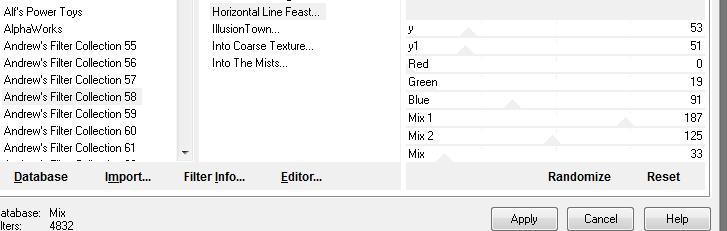
13. Effects- Plugins- Andrew's collection 58/Horizontal Line Feast use settings below
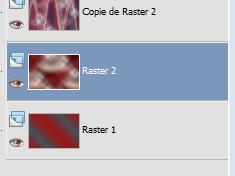
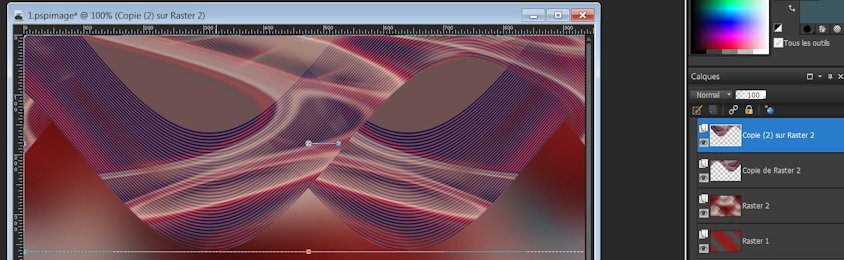
Your work and Layer Palette look like this now
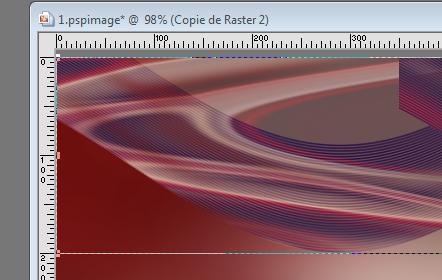
14. Layer palette – Make Copy of Raster 2 active -Activate the Pick Tool/Deformation tool (K) Mode Scale Pull the bottom Node up to 200 px high as shown in the example below Your work and Layer Palette look like this now
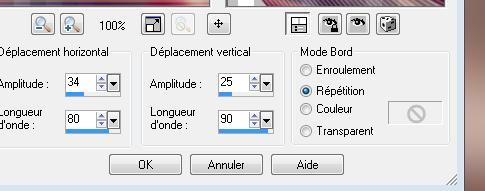
15. Effects- Distortion Effects- Wave with settings below
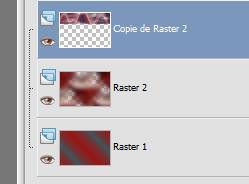
15. Layers- Duplicate /Image - Mirror - Mirror Horizontal ( Image - Mirror in previous PSP Versions) 16. Your work and Layer Palette look like this now
17. Layers- Merge- Merge Down 18. Activate the Pick Tool/Deformation tool (K) Mode Scale Pull the bottom Node up to 200 px high as shown in the example below
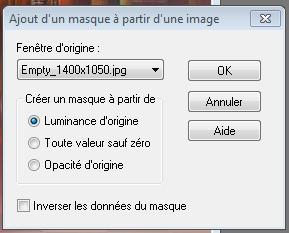
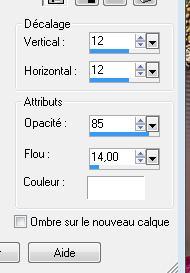
19. Effects- 3 D Effects- Drop Shadow with these settings 7/9/85/14 black 20. Layers- New Raster Layer 21. Selections –load/save selection –load selection from disc and choose my selection:'' @renee regarde moi'' 22. Open the tube « futurcity-peperinaa06042010 » Edit/ Copy-Edit - Paste into selection 23. Selections- Deselect All 24. Effects- 3 D Effects- Drop Shadow with the same settings 25. Effects- Plugins -FMTile tools - Saturation Emboss using the default settings 26. Stay on this layer 27. Layers- New Raster Layer / Activate Flood Fill Tool and fill the layer with the layer with the background color #3d595f 28. Layers- New Mask layer from Image and choose Mask: " empty-1400x 1050.jpg ''
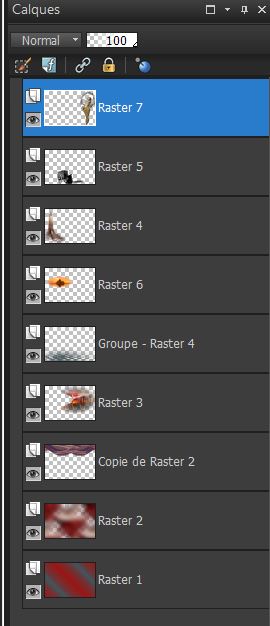
Layers- Merge- Merge Group 29. Effects- 3 D Effects- Drop Shadow with the same settings 30. Open the tube "tour magique" - Edit/ Copy-Edit - Paste as new layer on your working image and move to the left side 31. Layer Palette - Double click on this Layer and set the Blend Mode to " Luminance Legacy"- Effects- Plugins- FM Tile Tools -Saturation Emboss using the default settings 32. Open the tube « Jean baptiste donge -witchandtrolleys manon » Edit/ Copy-Edit - Paste as new layer on your working image and move EyeCandy 5 -Impact Perspective--tab Settings/User settings choose my - Preset '' regarde_moi_shadow'' 33. Layers- New Raster Layer 34. Selections –load/save selection –load selection from disc and choose my selection: @renee regarde moi 2 » 35. Open the tube " autre monde "" Edit/ Copy-Edit - Paste into selection Selections- Deselect All --Layer Palette - Double click on this Layer and set the Blend Mode to " Luminance -Legacy " 36. Layers- Arrange- Move 2x Down 37. Open the tube « jen-vrouws-510 « Image Resize 80 % /Edit/ Copy-Edit - Paste as new layer on your working image and move 38. Effects- 3 D Effects- Drop Shadow with these settings 7/9/85/14 black -Your work and Layer Palette look like this now
39. Open the tube "fleur rouge "« Edit Copy the selected part and paste as a new layer on your working image and move 40. Effects- Plugins- Eye candy 5 -perspective shadow--tab Settings/User settings choose my - Preset ''regarde moi'' 41. Open the tube'' effet'' /Edit/ Copy-Edit - Paste as new layer on your working image and move -Everything is in place ?? 42. Layers- Merge- Merge Visible 43. Adjust-One Step Photo Fix 44. Image - Add borders-Symmetric checked: 10 pixels #8c7676 45. Image - Add borders-Symmetric checked: 50 pixels #ffffff 46. Activate the magic wand and select the border of 50 pixels /Layers- New Raster Layer Activate Flood Fill Tool and fill the selection with the gradient 47. Selections- Invert 48. Effects- 3 D Effects- Drop Shadow with these settings-color #ffffff
49. Selections- Invert 50. Image - Add borders-Symmetric checked:3 pixels black 50. Click on your Text Tool-Font Bickham Script Fancy 2- Size 48 -Write: 'Regarde moi ' 51. Layers- Duplicate / Layers- Merge- Merge All - Save as JPG
I am part of the Tutorial Writers Inc. My tutorials are registered regularly
ReneeGraphisme_All rights reserved
*
|
 Translations