|
Let's start the lesson .
- Material Properties: Foreground color to this color: #141f36 Background color to this color :#fffdf7
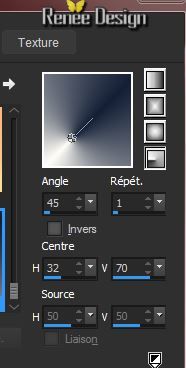
- Put your foreground/background into a sunburst gradient as configured
1. Open a new transparent image of 995
x 555 pixels
- Activate Flood Fill Tool and fill the layer with the gradient
2. Effects- Plugins - L and K's - Jeffrey - Tile at 45
3. Effects- Plugins - Simple - 4 way average
4. Effects- Edge Effects-Enhance
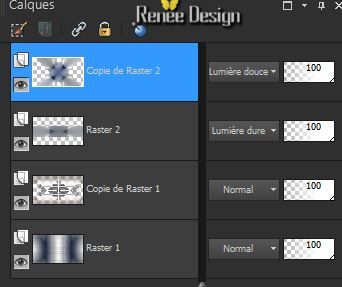
5. Layers- Duplicate
6. Effects- Plugins -Unlimited 2.0 -
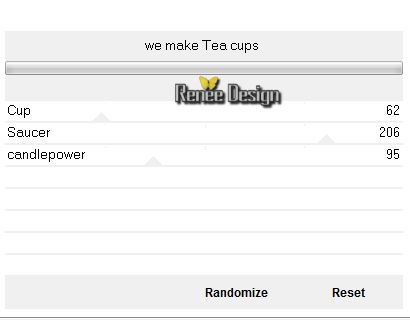
Kang 1 -We make Tea cups
7. Effects- Plugins - Transparency -Eliminate black
8.
Effects- Plugins -
Unlimited 2.0 - Kang 1 -We make Tea cups (same settings )
9. Effects- Edge Effects-Enhance -More
10.
Effects- Plugins - Simple- Pizza slice Mirror
11.
Effects- Plugins - Simple - Top left Mirror
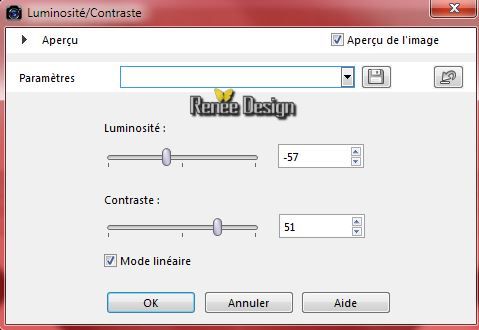
12.
Adjust-Brightness and Contrast-Brightness/Contrast with these settings
13.Layer-New Raster Layer
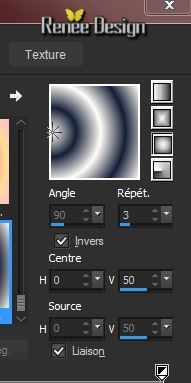
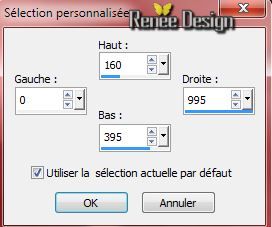
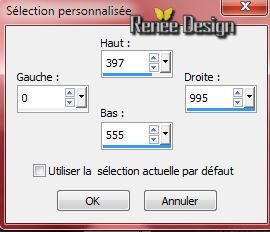
14.
Selections-Gustom Selection with these settings
15.
Material Properties: Change the sunburst gradient into a radial gradient as configured
-
Activate Flood Fill Tool and fill the selection with the radial gradient
16.
Effects-Plugins - Unlimited 2.0 - /&<BKGKaleidoscope-
4 QFlip ZBottom L
-
Layer Palette -Double click on this Layer and set the Blend Mode to "Hard Light "
Selections-Deselect All
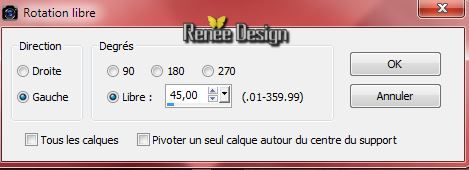
17.Layers- Duplicate- Image Free Rotate- Left 45°
18.
Layers- Duplicate -Image Mirror
19.
Layers- Merge- Merge Down
-
Layer Palette -Double click on this Layer and set the Blend Mode to "Soft Light "
Your work look like this now
20.
Effects - 3D Effects - Drop shadow with these settings 0/0/75/40 black
-
Layers- Merge-Merge Visible
21.
Layers- New Raster layer
22.
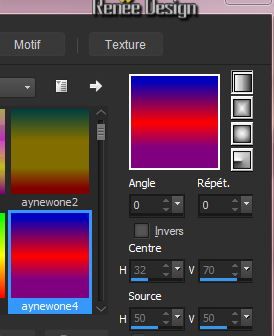
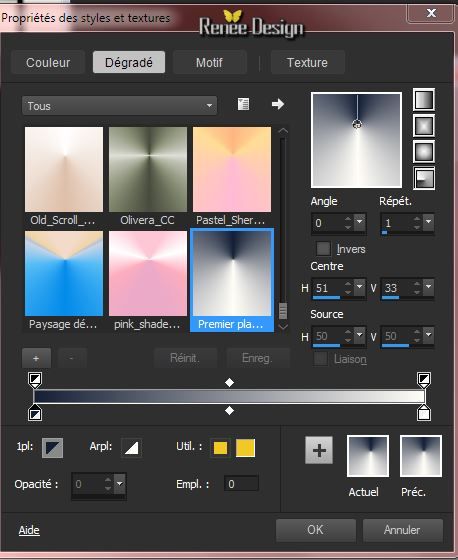
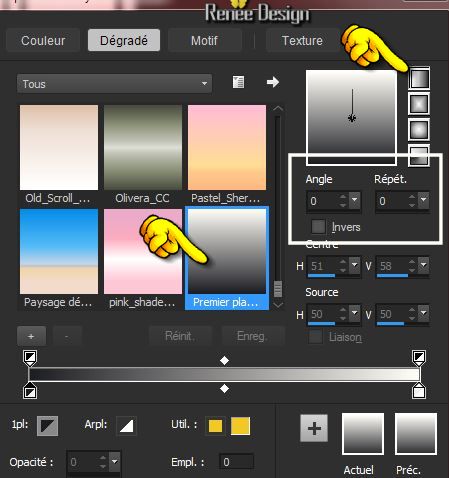
Properties Foreground:Select my gradient and choose "anywone 4".
Selections - load/save selection - load selection from disk and choose my selection: viveros_1'' /Activate Flood Fill Tool and fill the selection with the gradient ("anywone4")
Prepare a linear gradient as configured
Selections- Deselect All
23.
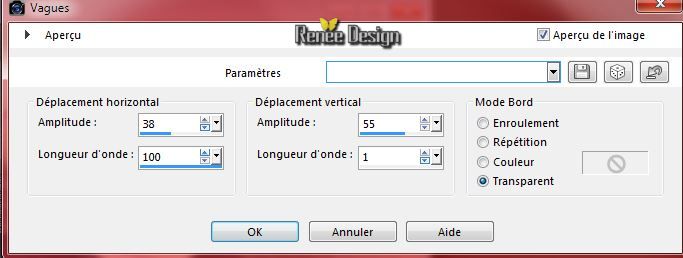
Effects-Distortion Effects -Wave use settings below
24.
Layer-New Raster Layer
25.
Selections-Gustom Selection with these settings
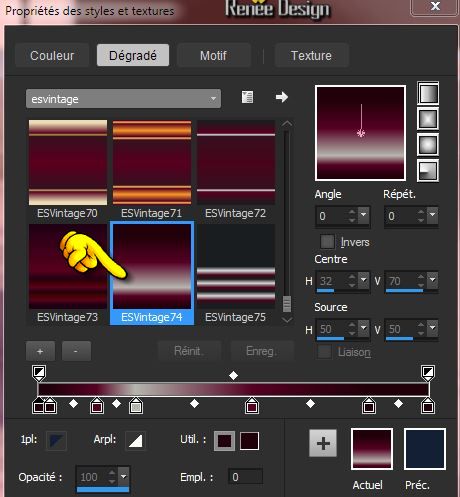
26.
Properties Foreground:Select my gradient and choose ''
ESVintage74"
Prepare a linear gradient as configured
27.
Activate Flood Fill Tool and fill the selection with the linear gradient
28.
Effects- Plugins - VM Toolbox - Seamless Tile
: 255/0/0/255/0
29.
Effects - 3D Effects - Drop shadow with the same settings
Selections-Deselect All
30.
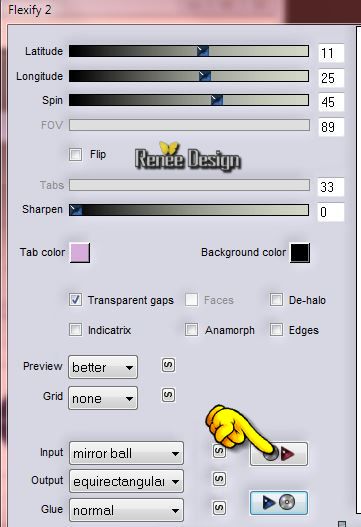
Effects- Plugins - Flaming pear - Flexify 2-Use the preset
'' viveros-Flexify.2q2q ''
clicking on the red arrow and search your file:'' viveros-Flexify.2q2q ''click on the Preset and OK
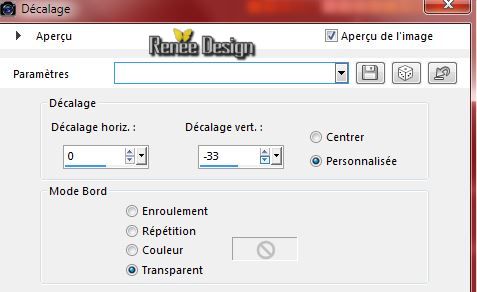
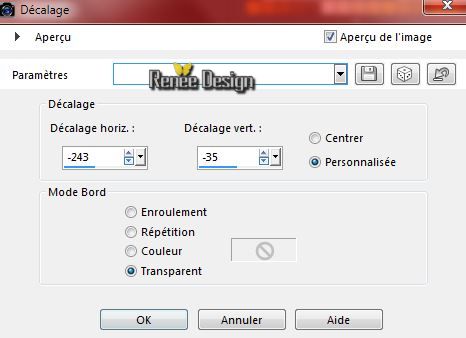
31. Effects- Image Effects-Offset with these settings
-
Layer Palette -Double click on this Layer and set the Blend Mode to"Luminance " Reduce the opacity of this layer to: 79%
32.
Layer-New Raster Layer
-
Material Properties: Foreground color to this color: #141f36 Background color to this color :#fffdf7
-Put your foreground/background into a radial gradient with these settings
-Activate Flood Fill Tool and fill the layer with the gradient
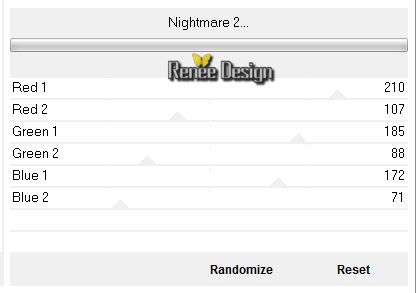
33. Effects- Plugins - Unlimited 2.0
- Andrews Filters11 / Nightmare 2...
34. Effects- Geometric Effects-Circle-Transparent
35. Image Resize
55 % (Resize all the layers not checked)
- Layer Palette -Double click on this Layer and set the Blend Mode to"Hard Light " Reduce the opacity of this layer to: 65%
Your work look like this now

-
Activate the bottom of the layer-Palette
36. Activate this tube"
viveros_image_1.pspimage"/ Edit/copy-Edit paste as a new layer on your working area and move to the bottom.
37.
Effects- Plugins - EyeCandy 5 Impact - Glass - tab-User-User Settings click on the preset
''vivers_glass"
- Activate the top of the layer-palette
-
Change the foreground color to this color : #637999
Put your foreground/background into a radial gradient as configured
38.
Layer-New Raster Layer
39.
Selections - load/save selection - load selection from disk and choose my selection: ''viveros_2''-
Activate Flood Fill Tool and fill the selection with the gradient
40.
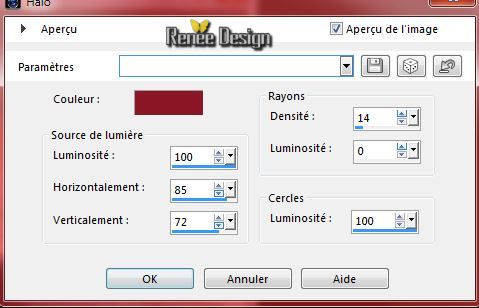
Effects- Illumination Effects- Sunburst - color #8B1524
39.
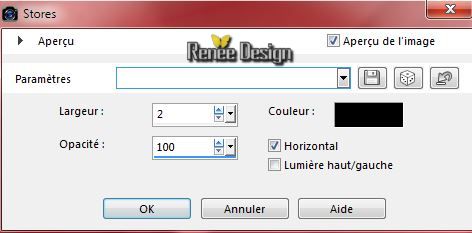
Effects- Textur Effects- Blinds - black
Selections-Deselect All
40.
Activate this tube " viveros_image_2.pspimage"- Edit/copy- Edit/ paste as new layer (do not move it is in the right place)
41.
Layers- Arrange-Move Down
- Activate the top of the layer-Palette
42.
Activate this tube " viveros_pretty_popular"
-
Edit/copy-Edit paste as a new layer on your working area.
43.
Effects- Image Effects- Offset with these settings
44.
Activate this tube '' viveros_image_3.pspimage''- Edit/copy-Edit paste as a new layer on your working area and place .With your move tool move it in the bottom left corner.
44.
Activate this tube '' BMViveros 001-moebyx-pequeña.pspimage"
-
Image Resize 65% -
-
Edit/copy-Edit paste as a new layer on your working area. With your move tool move it in the bottom right corner
45.
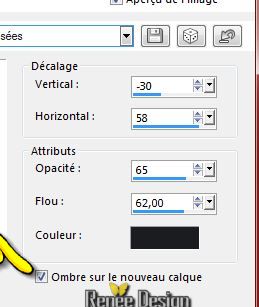
Effects - 3D Effects - Drop shadow with these settings -Shadow on new layer
46.
Activate the shadow layer
47.
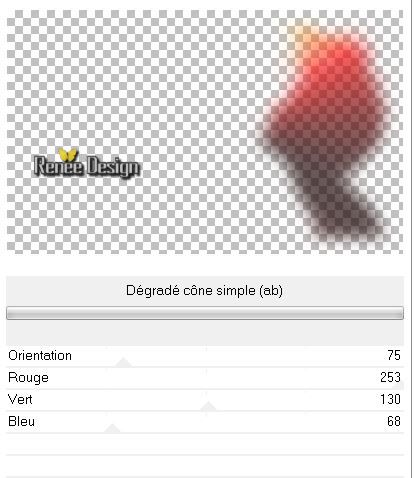
Effects- Plugins - Unlimited 2.0 - Dégradé- Dégrade Cône simple
(ab)
-
Layer Palette -Double click on this Layer and set the Blend Mode to"Hard Light " Reduce the opacity of this layer to: 69%
48.
Material Properties: Foreground color to this color:
#1c1d21 Background color to this color : #fffdf7
-
Prepare a linear gradient configured like this.
49.
Layer-New Raster Layer
50.
Selections - load/save selection - load selection from disk and choose my selection: "viveros_3'- Activate Flood Fill Tool and fill the selection with the gradient
51.
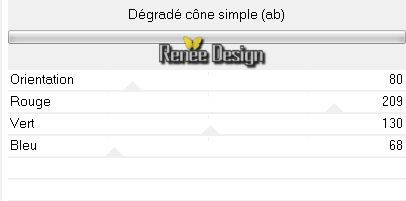
Effects- Plugins -Unlimited 2.0 -Dégradé- Dégrade Cône simple (ab)
Selections-Deselect All
52.
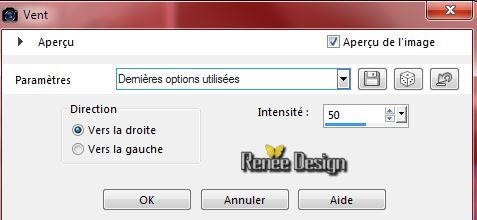
Effects- Distortion Effects - Wind from right 50
53.
Layers- Merge-Merge Visible
54.Image - Add borders-Symmetric checked: 1 pixel color black
55.
Image - Add borders-Symmetric checked: 35 pixels color white
56.
Image - Add borders-Symmetric checked: 1 pixel color black
57.
Image - Add borders-Symmetric checked: 35 pixels color white
58.
Activate the Text-Edit - Copy -Edit - Paste as new layer on your working area and move .Ore write your own text (font is included into the zip file)
59.
Layers - Merge - Merge all
60.
Image Resize at 995 pixels Width.
Save as JPG
I hope you enjoyed this lesson
Renée
This lesson was written by Renée 13/09/2014
Created the
09/2014
*
Any resemblance with an existing lesson is merely a coincidence *
* Don't forget to thank the people who work for us and with us. I named the tubeurs - Testers and the translators.
Thanks Renée.
*
|

 Translations


 All rights reserved